Creating and resorting back-ups
It is important to keep back-ups of the items listed below. Best practice is to keep a back-up on a local hard drive as well as a cloud location (i.e. Google Drive, box, etc…). Below are the items that it is recommended to keep back-ups of.
1 - keystore file from the computer you used to build the APK.
The keystore is what allows you to install an updated APK on top of the existing application. Maintaining the keystore will greatly reduce the complexity of updating the APK in the future, especially if you need to build the app from a new computer. See the Updating AAPS (link) section for details on using the keystore when building a new APK.
When to back-up: the keystore should be backed up after you first build the AAPS apk.
How to back-up: locate your keystore path. If you don’t remember it you can find it in Android Studio by selecting Build > APK > Next. The path will be listed in “Key store path”. Using your file explorer, navigate to this path and make a copy of your keystore file (ending in file extension .jks). Save it to a safe cloud location should your computer become unavailable. Make sure to also record your key store password, key alias and key password.
2 - copies of the most recent APK
If your main AAPS phone is lost or damaged, having a copy of the APK available will allow you to quickly resume using AAPS with a new phone (note: you also need your preferences backed up as noted below).
When to back-up: you should maintain a back-up of the most recent APK that you installed on your main AAPS phone. You may want to also maintain one earlier version in case you need to roll-back to that for any reason.
How to back-up: a copy will be maintained on the computer used to build the APK with Android Studio. Additionally, if you use a cloud platform to copy the APK to your phone, that will maintain a copy in the cloud as well. Make sure you know how to find both locations in the event you need them. Consider setting up dedicated folders on your computer and your cloud platform to store these back-ups.
3 - AAPS preferences
Preferences are what tailors the stock AAPS application to how you have it setup. Preferences include details on your config builder settings, status of objectives, nightscout settings, automations and local profiles. With a copy of the APK (see above) and preferences you can be up and running on a new phone quickly.
When to back-up:
1 - as preferences store your progress towards completing the objectives, you should back-up your preferences each time you complete an objective so that you do not lose your progress. Without a copy of your preferences you will have to complete all objectives again in the event you need to replace your phone.
2 - any time you plan to make significant changes to your configuration (change SMB settings, change insulin types, change pump, make changes to automations) you should back-up your preferences before and after making the changes. This way you have your most recent settings as well as a copy of what they were before the changes in case you need to revert back to them.
3 - Omnipod dash users only - the preferences file contains connection details on your current pod and can be used to restore connection to that pod with a new phone. If you do not have a copy of your preferences exported after you started your current pod you will need to start a new pod in the event you need to replace your current phone.
How to back-up:
1 - If this your first time importing or exporting preferences you will need to set a master password. In AAPS, select the three dots in the top right corner > Preferences > General > Protection > Master password. Set a password and record this in a safe place. You will be unable to access your preferences back-ups without this password.
2 - From the AAPS home screen, select the three line (hamburger) menu in the top left > Maintenance > Export settings > type in Master password set above > Ok

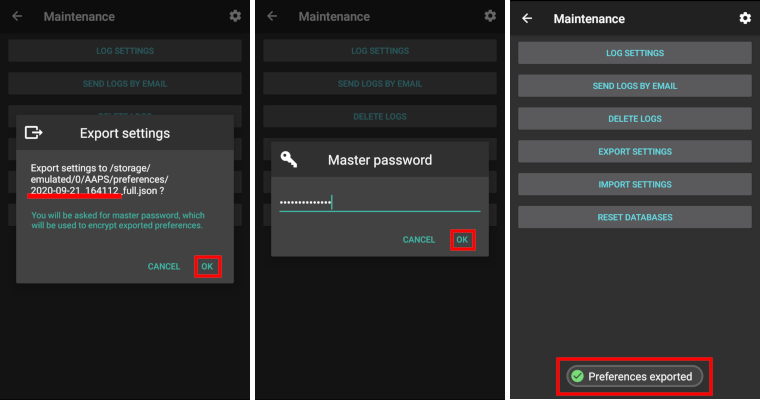
3 - using the file explorer on your phone (commonly called “Files” or “My Files”) navigate to Internal Storage > AAPS > preferences. Here you will see a copy of all exported preferences files. The file name should be YYYY-MM-DD_Time_appname.json. Upload this file to the cloud platform of your choice. Then from the cloud platform, also download a copy to your local computer.
Restoring from your backups on a new phone or fresh installation of AAPS
Use these instructions if you have a back-up of your APK and preferences that you want to load on to a new phone or if you needed to delete and reinstall the APK on your existing phone for any reason.
If you are updating AAPS using an APK built with the same keystore you should not need to follow this process. However, it is still advised to create a back-up before you apply the update.
If you are updating AAPS after you lost or replaced your original keystore (i.e. using a new build computer without transferring the keystore), ensure that you back-up all settings per the above and then uninstall the existing version of AAPS on your phone.
If needed, setup your CGM/BG source receiver prior to the steps listed below (link: https://androidaps.readthedocs.io/en/latest/Configuration/BG-Source.html)
Omnipod users: importing a preferences file will deactivate your current pod if those preferences were exported during a different active pod session.
1 - Using the back-up copy of your APK from above, follow the instructions for a new installation (link: https://androidaps.readthedocs.io/en/latest/Installing-AndroidAPS/Transferring-and-installing-AAPS.html)
2 - Launch AAPS and allow any requested permissions
3 - Exit the Setup Wizard. We will be importing all of the necessary settings from the back-up copy of preferences
4 - From the AAPS home screen select Request and allow on all permissions listed in red on the top
5 - From the AAPS home screen, select the three dots in the top right corner > Preferences > General > Protection > Master password. Set the Master password to the same password as you used with your back-ups.
6 - From the AAPS home screen, select the three line (hamburger) menu in the top left > Maintenance > Export settings > type in Master password set above > Ok. This will create the preferences folder if it does not already exist on your phone.
7 - Download the back-up of your preferences file from your cloud platform.
8 - Use your file explorer (commonly called “Files” or “My Files”) to move the file from your downloads to /internal storage/AAPS/preferences
9 - From the AAPS home screen, select the three line (hamburger) menu in the top left > Maintenance > Import settings > select the preferences file you want to back-up from > Ok > type in Master password set above > Ok. Make sure you select the correct preferences file, all .json files from the preferences folder will be shown.

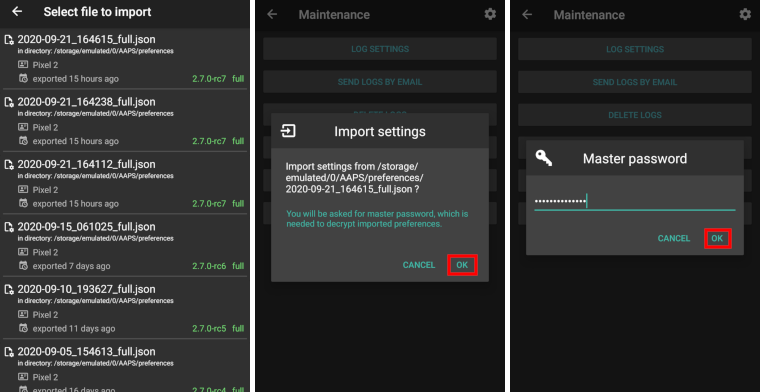
10 - AAPS will automatically restart and should then have all of your preferences imported.
11 - Omnipod dash users only - if your preferences were not backed up from the same pump you are currently using you will need to start a new pod to begin insulin delivery
Troubleshooting: if you are unable to get an active profile set from the AAPS home screen select the three line (hamburger) menu in the top left > config builder > Pump > switch to Virtual Pump > then switch back to your pump type
Note for Dana RS users
As pump connection settings are also imported AAPS on your new phone will already „know“ the pump and therefore not start a bluetooth scan.
Please pair new phone and pump manually.