Einstellungen
Open preferences by clicking the three-dot menu on the top right side of the home screen.

You can jump directly to preferences for a certain tab (i.e. pump tab) by opening this tab and clicking Plugin preferences.

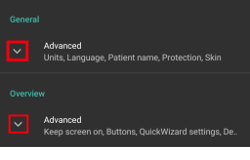
Sub-menus can be opened by clicking the triangle below the sub-menu title.
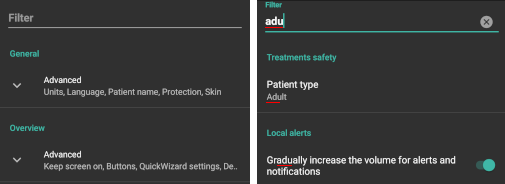
With the filter on top of the preferences screen you can quickly access certain preferences. Beginne einfach mit der Eingabe eines Teils des Textes, nach dem du suchst.
Inhalt
Allgemein
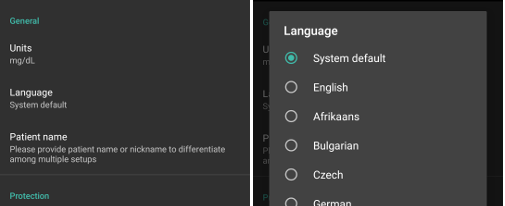
Units
Set units to mmol/l or mg/dl depending on your preferences.
Language
New option to use phone’s default language (recommended).
In case you want AAPS in a different language than your standard phone language you can choose from a broad variety.
If you use different languages you might sometimes see a language mix. Dies ist auf ein Android-Problem zurückzuführen, sodass das Überschreiben der Standardsprache einer App manchmal nicht korrekt funktioniert.
Patient name
Can be used if you have to differentiate between multiple setups (i.e. two T1D kids in your family).
Schutz
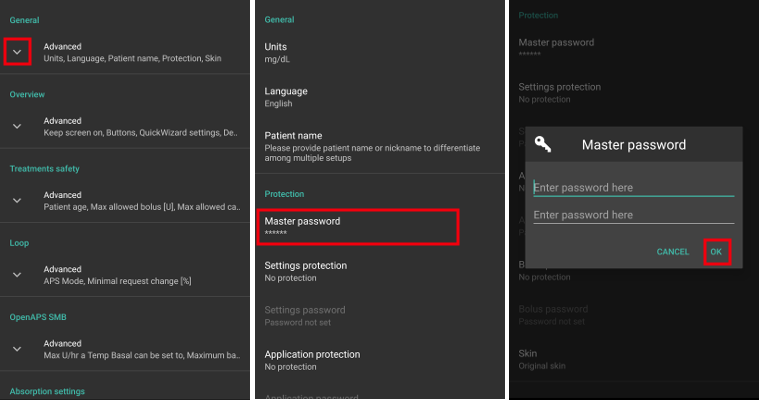
Master-Passwort
Necessary to be able to export settings as they are encrypted as of version 2.7. Biometric protection may not work on OnePlus phones. This is a known issue of OnePlus on some phones.
Open Preferences (three-dot menu on top right of home screen)
Click triangle below „General“
Click „Master-Password“
Enter password, confirm password and click ok.
Schutz der Einstellungen
Protect your settings with a password or phone’s biometric authentication (i.e. child is using AAPS).
Custom password should be used if you want to use master password just for securing exported settings.
If you are using a custom password click on line „Settings password“ to set password as described above.
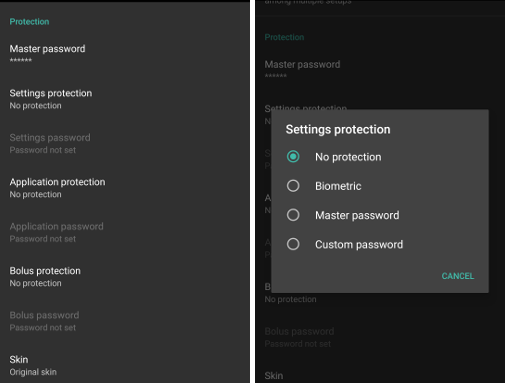
Schutz der App
If app is protected you must enter password or use phone’s biometric authentication to open AAPS.
App will shut down immediately if wrong password is entered - but still run in the background if it was previously opened successfully.
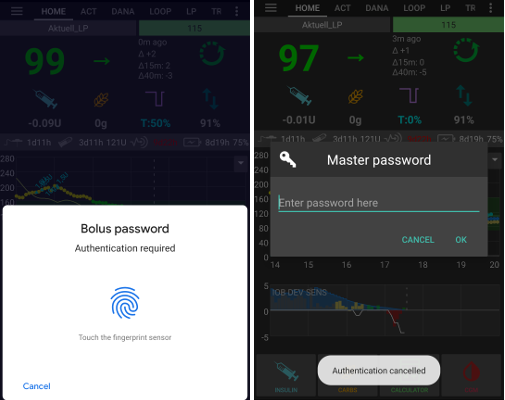
Bolus-Schutz
Bolus protection might be useful if AAPS is used by a small child and you bolus via SMS.
In the example below you see the prompt for biometric protection. Falls die biometrische Authentifizierung nicht funktioniert, klicke in den Bereich oberhalb der weißen Eingabeaufforderung und gib das Master-Passwort ein.
Erscheinungsbild
You can choose from four types of skins:
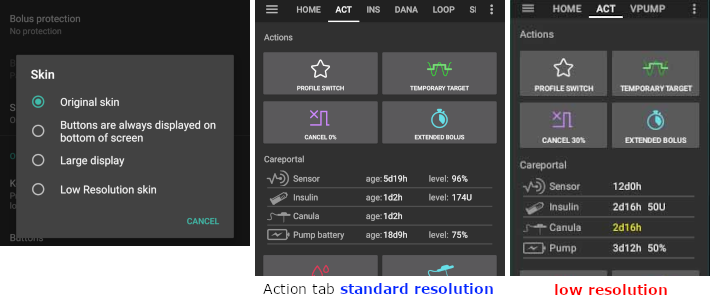
‚Low resolution skin‘ comes with shorter label and age/level removed to have more available space on very low resolution screen.
Difference of other skins depend of phone’s display orientation.
Hochformat
Original Skin and Buttons are always displayed on bottom of screen are identical
Large Display has an increased size of all graphs compared to other skins
Querformat
Using Original Skin and Large Display, you have to scroll down to see buttons at the bottom of the screen
Large Display has an increased size of all graphs compared to other skins

Übersicht
In overview section you can define preferences for home screen.
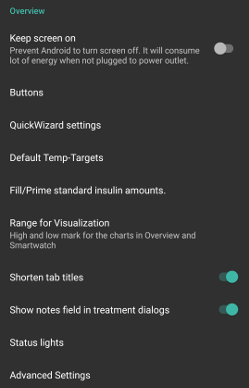
Bildschirm aktiv lassen
Useful while giving a presentation.
It will consume a lot of energy, so it is wise to have your phone plugged into a charger.
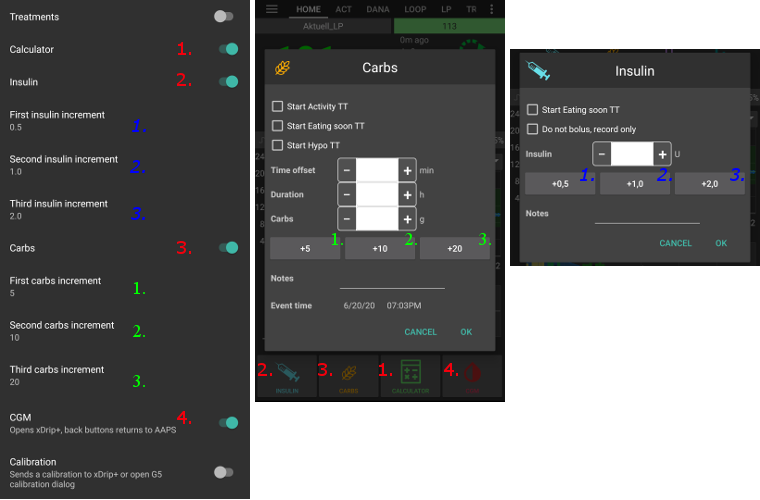
Schaltflächen
Define which buttons are visible on the bottom of your home screen.
With the increment figure you can define amount for the three buttons in carb and insulin dialogue for easy entry.
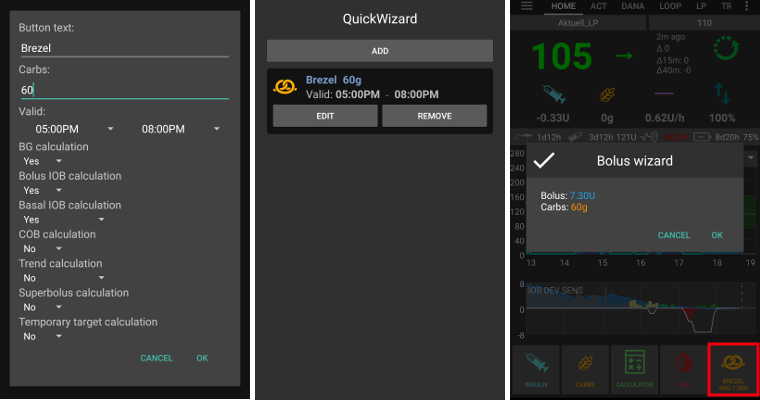
Quick Wizard
If you have a frequent snack or meal, you can use the quick wizard button to easily enter amount of carbs and set calculation basics.
In setup you define during which time period the button will be visible on your home screen - just one button per period.
If you click the quick wizard button AAPS will calculate and propose a bolus for those carbs based on your current ratios (considering blood glucose value or insulin on board if set up).
The proposal has to be confirmed before insulin is delivered.
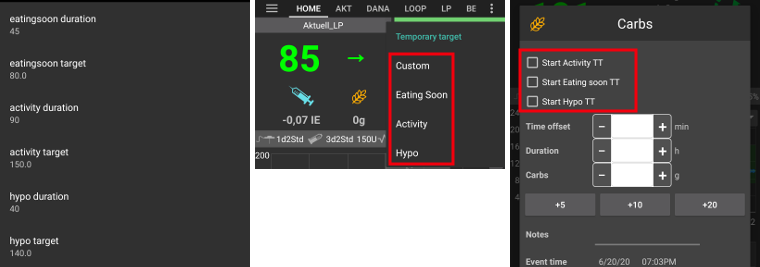
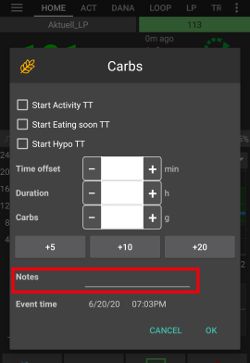
Vordefinierte temporäre Ziele
Temp targets (TT) allow you to define change your blood glucose target for a certain time period.
With setting of default TT you can easily change your target for activity, eating soon etc.
Press long on your target in the top right corner on the home screen or use the shortcuts in the orange “Carbs” button at the bottom.
Füll-/Vorfüll-Standardmengen
If you want to fill tube or prime cannula through AAPS you can do this through actions tab.
Pre-set values can be defined in this dialogue.
Zielbereich für die Grafikanzeige
Define which part of the graph on the home screen shall be you target range and be filled with green background.
Kurze Tab-Überschriften
See more tab titles on screen.
For example the ‚OpenAPS AMA‘ tab becomes ‚OAPS‘, ‚OBJECTIVES‘ becomes ‚OBJ‘ etc.

Möglichkeit zur Erfassung von Notizen in Behandlungsdialogen
Gives you the option to add short text notes to your treatments (bolus wizard, carbs, insulin…)
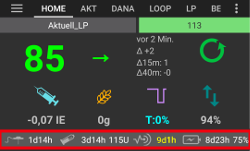
Statusanzeige
Status Lights geben eine optische Warnung für
Sensoralter
Sensor battery level for certain smart readers (see screenshots page for details).
Insulinalter (Tage Reservoirverwendung)
Reservoirstand (Einheiten)
Kanülenalter
Pump battery age
Pump battery level (%)
Bei Überschreitung der Warnschwelle werden die Werte gelb angezeigt.
Wenn die kritische Schwelle überschritten wird, werden die Werte rot angezeigt.
In versions prior to AAPS 2.7 settings for status lights had to be made in Nightscout settings.
Erweiterte Einstellungen (Übersicht)
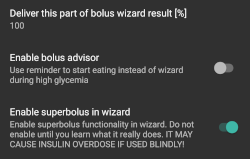
Abgabe nur eines Teils der vom Bolus-Rechner ermittelten Insulinmenge
General setting to deliver only part of bolus wizard result.
Only the set percentage (must be between 10 and 100) of the calculated bolus is delivered when using bolus wizard.
The percentage is shown in bolus wizard.
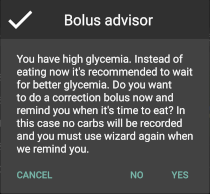
Bolus-Berater
If you run Bolus wizard and your glucose value is above 10 mmol (180 mg/dl) a correction bolus will be offered.
If correction bolus is accepted no carbs will be recorded.
An alarm will be started when glucose value is in good level to start eating.
You have to enter Bolus wizard again and enter the amount of carbs you want to eat.
Superbolus
Option to enable superbolus in bolus wizard.
Superbolus is a concept to „borrow“ some insulin from basal rate in the next two hours to prevent spikes.
Sicherheitseinstellungen der Behandlungen
Patient type
Safety limits are set based on the age you select in this setting.
If you start hitting these hard limits (like max bolus) it’s time to move one step up.
It’s a bad idea to select higher than real age because it can lead to overdosing by entering the wrong value in insulin dialog (by skipping the decimal dot, for example).
If you want to know the actual numbers for these hard-coded safety limits, scroll to the algorithm feature you are using on this page.
Max allowed bolus [U]
Defines maximum amount of bolus insulin that AAPS is allowed to deliver at once.
This setting exists as a safety limit to prevent the delivery of a massive bolus due to accidental input or user error.
It is recommended to set this to a sensible amount that corresponds roughly to the maximum amount of bolus insulin that you are ever likely to need for a meal or correction dose.
This restriction is also applied to the results of the bolus calculator.
Max allowed carbs [g]
Defines the maximum amount of carbs that AAPS bolus calculator is allowed to dose for.
This setting exists as a safety limit to prevent the delivery of a massive bolus due to accidental input or user error.
It is recommended to set this to a sensible amount that corresponds roughly to the maximum amount of carbs that you are ever likely to need for a meal.
Loop
APS-Modus
Toggle between open and closed looping as well as low glucose suspend (LGS)
Open looping means TBR suggestions are made based on your data and appear as a notification. Nach der manuellen Bestätigung wird das Kommando an die Pumpe übertragen und Insulin abgegeben. Nur wenn Du eine virtuelle Pumpe verwendest, musst Du die Änderungen selbst manuell an der Pumpe eingeben.
Closed looping means TBR suggestions are automatically sent to your pump without confirmation or input from you.
Low glucose suspend is similar to closed looping, but overrides the maxIOB setting to zero. This means that if blood glucose is dropping it can reduce the basal rate, but if blood glucose is rising then it will only increase the basal rate if the basal IOB is negative (e.g. from a previous Low Glucose Suspend).
Minimal request change [%]
Im Open Loop erhälst Du jedes Mal eine Benachrichtigung, wenn AAPS empfiehlt, die Basalrate anzupassen.
To reduce number of notifications you can either use a wider BG target range or increase percentage of the minimal request rate.
Diese definiert, wie hoch die relative Änderung sein muss, damit eine Benachrichtigung erscheint.
Advanced Meal Assist (AMA) oder Super Micro Bolus (SMB)
Depending on your settings in config builder you can choose between two algorithms:
Advanced meal assist (OpenAPS AMA) - state of the algorithm in 2017
Super Micro Bolus (OpenAPS SMB) - most recent algorithm for advanced users
OpenAPS AMA-Einstellungen
Allows the system to high-temp more quickly after a meal bolus IF you enter carbs reliably.
More details about the settings and Autosens can be found in the OpenAPS docs.
Maximale IE/h, die als TBR gesetzt werden können
Exists as a safety limit to prevent AAPS from ever being capable of giving a dangerously high basal rate.
The value is measured in units per hour (U/h).
Es wird empfohlen, hier etwas vernünftiges einzugeben. A good recommendation is to take the highest basal rate in your profile and multiply it by 4.
For example, if the highest basal rate in your profile was 0.5 U/h you could multiply that by 4 to get a value of 2 U/h.
See also detailed feature description.
Maximum basal IOB OpenAPS can deliver [U]
Amount of additional basal insulin (in units) allowed to accumulate in your body, on top of your normal basal profile.
Once this value is reached, AAPS will stop giving additional basal insulin until your basal Insulin on Board (IOB) has decayed to within this range again.
This value does not consider bolus IOB, only basal.
This value is calculated and monitored independently of your normal basal rate. Es wird lediglich das zusätzliche Basalinsulin zu der normalen Basalrate berücksichtigt.
When you begin looping, it is advised to set Max Basal IOB to 0 for a period of time, while you are getting used to the system. Das verhindert, dass AAPS dir generell zusätzliches Basal-Insulin verabreicht. Während dieser Zeit wird AAPS trotzdem in der Lage sein, dein Basalinsulin abzuschalten, um Hypoglykämien zu verhindern. Das ist ein wichtiger Schritt, um:
Have a period of time to safely get used to the AAPS system and monitor how it works.
Take the opportunity to perfect your basal profile and Insulin Sensitivity Factor (ISF).
See how AAPS limits your basal insulin to prevent hypoglycaemia.
Wenn du dich damit gut fühlst, kannst du dem System erlauben, dir zusätzliches Basalinsulin zu geben, indem du den Wert Max-Basal IOB erhöhst. The recommended guideline for this is to take the highest basal rate in your profile and multiply it by 3. Wenn zum Beispiel die höchste Basalrate in deinem Profil 0.5IE/h war, kannst du das mit 3 multiplizieren, um einen Wert von 1.5IE/h zu erhalten.
You can start conservatively with this value and increase it slowly over time.
These are guidelines only; everyone’s body is different. Es kann durchaus sein, dass du mehr oder weniger benötigst als hier empfohlen wurde, aber beginne dennoch konservativ und passe es langsam an.
Note: As a safety feature, Max Basal IOB is hard-limited to 7u.
Autosens
Autosens looks at blood glucose deviations (positive/negative/neutral).
It will try and figure out how sensitive/resistant you are based on these deviations and adjust basal rate and ISF based on these deviations.
If you select „Autosens adjust target, too“ the algorithm will also modify your glucose target.
Erweiterte Einstellungen (OpenAPS AMA)
Normally you do not have to change the settings in this dialogue!
If you want to change them anyway make sure to read about details in OpenAPS docs and to understand what you are doing.
OpenAPS SMB-Einstellungen
In contrast to AMA, SMB does not use temporary basal rates to control glucose levels, but mainly small super micro boluses.
You must have started objective 9 to use SMB.
The first three settings are explained above.
Details on the different enable options are described in OpenAPS feature section.
How frequently SMBs will be given in min is a restriction for SMB to be delivered only every 4 min by default. Dieser Wert verhindert, dass das System SMB zu häufig abgibt (z. B. wenn Du ein temporäres Ziel setzt). Sie sollten diese Einstellung nicht ändern, außer Du weißt genau über die Folgen Bescheid.
If ‚Sensitivity raises target‘ or ‚Resistance lowers target‘ is enabled Autosens will modify your glucose target according to your blood glucose deviations.
If target is modified it will be displayed with a green background on your home screen.
Kohlenhydrat-Vorschlag
This feature is only available if SMB algorithm is selected.
Eating of additional carbs will be suggested when the reference design detects that it requires carbs.
In this case you will receive a notification which can be snoozed for 5, 15 or 30 minutes.
Additionally the required carbs will be displayed in the COB section on your home screen.
A threshold can be defined - minimum amount of carbs needed to trigger a notification.
Auf Wunsch können die Kohlenhydrat-Vorschläge an Nightscout gesandt werden. In diesem Fall wird eine Ankündigung angezeigt und verteilt.

Erweiterte Einstellungen (OpenAPS SMB)
Normally you do not have to change the settings in this dialogue!
If you want to change them anyway make sure to read about details in OpenAPS docs and to understand what you are doing.
Resorptions-Einstellungen
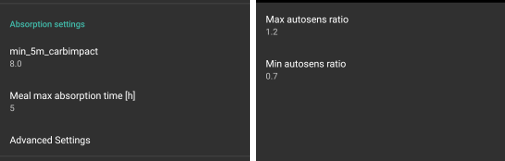
min_5m_carbimpact
The algorithm uses BGI (blood glucose impact) to determine when carbs are absorbed.
The value is only used during gaps in CGM readings or when physical activity “uses up” all the blood glucose rise that would otherwise cause AAPS to decay COB.
At times when carb absorption can’t be dynamically worked out based on your blood’s reactions it inserts a default decay to your carbs. Im Prinzip ist es eine Notlauffunktion.
To put it simply: The algorithm „knows“ how your BGs should behave when affected by the current dose of insulin etc.
Whenever there is a positive deviation from the expected behaviour, some carbs are absorbed/decayed. Große Abweichung = viele Kohlenhydrate etc.
The min_5m_carbimpact does define the default carb absorption impact per 5 minutes. For more details see OpenAPS docs.
Standard value for AMA is 5, for SMB it’s 8.
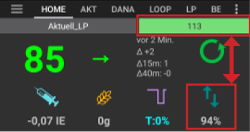
The COB graph on the home screen indicates when min_5m_impact is being used by putting an orange circle at the top.
Maximale Dauer des Essens-Resorption
If you often eat high fat or protein meals you will need to increase your meal absorption time.
Erweiterte Einstellungen - Autosens-Faktoren
Define min. and max. autosens ratio.
Normally standard values (max. 1.2 and min. 0.7) should not be changed.
Pumpen-Einstellungen
The options here will vary depending on which pump driver you have selected in Config Builder. Verbinde Deine Pumpe und richte sie entsprechend der pumpenspezifischen Beschreibung ein:
Stelle sicher, dass du die virtuelle Pumpe im Konfigurations-Generator ausgewählt hast, wenn du AndroidAPS als Open Loop betreibst.
Nightscout-Client
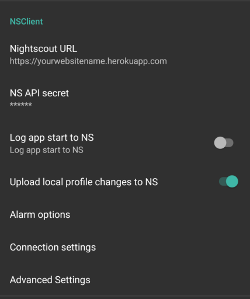
Set your Nightscout URL (i.e. https://yourwebsitename.herokuapp.com) and the API secret (a 12 character password recorded in your Heroku variables).
This enables data to be read and written between both the Nightscout website and AndroidAPS.
Double check for typos here if you are stuck in Objective 1.
Make sure that the URL is WITHOUT /api/v1/ at the end.
Log app start to NS will record a note in your Nightscout careportal entries every time the app is started. The app should not be needing to start more than once a day; more frequently than this suggests a problem (i.e. battery optimization not disabled for AAPS).
If activated changes in local profile are uploaded to your Nightscout site.
Verbindungseinstellungen
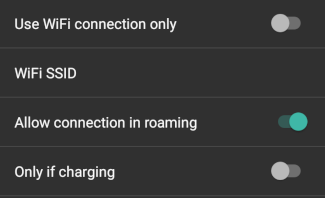
Restrict Nightscout upload to Wi-Fi only or even to certain Wi-Fi SSIDs.
If you want to use only a specific WiFi network you can enter its WiFi SSID.
Multiple SSIDs can be separated by semicolon.
To delete all SSIDs enter a blank space in the field.
Alarm-Optionen
Alarm options allows you to select which default Nightscout alarms to use through the app.
For the alarms to sound you need to set the Urgent High, High, Low and Urgent Low alarm values in your Heroku variables.
They will only work whilst you have a connection to Nightscout and are intended for parent/carers.
If you have the CGM source on your phone (i.e. xDrip+ or BYODA [Build your own dexcom app]) then use those alarms instead.
Erweiterte Einstellungen (Nightscout-Client)

Most options in advanced settings are self-explanatory.
Enable local broadcasts will share your data to other apps on the phone such as xDrip+.
You need to go through AAPS and enable local broadcast in AAPS to use xDrip+ alarms.
Always use basal absolute values must be activated if you want to use Autotune properly. See OpenAPS documentation for more details on Autotune.
SMS Kommunikator
Options will only be displayed if SMS communicator is selected in Config Builder.
This setting allows remote control of the app by texting instructions to the patient’s phone which the app will follow such as suspending loop, or bolusing.
Further information is described in SMS Commands.
Additional safety is obtained through use of an authenticator app and additional PIN at token end.
Automatisierung
Wähle aus, welcher Standortservice verwendet werden soll:
Use passive location: AAPS only takes locations if other apps are requesting it
Use network location: Location of your Wi-Fi
Use GPS location (Attention! Kann zu übermäßigen Akkuverbrauch führen!)
Lokale Alarme
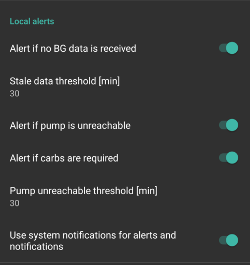
Settings should be self-explanatory.
Datenübermittlung

You can help develop AAPS further by sending crash reports to the developers.
Wartungseinstellungen
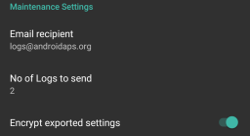
Standard recipient of logs is logs@androidaps.org.
If you select Encrypt exported settings these are encrypted with your master password. In diesem Fall muss das Master-Passwort jedes Mal eingegeben werden, wenn die Einstellungen ex- oder importiert werden.
Open Humans
Du kannst die Community unterstützen, indem Du Deine Daten für Forschungsprojekte zur Verfügung stellst. Details are described on the Open Humans page.
In Preferences you can define when data shall be uploaded
only if connected to WiFi
only if charging