AAPS auf einer Smartwatch mit Wear OS
Du kannst AndroidAPS auf Deiner Smartwatch mit Wear OS installieren. Mit der Watch-Version von AAPS kannst Du:
Daten auf Deiner Uhr anzeigen: nutze dafür ein Custom Watchface oder stattdessen ein Standard-Watchface mit Komplikationen.
AAPS steuern: Bolus abgeben, temporäres Ziel setzen, etc.
Bevor Du Dir eine Uhr kaufst…
Manche Funktionen wie Komplikationen erfordern Wear OS Version 2.0 oder höher.
Google hat Android Wear 1.x ab Version 2.0 in Wear OS umbenannt. Wenn die Uhr also mit Android Wear angepriesen wird, kann das auf eine ältere Version 1.x hinweisen.
Wenn die Smartwatch nur als mit Android und iOS kompatibel beschrieben wird, bedeutet dies nicht, dass sie Wear OS nutzt. Es kann sich auch um ein herstellerspezifisches Betriebssystem handeln, das nicht mit AAPS Wear kompatibel ist!
Check list of tested phones and watches and ask community if in doubt if your watch will be supported
Wear OS Version von AAPS erstellen
Die Wear OS App von AAPS wurde von der AAPS-Version für das Android Smartphone getrennt. Daher musst Du eine zweite signierte APK generieren. Wähle als Modul „AndroidAPS.wear“ und als Build-Variante „fullRelease“ und eine zweite apk Datei für die Wear OS Uhr wird generiert, wenn die APK Build (oder „pumpcontrolRelease“, die es dir erlaubt, einfach die Pumpe ohne Loop zu steuern).
Ab März 2021 musst Du AAPS mittels sogenanntem Sideload auf die Uhr übertragen. Dies kann nicht mehr über den Google Play Store der Uhr erfolgen. Verwende dazu am besten einen Wear Installer. Diesen musst Du sowohl auf Deinem Smartphone als auch Deiner Uhr installieren. Die Wear Installer App kann aus dem Google Play Store heruntergeladen werden. Das verlinkte Video von Malcolm Bryant, dem Entwickler von Wear Installer gibt Dir detaillierte Anweisungen um a) die apk auf Dein Smartphone herunterzuladen b) den Android Debugger auf der Uhr einzurichten c) den Wear Installer auf dem Smartphonezu verwenden und die AAPS-Wear-App auf das Smartphone zu laden. Sobald Du AndroidAPS wear version auf der Uhr ausgewählt hast, kannst Du Watchfaces und Komplikationen nutzen und AAPS teilweise über die Uhr steuern.
Einrichten auf dem Smartphone
Within AndroidAPS, in the ConfigBuilder you need to enable Wear plugin.
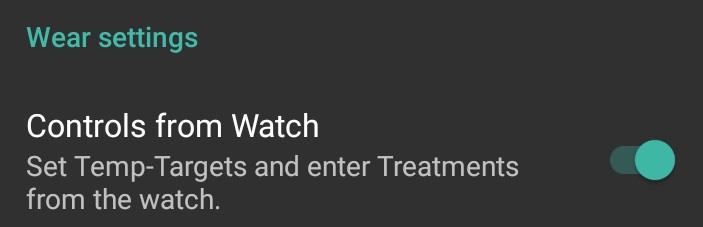
AAPS von der Uhr aus steuern
AndroidAPS kann mit einer Android Wear Smartwatch gesteuert werden. Wenn Du Deinen Loop von der Uhr aus steuern willst (z.B. Bolus abgeben), aktiviere „Steuerung durch die Uhr“.
Die nachfolgenden Funktionen kannst Du von der Uhr aus starten:
temporäres Ziel setzen
use the bolus calculator (calculation variables can be defined in settings on the phone)
eCarbs eintragen
Bolus (Insulin + Kohlenhydrate) abgeben
Uhreinstellungen
status
pumpenstatus überprüfen
Pumpenstatus überprüfen
Profil prüfen und ändern, CPP (Circadian Percentage Profile = Zeitverschiebung + Prozentsatz)
TDD (Total daily dose = Bolus + Basal pro Tag) anzeigen
AAPS Watchfaces
Es gibt mehrere Ziffernblätter zur Auswahl, die das durchschnittliche Delta, IOB, die derzeit aktive TBR und Basalraten sowie die Kurve der CGM-Werte anzeigen können.
Stelle sicher, dass AndroidAPS die Erlaubnis hat, Benachrichtigungen auf der Uhr anzuzeigen. Die Eingaben werden aktiviert, indem man die Benachrichtigung auf der Uhr öffnet, einmal wischt und bestätigt.
Um schneller zu AndroidAPS zu kommen, kannst du den angezeigten CGM-Wert auf der Uhr doppelt anklicken. Klicke doppelt auf die BZ-Kurve um den Zeitraum zu ändern.
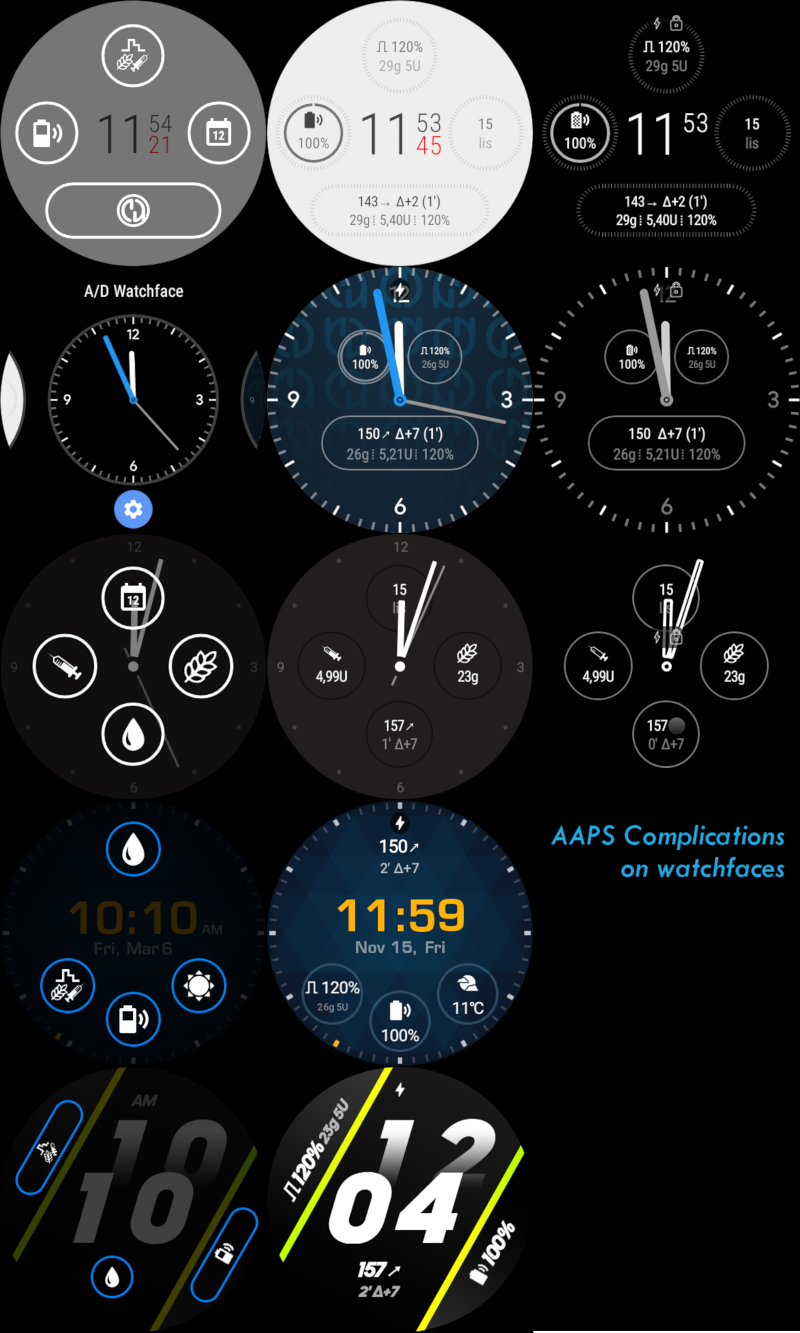
Verfügbare Watchfaces
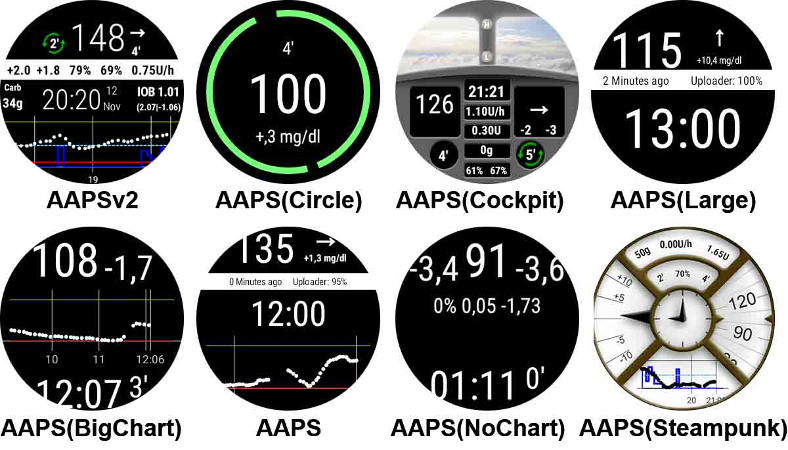
Neues Watchface ab Version 2.8
Farbe, Linien und der Kreis sind im Einstellungsmenü (Zahnradsymbol) des Watchface-Auswahl-Menüs konfigurierbar.
AAPSv2 Watchface - Legende
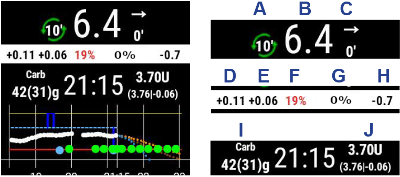
A - Zeit seit der letzten Loop-Aktivität
B - CGM Wert
C - Minuten seit dem letzten CGM-Wert
D - Veränderung zwischen letztem und vorletztem CGM-Wert (in mmol oder mg/dl)
E - Durchschnittliche Änderung der CGM-Werte in den letzten 15 Minuten
F - Batteriestatus des Smartphones
G - Basalrate (Anzeige in IE/Std. bei Standard-BR und in % während einer TBR)
H - BGI (blood glucose interaction) -> erwartete BZ-Änderung allein auf Basis des aktiven Insulins.
I - Kohlenhydrate (carbs on board | e-carbs in der Zukunft)
J - Insulin on board (aus Boli | aus Basal)
Einstellungen (in der Watch-App)
Um auf die Watchface-Einstellungen zuzugreifen, gehe ins AAPS-Hauptmenü, wische nach oben und wähle „Einstellungen“ aus.
Ein gefüllter Stern (Ein) zeigt an, dass die Option ausgewählt wurde und ein leerer Stern (Aus), dass die Option deaktiviert ist:

AAPS Companion Parameters
Vibrieren beim Bolus (Standard:
Ein):Einheiten (Standard:
mg/dl): Falls auf Ein gestellt, werdenmg/dlverwendet, bei Ausmmol/l. Wird beim Setzen eines temporären Ziels von der Uhr aus verwendet.
Watchface-Einstellungen
Show Date (Standard:
Off): Anzeige Datum, nicht auf allen Watchfaces verfügbarShow IOB (Standard:
On): Anzeige aktives Insulin (Details werden in den Wear-Einstellungen in AAPS vorgenommen)Show COB (Standard:
On): Anzeige aktive KohlenhydrateShow Delta (Standard:
On): Anzeige BZ-Änderung der letzten fünf MinutenShow AvgDelta (Standard:
On): Anzeige der BZ-Änderung der letzten 15 MinutenShow Phone Battery (Standard:
On): Anzeige Akkuladestand Smartphone in % Rot, wenn unter 30%.Show Rig Battery (Standard:
Off): Anzeige niedrigster Wert der Ladestände von Smartphone, Pumpe und TransmitterShow Basal Rate (Standard:
On): Anzeige der aktuellen Basalrate (in IE/Std. oder in % bei temporärer Basalrate)Show Loop Status (Standard:
On): Anzeige der Minuten seit letzter Loop-Aktion (Pfeile um den Wert werden rot, wenn dieser über 15 Minuten liegt.)Show BG (Standard:
On): Anzeige des letzten CGM-WertsShow Direction Arrow (Standard:
On): Anzeige TrendpfeilShow Ago (Standard:
On): Anzeige Minuten seit letztem CGM-WertDark (Standard:
On): Wechsel zwischen schwarzem und weißem Hintergrund (außer Cockpit und Steampunk Watchface)Highlight Basals (Standard:
Off): verbesserte Sichtbarkeit der Basalrate und von temporären BasalratenMatching divider (Standard:
Off): nur für die AAPS, AAPSv2 und AAPS(Large) Watchfaces: kontrastreiche Anzeige des Querbalkens (Off) oder Anzeige in Hintergrundfarbe (On)Chart Timeframe (Standard:
3 Std.): Anzeigezeitraum des Diagramms zwischen einer und fünf Stunden
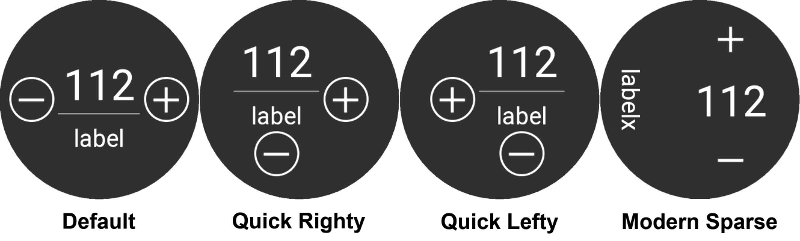
Einstellungen für die Benutzeroberfläche
Input Design: Position der Schaltflächen „+“ und „-“ für Kommandos an AAPS (TT, Insulin, Kohlenhydrate …)
Watchface-spezifische Parameter
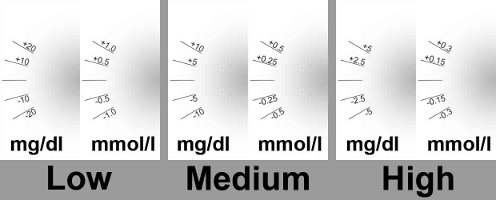
Steampunk Watchface
Delta Granularity (Standard:
Medium): Genauigkeit der Anzeige der CGM-Werte (siehe Screenshot)
Circle Watchface
Big Numbers (Standard:
Off): größere SchriftRing History (Standard:
Off): Graphische Darstellung der BZ-Historie mit grauen Ringen innerhalb des grünen „Stundenrings“Light Ring History (Standard:
On): Ring history dezenter mit dunklerem GrauAnimations (Standard:
On): Animation des Kreises im Watchface - Voraussetzung: Funktion wird von der Uhr unterstützt und diese ist nicht im Energiesparmodus
Kommando-Einstellungen
Wizard in Menu (Standard:
On): Bolus Assistent im Hauptmenü, um direkt an der Uhr Boli und Kohlenhydrate zu erfassen.Prime in Menu (Standard:
Off): Katheter- und Kanülenbefüllung über die UhrSingle Target (Standard:
On):On: Zielwert für temporäre Ziele (TT)Off: Zielbereich für temporäre Ziele (TT)
Wizard Percentage (Standard:
Off): Boluskorrektur über den Assistenten (Wert wird in Prozent eingegeben, bevor die Insulinabgabe bestätigt wird)
Komplikationen
Komplikation ist ein Begriff aus der traditionellen Uhrmacherei und beschreibt Zusätze zur eigentlichen Zeitanzeige - als ein weiteres kleines Fenster o.ä. um Datum, Wochentag, Mondphase, etc. anzuzeigen. Mit Wear OS 2.0 können solche Zusatzinformationen (Wetter, Benachrichtigungen, Fitness Tracker etc.) zu jedem Watchface hinzugefügt werden, das Komplikationen unterstützt.
Die AndroidAPS Wear OS App unterstützt Komplikationen ab Build 2.6 und erlaubt damit jedem beliebigen Watchface, das Komplikationen unterstützt, die Anzeige von AAPS Daten wie BZ mit Trendpfeil, IOB, COB etc.
Dabei können die Komplikationen auch als Shortcut zu AAPS Funktionen genutzt werden. Durch antippen der AAPS-Komplikation kannst Du - abhängig vom Komplikations-Typ und den Einstellungen - AAPS-spezifische Menüs und Dialoge aufrufen.
Komplikationstypen
Die AAPS Wear OS App liefert nur Rohdaten in entsprechend vordefinierten Formaten. Die Drittanbietern der Watchfaces legen fest, wo und wie Komplikationen - einschließlich des Layouts, Rahmen, Farben und Schriftarten - wiedergegeben werden sollen. Von den vielen zur Verfügung stehenden Wear-OS-Komplikations-Typen verwendet AAPS:
SHORT TEXT- Enthält zwei Textzeilen mit jeweils 7 Zeichen, die manchmal als Wert und Beschriftung bezeichnet werden. Diese werden in der Regel in einem Kreis oder einer „Pill“ unter- oder nebeneinander angezeigt. Es handelt sich um eine Komplikation mit sehr begrenztem Platz. AAPS versucht, unnötige Zeichen zu entfernen und rundet Werte, entfernt führende oder abschließende Nullen etc.LONG TEXT- Enthält zwei Textzeilen, jeweils ca. 20 Zeichen. Normalerweise werden diese in einem Rechteck oder einer „long pill“ untereinander dargestellt. Er wird für weitere Details und den Statusangaben in Textform verwendet.RANGED VALUE- für Werte aus einem vordefinierten Bereich, z.B. Prozentsätze. Beinhaltet ein Icon, eine Beschriftung und wird meist als Kreis-Fortschritts-Diagramm angezeigt.LARGE IMAGE- Benutzerdefiniertes Hintergrundbild, das verwendet werden kann, wenn es vom Watchface unterstützt wird.
Konfiguration der Komplikation
Um eine Komplikation zu einem Watchface hinzuzufügen, konfiguriere es durch langes Drücken auf die Komplikation und anschließendem Klicken auf das Zahnrad-Symbol. Je nach dem wie das einzelne Watchface die Komplikationen behandelt musst Du entweder auf die Platzhalter klicken oder das Setup für Komplikationen des Watchfaces aufrufen. AAPS-Komplikationen werden unter dem AAPS-Menü-Eintrag gruppiert.
Bei der Konfiguration von Komplikationen passt Wear OS die Auswahl an und führt nur die Komplikationen auf, die an der gewünschten Stelle angezeigt werden können. Wenn Du also eine bestimmte Komplikation nicht in der Liste findest, passt sie wahrscheinlich nicht an den gewünschten Platz innerhalb des Watchfaces.
AAPS-Komplikationen
AndroidAPS stellt folgende Komplikationen zur Verfügung:
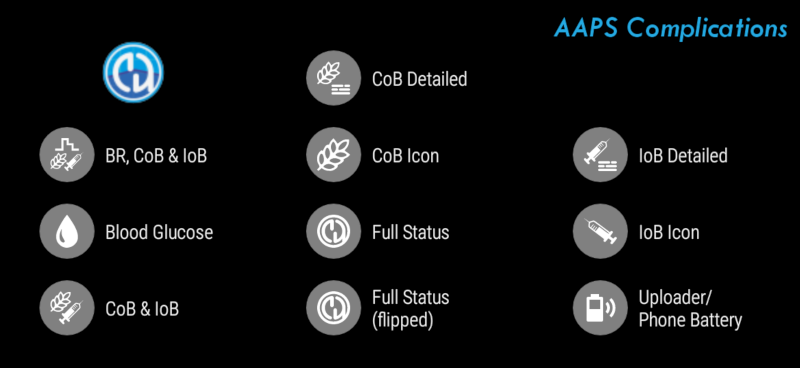
BR, CoB & IoB (
SHORT TEXT, öffnet das Menü): Zeigt die Basalrate in der ersten Zeile sowie Carbs on Board und Insulin on Board in der zweiten Zeile.Blood Glucose (
SHORT TEXT, öffnet das Menü): Zeigt den BZ-Wert und *Trendpfeil * in der ersten Zeile und das Alter des Werts sowie das BZ Delta in der zweiten Zeile.CoB & IoB (
SHORT TEXT, öffnet das Menü): Zeigt Carbs on Board in der ersten Zeile und Insulin on Board in der zweiten Zeile an.COB Detailed (
SHORT TEXT, öffnet den Bolusassistenten): Zeigt die aktuell aktiven Carbs on Board in der ersten und geplante eCarbs in der zweiten Zeile an.CoB Icon (
SHORT TEXT, öffnet den Bolus-Assistenten): Zeigt Carbs on Board mit einem statischen Icon an.Full Status (
LONG TEXT, öffnet das Menü): Zeigt den Großteil der Daten auf einmal an: BZ-Wert und Trendpfeil, BZ Delta und Alter des Werts in der ersten Zeile. In der zweiten Zeile: Carbs on Board, Insulin on Board und die Basalrate.Full Status (flipped) (
LONG TEXT, öffnet das Menü): Die gleichen Daten wie beim Standard Full Status, aber die Zeilen sind vertauscht. Kann z.B. in Watchfaces verwendet werden, die eine der beiden Zeilen inLONG TEXTignorieren.IoB Detailed (
SHORT TEXT, öffnet Bolus): Zeigt das gesamte Insulin on Board in der ersten Zeile und in der zweiten Zeile aufgeteilt nach Bolus und Basal.IoB Icon (
SHORT TEXT, öffnet Bolus): Zeigt Insulin on Board mit einem statischen Icon.Uploader/Phone Battery (
RANGED VALUE, öffnet den Status): Zeigt den Akkuladestand des AAPS Smartphones (uploader). Wird als prozentualer Wert mit einem Akkusymbol angezeigt, das den gemeldeten Wert widerspiegelt. Wird ggf. nicht sofort aktualisiert, aber spätestens wenn sich andere wichtige AAPS-Daten ändern (normalerweise alle ~5 Minuten mit neuen CGM-Daten).
Darüber hinaus gibt es drei Komplikationen vom Typ LARGE IMAGE Art: Dark Wallpaper, Gray Wallpaper und Light Wallpaper, mit statischem AAPS Hintergrundbild.
Einstellungen zu den Komplikationen
Complication Tap Action (Standard-Einstellung:
Default): Legt fest, welcher Dialog nach Tippen der Komplikation geöffnet wird:Default: Abhängig vom Komplikations-Typ (siehe Liste oben)
Menu: AAPS Hauptmenü
Wizard: Bolus Assistent
Bolus: direkte Boluseingabe
eCarb: eCarb Dialog
Status: Status-Menü
None: Deaktiviert den Menüaufruf bei Tippen der Komplikation
Unicode in Complications (Standard:
On): WennOngewählt ist, nutzt die Komplikation Unicode Zeichen für Symbole wieΔDelta,⁞vertikaler Punkttrenner oder⎍Basalraten-Symbol. Die Anzeige hängt von der Schriftart ab und kann sich je nach Watchface unterscheiden. Mit dieser Option können die Unicode-Zeichen bei Bedarf ausgeschaltet werden (Off), wenn der Font des Watchfaces diese Zeichen nicht unterstützt. Anzeigefehler können so vermieden werden.
Wear OS Tiles
Wear OS Tiles provide easy access to users‘ information and actions to get things done. The tiles are only available on Android smartwatches running on Wear Os version 2.0 and higher.
Tiles allow you to quickly access actions on the AAPS application without going through the watch face menu. The tiles are optional and can be added and configured by the user.
The tiles are used „next to“ any watch face. To access a tile, when enabled, swipe right to left on your watch face to show them.
Please note; that the tiles do not hold the actual state of the AAPS phone app and will only make a request, which has to be confirmed on the watch before it is applied.
How to add Tiles
Before using the tiles, you have to switch on „Control from Watch“ in the „Wear OS“ settings of Android APS.
Depending on your Wear OS version, brand and smartphone there are two ways of enabling the tiles:
On your watch, from your watch face;
Swipe right to left till you reach the „+ Add tiles“
Select one of the tiles.
On your phone open the companion app for your watch.
For Samsung open „Galaxy Wearable“, or for other brands „Wear OS“
In the click on the section „Tiles“, followed by „+ Add“ button
Find the AAPS tile you like to add by selecting it.
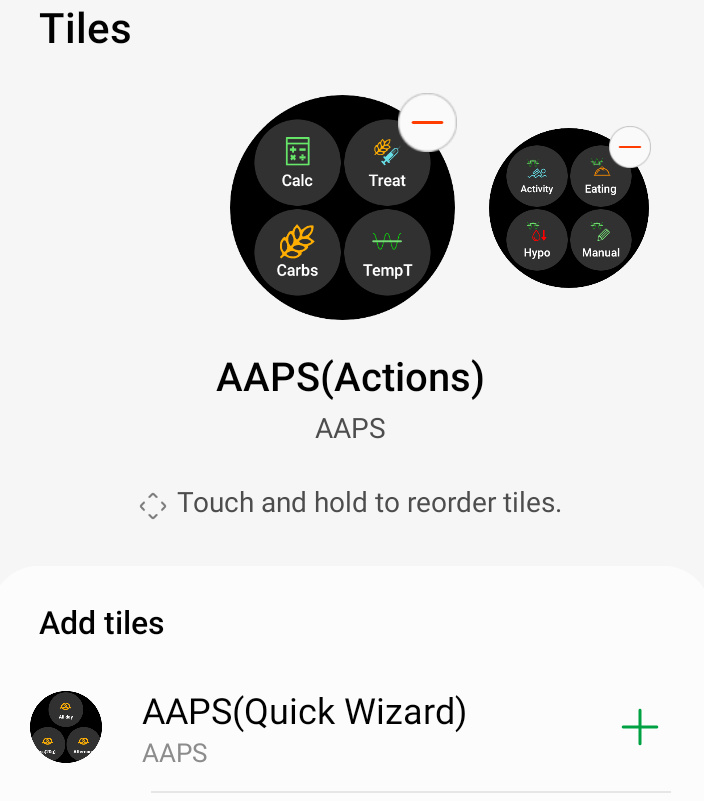 The order of the tiles can be changed by dragging and dropping
The content of the tiles can be customized by long-pressing a tile and clicking the „Edit“ or „gear icon“ button.
APS(Actions) Tile
The action tile can hold 1 to 4 user-defined action buttons. To configure, long-press the tile, which will show the configuration options. Similar actions are also available through the standard watch menu.
Actions supported in the Action tile can request the AAPS phone app for:
Calc; do a bolus calculation, based on carb input and optional a percentage [1]
Insulin; request insulin delivery by entering the unit of insulin
Treatment; request both insulin delivery and add carbs
Carbs; add (extended) carbs
TempT; set a custom temporary target and duration
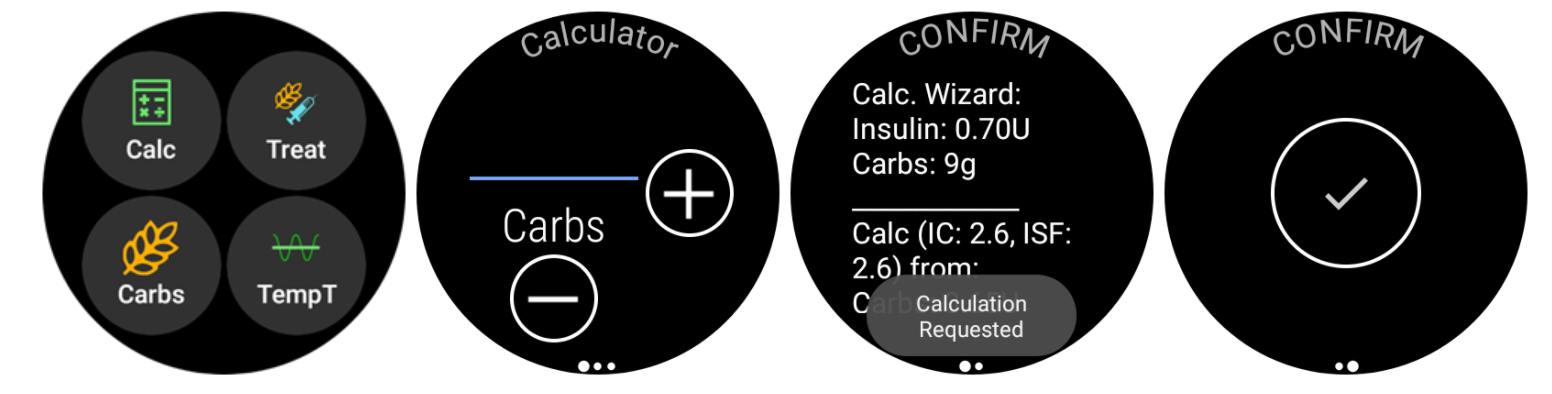
[1] Via, the Wear OS menu, set the „Calculator Percentage“ option to „ON“ to show the percentage input in the bolus calculator. The default percentage is based on the phone settings in the“Overview“ section „Deliver this part of the bolus wizard result %“ When the user does not provide a percentage, the default value from the phone is used. Configure the other parameters for the bolus calculator in the phone app via „Preferences“ „Wizard Settings“.
AAPS(Temp Target) Tile
The Temp Target Tile can request a temporary target based on AAPS phone presets. Configure preset time and targets through the phone app setting by going to „Preferences“, „Overview“, „Default Temp-Targets“ and set the duration and targets for each preset. Configure the visible actions on the tile through the tile settings. Long press the tile to show the configuration options and select 1 to 4 options:
Activity; for sport
Hypo; to raise the target during hypo treatment
Eating soon; to lower the target to raise the insulin on board
Manual; set a custom temporary target and duration
Cancel; to stop the current temporary target

AAPS(QuickWizard)Tile
The QuickWizard tile can hold 1 to 4 quick wizard action buttons, defined with the phone app[2]. See QuickWizard. You can set standard meals (carbs and calculation method for the bolus) to be displayed on the tile depending on the time of the day. Ideal for the most common meals/snacks you eat during the day. You can specify if the quick wizard buttons will show on the phone, watch, or both. Please note that the phone can show only one quick wizard button at a time. The quick wizard setup also can specify a custom percentage of the insulin for the bolus. The custom percentage enables you to vary, for example, snack at 120%, slow absorbing breakfast 80% and hypo treatment sugar snack at 0%
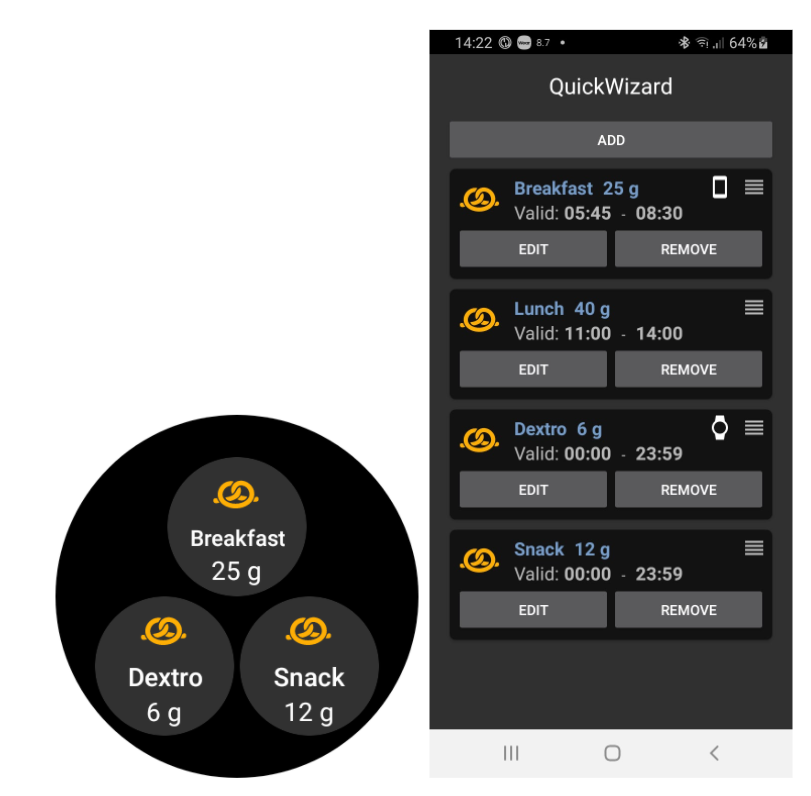
[2] Wear OS limits tiles update frequency to only once every 30 seconds. When you notice that the changes on your phone are not reflected on the tile, consider; waiting 30 seconds, using the „Resend all data“ button from the Wear OS section of AAPS, or removing the tile and adding it again. To change the order of the QuickWizard buttons dragging an item up or down.
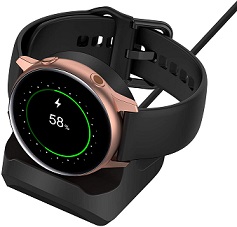
Always on
Long battery life for Android Wear OS smartwatches is a challenge. Some smartwatches get as much as 30 hours before recharging. The display should be switched off for optimal power saving when not in use. Most watches support the “Always on” display.
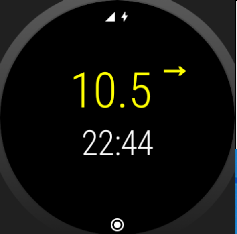
Since AAPS version 3, we can use a “Simplify UI” during always-on-mode. This UI only contains the blood glucose, direction, and time. This UI is power-optimized with less frequent updates, showing less information and lightening fewer pixels to save power on OLED displays.
The simplified UI mode is available for the watch-faces: AAPS, AAPS V2, Home Big, Digital Style, Steampunk, and Cockpit. The simplified UI is optional and is configured through the watch face settings. (log press the watch face and click “edit” or the gear icon) Select the configuration “Simplify UI“ and set it to “Always on” or “Always on and charging”.
Night-time mode
While charging, it would be helpful if the display could stay “always-on” and show your blood glucose during the night. However, the standard watch-faces are too bright and have too much information, and the details are hard to read with sleepy eyes. Therefore, we added an option for the watch-face to simplify the UI only during charging when set in the configuration.
The simplified UI mode is available for the watch-faces: AAPS, AAPS V2, Home Big, Digital Style, Steampunk, and Cockpit. The simplified UI is optional and is configured through the watch face settings. (log press the watch face and click “edit” or the gear icon) Select the configuration “Simplify UI“ and set it to “During charging” or “Always on and charging”
The Android developer options enable your watch to stay awake during charging. To make the developer options available, see https://developer.android.com/training/wearables/get-started/debugging. Set the “Stay awake when charging” to “on” in the developer options”.
Note: not all displays can handle always-on very well. It can cause screen burn-in, especially on the older OLED displays. The watches will generally dim the display to prevent burn-in; please check your owner’s manual, the manufacturing, or the internet for advice.
Performance and battery life tips
Wear OS watches are very power-constrained devices. The size of the watch case limits the capacity of the included battery. Even with recent advancements both on hardware and software side, Wear OS watches still require daily charging.
If an experienced battery span is shorter than a day (from dusk to dawn), here are some tips to troubleshoot the issues.
Main battery-demanding areas are:
Active display with a backlight on (for LED) or in full intensity mode (for OLED)
Rendering on screen
Radio communication over Bluetooth
Since we cannot compromise on communication (we need up-to-date data) and want to have the most recent data rendered, most of the optimizations can be done in display time area:
Stock watchfaces are usually better optimized than custom one, downloaded from the store.
It is better to use watchfaces that limit the amount of rendered data in inactive / dimmed mode.
Be aware when mixing other Complications, like third party weather widgets, or other - utilizing data from external sources.
Start with simpler watchfaces. Add one complication at the time and observe how they affect battery life.
Try to use Dark theme for AAPS watchfaces, and Matching divider. On OLED devices it will limit the amount of pixels lit and limit burnout.
Check what performs better on your watch: AAPS stock watchfaces or other watchfaces with AAPS Complications.
Observe over a few days, with different activity profiles. Most watches activate the display on glancing, movement and other usage-related triggers.
Check your global system settings that affect performance: notifications, backlight/active display timeout, when GPS is activated.
Check list of tested phones and watches and ask community for other users experiences and reported battery lifetime.
We cannot guarantee that data displayed on watchface or complication is up-to-date. In the end, it is up to Wear OS to decide when to update a watchface or a complication. Even when the AAPS app requests update, the System may decide to postpone or ignore updates to conserve battery. When in doubt and low on battery on watch - always double-check with main AAPS app on phone.
Troubleshooting the wear app:
Sometimes it helps to re-sync the apps to the watch as it can be a bit slow to do so itself: Android Wear > Cog icon > Watch name > Resync apps.
Enable ADB debugging in Developer Options (on watch), connect the watch via USB and start the Wear app once in Android Studio.
If Complications does not update data - check first if AAPS watchfaces work at all.
Sony Smartwatch 3
The Sony Smartwach 3 is one of the most popular watches to be used with AAPS.
Leider hat Google die Unterstützung für Wear OS 1.5 Geräte im Herbst 2020 eingestellt. Dies führt zu Problemen bei der Verwendung von Sony SW3 mit AndroidAPS 2.7 und höher.
A possible workaround can be found on this troubleshooting page.
View Nightscout data
If you are using another looping system and want to view your looping detail on an Android Wear watch, or want to watch your child’s looping, then you can build/download just the NSClient APK. To do this follow the build APK instructions selecting the build variant „NSClientRelease“. Es gibt mehrere Ziffernblätter zur Auswahl, die das durchschnittliche Delta, IOB, die derzeit aktive TBR und Basalraten sowie die Kurve der CGM-Werte anzeigen können.
Pebble
Pebble users can use the Urchin watchface to view looping data (if uploaded to Nightscout), but you will not be able to interact with AndroidAPS through the watch. You can choose fields to display such as IOB and currently active temp basal rate and predictions. If open looping you can use IFTTT to create an applet that says if Notification received from AndroidAPS then send either SMS or pushover notification.