Wie man die Dokumentation bearbeitet
An dieser Stelle wird nur die Bearbeitung der englischen Dokumentation erläutert. Alle neuen Informationen müssen zuerst in Englisch eingegeben werden. Falls du diese in eine andere Sprache übersetzen willst (Danke dafür!), nutze bitte crowdin.
For hints how to format text (headline, bold…) and set links please see the „code syntax“ section of this page.
Allgemein
Bei Fragen, Feedback oder neuen Ideen für die Dokumentation erreichst Du das Docs team via discord. Einen „pull request“ zu machen ist nicht schwierig, aber wir können Dir helfen, die Dokumentation zu bearbeiten.
Es kann sein, dass dir irgendwann vorgeschlagen wird, einen PR zu machen. PR, die Abkürzung für Pull-Request, ist eine Möglichkeit wie man Quellcode oder - wie in diesem Fall - Dokumentationen auf GitHub ergänzen oder ändern kann. Es ist eigentlich nicht allzu schwer und eine gute Möglichkeit, einen Beitrag zu leisten. Diese Dokumentation gibt es, weil Leute wie du PRs gemacht haben. Mach dir keine Sorgen einen Fehler zu machen oder irgendwie die falschen Dokumente zu bearbeiten. Es wird immer Korrektur gelesen, bevor Änderungen in die „finale“ AndroidAPS Dokumentation integriert werden. Du kannst das Original nicht zerstören, wenn du beim PR etwas falsch machst. Die allgemeine Vorgehensweise ist:
Mache Änderungen und Verbesserungen am Code oder der Dokumentation, indem du das bestehende Dokument veränderst.
Vergewissere dich, dass die Änderungen gut aussehen.
Füge Notizen hinzu, damit andere die Änderungen verstehen können.
Erstelle einen Pull-Request, durch den die Administratoren aufgefordert werden deine Änderungen zu verwenden.
Sie werden sich das anschauen und entweder (1) deine Änderungen übernehmen (2) deine Änderungen kommentieren oder (3) ein neues Dokument mit deinen Änderungen erstellen.
(Randbemerkung: Wenn Du ein visueller Lerner bist, gibt es hier ein YouTube Video, das den PR-Prozess darstellt.)
In unserem Beispiel nehmen wir nun eine Änderung an der AndroidAPS-Dokumentation vor. Dies muss nicht in einer Linux-Umgebung durchgeführt werden. Es kann auf jedem Windows-PC, Mac, etc. erfolgen. (jedem Computer mit Internet-Zugang).
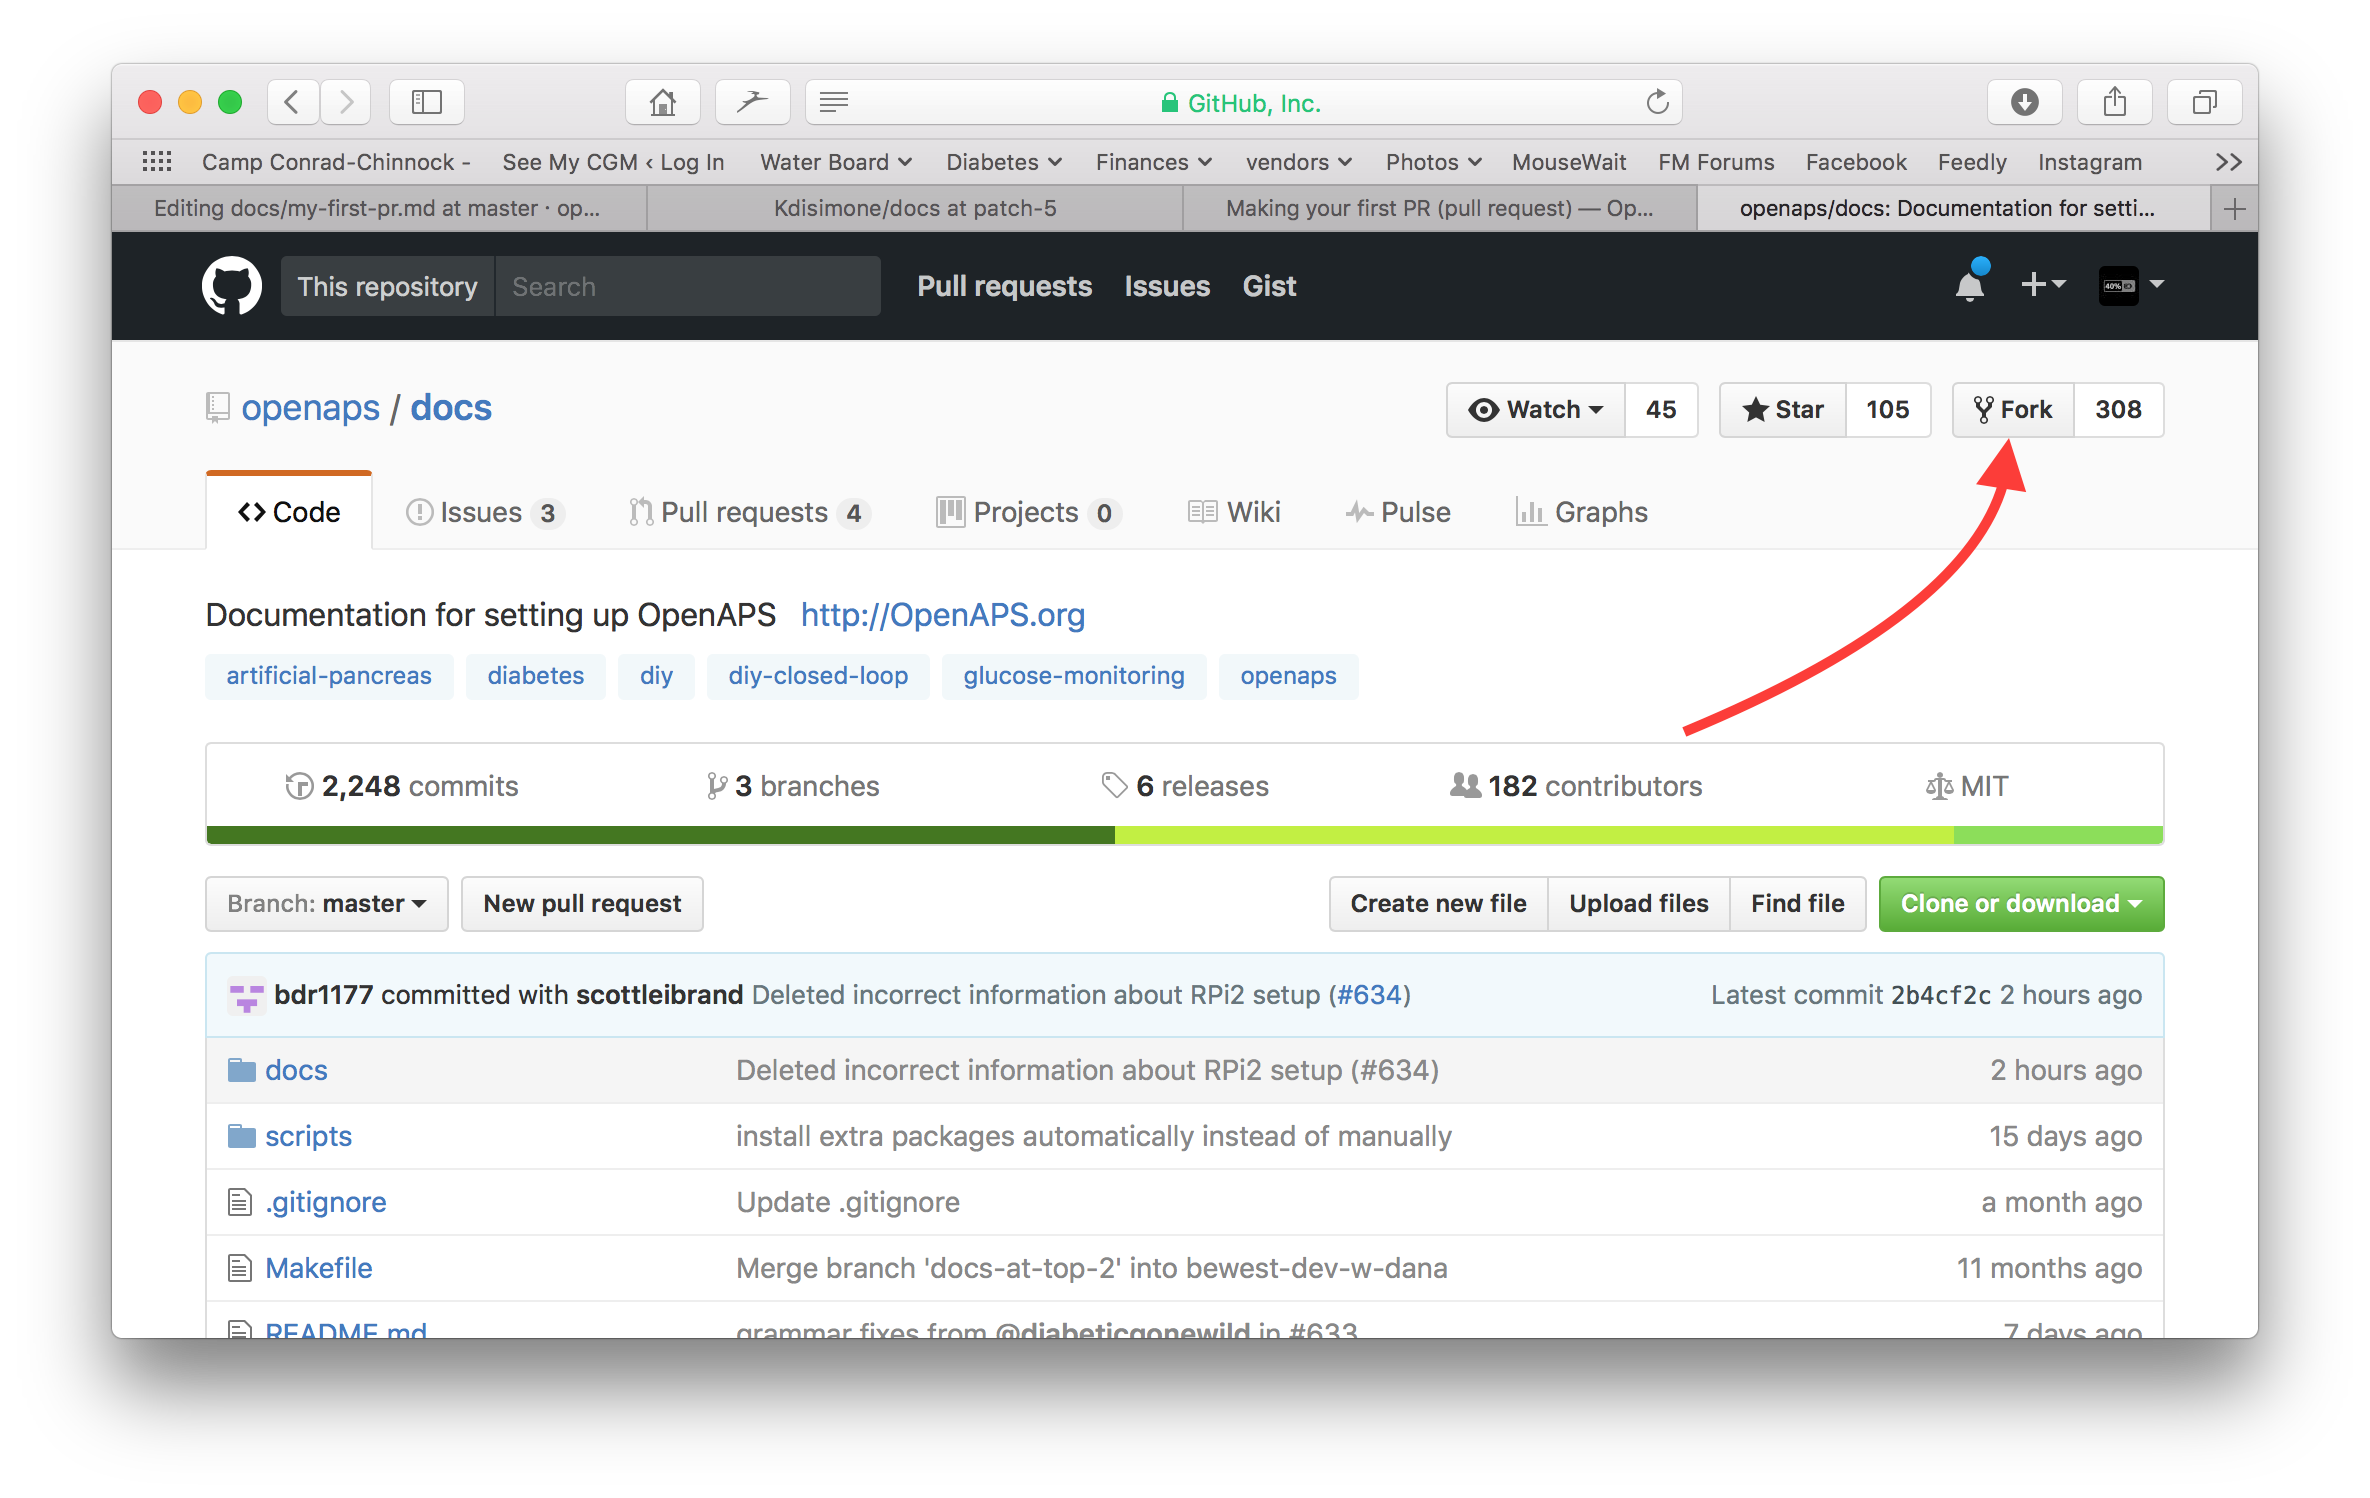
Gehe zu https://github.com/openaps/AndroidAPSdocs und klicke auf „Fork“ oben rechts, um deine eigene Kopie des Repositories (=Quell-Code) zu machen.
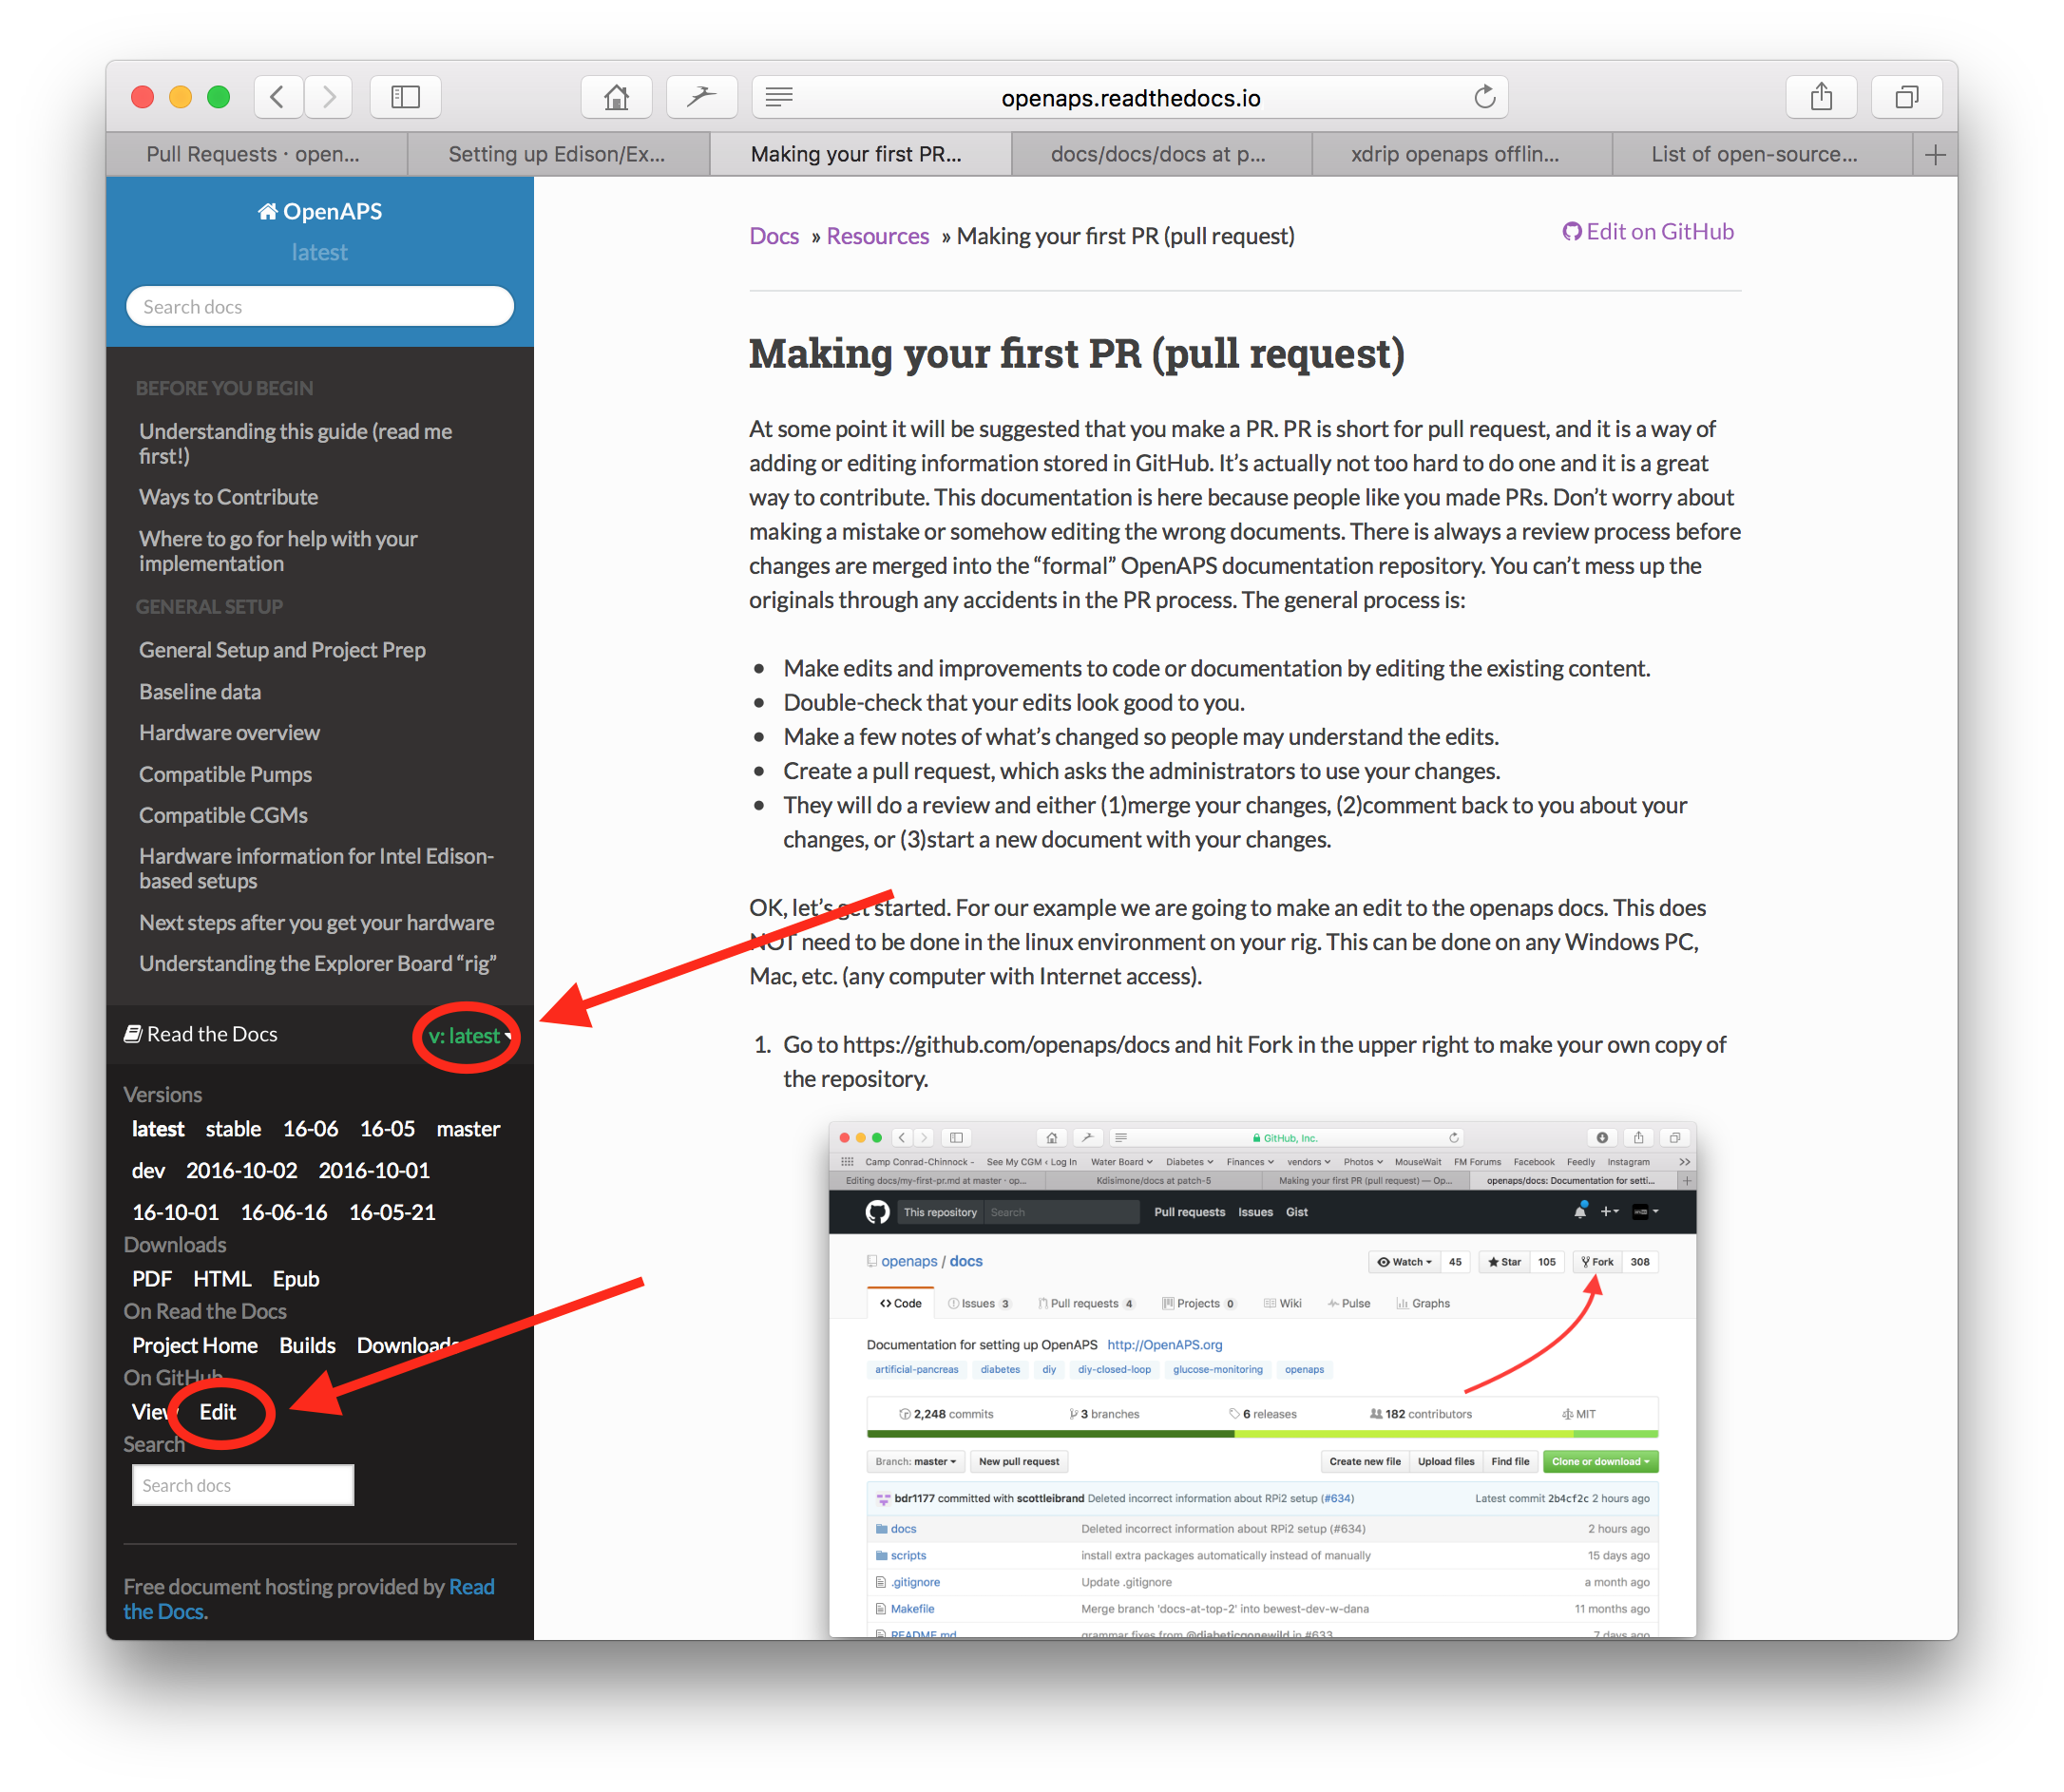
Wechsle zu einer beliebigen Seite und navigiere zu der Seite, die du bearbeiten möchtest. Klicke auf die Black-Box unten links in der Seite mit dem grünen Wort „v: newest“ oder ähnliches. Es öffnet sich ein Pop-Up-Fenster. Klicke in diesem auf „edit“, um in GitHub zu bearbeiten.
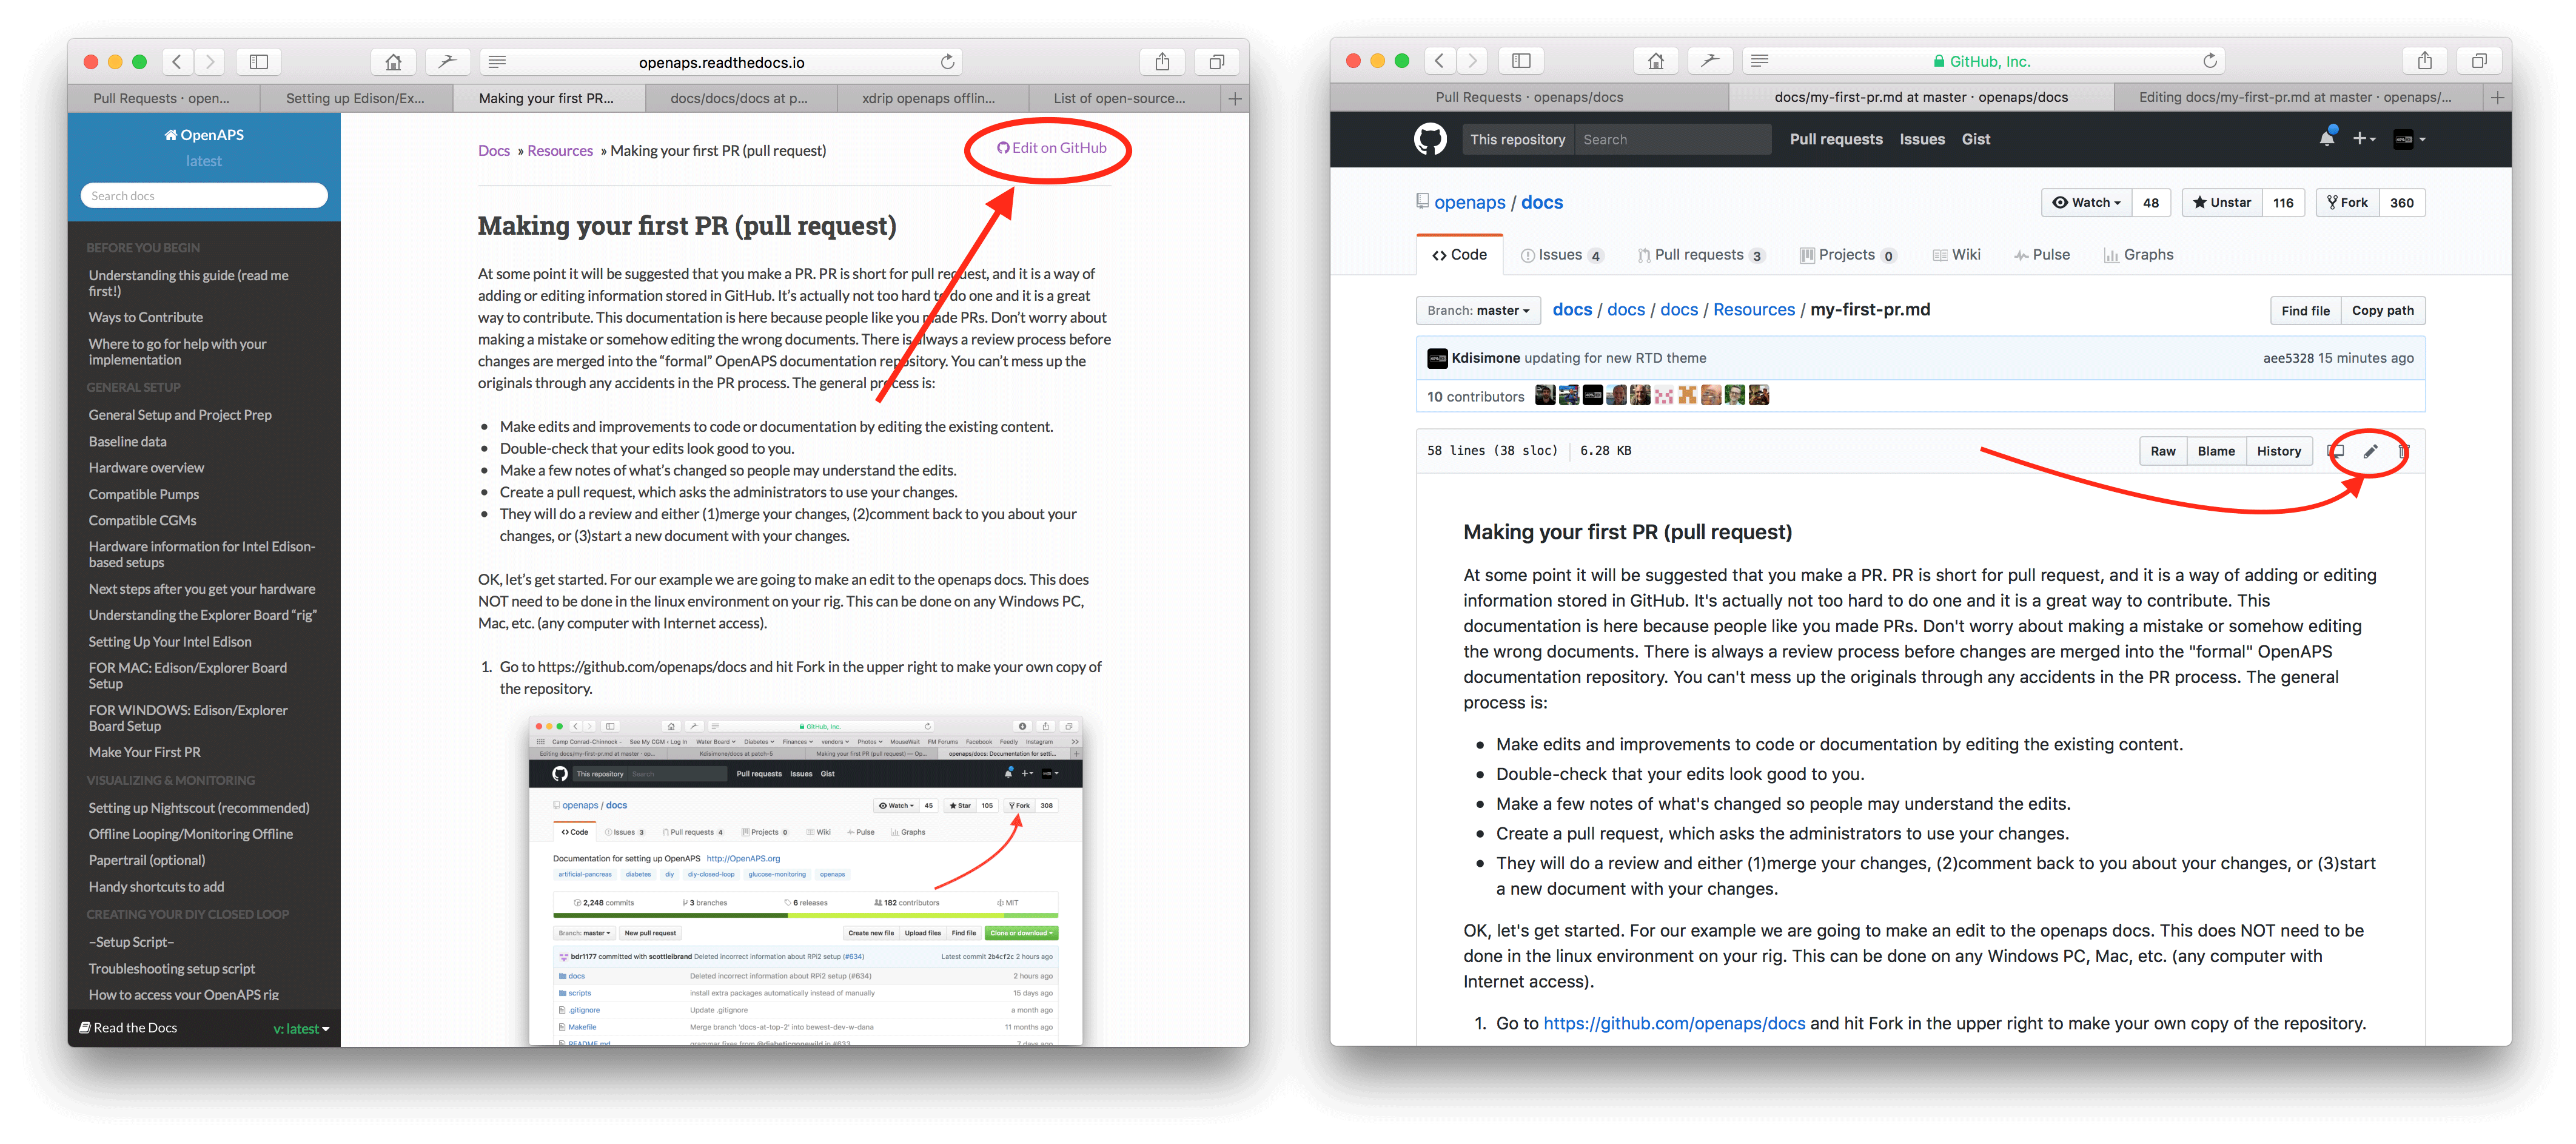
Oder du klickst auf den “Edit in Github”-Link in der oberen rechten Ecke und klickst dann auf das Bleistift-Symbol, das in der oberen Leiste der Seite erscheint, um diese zu editieren.
One or the other of the options in Step 2 will create a new branch in YOUR repository where your edits will be saved. Make your edits to the file.
We are using markdown for the docs pages. The file have got the suffix „.md“.The Markdown specification is not fixed and we use at the moment the myst_parser for our markdown files. Take care to use the correct syntax as described below.
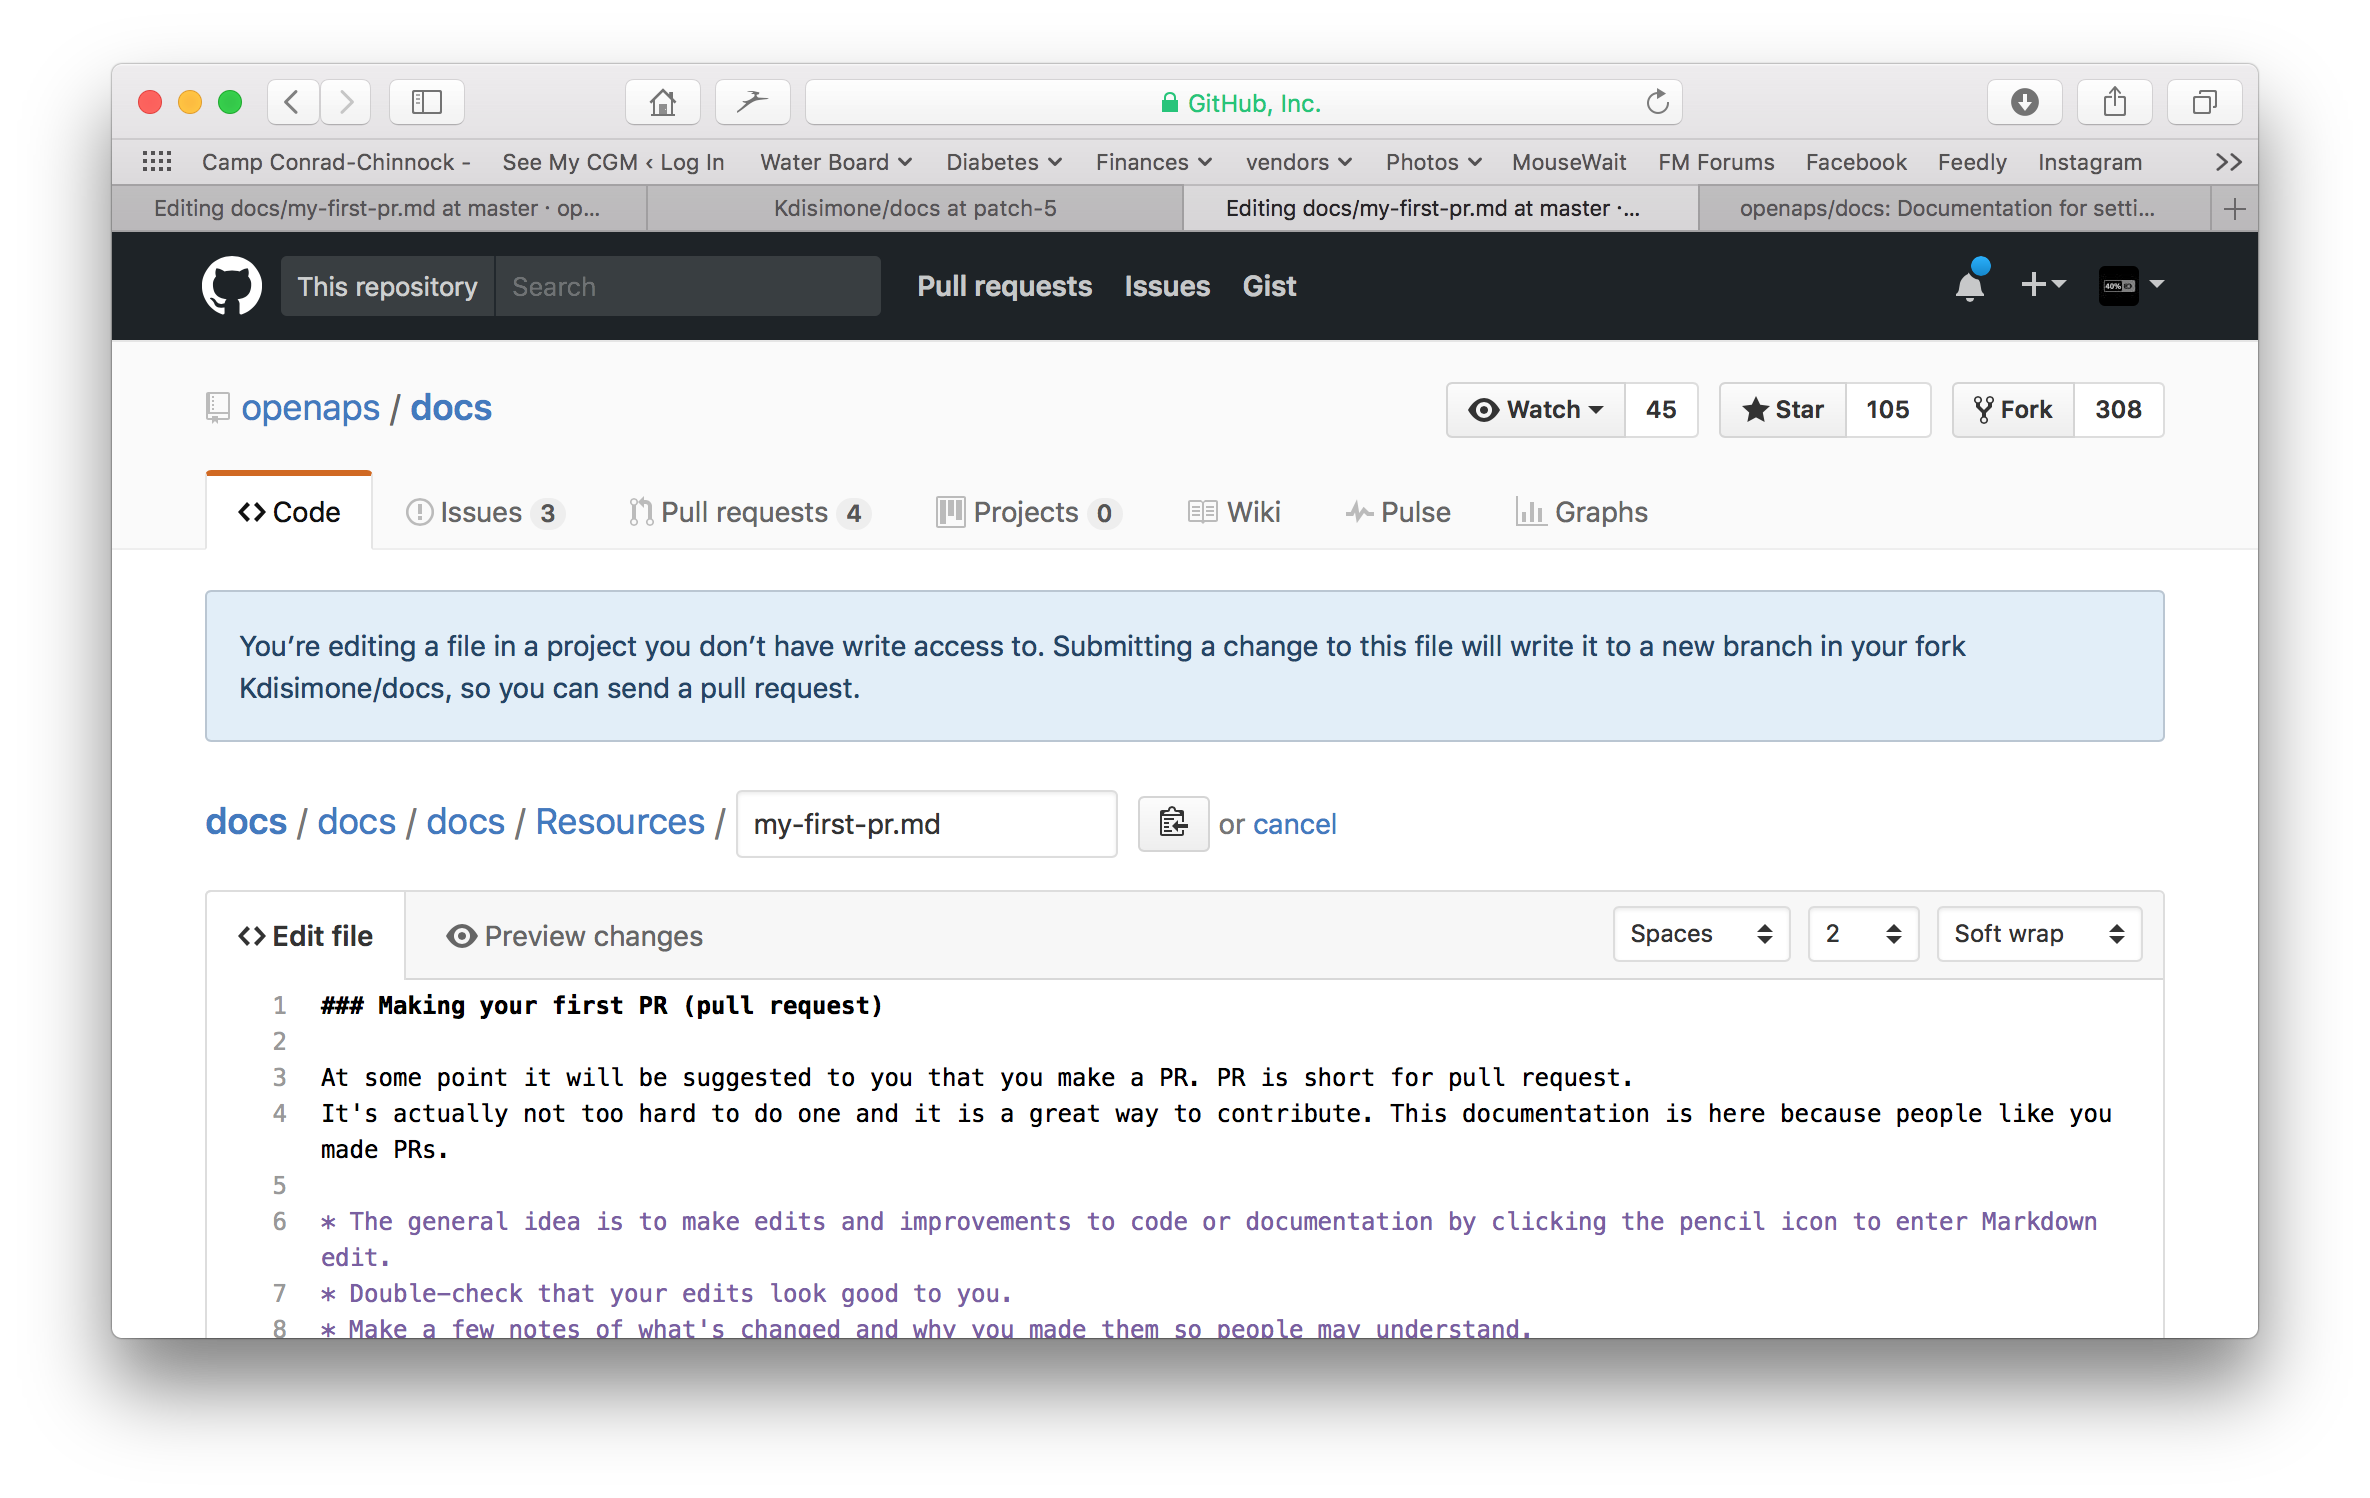
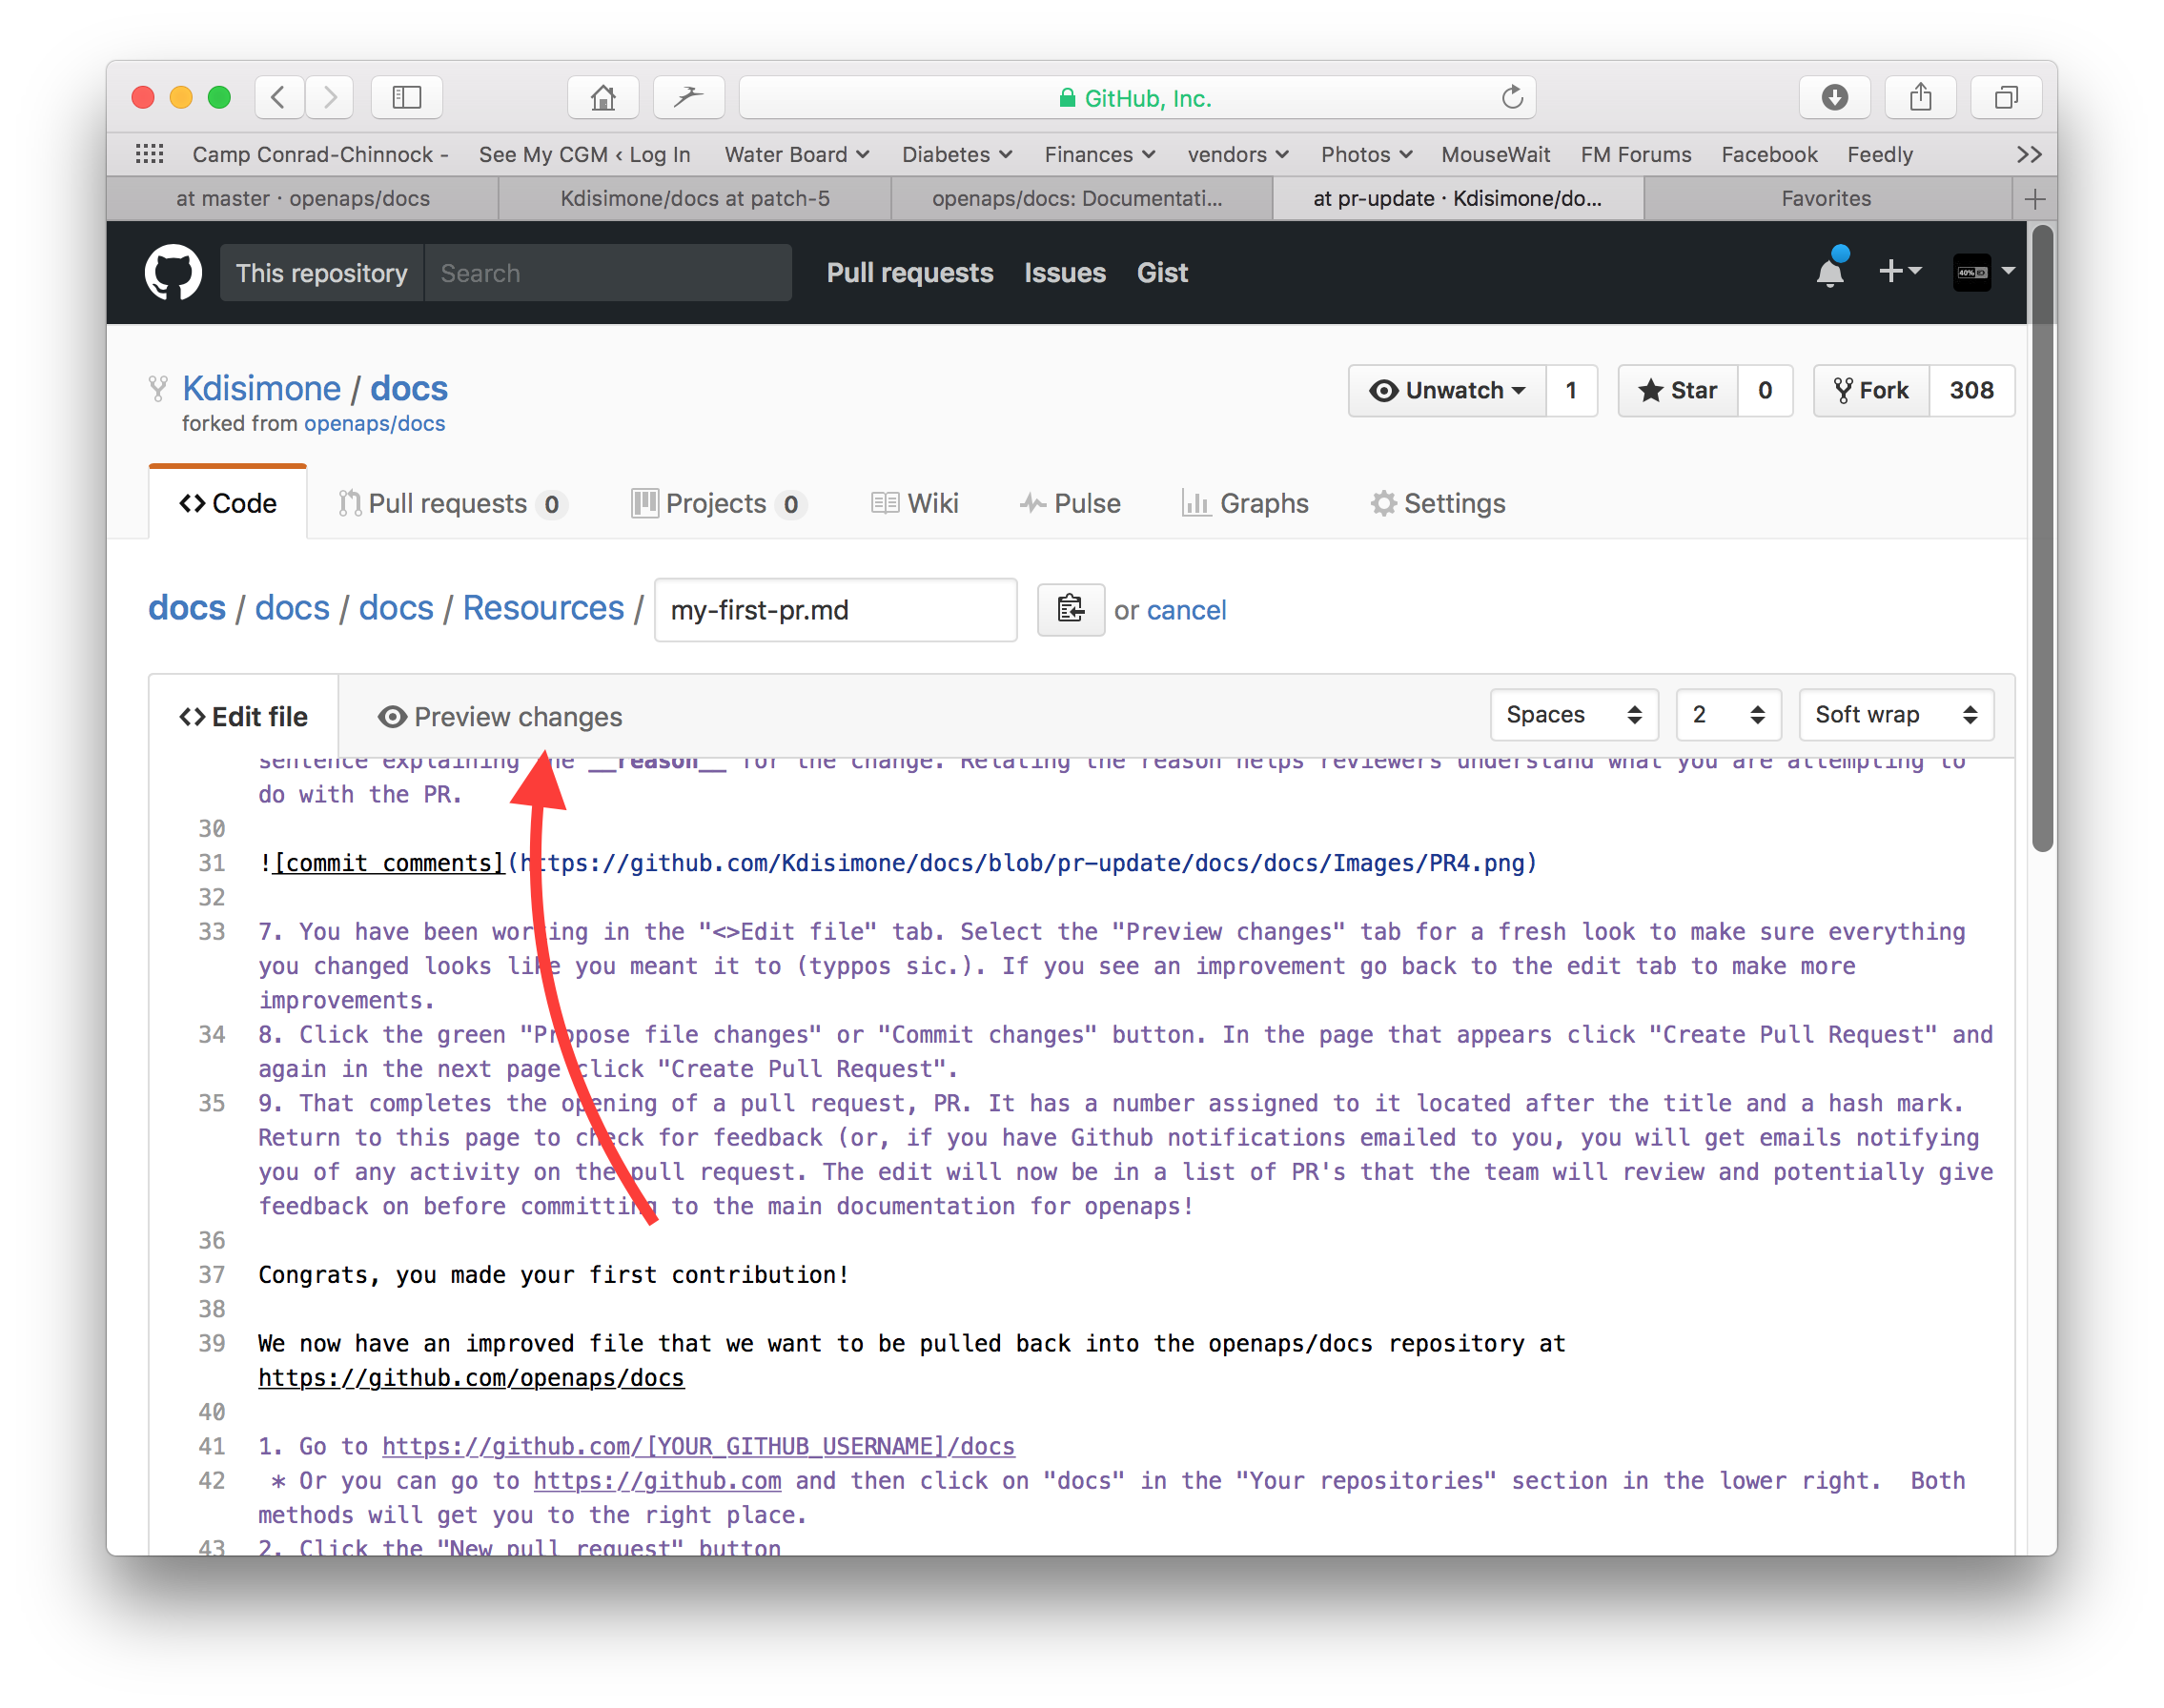
Du arbeitest im „<>Edit file“ Reiter. Wechsle zum „Preview changes“ Reiter, um auf die Vorschau einen Blick zu werfen, damit alles was du geändert hast so aussieht wie du es wolltest (Rechtschreibfehler prüfen). Wenn du etwas entdeckst, das ausgebessert werden muss, wechsle wieder zum edit Reiter, um die Ausbesserungen vorzunehmen.
Wenn du mit deinen Änderungen fertig bist, scrolle zum Seitenende. In der Box am Seitenende solltest du deine Kommentare im Textfeld namens „Add an optional extended description…“ einfügen. Der Standardtitel beinhaltet den Dateinamen. Versuche einen Satz dazu zu schreiben, warum du etwas geändert hast. Die Angabe des Grundes hilft den Admins zu verstehen, was du mit deinem PR bezweckst.
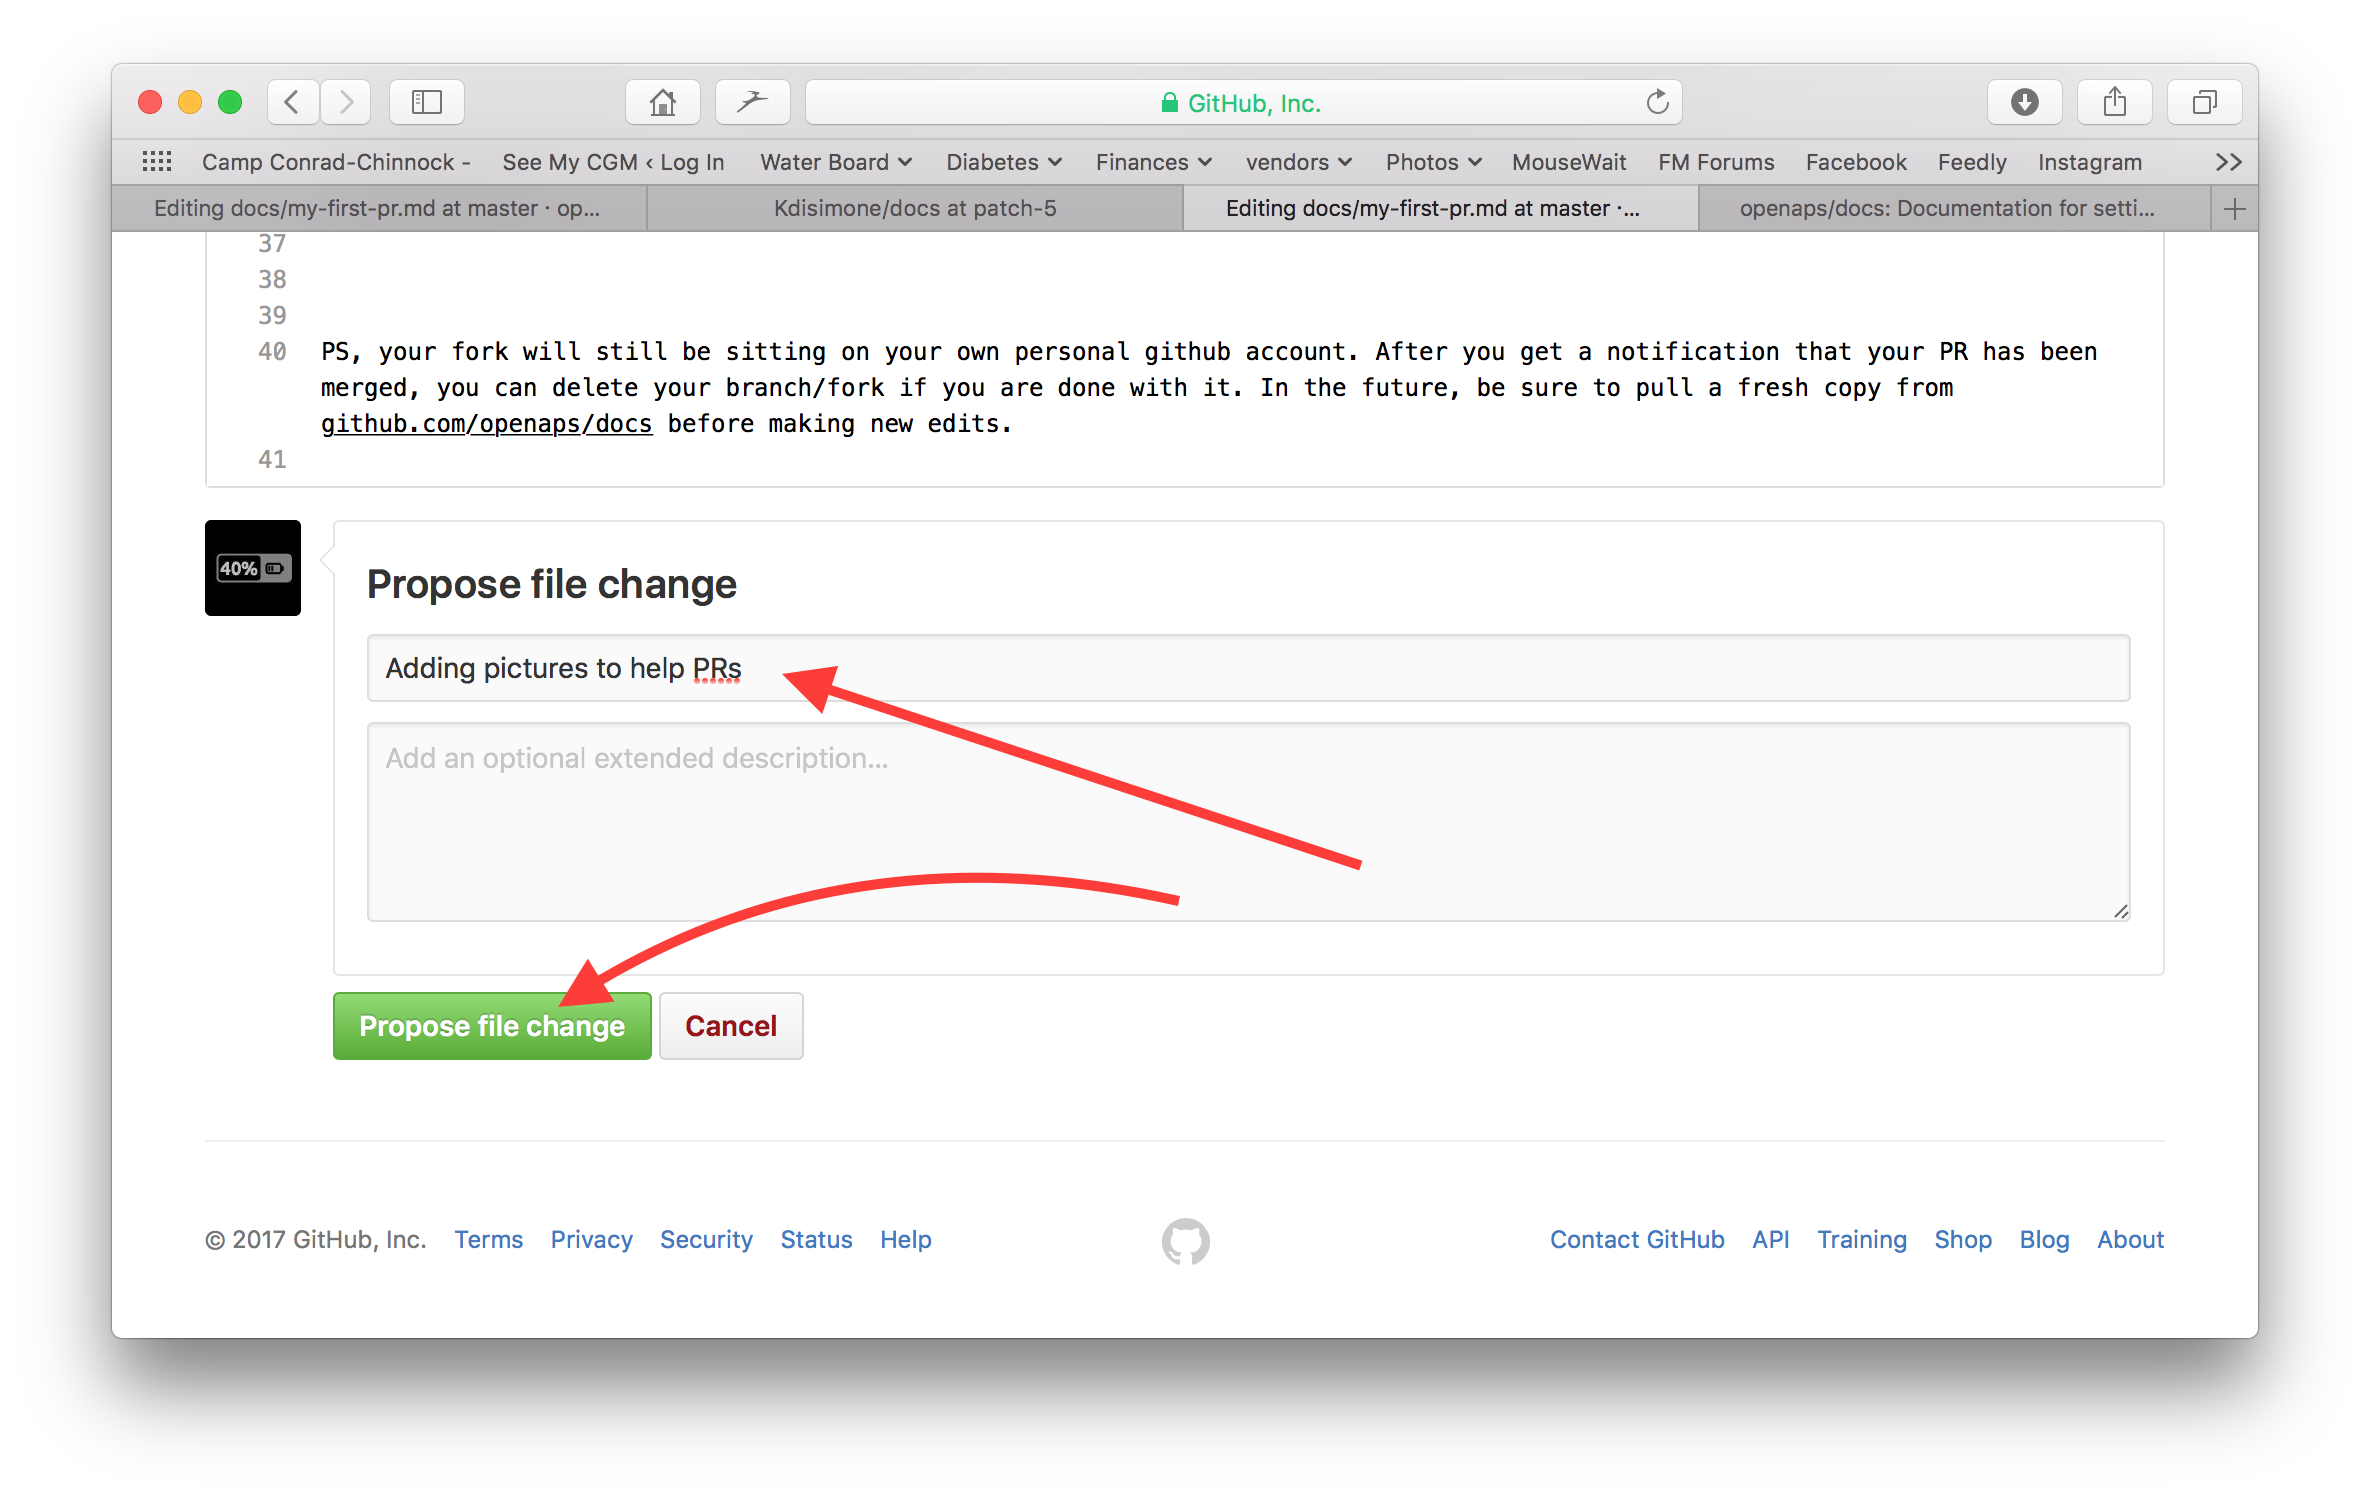
Klicke auf den grünen „Propose file changes“ (Änderungen vorschlagen) oder „Commit changes“ (Änderungen integrieren) Button. Auf der Seite, die dann erscheint, klicke auf „Create Pull Request“ und auf der dann erscheinenden Seite klicke auf „Create Pull Request“.
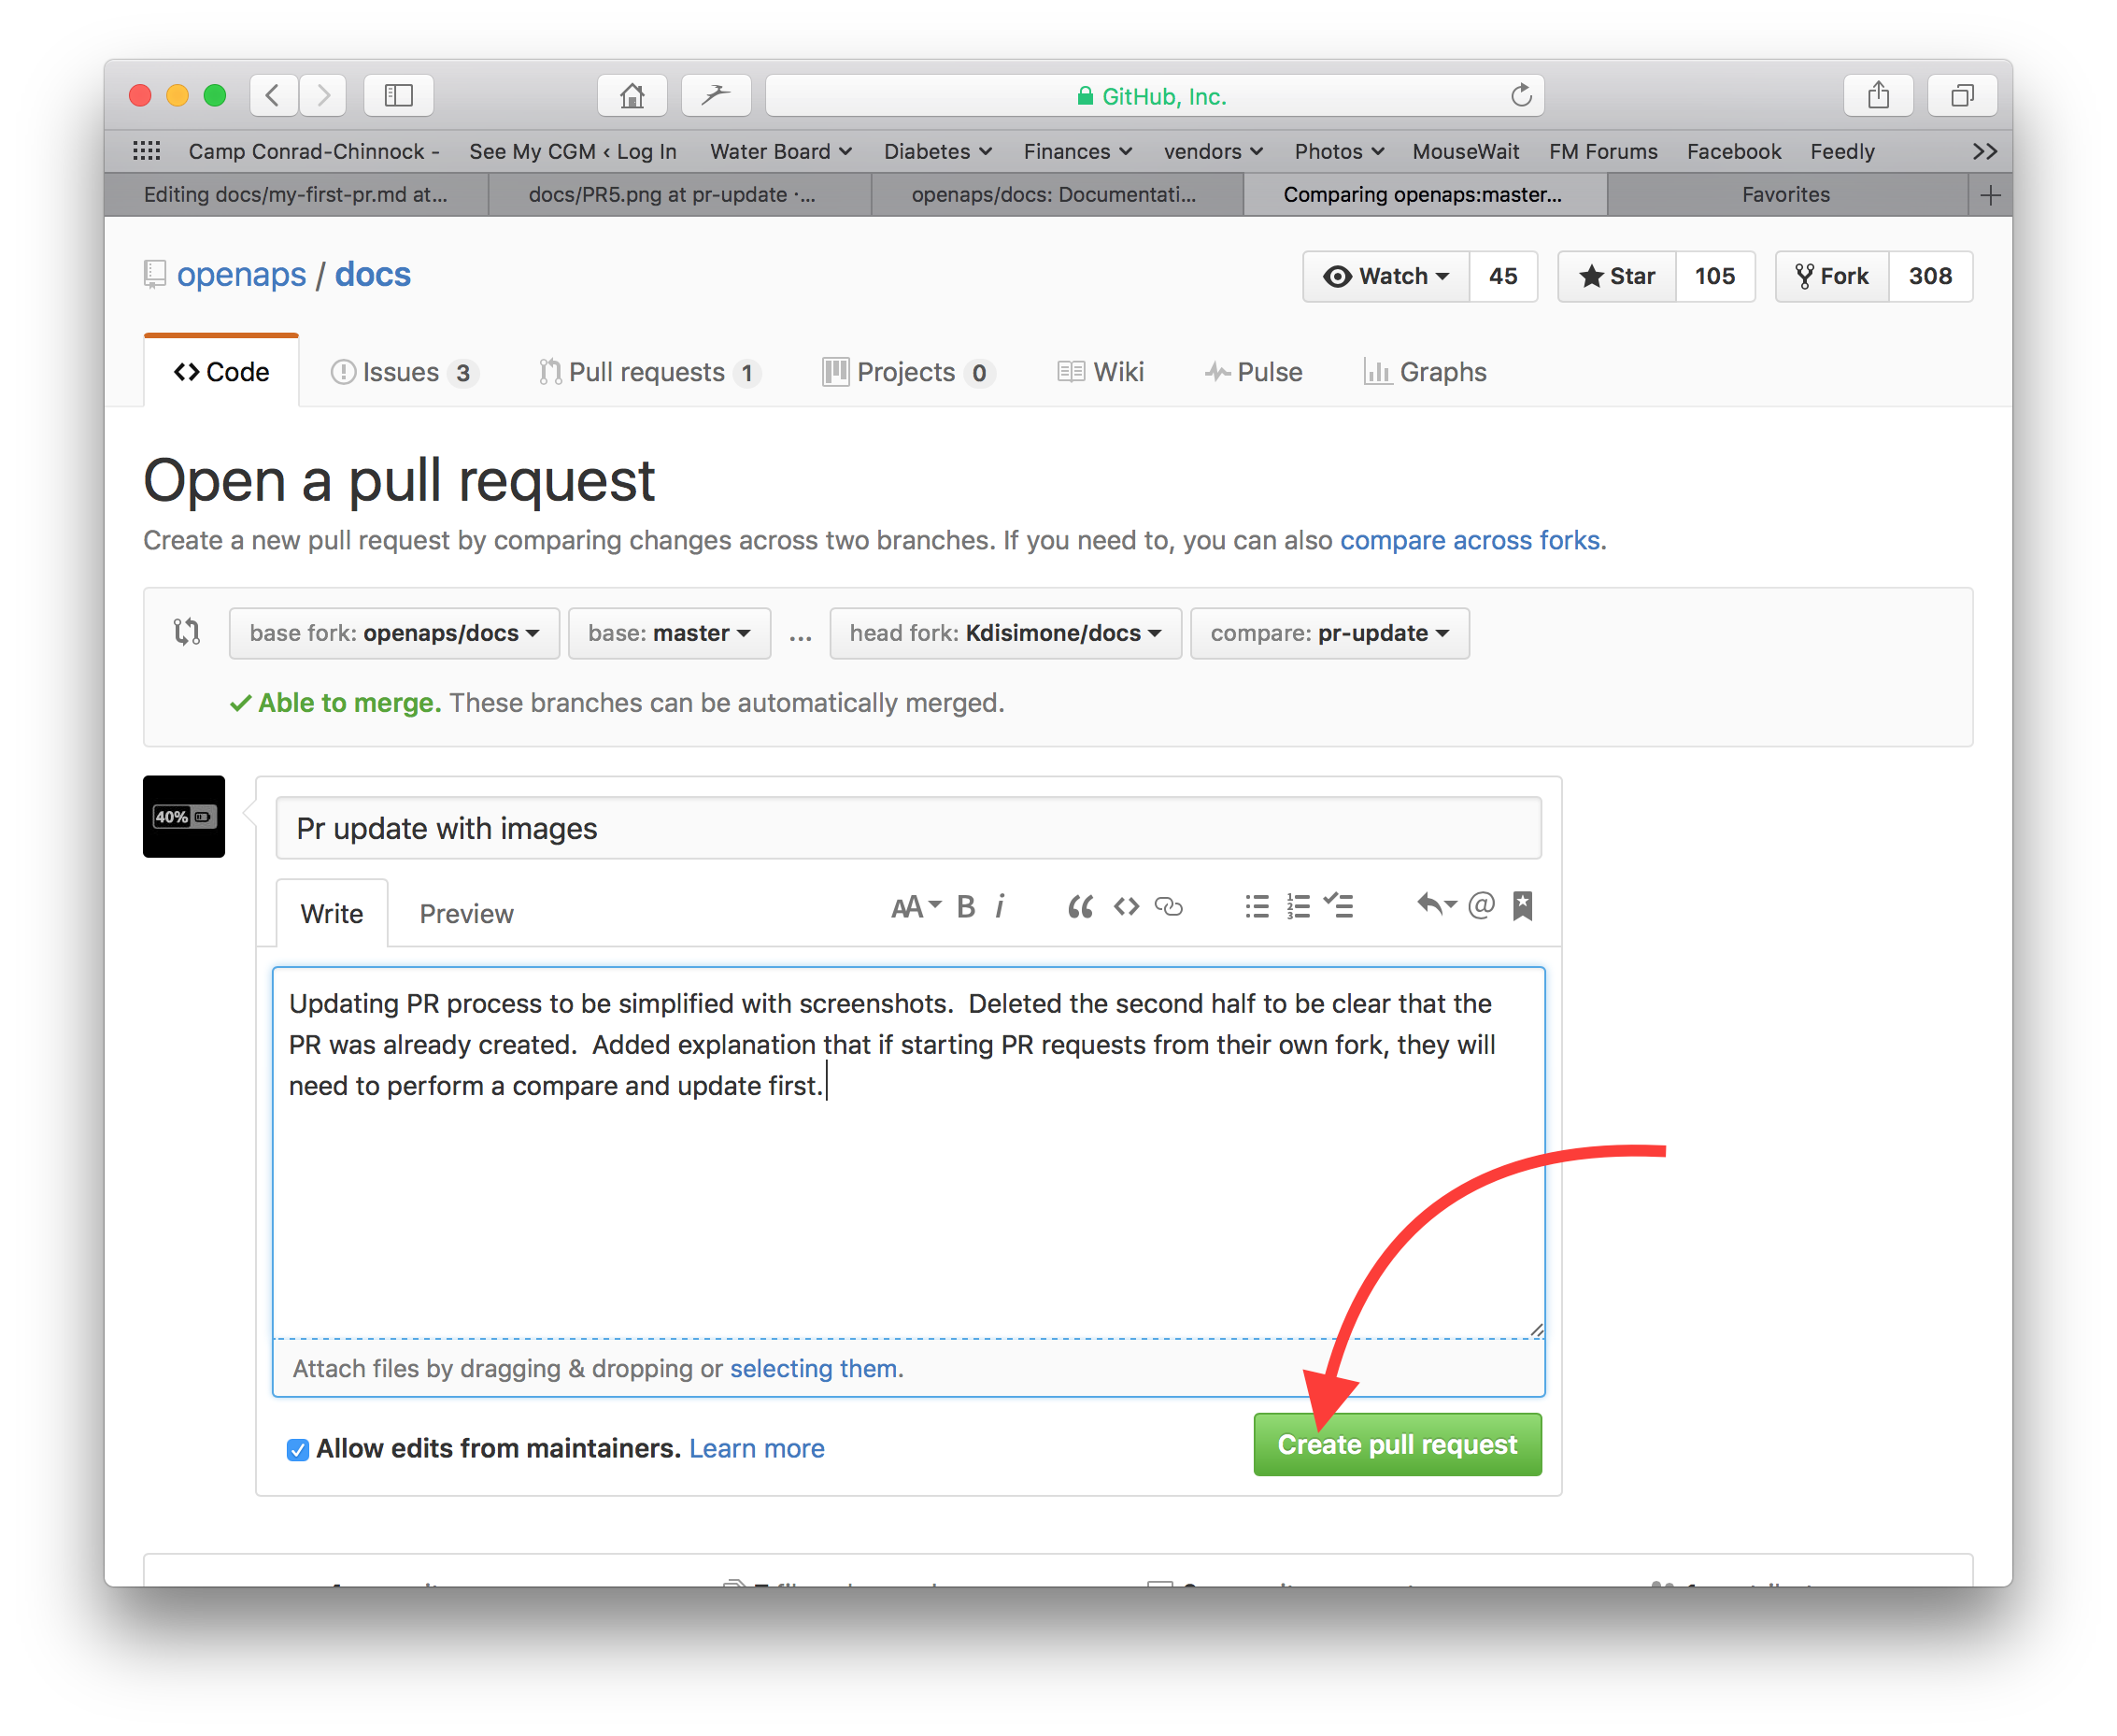
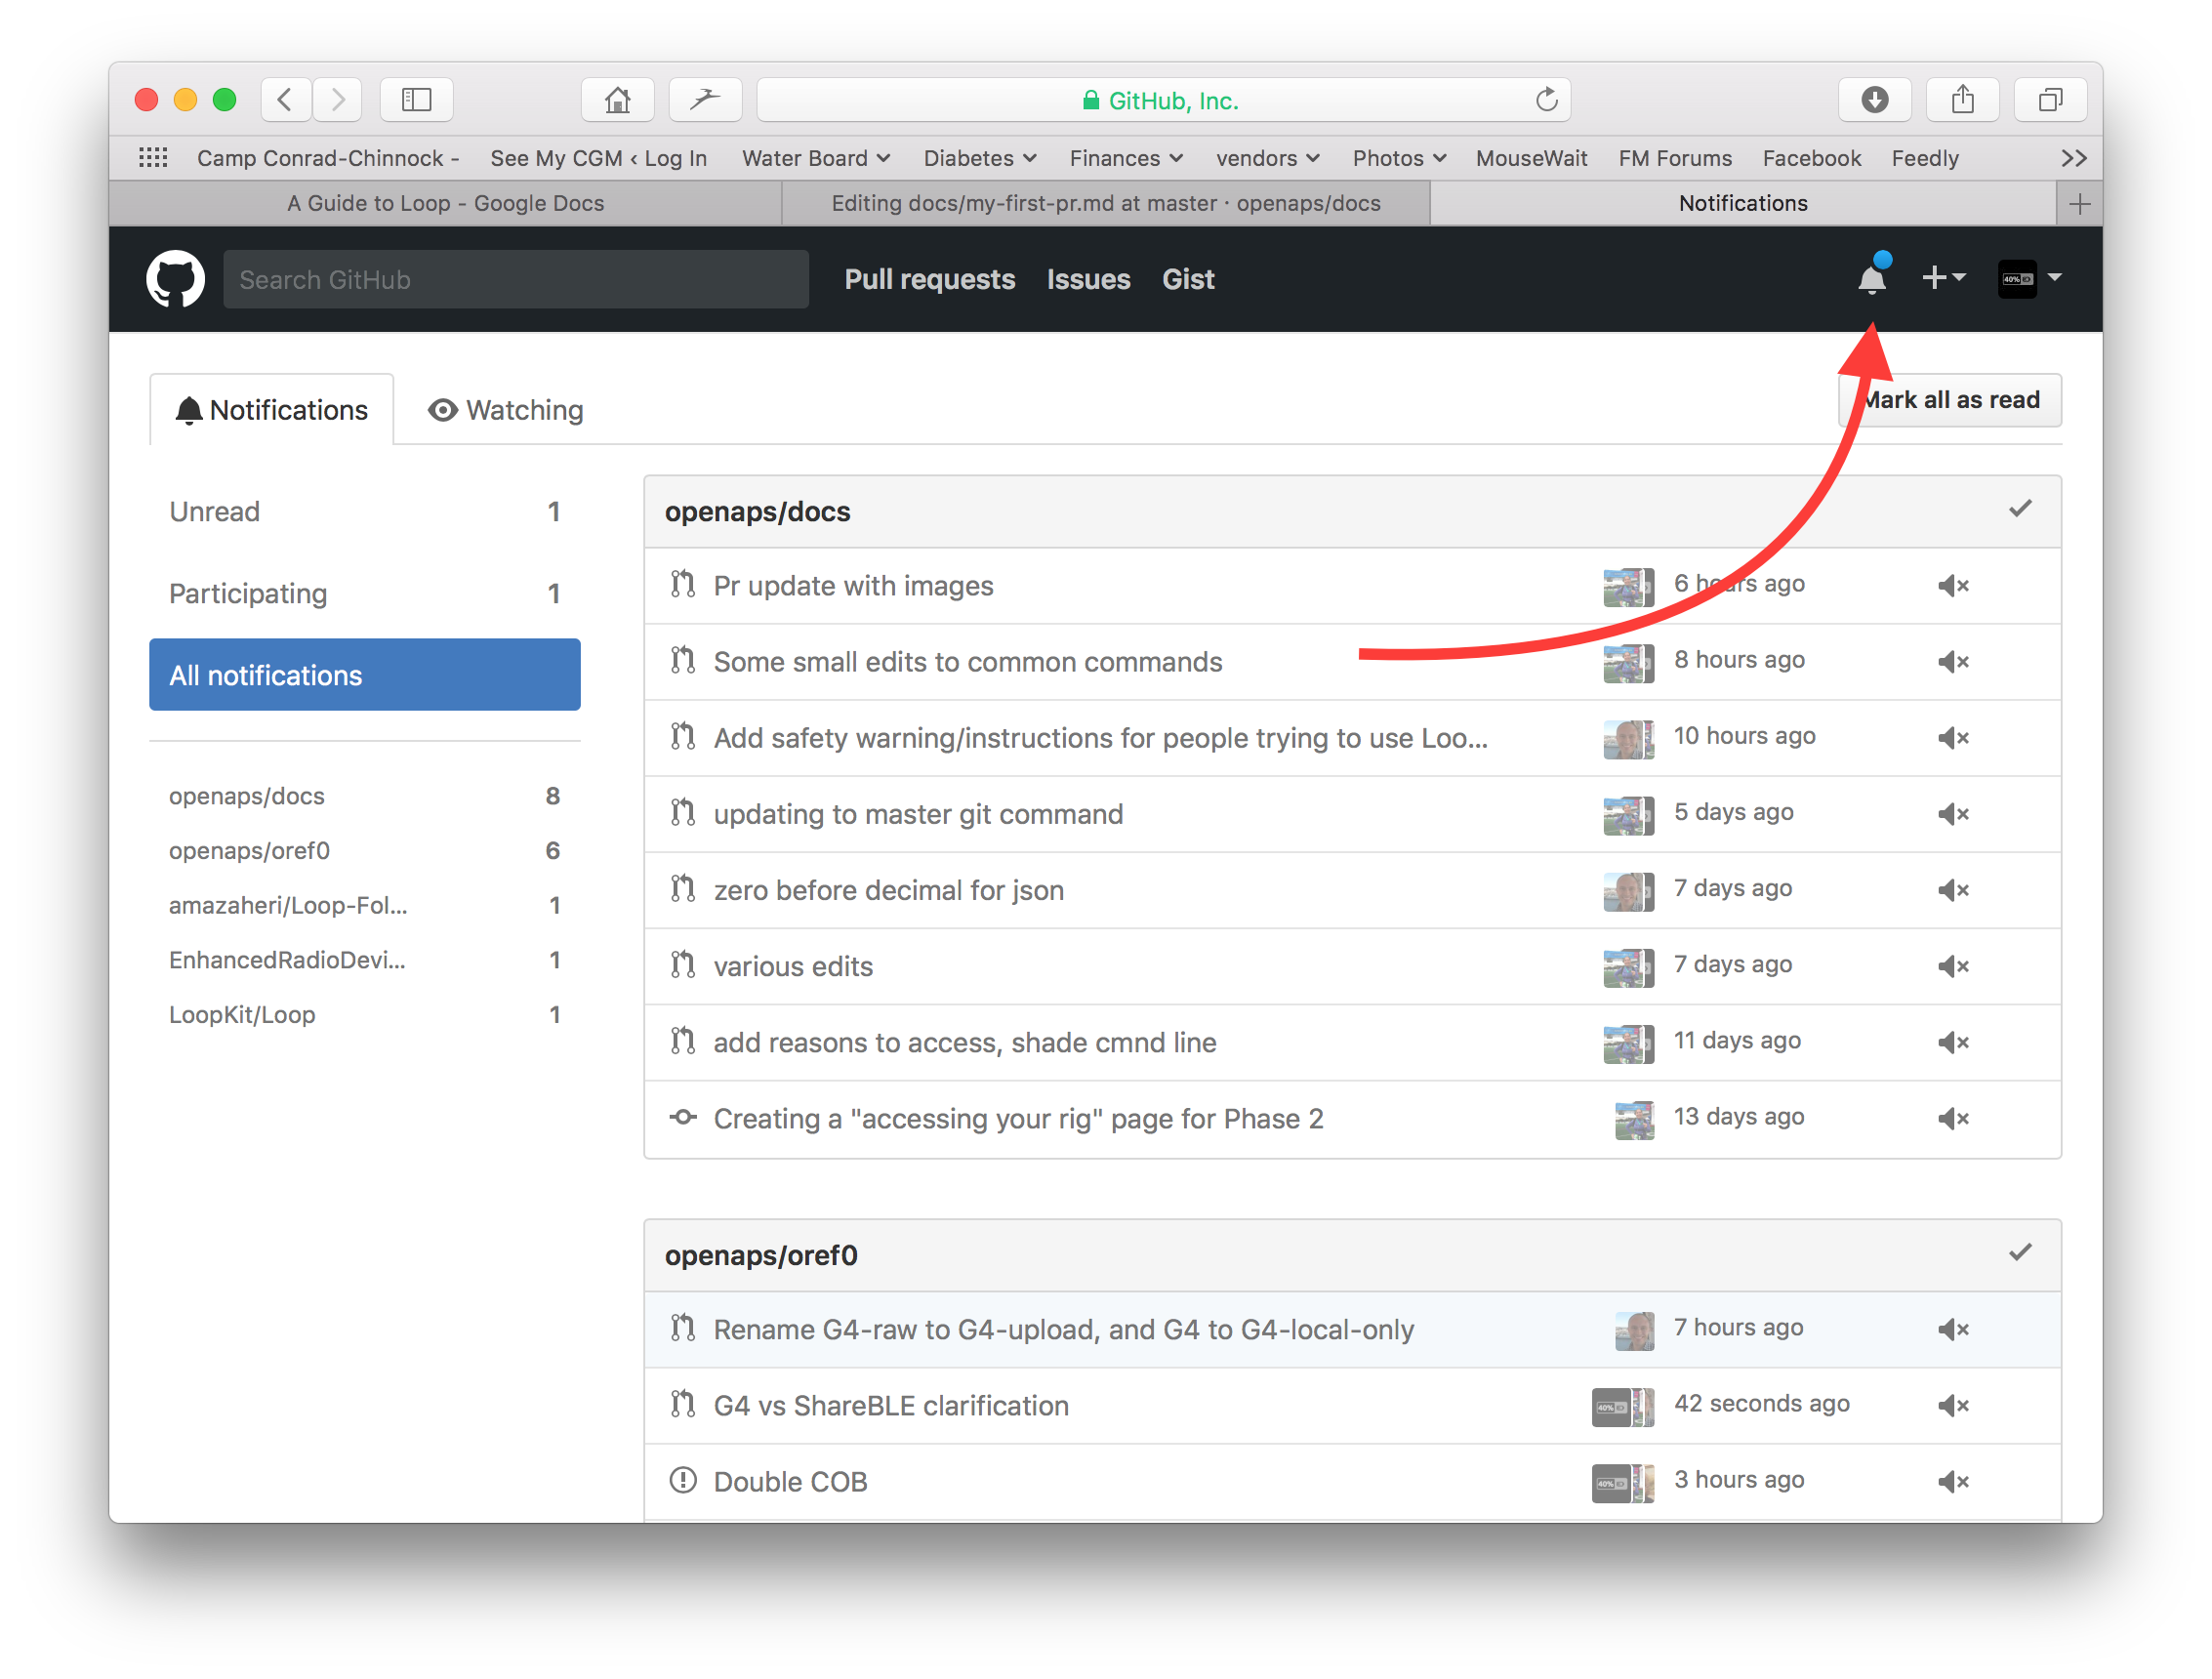
Das war der letzte Schritt zur Erstellung eines pull requests, PR. GitHub ordnet dem PR eine Nummer, die du nach dem Titel findest, zu und einen Hashtag. Rufe diese Seite wieder auf, um Feedback zu erhalten (oder du erhältst automatisch E-Mail Benachrichtigungen über Aktivitäten bei deinem PR, wenn du Github entsprechend konfiguriert hast). Die Änderung wird nun in einer Liste von PR’s aufgeführt, die das Team überprüfen wird; es wird gegebenenfalls Rückmeldungen dazu geben, bevor die Änderung in die Hauptdokumentation für AndroidAPS einfließt! Wenn du den Fortschritt des PR überprüfen willst, kannst du auf das Logo mit der Glocke in der oberen rechten Ecke deines GitHub-Kontos klicken, wo du dann alle deine PRs siehst.
PS: Your fork and branch will still be sitting on your own personal GitHub account. After you get a notification that your PR has been merged, you can delete your branch if you are done with it (Step 8’s notification area will provide a link to delete the branch once it has been closed or merged). For future edits, if you follow this procedure the edits will always start with an updated version of the AndroidAPSdocs repositories. If you choose to use another method to start a PR request (e.g., editing starting from your forked repo’s master branch as the starting point), you will need to ensure your repo is up-to-date by performing a „compare“ first and merging in any updates that have happened since you last updated your fork. Since people tend to forget to update their repos, we recommend using the PR process outlined above until you get familiar with performing „compares“.
Code-Syntax
We are using markdown for the docs pages. The files have got the suffix „.md“.
Bildgröße
If using images please use reasonable sizes. Screenshot images should be 250 pixels wide.
Text format
bold:
**text**italic:
*text*Headline 1:
# headlineHeadline 2:
## headlineHeadline 3:
### headline
ordered list
1. first
1. second
1. third
first
second
third
unordered list
- one element
- another element
- and another element
one element
another element
and another element
multi level list
You can insert lists in lists by indenting the nect level with 4 more spaces to the right than the one before.
1. first
1. second
1. third
  1. one element
  1. another element
  1. and another element
1. four
1. five
1. six
first
second
third 1. one element 1. another element 1. and another element
four
five
six
Images
Bilder:

Links
externe Links:
[Linktext](www.url.tld)Interne Links zu .md Seiten:
[Linktext](.../folder/file.md)internal link to headline:
[alt text](../folder/file.html#headline)
Internal links
If you want to set an internal link within the AndroidAPS documentation, please only use relative links. Only this will make the link work in the other languages (Czech, German…) as well.
[text](../Usage/Test.md)will set an internal hyperlink one directory up from where you are and then into the subdirectory /Usage. Ending of the target file must be .md or .rst (not .html)[text](./Usage/Test.md)will set an internal hyperlink from where you are into /Usage. Ending of the target file must be .mdTo set the link to an anchor (i.e. a headline) you let the file extension .md in place!
[text](../Usage/Test.md#anchor)
Notes
:::{admonition} Friendly Note
:class: note

This is a note.
:::
Friendly Note :class: note
This is a note. :::
Warnings
:::{admonition} Strong Warning
:class: warning

This is a warning.
:::
Strong Warning :class: warning
This is a warning. :::
Adding multiple images to the documentation
If you are planning to make a lot of edits, including adding images to help illustrate parts of the documentation (thank you!), you may want to take the following approach:
As you go and save screenshots, rename the screenshots to a descriptive name - but try not to use spaces as that confuses GitHub. Instead, use underscores. I.e. Example_batch_images_upload.png rather than „Example batch images upload.png“.
Please use reasonable sizes. Screenshot images should be 250 pixels wide.
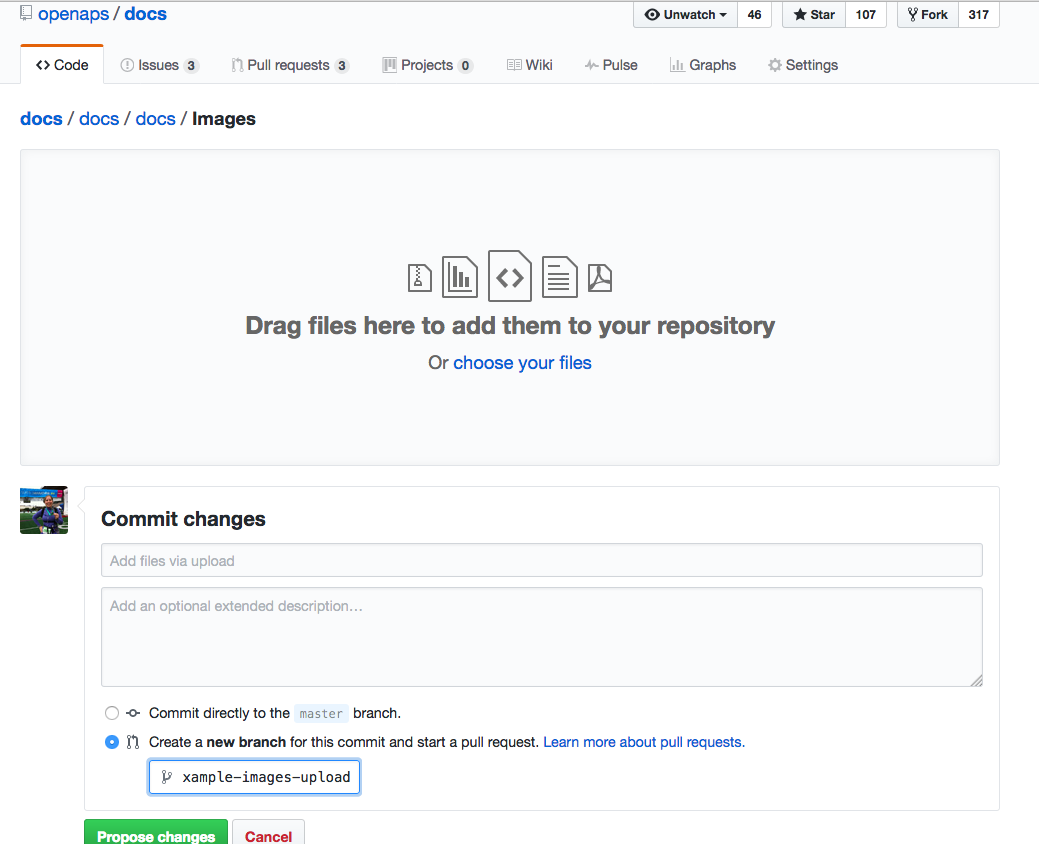
You can upload images in batches easily by:
Navigate to the images folder (https://github.com/openaps/AndroidAPSdocs/tree/master/docs/EN/images - but make sure you are in your fork/copy of the docs Images folder to be able to do this (replace „openaps“ in the URL with your GitHub username)).
Click in the upper right corner where it says „Upload files“
Drag and drop your images into the screen
Commit these to your branch
Now, you can look for the URL/relative path of each file and use that to refer to when adding images into a page in the documentation.
To see examples of how to add the images, you can look at the „raw“ code of a page to see an example from a page that already has the images embedded successfully. Make sure you use the correct code for the page type you are on (.md or .rst). The main thing is to have a plain text description, followed by a link with a relative path to the image, like this:
For .md pages:
(That code is exactly how the image below is embedded to be displayed.)For .rst pages:
.. image:: ../images/Example_batch_images_upload.png
:alt: Example of uploading images in batches
After adding images or making adjustments, you can submit a PR to the master branch of AndroidAPSdocs.