Browser build with AAPS Builder
Note
This is the recommended way to build AAPS from an Android phone. It also works from any computer browser. For the other ways to build from a computer or an iPhone, see the Browser build overview.
AAPS Builder builds the AAPS app for you in GitHub, the free code-hosting website. There is nothing to install on your phone, and no preparation file to open.
A setup page walks you through it. It takes about 10 minutes the first time:
Create your own private copy of AAPS Builder in your GitHub account: the setup page opens GitHub with everything filled in, you only confirm. The build workflow, the file that tells GitHub how to build AAPS, is already in it.
Create or upload your signing key (the keystore).
Give the key to your repository as a GitHub secret.
Build the app. One build takes 15 to 30 minutes.
Download and install the app on your phone.
You do not need to fork AndroidAPS: the AAPS source code is downloaded from the official AndroidAPS repository at every build. You also do not need Google Drive: you download the app directly from GitHub.
Where the code comes from
The build workflow is maintained by the AAPS developers in the nightscout/aaps-builder repository, and your repository is a copy of it. The workflow in your copy is short: it runs the build steps kept in that repository, so improvements reach you without any change to your repository. You can read both files. When it builds, the workflow downloads only the official AAPS source code and GitHub’s own build tools. Your keystore never leaves your browser and your private repository.
Before you start
You will need:
A GitHub account (free). If you don’t have one, create it on github.com first.
A web browser: Chrome on your phone, or any browser on a computer. Log in to github.com in that browser before you start.
GitHub app on your phone? You can keep it. Some buttons of the setup page then open the app instead of Chrome. Building works in the app, but the app cannot download the finished AAPS: step 5 shows how to switch to Chrome for the download.
Your existing keystore (
.jksfile), its password and its alias, if you built AAPS before and want to update it without reinstalling.
Warning
Your build repository must stay private. Everything a build produces is visible to anyone who can see the repository. The setup page creates a private repository for you. Never change it to public, and don’t fork AAPS Builder instead: a fork is always public.
A private repository gets 2000 free GitHub Actions minutes per month, which is enough for several builds.
Warning
New key or existing key: this decides whether you can update AAPS.
You already have AAPS on your phone, built with a keystore you still have: choose I already have a keystore on the setup page and upload it. Your next build will update AAPS in place. Built AAPS with the previous browser build (your own fork)? Your keystore is in your fork: get a copy of it first.
You build AAPS for the first time, or you lost your keystore or its password: choose Create a new key. An app signed with a new key cannot update an AAPS signed with another key. You must export your settings, copy the file off your phone, uninstall the old AAPS, install the new one, then import your settings: see Reinstalling AAPS with a new keystore.
Always keep using the same key afterwards. When you create a new key, download the backup the page offers and store it with its password and its alias (key0) somewhere safe, off your phone.
Coming from the previous browser build (fork)
Skip this section if you never built AAPS with the previous browser build method (your own copy, or fork, of AndroidAPS in GitHub, with the preparation file and Google Drive).
Your keystore is stored as secrets in your fork. GitHub never shows a secret again, so you can’t copy it to your new repository. Get a copy of your keystore first, then use it in step 2 with I already have a keystore.
Warning
Don’t choose Create a new key. AAPS built with a new key cannot update the AAPS on your phone.
Which case is yours?
You used Option 2 (you uploaded your own keystore from Android Studio), and you still have the
.jksfile, its passwords and its alias: nothing to do here. Use that file in step 2.You used Option 1 (the preparation file created your key), or you no longer have your keystore file: export it from your fork as below.
To export your keystore from your fork:
In your fork, open Settings → Secrets and variables → Actions and add a secret named
ZIP_PASSWORD. Choose a password with only English letters and numbers. It protects the file you are about to create.Open the Actions tab of your fork, tap CI Keystore Export, then Run workflow. More details: Export your keystore.
When the run has a green check, open your Google Drive: the file
keystore.zipis in the folder AAPS → KeyStore. If the run fails at the Google Drive step, your fork’s Google Drive access has expired: see Google refresh token expired.Download
keystore.zipand open it with yourZIP_PASSWORD: on a computer, or on your phone with a file manager app that can open password-protected ZIP files. It contains:keystore.jks: your keystore,keyStoreInfo.txt: yourKEYSTORE_PASSWORD,KEY_PASSWORDandALIAS(usuallykey0).
Copy
keystore.jksto your phone (or to Google Drive, so you can pick it from there).
In step 2 of the setup page:
Tap I already have a keystore.
In Keystore file, choose
keystore.jks.In Keystore password, type the
KEYSTORE_PASSWORDfromkeyStoreInfo.txt.In Key alias, pick or type the
ALIASfromkeyStoreInfo.txt.If
KEY_PASSWORDis different fromKEYSTORE_PASSWORD, untick Key password is the same as the keystore password and type theKEY_PASSWORD.
Keep keystore.zip and its ZIP_PASSWORD somewhere safe, off your phone: it is the backup of your key.
To also save the builds of AAPS Builder in Google Drive, do step 6: the setup page gets a new GDRIVE_OAUTH2 for you. You can keep your fork until AAPS built with AAPS Builder is installed on your phone.
Open the setup page
→ Open the AAPS Builder setup page
The setup page is part of this documentation, in your language. Keep this page open in another tab as well: the sections below explain each step of the setup page in more detail, with screenshots.
The setup page opens each GitHub page in a new Chrome tab. To come back to the setup page, tap the tab button next to Chrome’s address bar (the square with a number) and choose the AAPS Builder setup page.

The setup page runs entirely in your browser: your key and passwords are never sent anywhere, except into the GitHub secret you paste them into yourself. Only your GitHub username is sent to GitHub, to check that it exists. It remembers your GitHub username and repository name, so you can come back to it at any time to reopen your secrets page or your builds.

Step 1 – Create your private build repository
This step creates your own private copy of AAPS Builder in your GitHub account, with the build workflow already in it. Only you can see it and the apps it builds.
Make sure you are logged in to github.com in this browser.
In Your GitHub username, type your GitHub username, not your e-mail. The page checks it with GitHub: ✓ GitHub user found means it is right.
In Name of your repository, keep the suggestion
my-aaps. If you already created your repository with another name, type that exact name.Note
Already have an AAPS Builder repository (made with an earlier version of the setup page)? Don’t create a new one: type its exact name, skip Create my private repository, and update its workflow once as explained in Updating AAPS. Your secrets stay as they are. If you want a new repository anyway, choose a name you don’t have yet, for example
my-aaps-2, and use the same keystore in step 2.Don’t type the name of your fork of AndroidAPS: a fork is public, and it already builds with its own AAPS CI workflow.

Check the line Your repository: it shows
github.com/<your username>/my-aaps. The setup page remembers the name from your last visit: check it every time before you use its buttons.Tap Create my private repository.

GitHub opens Create a new repository in a new tab. Everything is already filled in: under Start with a template, the template
nightscout/aaps-builderwith Include all branches off, and under General, your account as Owner and the name you chose.
Don’t change anything.
Scroll down: under Configuration, Choose visibility is already Private. Tap the green Create repository button.

GitHub shows your new repository: it contains a folder
.github(with the build workflow) and a fileREADME.md. Go back to the setup page tab for step 2: tap the tab button next to Chrome’s address bar and choose the setup page.
Warning
Your new repository is empty, with no files? It was not created from the template, and it cannot build. Delete it (Settings → bottom of the page → Delete this repository), then tap Create my private repository on the setup page again.
Tip
GitHub says my-aaps already exists in this account? You already have your repository: close the GitHub tab and go on with the setup page. If your key is already in it, continue with step 4. See troubleshooting.
Step 2 – Your signing key
The app must be signed with your own key. Choose one of the two tabs. Read the new key or existing key warning first.

I already have a keystore
Tap I already have a keystore.
In Keystore file, choose your
.jksfile (or.keystore,.p12,.pfx). On a phone, copy the file to your phone or to Google Drive first.In Keystore password, type the keystore password.
In Key alias, pick your alias from the list, or type it if there is no list. For keystores made with Android Studio it is usually
key0.If your key password is different from the keystore password, untick Key password is the same as the keystore password and type the key password.
Tap Check and continue.
The page checks the password and the alias on your device. Keystore OK! Continue with step 3. means everything is right. If it says the password will be checked when you build, continue anyway: the build tells you if something is wrong.
Create a new key
Tap Create a new key.
Choose a password and type it twice. Rules: at least 8 characters, only the letters a–z and A–Z, the digits 0–9 and symbols such as
! ? #. No spaces, no accented letters, and not the|character.Tap Create key. It takes a few seconds before Key created appears.

Tap Download backup (aaps-keystore.jks). If Chrome asks Download file again?, an older backup with the same name is already on your phone: tap Download again. Chrome then saves the new key as
aaps-keystore (1).jks: that is the file that goes with this key, keep it and don’t mix it up with the older one.Keep these three together, somewhere safe off your phone (for example your own cloud storage):
the file
aaps-keystore.jks,your password,
the alias of the key:
key0.
You need all three if you ever build AAPS another way, for example with Android Studio. Keys created with an earlier version of the setup page have the alias
aaps.
Step 3 – Give the key to your repository
Step 3 unlocks when step 2 is done. Your key, its passwords and its alias are packed into one value, the KEYSTORE_SET secret.
Tap Open the secrets page.

GitHub opens the New secret page of your repository. On a phone, it is below the settings menu: scroll down.

Switch to the setup page tab and tap Copy name. Switch back to the GitHub tab and paste it into the small Name field. The name is
KEYSTORE_SET.Switch to the setup page tab and tap Copy secret. Switch back to the GitHub tab and paste it into the big Secret box (long press on a phone). The secret is a very long code, thousands of characters: the setup page shows its first characters next to the button. Don’t paste the word
KEYSTORE_SETthere.Tap Add secret.
KEYSTORE_SETnow shows under Repository secrets.

You only need to do this once.
Tip
GitHub shows Page not found (404)? First check that you are logged in to github.com in this browser: GitHub shows 404 for private repositories when you are not logged in. Otherwise the username or repository name in step 1 doesn’t match your repository. Check the name on github.com, correct it in step 1, and tap the button again.
Step 4 – Build the app
On the setup page, tap Open the build page. GitHub opens the Build AAPS page of your repository.

If the GitHub app opens instead: tap RUN WORKFLOW, check the version and the variant, and tap RUN WORKFLOW again. The app may still show Nothing to see here: pull the list down to refresh it and see your build. Then continue with step 4 below.
If GitHub asks, tap the green button to enable workflows.
The list of workflows shows two entries: use Build AAPS. Ignore AAPS Builder: it holds the build steps and has no Run workflow button.
Tap Run workflow. A small form opens:
Version: keep
latestto build the newest AAPS release, or type a release number such as4.0.0.Variant: keep
fullReleasefor normal use with a pump. The other variants are explained in build variants.aapsclient3Releasebuilds AAPSClient3, available from AAPS version 4.0 (see About AAPSClient, AAPSClient2 and AAPSClient3).Tap the green Run workflow button.

The build starts and shows In progress, with two parts: AAPS / Check, then AAPS / Build AAPS.

Wait 15 to 30 minutes. A green check means the build is done. A red cross means it failed: open the build to read the message, then see troubleshooting.

Tip
E-mail when a build is done: GitHub only e-mails you when a build fails. To also get an e-mail when it succeeds: on github.com, open your profile picture → Settings → Notifications → System → Actions, and untick Only notify for failed workflows.
If there is no Build AAPS or Run workflow button:
Open your repository and check that it has a folder
.githubwith the fileworkflows/build.yml. If the repository is empty, it was not created from the template: delete it (Settings → bottom of the page → Delete this repository) and do step 1 again with the button.The file is there, but GitHub shows This workflow does not exist: see troubleshooting.
Open the Actions tab. If it says workflows are disabled, tap the green button to enable them, then tap Build AAPS in the list.
Step 5 – Install the app on your phone
Warning
Before every update, export your settings in AAPS and copy the file off the phone (Google Drive, Dropbox…). Keep several older exports and the APK files there too, so you can always go back.
On your phone, open the setup page in Chrome. Log in to github.com if asked.
Tap Open my builds, then the newest build with a green check.
The GitHub app opened instead of Chrome?
The GitHub app cannot download builds. In the app, open the newest build, then tap Artifacts ↗, or tap the share icon at the top and choose Chrome (or Copy link, then paste the link in Chrome’s address bar). The build opens in Chrome: continue with the next step there.
To stop GitHub links opening in the app: Android Settings → Apps → GitHub → Open by default → turn off Open supported links.

Scroll down to the build summary and tap the Download AAPS link.

Tip
Scroll with your finger on the text, not on the diagram of the build steps: the diagram moves instead of the page.
You can also scroll further down to Artifacts and tap the download icon next to
aaps-….apk.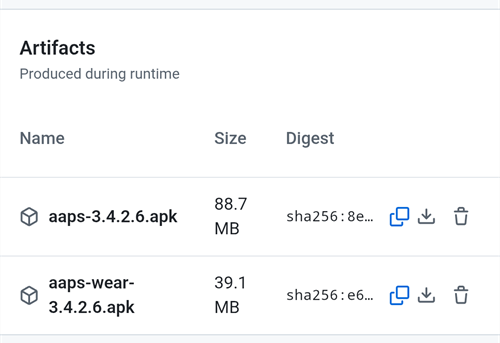
When the download is done, open Chrome’s menu ⋮ → Downloads, tap
aaps-….apkand choose Install. If asked, allow installing apps from this source.
aaps-wear-….apk is the smartwatch app. Skip it if you don’t use one.
The app is kept on the build page for 14 days. It is not shown under Code in your repository. Copy it somewhere safe, off your phone, together with your settings exports.
For more ways to install the app, see Transferring and Installing AAPS.
Note
From September 2026, Google’s Android developer verification may block installing the APK by tapping the file, depending on your country. Free workarounds are explained on that page.
Step 6 (optional) – Also save the app in Google Drive
You can also have each build saved to your Google Drive, in the folder AAPS/<version>. This is optional: the app is always available on the build page.
It needs one more secret, GDRIVE_OAUTH2. Step 6 of the setup page gets it from Google for you, on a phone or a computer. AAPS can then only see and change the files it creates in your Google Drive, nothing else.
On the setup page, tap Connect Google Drive. Google opens in a new tab.
Choose your Google account and allow access. If Google says the app is not verified, tap Advanced, then Go to ….


The new tab then shows an error such as This site can’t be reached or 127.0.0.1 refused to connect. This is expected: Google’s answer is in the address of that tab. Tap the address bar, then the copy icon next to the address (on a computer: select the whole address and copy it). It starts with
http://127.0.0.1:47913/.

Go back to the setup page tab within a few minutes: Google’s answer is only valid for a short time, and only once. Paste the address into Paste the copied address here and tap Get GDRIVE_OAUTH2. The page shows GDRIVE_OAUTH2 is ready.


Tap Open the secrets page. Tap Copy name, then paste it into the small Name field (the name is
GDRIVE_OAUTH2). Tap Copy secret, paste it into the big Secret box and tap Add secret.
From the next build, the APKs are also saved in Google Drive.
Already have a GDRIVE_OAUTH2 value from the preparation file of the other browser build methods? It works too: add it as the GDRIVE_OAUTH2 secret.
Google stops the access if you don’t build for 6 months, or if you change your Google password. The build then tells you so: redo these steps. See Google refresh token expired.
Updating AAPS
Your repository never builds anything by itself: you decide when to build, which version and which variant. When a new AAPS version is released:
Back up your settings as explained in step 5.
Build the new version as in step 4. Keep
latest, or type the release number.Download and install it as in step 5.
Updates of the build steps reach you by themselves: at every build, your repository runs the build steps released by the AAPS developers in nightscout/aaps-builder. Nothing changes in your repository, and there is no automatic build.
Updates of your workflow file are rare: only when the Run workflow form changes, for example for a new build variant, or once if your repository was made with an earlier version of the setup page (an empty repository with a short workflow file) or from the old template. The Docs updates & changes page says so. Your KEYSTORE_SET secret stays as it is. On the setup page, open Updating your copy at the end of step 1:
Tap Open the newest workflow. On a computer, click the copy icon (“Copy raw file”) at the top right of the file. On a phone, open the plain-text version instead, press and hold the text, then Select all and Copy.
Tap Open my workflow file, then the ⋯ menu at the top right of the file and Edit file… In place (on a computer, click the pencil).
Replace the whole text with the copied workflow (long press on a phone: Select all, then Paste).
Tap Commit changes…, then Commit changes.
The first line of the file shows its version.
Troubleshooting
Something went wrong? See AAPS Builder troubleshooting.