Objectives
AAPS has a series of Objectives that need to be completed to walk you through the features and settings of safe looping. They ensure you have configured everything detailed in the sections above correctly, and that you understand what your system is doing and why so you can trust it.
If you are upgrading phones then you can export your settings to keep your progress through the objectives. Not only will your progress through the objectives be saved, but also your safety settings such as max bolus etc. If you do not export and import your settings then you will need to start the objectives from the beginning again. It is a good idea to backup your settings frequently just in case.
If you want to go back in objectives see explanation below.
Objective 1: Setting up visualization and monitoring, analysing basals and ratios
Select the right blood glucose source for your setup. See BG Source for more information.
Select the right Pump in ConfigBuilder (select Virtual Pump if you are using a pump model with no AAPS driver for looping) to ensure your pump status can communicate with AAPS.
If using DanaR pump then ensure you have followed DanaR Insulin Pump instructions to ensure the link between pump and AAPS.
Follow instructions in Nightscout page to ensure Nightscout can receive and display this data.
Note that URL in NSClient must be WITHOUT /api/v1/ at the end - see NSClient settings in Preferences.
You may need to wait for the next blood glucose reading to arrive before AAPS will recognise it.
Objective 2: Learn how to control AAPS
Perform several actions in AAPS as described in this objective.
Click on the orange text “Not completed yet” to access the to-dos.
Links will be provided to guide you in case you are not familiar with a specific action yet.

Objective 3: Prove your knowledge
Pass a multiple-choice exam testing your AAPS knowledge.
Click on the orange text “Not completed yet” to access the page with the question and answering options.
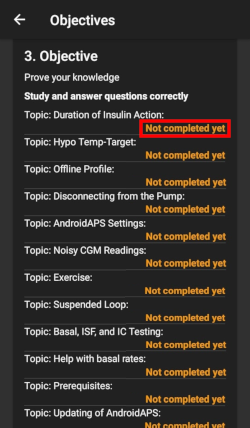
Links will be provided to guide you in case you are unsure about the correct answers yet.
The questions for objective 3 have been completely rewritten by native speakers as of AAPS 2.8. The new ones cover the same basic topics plus a few new ones.
These new questions will lead to some not answered questions even though you have successfully completed objective 3 in previous versions.
Unanswered questions will affect you only if you start a new objective. In other words: If you have already completed all objectives you can wait and answer the new questions later without loosing AAPS functions.
Objective 4: Starting on an open loop
Select Open Loop either from Preferences, or by pressing and holding the Loop button in top left of the home screen.
Work through the Preferences to set up for you.
Manually enact at least 20 of the temporary basal rate suggestions over a period of 7 days; input them to your pump and confirm in AAPS that you have accepted them. Ensure this data shows in AAPS and Nightscout.
Enable temp targets if necessary. Use hypo temp targets to prevent that the system will correct too strong because of a raising blood glucose after a hypo.
Reduce number of notifications
To reduce the Number of decisions to be made while in Open Loop set wide target range like 90 - 150 mg/dl or 5,0 - 8,5 mmol/l.
You might even want to wider upper limit (or disable Open Loop) at night.
In Preferences you can set a minimum percentage for suggestion of basal rate change.
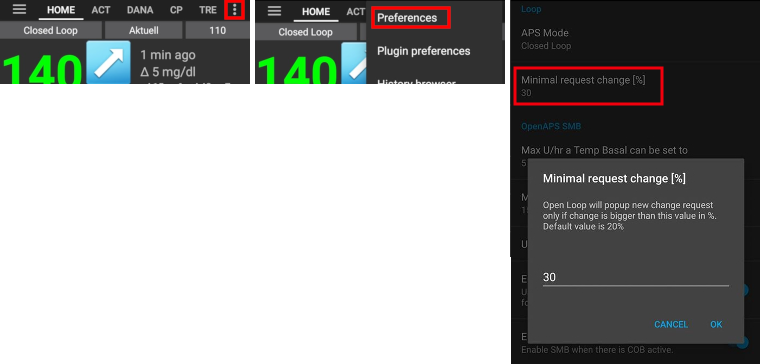
Also, you do not need to act every 5 minutes on all suggestions…
Objective 5: Understanding your open loop, including its temp basal recommendations
Start to understand the thinking behind the temp basal recommendations by looking at the determine basal logic and both the forecast line in AAPS homescreen/Nightscout and the summary of outputs from the calculations in your OpenAPS tab.
You will want to set your target higher than usual until you are confident in the calculations and settings. System allows
a low target to be a minimum of 4 mmol (72 mg/dl) or maximum of 10 mmol (180 mg/dl)
a high target to be a minimum of 5 mmol (90 mg/dl) and maximum of 15 mmol (225 mg/dl)
a temporary target as a single value can be anywhere in the range of 4 mmol to 15 mmol (72 mg/dl to 225 mg/dl)
The target is the value that calculations are based on, and not the same as where you aim to keep your blood glucose values within. If your target is very wide (say, 3 or more mmol [50 mg/dl or more] wide), you will often find little AAPS action. This is because blood glucose is eventually predicted to be somewhere in that wide range and therefore not many fluctuating temporary basal rates are suggested.
You may want to experiment with adjusting your targets to be a closer together range (say, 1 or less mmol [20 mg/dl or less] wide) and observe how the behavior of your system changes as a result.
You can view a wider range (green lines) on the graph for the values you aim to keep your blood glucose within by entering different values in Preferences > Range for Visualisation.

Stop here if you are open looping with a virtual pump - do not click Verify at the end of this objective.

Objective 6: Starting to close the loop with Low Glucose Suspend

Closed loop will not correct high BG values in objective 6 as it is limited to low glucose suspend. High BG values have to be corrected manually by you!
Prerequisite: You need a good profile (basal, ISF, IC) already working in AAPS to start with Loop in Low Glucose Suspend mode. Otherwise you can run in a hypo which you have to manually correct. This will help you a lot to avoid having to treat a low glucose over a period of 5 days. If you are still having frequent or severe low glucose episodes then consider refining your DIA, basal, ISF and carb ratios and do NOT start objective 6 at this time.
You don’t have to change your settings now. During objective 6, the maxIOB setting is internally set to zero automatically. This override will be reversed when moving to objective 7.
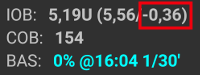
The system will override your maxIOB settings to zero, which means if blood glucose is dropping it can reduce basal for you. If blood glucose is rising then it will only increase basal if the basal IOB is negative from a previous Low Glucose Suspend. Otherwise basal rates will remain the same as your selected profile. That means that you have to manually handle high values with insulin corrections.
If your basal IOB is negative (see screenshot below) a TBR > 100% can be issued also in objective 6.
Set your target range slightly higher than you usually aim for, just to be safe and have a bit more scurity buffer.
Enable ‘Low Glucose Suspend’ mode either by by pressing and holding the Loop icon at the top right corner of the home screen and selecting the Loop - LGS mode icon.
Watch how temporary basals are active by viewing the blue basal text on the homescreen or the blue basal render on the homescreen graph.
You may temporarily experience spikes following treated hypos without the ability to increase basal on the rebound.
Objective 7: Tuning the closed loop, raising maxIOB above 0 and gradually lowering BG targets
Select ‘Closed Loop’ either from Preferences or by pressing and holding the Loop icon at the top right corner of the home screen, over a period of 1 day.
Raise your ‘Maximum total IOB OpenAPS can’t go over’ (in OpenAPS called ‘max-iob’) above 0. The default recommendation is “average mealbolus + 3x max daily basal” (for the SMB algorithm) or “3x max daily basal” (for the older AMA algorithm) but you should slowly work up to this until you know your settings work for you (max daily basal = the maximum hourly value in any time segment of the day).
This recommendation should be seen as a starting point. If you set to the 3x and you are seeing moves that push you too hard and fast then lower that number. If you are very resistant, raise it very little at a time.

Once confident on how much IOB suits your looping patterns, then reduce your targets to your desired level.
Objective 8: Adjust basals and ratios if needed, and then enable autosens
You can use autotune as a one off to check your basals remain accurate or do a traditional basal test.
Enable autosens over a period of 7 days and watch the white line on the homescreen graph show how your sensitivity to insulin may be rising or falling as a result of exercise or hormones etc. and keep an eye in the OpenAPS report tab how AAPS is adjusting the basals and/or targets accordingly.
Don’t forget to record your looping in this form logging AAPS as your type of DIY loop software, if you have not already done so.
Objective 9: Enabling additional oref1 features for daytime use, such as super micro bolus (SMB)
You must read the SMB chapter in this wiki and chapter oref1 in openAPSdocs to understand how SMB works, especially what’s the idea behind zero-temping.
Then you ought to rise maxIOB to get SMBs working fine. maxIOB now includes all IOB, not just added basal. That is, if given a bolus of 8 U for a meal and maxIOB is 7 U, no SMBs will be delivered until IOB drops below 7 U. A good start is maxIOB = average mealbolus + 3x max daily basal (max daily basal = the maximum hourly value in any time segment of the day - see objective 7 for an illustration)
min_5m_carbimpact default in absorption settings has changed from 3 to 8 going from AMA to SMB. If you are upgrading from AMA to SMB, you have to change it manually.
Objective 10: Automation
You have to start objective 10 to be able to use Automation.
Make sure you have completed all objectives including exam Objectives-objective-3-prove-your-knowledge.
Completing previous objectives will not effect other objectives you have already finished. You will keep all finished objectives!
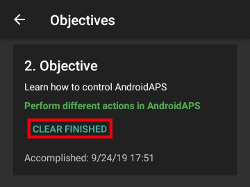
Go back in objectives
If you want to go back in objectives for whatever reason you can do so by clicking at “clear finished”.
Objectives in Android APS before version 3.0
One objective was removed when Android APS 3.0 was released. Users of Android APS version 2.8.2.1 who are on older Android software (i.e. earlier than version 9) will be using an older set of objectives which can be found here.