Configuración de xDrip+
If not already set up, then download xDrip+.
Desactiva la optimización de la batería y permite la actividad en segundo plano para la aplicación xDrip+.
You can safely download the latest APK (stable) unless you need recent features or are using sensors that are being actively integrated (like G7), in which case you should use the latest Nightly Snapshot.
Configuración básica para todos los medidores contínuos (CGM), sistemas CGM puros o sistemas flash (FGM)
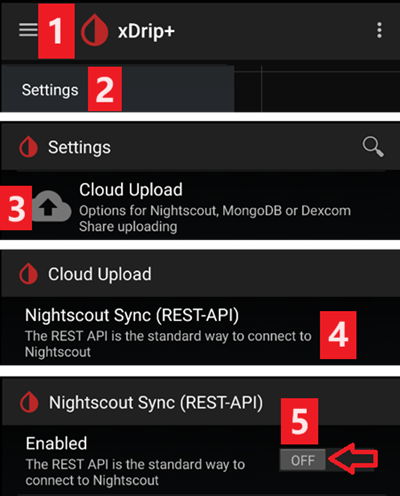
Disable Nightscout upload
Starting with AAPS 3.2, you shouldn’t let any other app upload data (blood glucose and treatments) to Nightscout.
→ Hamburger Menu (1) → Settings (2) → Cloud Upload (3) -> Nightscout Sync (REST-API)(4) → Switch OFF Enabled (5)
Disable automatic calibration and treatments
If you use an older version of AAPS (before 3.2), make sure to deactivate Automatic Calibration (7) If the checkbox for Automatic Calibration is checked, activate Download treatments (6) once, then remove the checkbox for Automatic Calibration and deactivate Download treatments again.
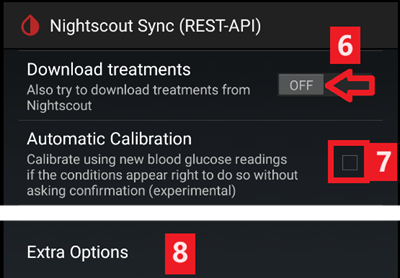
Tap Extra Options(8)
Deactivate Upload treatments(9) and make sure you will NOT use Back-fill data (11).
Option Alert on failures should also be deactivated (10). Otherwise you will get an alarm every 5 minutes in case Wi-Fi/mobile network issues or if the server is not available.

Inter-app Settings (Broadcast)
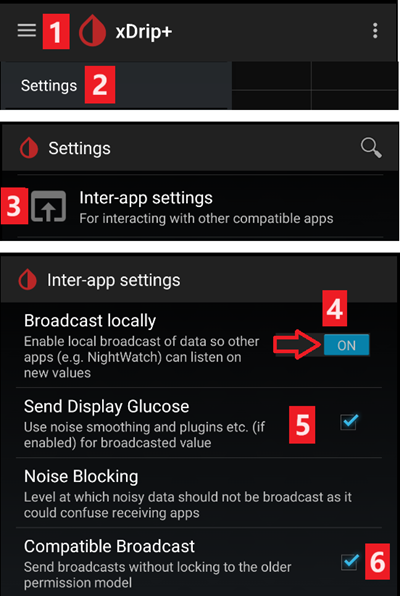
If you are going to use AAPS and the data should be forwarded to i.e. AAPS you have to activate broadcasting in xDrip+ in Inter-App settings.
→ Hamburger Menu (1) → Settings (2) → Inter-app settings (3) → Broadcast locally ON (4)
In order for the values to be identical in AAPS with respect to xDrip+, you should activate Send the displayed glucose value (5).
Enable Compatible Broadcast (6).
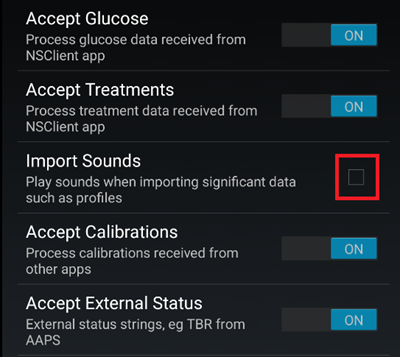
If you have also activated Accept treatments in xDrip+ and Enable broadcasts to xDrip+ in AAPS xDrip+ plugin, then xDrip+ will receive insulin, carbs and basal rate information from AAPS.
If you enable Accept Calibrations, xDrip+ will use the calibrations from AAPS. Be careful when you use this feature with Dexcom sensors: read this first.
Remember to disable Import Sounds to avoid xDrip+ making a ringtone every time AAPS sends a basal/profile change.
Identificar receptor
If you discover problems with local broadcast (AAPS not receiving BG values from xDrip+) go to → Hamburger Menu (1) Settings (2) → Inter-app settings (3) → Identify receiver (7) and enter
info.nightscout.androidapsfor AAPS build (if you are using PumpControl build, please enterinfo.nightscout.aapspumpcontrolinstead!!).Importante: la corrección automática a veces tiende a cambiar la «i» de «info» por una mayúscula. You must use only lowercase letters when typing
info.nightscout.androidaps(orinfo.nightscout.aapspumpcontrolfor PumpControl). Capital I would prevent the App from receiving BG values from xDrip+.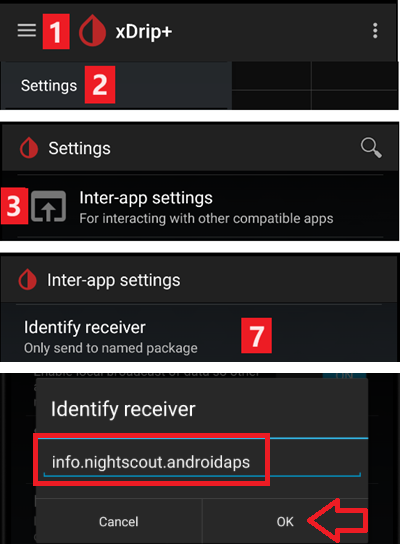
Use AAPS to calibrate in xDrip+
If you want to be able to use AAPS to calibrate then in xDrip+ go to Settings → Interapp Compatibility → Accept Calibrations and select ON.
You may also want to review the options in Settings → Less Common Settings → Advanced Calibration Settings.
Dexcom G6
El transmisor Dexcom G6 puede conectarse simultáneamente al receptor Dexcom (o alternativamente a la bomba t:slim) y a una aplicación en tu teléfono.
Para usar xDrip+ como receptor, desinstala primero la aplicación Dexcom. No se puede conectar al mismo tiempo la aplicación xDrip+ y Dexcom con el transmisor.
If you need Clarity and want to profit from xDrip+ features, use the Build Your Own Dexcom App with local broadcast to xDrip+, or use xDrip+ as a Companion app receiving notifications from the official Dexcom app.
La versión de xDrip+ a utilizar depende del número de serie de los transmisores G6.
All G6 transmitters manufactured after fall/end 2018 are called «Firefly». They do not allow sensor restart without removing the transmitter, they do not send raw data. It is recommended to use the latest Nightly Snapshot.
Old rebatteried transmitters and modified trasmitters allow sensor life extension and restarts, they also send raw data. You can use the latest APK (stable).
Ajustes específicos de Dexcom
Follow these instructions to setup xDrip+.
No se recomiendan reinicios preventivos
Only rebatteried or modified Dexcom transmitters. Preemptive restarts do not work with standard transmitters and will stop the sensor completely: you need to remove the transmitter to restart the sensor.
The automatic extension of Dexcom sensors (preemptive restarts) is not recommended as this might lead to “jumps” in BG values on day 9 after restart.
To use it safely, there are a few points to be aware of:
Si estás usando los datos nativos con el código de calibración en xDrip+ o Spike, la cosa más segura es no permitir reinicios preventivos del sensor.
Si debe usar reinicio preventivo, a continuación, asegúrese de insertar una hora del día donde puede observar el cambio y calibrar si es necesario.
Si está reiniciando sensores, o bien haga esto sin la calibración de fábrica para obtener resultados más seguros en los días 11 y 12, o asegúrate de que estás listo para calibrar y vigilar la variación.
La preabsorción del G6 con calibración de fábrica es probable que dé variaciones en los resultados. Si haces preconfiguración, entonces para obtener los mejores resultados, probablemente necesitarás calibrar el sensor.
Si no estás observando los cambios que pueden estar teniendo lugar, puede ser mejor volver al modo no calibrado en fábrica y usar el sistema como un G5.
To learn more about the details and reasons for these recommendations read the complete article published by Tim Street at www.diabettech.com.
Conectar el transmisor G6 por primera vez
For second and following transmitters see Extend transmitter life below.
Follow these instructions.
Estado de la batería de Transmisor
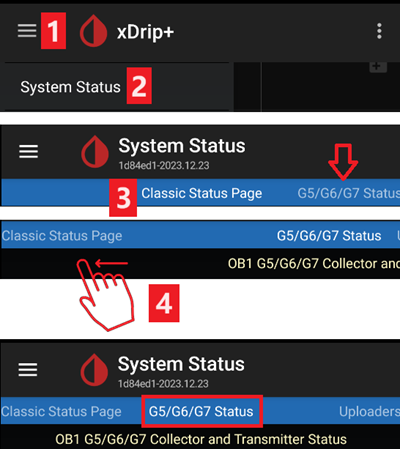
Battery status can be controlled in system status
→ Hamburger Menu (1) → System Status (2) → If you are on the Classic Status Page (3) swipe the screen (4) to reach → G5/G6/G7 Status screen.
See here for more information.
Extender vida del transmisor
Lifetime cannot be extended for Firefly transmitters: only rebatteried or modified transmitters.
Follow these instructions for non-Firefly transmitters.
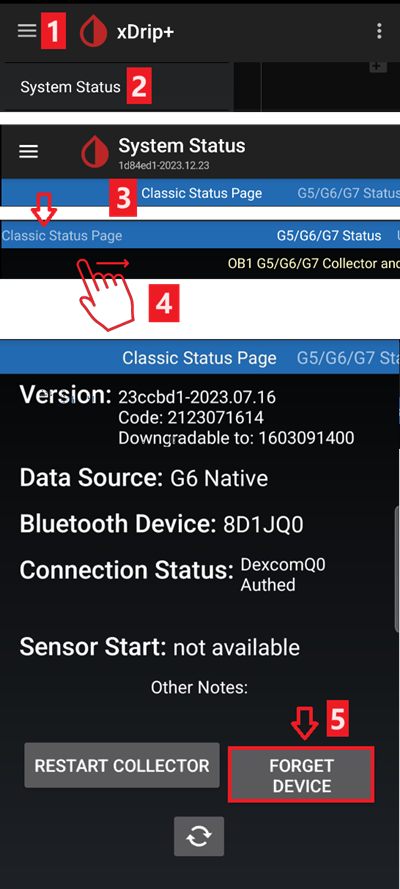
Sustituir transmisor
Desactive el receptor Dexcom original (si se utiliza).
Stop sensor (only if replacing sensor).
Forget device in xDrip+ system status AND in smartphone’s BT settings (Will be shown as Dexcom?? mientras ?? are the last two digits of the transmitter serial no.)
→ Hamburger Menu (1) → System Status (2) → If you are on the Classic Status Page (3) swipe the screen (4) to reach → G5/G6/G7 Status screen → Forget Device (5).
Remove transmitter (and sensor if replacing sensor). To remove transmitter without removing sensor see this, or this video https://youtu.be/AAhBVsc6NZo.
Coloque el transmisor antiguo lejos para evitar la reconexión. A microwave is a perfect Faraday shield for this - but unplug power cord to be 100% sure no one is turning the microwave on.
Follow these instructions.
No encienda el receptor original de Dexcom (si lo utiliza) de nuevo antes de xDrip+ muestre las primeras lecturas.
Nuevo Sensor
Desactive el receptor Dexcom original (si se utiliza).
Stop sensor following these instructions.
Insert and then start a new sensor following these instructions.
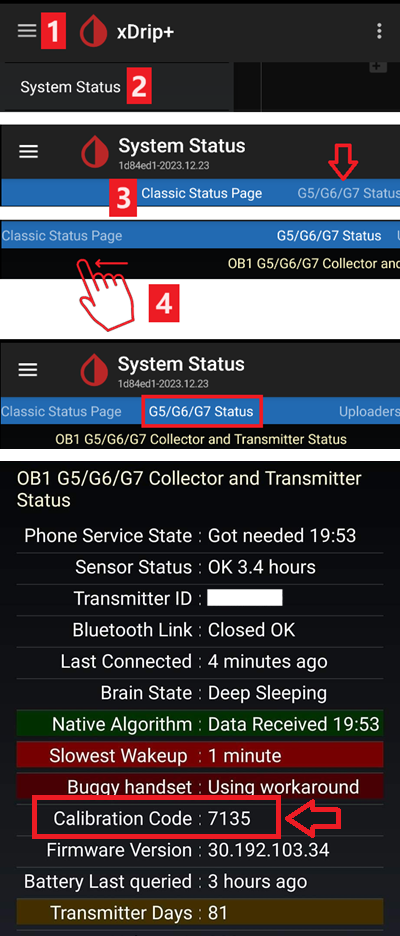
Recuperar código de sensor
→ Hamburger Menu (1) → System Status (2) → If you are on the Classic Status Page (3) swipe the screen (4) to reach → G5/G6/G7 Status screen → Calibration Code.
Solución de problemas de Dexcom G5/G6 y xDrip+
Problema al conectar el transmisor
Follow these instructions.
Problema al iniciar un nuevo sensor
Follow these instructions.
Libre 1
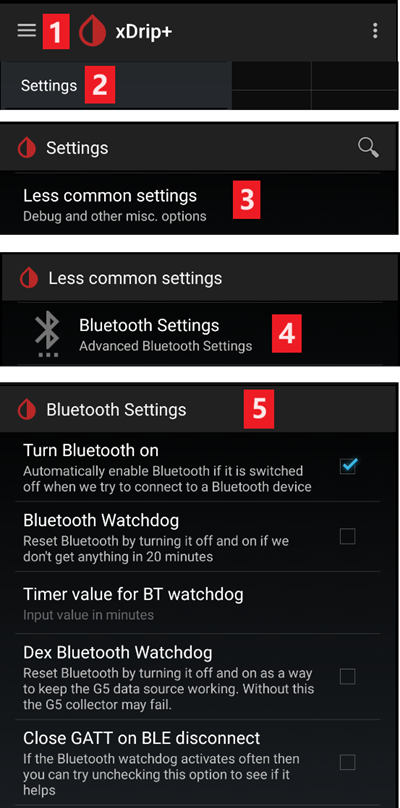
Setup your NFC to Bluetooth bridge in xDrip+
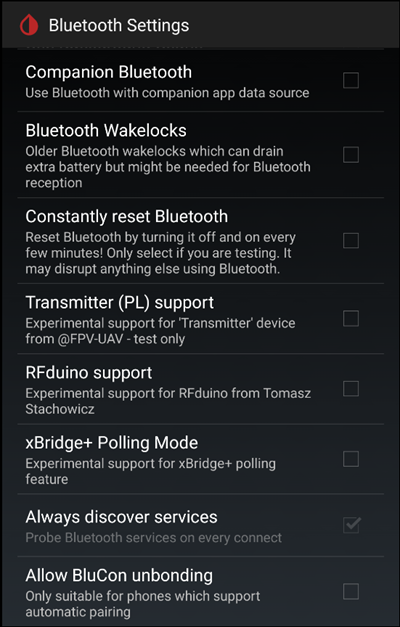
→ Hamburger Menu (1) → Settings (2) → Less common settings (3) → Bluetooth Settings (4)
In Bluetooth Settings set the checkboxes exactly as in the screenshots below (5)
Disable watchdogs as they will reset the phone Bluetooth and interrupt your pump connection.
You can try to enable the following settings (7)
Usar escaneo
Trust Auto-Connect
Use Background Scans
If you easily lose connection to the bridge or have difficulties recovering connection, DISABLE THEM (8).
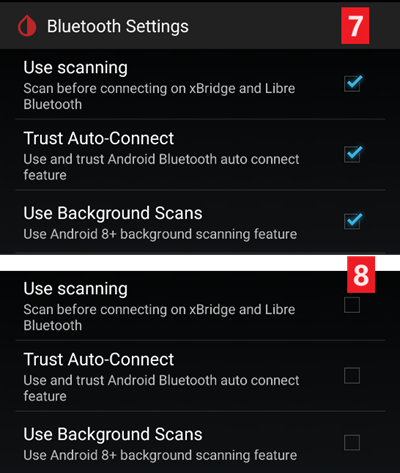
Leave all other options disabled unless you know why you want to enable them.
Libre smart reader battery level
Battery level of bridges such as MiaoMiao and Bubble can be displayed in AAPS (not Blucon).
Details can be found on screenshots page.
Connect Libre Transmitter & start sensor
If your sensor requires it (Libre 2 EU and Libre 1 US) install the latest out of process algorithm.
Your sensor must be already started using the vendor app or the reader (xDrip+ cannot start or stop Libre sensors).
Set the data source to Libre Bluetooth.
→ Hamburger Menu (1) → Settings (2) → Select Libre Bluetooth in Hardware Data source (3)

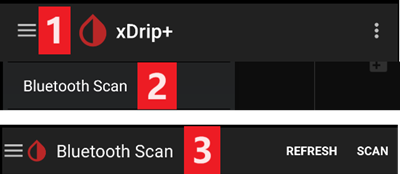
Scan Bluetooth and connect the bridge.
→ Hamburger Menu (1) → Scan Bluetooth (2) → Scan (3)
If xDrip+ can’t find the bridge, make sure it’s not connected to the vendor app. Put it in charge and reset it.
Start the sensor in xDrip+.
→ Hamburger Menu (1) → Start sensor (2) → Start sensor (3) → Set the exact time you started it with the reader or the vendor app. If you didn’t start it today, answer «Not Today» (4).

Libre 2 patched app
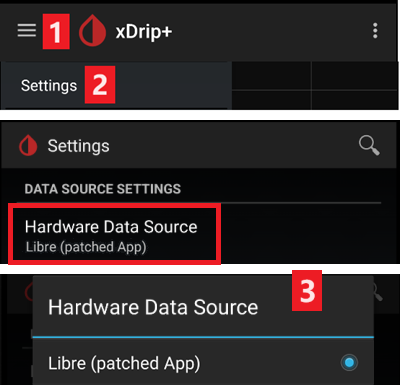
Set the data source to Libre patched app.
→ Hamburger Menu (1) → Settings (2) → Select Libre (patched App) in Hardware Data source (3)
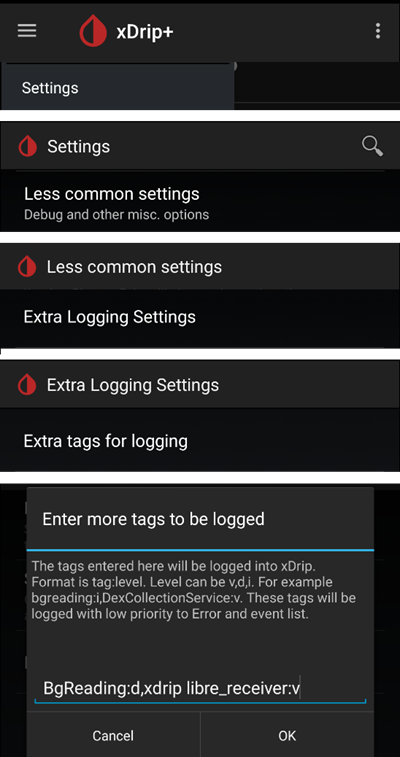
You can add
BgReading:d,xdrip libre_receiver:vunder Less Common Settings->Extra Logging Settings->Extra tags for logging. Esto registrará mensajes de error adicionales ante problemas.