Freestyle Libre 3
Freestyle Libre 3 (FSL3) requires a unique setup to receive BG values in to AAPS. There are two possible ways of getting Freestyle Libre 3 (FSL3) values to AAPS.

Version 3.2.0.1 of AndroidAPS does not support 1-minute values. Acceleration and Smoothing does not work with 1-minute values.
The below methods for achieving this are using the separate app Juggluco. It uses Juggluco to receive raw, 1-minute interval data from the sensor which is then passed to xDrip+ or AAPS. New sensors can be started either with the Libre 3 App or directly in Juggluco. The guide below indicates the process for starting a sensor with the Juggluco app. If the sensor has been started with a Libreview account logged in, it is also possible to switch between Juggluco and the Libre 3 app as receiver.
Juggluco can also pass data to LibreView for sharing with health care providers when the sensor is started with the Libre 3 app.
Within xDrip+ the sensor can be calibrated in the range of -40 mg/dl to +20 mg/dl (-2.2 mmol/l to +1.1 mmol/l) to compensate for differences between a manual meter reading and the sensor readings.
Method 1: 1-minute-readings
Version 3.2.0.1 of AndroidAPS does not support 1-minute values. Acceleration and Smoothing does not work with 1-minute values.
Method 2: 5-minute-readings
This method uses Juggluco to receive raw, 1-minute interval data from the sensor which is then passed to xDrip+ to be smoothed into 5-minute interval data to be passed to AAPS.
Step 1: Setup Juggluco
Download and install the Juggluco app from here. Follow the instructions here
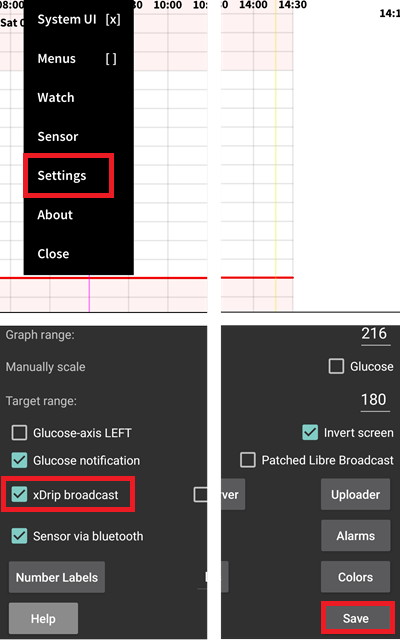
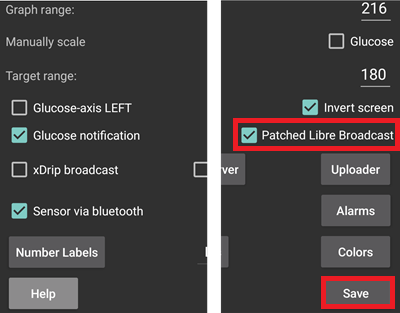
Make sure you send the glucose values to Xdrip+: In Juggluco’s settings you can configure Juggluco to send its glucose value to other apps. Juggluco can send three types of such broadcasts: The Patched Libre broadcast was originally used by the patched Librelink app and can be used to send glucose values to xDrip+
Step 2: Setup xDrip
The blood glucose values are received by the xDrip+ app on the smartphone.
If not already set up then download xDrip+ and follow the instructions on xDrip+ settings page.
In xDrip+ select «Libre2 (patched app)» as data source.
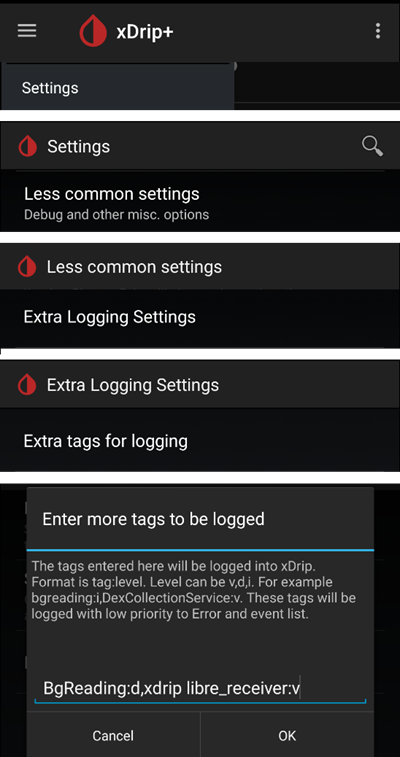
If necessary, enter «BgReading:d,xdrip libre_receiver:v» under Less Common Settings → Extra Logging Settings → Extra tags for logging. This will log additional error messages for troubleshooting.
Technically, the current blood sugar value is transmitted to xDrip+ every minute. A weighted average filter calculates a smoothed value over the last 25 minutes by default. You can change the period in the NFC Scan features menu.
→ Hamburger menu → Settings → NFC Scan features → Smooth libre 3 data when using xxx method

Step 3: Start sensor within xDrip
In xDrip+ start the sensor with «Start Sensor» and «not today». It is not necessary to hold the mobile phone onto the sensor. In fact «Start Sensor» will not physically start any Libre 3 sensor or interact with them in any case. This is simply to indicate xDrip+ that a new sensor is delivering blood sugar levels. If available, enter two bloody measured values for the initial calibration. Now the blood glucose values should be displayed in xDrip+ every 5 minutes. Skipped values, e.g. because you were too far away from your phone, will not be backfilled.
Wait at least 15-20 minutes if there is still no data.
After a sensor change xDrip+ will automatically detect the new sensor and will delete all calibration data. You may check you bloody BG after activation and make a new initial calibration.
Step 4: Configure AndroidAPS
Select xDrip+ in ConfigBuilder, BG Source.
If AndroidAPS does not receive BG values when phone is in airplane mode, use «Identify receiver»
Turn of Smoothing (done in Xdrip+ already)
As of now, when using Libre 3 as a BG source, the «Always enable SMB» and «Enable SMB by Carbs» options cannot be enabled in the SMB algorithm. The BG values from Libre 3 are not smooth enough to use safely.
Subsequent sensor changes
Open Juggluco and note the serial number of the existing sensor

Now simply scan your new sensor with your phone’s NFC reader. Juggluco will display a notice if the process had been started successfully.
When you are ready to deactivate the old sensor, then open the Juggluco menu by clicking anywhere in the empty space in the upper left hand corner of the screen.
Select the exired sensor and tap «Terminate»

Note: When two sensors are active Juggluco will send the most recent value from either sensor to xDrip+. If the sensors are not calibrated and reading BG similarly, this may result in jumpy BG values being reported to xDrip+. If you terminate the wrong sensor, you can reactivate it by simply scanning the sensor.
Switch sensor between Libre 3 and Juggluco app
If the sensor has been started with a Libreview account logged in, it is also possible to switch between Juggluco and the Libre 3 app as receiver. This requires the following steps:
Install the Libre 3 app from Google Playstore
Set up the Libre 3 app with the Libreview account with which the sensor was activated.
Force stop the Juggluco app in the Android settings.
In the Libre 3 menu, click «Start Sensor», select «Yes», «Next» and scan your sensor.
After some minutes, the BG-Values should be visible within Libre 3 App.
In order to switch from the Libre 3 app to Juggluco, you need to force-stop Libre 3 app via Android settings and proceed with Step 1 & 2.
Experiences and Troubleshooting
Troubleshooting Libre3 -> Juggluco Connection
Make sure you are using a current version of the Juggluco app
Check your settings according to this guide
You may sometimes have to force stop the Libre 3 app and Juggluco and restart it.
Disable Bluetooth and enable it again
Wait some time or try to close Juggluco
Older versions of Juggluco (below 2.9.6) do not send subsequent data from the Libre3 sensor to connected devices (e.g. Juggluco on WearOS). You may need to click «Resend data» in the patched Libre3 app (Juggluco menu).
Further help
Original instructions: jkaltes website
Additional Github repo: Github link