Omnipod Dash
Ces instructions sont pour configurer la pompe de génération Omnipod DASH (et pas Omnipod Eros). The Omnipod driver is available as part of AAPS (AAPS) as of version 3.0.
Ce logiciel est une partie d’un système de pancréas artificiel « Do it yourself » (faire soi-même), et ce n’est pas un produit fini destiné à la mise sur le marché. VOUS devez obligatoirement lire, apprendre et comprendre ce système, y compris la façon de l’utiliser. Attention, vous êtes le seul responsable de ce que vous faite avec ce système.
Spécifications de DASH Omnipod
Ce sont les spécifications du Omnipod DASH et ce qui le différencie du Omnipod EROS:
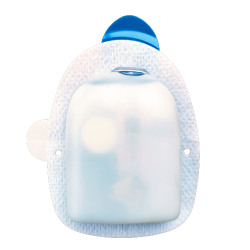
Les pompes DASH sont identifiées par un bouchon d’aiguille bleue (EROS a un bouchon d’aiguille clair). Les pods sont par ailleurs identiques en termes de dimensions physiques
Pas besoin d’un dispositif de liaison Omnipod / pont BLE séparé (pas de RileyLink, OrangeLink ou EmaLink nécessaires).
Connexion BT uniquement lorsque c’est nécessaire, se connecte pour envoyer la commande et se déconnecte immédiatement après !
Plus aucune erreur du type « aucune connexion au périphérique / pod »
AAPS attendra l’accessibilité du pod pour envoyer des commandes
Lors de l’activation, AAPS trouvera et se connectera à un nouveau pod DASH.
Distance usuelle : 5-10 mètres (selon les téléphones)
Configuration matérielle et logicielle requise
Un nouveau pod Omnipod DASH (identifié par un bouchon d’aiguille bleu)
Un téléphone Android compatible avec une connexion Bluetooth BLE
Tous les téléphones et versions d’Android ne sont pas garanties de fonctionner. Veuillez vérifier les téléphones testés avec DASH ou essayez simplement avec votre téléphone et dites-nous le résultat (référence du téléphone et région géographique, version d’Android, fonctionné / quelques difficultés / n’a pas fonctionné).
Remarque importante : Il y a eu de multiples cas de pertes de connexion permanentes et non récupérables lors de l’utilisation de pods anciens avec la version 3.XX.X. Be careful when using these old pods with AAPS, especially with other Bluetooth devices connected! Be aware that AAPS Omnipod Dash driver Connects with the Dash POD via Bluetooth every time it sends a command, and it disconnects right after. Les connexions Bluetooth peuvent être perturbées par d’autres périphériques connectés au téléphone qui exécutent AAPS, comme les écouteurs etc… (qui peuvent occasionner, dans des rares occasions, des problèmes de connexion ou des erreurs/perte de pod lors de l’activation ou par la suite pour certains téléphones), ou être perturbés par elle.
Version 3.0 or newer of AAPS built and installed using the Build APK instructions.
Ces instructions supposent que vous commencez une nouvelle session de pod; si ce n’est pas le cas, soyez patient et essayez de commencer ce processus lors de votre prochain changement de pod.
Avant de commencer
SÉCURITÉ D’ABORD - ne pas essayer ce processus dans un environnement où vous ne pouvez pas récupérer d’une erreur (pods supplémentaires, insuline, et les smartphones sont nécessaires).
Votre PDM Omnipod Dash ne fonctionnera plus suite à l’activation de votre pod avec le pilote AAPS Dash. Vous avez précédemment utilisé votre PDM Dash pour envoyer des commandes à votre Dash pod. Un pod Dash ne permet qu’à un seul périphérique d’envoyer des commandes pour communiquer avec lui. L’appareil qui active le pod avec succès est le seul appareil autorisé à communiquer avec lui à partir de ce moment. Cela signifie que lorsque vous activez un pod Dash avec votre téléphone Android via le pilote AAPS Dash, vous ne serez plus en mesure d’utiliser votre PDM avec ce pod. Le pilote AAPS Dash de votre téléphone Android devient maintenant votre PDM.
Cela ne veut pas dire que vous pouvez jeter votre PDM, il est recommandé de le garder comme une sauvegarde, et en cas d’urgence dans le cas où vous perdez votre téléphone ou AAPS ne fonctionne pas correctement.
Your pod will not stop delivering insulin when it is not connected to AAPS. Les débits de basal par défaut définis dans le profil actif actuel sont programmés dans le pod lors de l’activation. As long as AAPS is operational it will send basal rate commands that run for a maximum of 120 minutes. Lorsque, pour une raison quelconque, le pod ne reçoit pas de nouvelles commandes (par exemple parce que la communication a été perdue à cause de la distance Pod - téléphone) le pod retourne automatiquement aux débits de basal par défaut.
30 min Basal Rate Profiles are NOT supported in AAPS. The AAPS Profile does not support a 30 minute basal rate time frame If you are new to AAPS and are setting up your basal rate profile for the first time, please be aware that basal rates starting on a half-hour basis are not supported, and you will need to adjust your basal rate profile to start on the hour. Par exemple, si vous avez un débit de basal de 1,1 unités qui commence à 09h30 et a une durée de 2 heures se terminant à 11h30, cela ne marchera pas. Vous devrez mettre à jour ce taux de basal de 1,1 sur une plage horaire de 9h00 à 11h00 ou de 10h00 à 12h00. Even though the Omnipod Dash hardware itself supports the 30 min basal rate profile increments, AAPS is not able to take them into account with its algorithms currently.
0U/h profile basal rates are NOT supported in AAPS While the DASH pods do support a zero basal rate, since AAPS uses multiples of the profile basal rate to determine automated treatment it cannot function with a zero basal rate. A temporary zero basal rate can be achieved through the « Disconnect pump » function or through a combination of Disable Loop/Temp Basal Rate or Suspend Loop/Temp Basal Rate.
Activation du Driver Dash dans AAPS
You can enable the Dash driver in AAPS in two ways:
Option 1 : Nouvelles installations
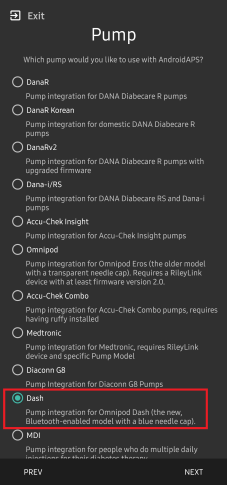
When you are installing AAPS for the first time, the Setup Wizard will guide you through installing AAPS. Select “DASH” when you reach Pump selection.
When in doubt you can also select “Virtual Pump” and select “DASH” later, after setting up AAPS (see option 2).
Option 2 : Le Générateur de configuration
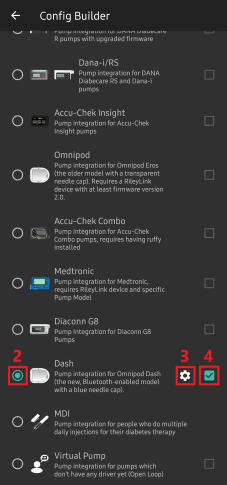
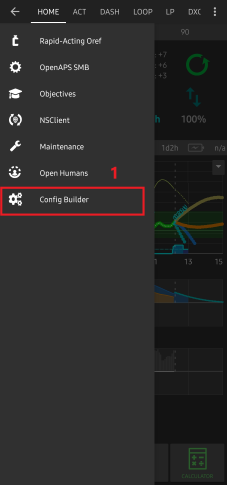
On an existing installation you can select the DASH pump from the Config builder:
On the top-left hand corner hamburger menu select Config Builder (1)\ ➜\ Pump\ ➜\ Dash\ ➜\ Settings Gear (3) by selecting the radio button (2) titled Dash.
Selecting the checkbox (4) next to the Settings Gear (3) will allow the Dash menu to be displayed as a tab in the AAPS interface titled DASH. Checking this box will facilitate your access to the DASH commands when using AAPS.
NOTE: A faster way to access the Dash settings can be found below in the Dash settings section of this document.
Vérification de la sélection du pilote Omnipod
To verify that you have enabled the Dash driver in AAPS, if you have checked the box (4), swipe to the left from the Overview tab, where you will now see a DASH tab. If you have not checked the box, you’ll find the DASH tab in the hamburger menu upper left.
Configuration du Dash
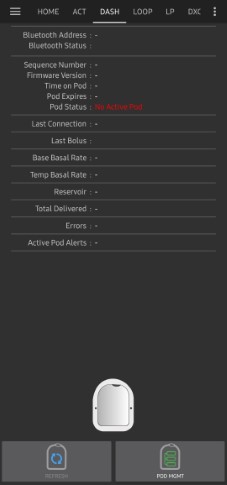
Please swipe left to the DASH tab where you will be able to manage all pod functions (some of these functions are not enabled or visible without an active pod session):
![]() Refresh Pod connectivity and status, be able to silence pod alarms when the pod beeps
Refresh Pod connectivity and status, be able to silence pod alarms when the pod beeps
![]() Pod Management (Activate, Deactivate, Play test beep, and Pod history)
Pod Management (Activate, Deactivate, Play test beep, and Pod history)
Activer le Pod
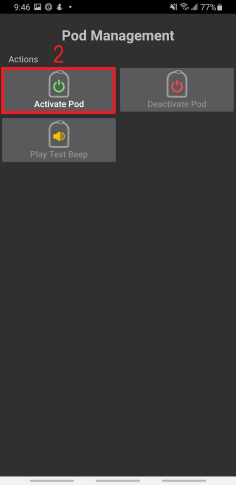
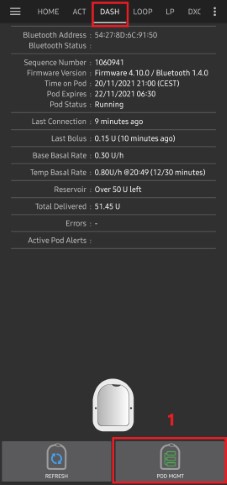
Naviguez vers l’onglet DASH et cliquez sur le bouton POD MGMT (1) , puis cliquez sur Activer Pod (2).

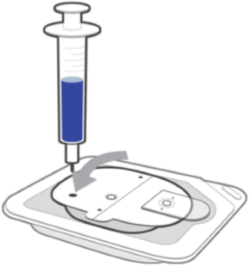
L’écran Remplir le pod s’affiche. Remplissez le nouveau pod avec au moins 80 unités d’insuline et écoutez le deux bips indiquant que le pod est prêt à être amorcé. Lors du calcul de la quantité totale d’insuline dont vous avez besoin pour 3 jours, veuillez prendre en compte que l’amorçage du pod utilisera de 3 à 10 unités.
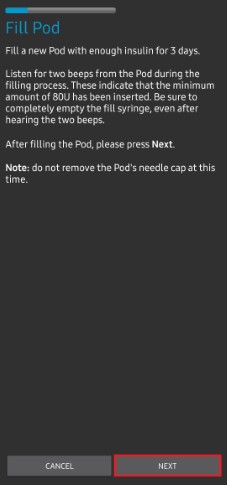
Ensure that the new pod and the phone running AAPS are within close proximity of each other and click the Next button.
NOTE: Just in case you get the below error message (this can happen), do not panic. Click on the Retry button. In most situations activation will continue successfully.
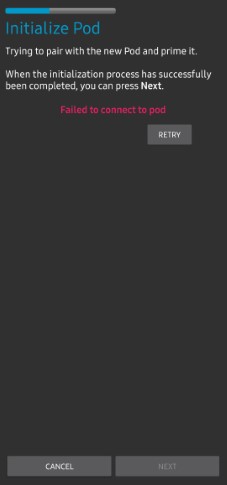
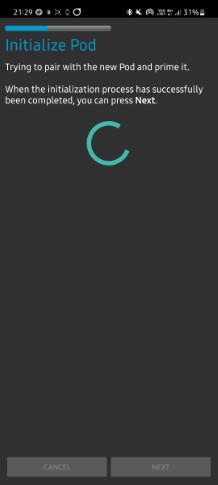
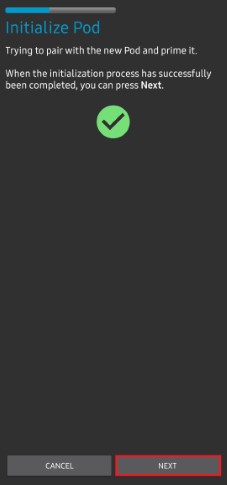
Sur l’écran Initialiser le Pod le pod commencera à amorcer (vous entendrez un clic suivi d’une série de tics pendant que le pod s’amorce). Une coche verte s’affichera en cas d’amorçage réussi, et le bouton Suivant sera activé. Cliquer sur le bouton Suivant pour terminer l’initialisation de l’amorçage du pod et afficher l’écran Attacher Pod.
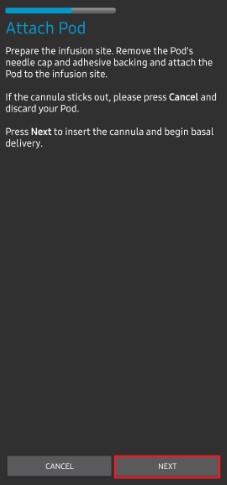
Ensuite, préparer le site de perfusion du nouveau pod. Retirez le bouchon en plastique de l’aiguille du Pod. Si vous voyez quelque chose qui depasse du pod, annulez le processus et recommencez avec un nouveau pod. Si tout semble OK, retirez le papier blanc de protection de l’adhésif et appliquez le pod sur le site sélectionné sur votre corps. Une fois terminé, cliquez sur le bouton Suivant.
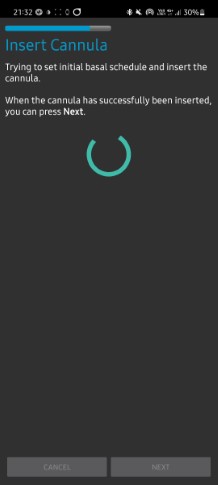
La boîte de dialogue Attacher Pod apparaîtra. cliquez sur le bouton OK UNIQUEMENT si vous êtes prêt à déployer la canule.
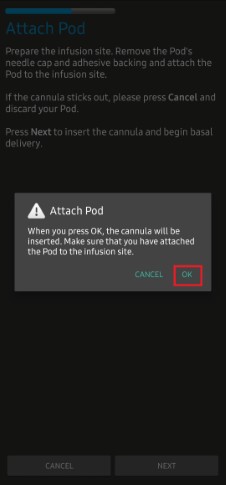
Après avoir appuyé sur OK, il peut se passer un certain temps avant que le pod Dash réponde et insère la canule (1-2 minutes maximum), donc soyez patient.
REMARQUE : Avant d’insérer la canule, il est recommandé de pincer la peau près du point d’insertion de la canule. Cela permet une insertion en douceur de l’aiguille et réduira les risques d’occlusions.

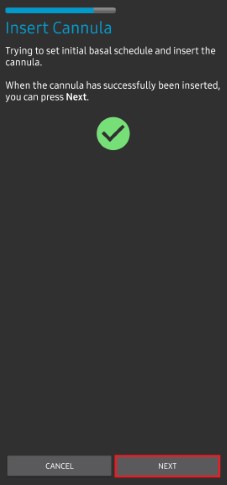
Une coche verte s’affiche, et le bouton Suivant est activé en cas d’insertion de canule réussie. Cliquer sur le button Suivant.
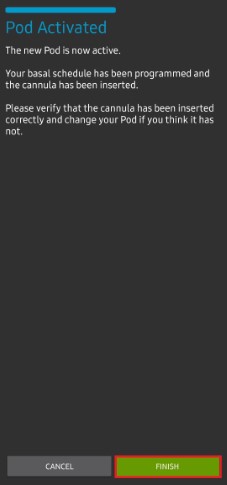
L’écran Pod activé s’affiche. Cliquer sur le bouton vert Terminé. Félicitations ! Vous avez démarré une nouvelle session de Pod actif.
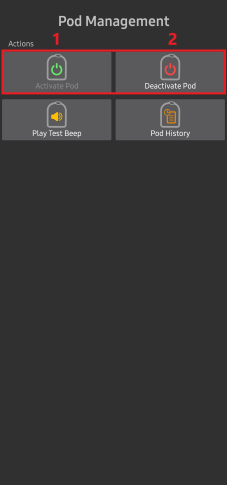
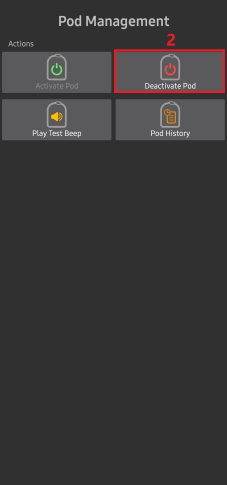
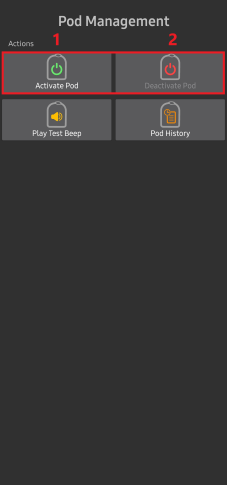
L’écran de menu Gestion pod devrait maintenant afficher le bouton Activer Pod (1) désactivé et le Désactiver Pod (2) bouton activé. Ceci est dû au fait qu’un pod est maintenant actif et que vous ne pouvez pas activer un pod supplémentaire sans désactiver d’abord le pod actuellement actif.
Cliquez sur le bouton Retour de votre téléphone pour retourner à l’onglet DASH qui affichera maintenant les informations du Pod pour votre session active de pod, y compris le débit de basal actuel, le niveau du réservoir de pod, l’insuline délivrée, les erreurs de pod et les alertes.
For more details on the information displayed go to the DASH Tab section of this document.
It is good practice to export settings AFTER activating the pod. Do this at each pod change and once a month, copy the exported file to your internet drive. see Export settings Doc.
Désactiver Pod
Under normal circumstances, the expected lifetime of a pod is three days (72 hours) and an additional 8 hours after the pod expiration warning for a total of 80 hours of pod usage.
To deactivate a pod (either from expiration or from a pod failure):
Allez à l’onglet DASH , cliquez sur le bouton POD MGMT (1) , sur l’écran de Gestion du pod cliquez sur le bouton Désactiver Pod (2).
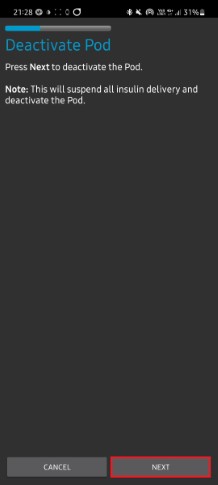
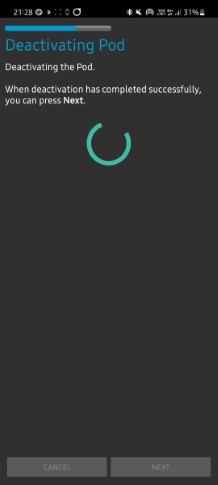
Sur l’écran Désactiver Pod , cliquez sur le bouton Suivant pour commencer le processus de désactivation du pod. Vous recevrez un bip de confirmation du pod indiquant une désactivation réussie.
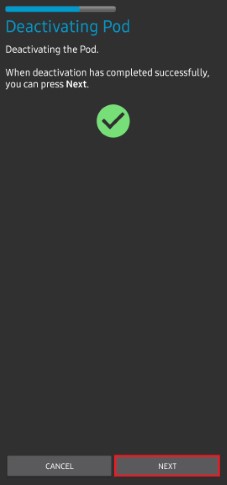
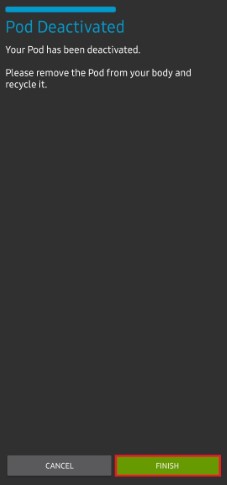
Une coche verte apparaîtra une fois la désactivation réussie. Cliquer sur le bouton Suivant pour afficher l’écran désactivé du pod. Vous pouvez maintenant supprimer votre pod car la session active a été désactivée.
Cliquez sur le bouton vert pour retourner à l’écran de Gestion du Pod.
Vous êtes maintenant dans le menu Gestion de pod ; appuyez sur le bouton retour de votre téléphone pour retourner à l’onglet DASH. Verify that the Pod status: field displays a No active Pod message.

Reprendre l’injection d’insuline
Note: During profile switches, dash must suspend delivery before setting the new basal profile. If communication fails between the two commands, then delivery can be suspended. Read Delivery suspended in the troubleshooting section for more details.
Use this command to instruct the active, currently suspended pod to resume insulin delivery. After the command is successfully processed, insulin will resume normal delivery using the current basal rate based on the current time from the active basal profile. The pod will again accept commands for bolus, TBR, and SMB.
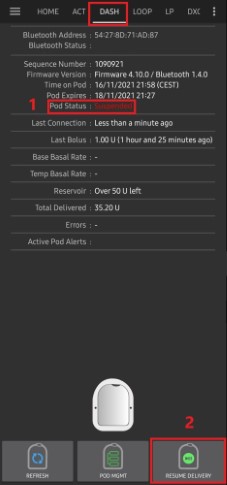
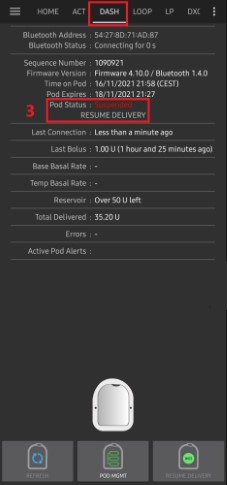
Allez à l’onglet DASH et assurez-vous que le champ statut du pod (1) affiche SUSPENDU, puis appuyez sur le bouton REPRENDRE LA LIVRAISON (2) pour démarrer le processus pour indiquer au pod actuel de reprendre la distribution normale d’insuline. Un message REPRENDRE LA LIVRAISON s’affichera dans le champ Statut du pod (3).
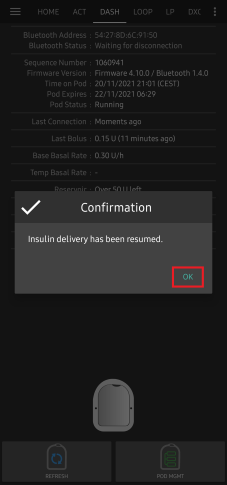
Lorsque la commande de reprise de livraison est réussie, une boîte de dialogue de confirmation affichera le message La livraison d’insuline a été reprise. Cliquez sur OK pour confirmer et continuer.
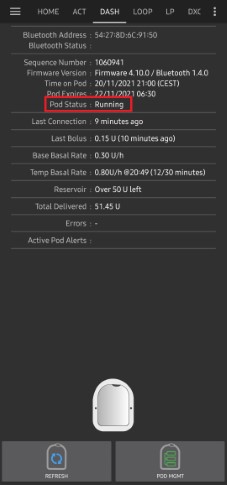
L’onglet DASH mettra à jour le champ état du pod (1) pour afficher En cours d’exécution, et le bouton Reprendre la distribution ne sera plus affichés
Arrêter les alarmes du pod
NOTE - The SILENCE ALERTS button is only available on the DASH tab when the pod expiration or low reservoir alert has been triggered. If the SILENCE ALERTS button is not visible and you hear beep sounds from the pod, try to “Refresh pod status”.
The process below will show you how to acknowledge and dismiss pod beeps when the active pod time reaches the warning time limit before the pod expiration of 72 hours (3 days). This warning time limit is defined in the Hours before shutdown Dash alerts setting. The maximum life of a pod is 80 hours (3 days 8 hours), however Insulet recommends not exceeding the 72 hours (3 days) limit.
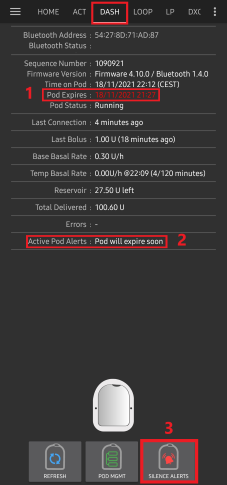
When the defined Hours before shutdown warning time limit is reached, the pod will issue warning beeps to inform you that it is approaching its expiration time and pod change will be required soon. You can verify this on the DASH tab, the Pod expires: (1) field will show the exact time the pod will expire (72 hours after activation), and the text will turn red after this time has passed. Under the Active Pod alerts (2) field the status message Pod will expire soon is displayed. This also will trigger displaying the SILENCE ALERTS (3) button.
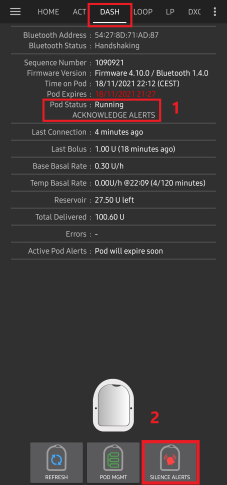
Go to the DASH tab and press the SILENCE ALERTS (2) button . AAPS sends the command to the pod to deactivate the pod expiration warning beeps and updates the Pod status (1) field with ACKNOWLEDGE ALERTS.
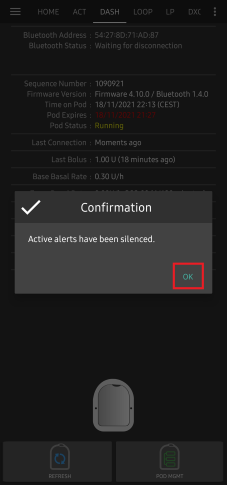
Upon successful deactivation of the alerts, 2 beeps will be issued by the active pod and a confirmation dialog will display the message Activate alerts have been Silenced. Cliquez sur le bouton OK pour confirmer et fermer la boîte de dialogue.
Allez dans l’onglet DASH. Sous le champ Alertes du Pod actif , le message d’alerte n’est plus affiché, et le pod actif n’émettra plus de beeps d’expiration du pod.
Voir l’historique du Pod
This section shows you how to review your active pod history and filter by different action categories. The pod history tool allows you to view the actions and results committed to your currently active pod during its three days (72 - 80 hours) life.
This feature is helpful in verifying boluses, TBRs and basal commands that were sent to the pod. The remaining categories are useful for troubleshooting issues and determining the order of events that occurred leading up to a failure.
NOTE: Only the last command can be uncertain. New commands will not be sent until the last “uncertain” command becomes “confirmed” or “denied”. The way to “fix” uncertain commands is to “refresh pod status”.
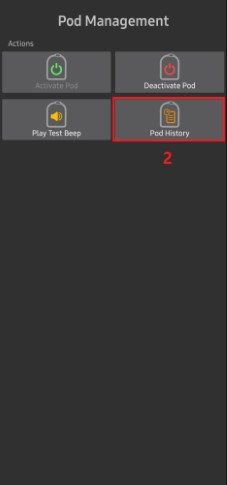
Go to the DASH tab and press the POD MGMT (1) button to access the Pod Management menu and then press the Pod history (2) button to access the pod history screen.

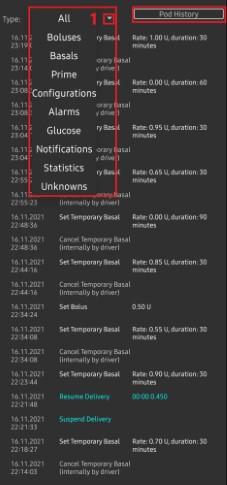
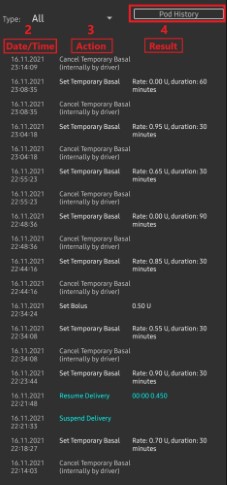
Sur l’écran Historique Pod la catégorie par défaut Tous (1) est affichée, avec la Date / Heure (2) de tous les pods Actions (3) et Résultats (4) dans l’ordre chronologique inverse. Utilisez le bouton retour 2 fois sur votre téléphone pour retourner à l’onglet DASH dans l’interface principale AAPS.
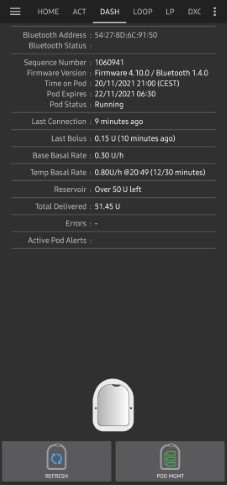
Onglet DASH
Below is an explanation of the layout and meaning of the icons and status fields on the DASH tab in the main AAPS interface.
NOTE: If any message in the DASH tab status fields report (uncertain), then you will need to press the Refresh button to clear it and refresh the pod status.

Champs
Bluetooth Address: Displays the current bluetooth address of the connected Pod.
Bluetooth Status: Displays the current connection status.
Sequence Number: Displays the sequence number of the active POD.
Firmware Version: Displays the firmware version for the active connection.
Time on Pod: Displays the current time on the Pod.
Pod expires: Displays the date and time when the Pod will expire.
Pod status: Displays the Pod status.
Last connection: Displays time of last communication with the Pod.
À l’instant - il y a moins de 20 secondes.
Il y a moins d’une minute - plus de 20 secondes mais moins de 60 secondes.
il y a 1 minute - plus de 60 secondes mais moins de 120 secondes (2 min)
il y a XX minutes - il y a plus de 2 minutes comme défini par la valeur de XX
Last bolus: Displays the amount of the last bolus sent to the active pod and how long ago it was issued in parenthesis.
Débit de Basal : Affiche le débit Basal courant en ce moment, à partir du débit de basal du profil.
Débit de Basal Temp. : Affiche le débit de basal Temporaire actuellement en cours d’exécution dans le format suivant
{Units per hour} @{TBR start time} ({minutes run}/{total minutes TBR will be run})
Exemple : 0.00U/h @18:25 (90/120 minutes)
Réservoir : Affiche plus de 50+U quand plus de 50 unités sont dans le réservoir. Below 50 U, the exact units are displayed.
Total injecté : Affiche le nombre total d’unités d’insuline injectées depuis le réservoir. This includes insulin used for activating and priming.
Erreurs : Affiche la dernière erreur rencontrée. Review the Pod history and log files for past errors and more detailed information.
Alertes Pod actif : Réservées pour les alertes en cours sur le pod actif.
Boutons
![]() : Sends a refresh command to the active pod to update communication.
: Sends a refresh command to the active pod to update communication.
A utiliser pour actualiser l’état du pod et rejeter les champs qui contiennent le texte (incertain).
See the Troubleshooting section below for additional information.
![]() : Navigates to the Pod management menu.
: Navigates to the Pod management menu.
![]() : When pressed this will disable the pod alerts beeps and notifications (expiry, low reservoir..).
: When pressed this will disable the pod alerts beeps and notifications (expiry, low reservoir..).
Le bouton ne s’affiche que lorsque la durée d’utilisation du pod dépasse le seuil d’alerte d’expiration.
En cas de désactivation réussi, cette icône n’apparaîtra plus.
![]() : Resumes the currently suspended insulin delivery in the active pod.
: Resumes the currently suspended insulin delivery in the active pod.
Menu de Gestion du pod
Below is the meaning of the icons on the Pod Management menu accessed by pressing POD MGMT (0) button from the DASH tab. 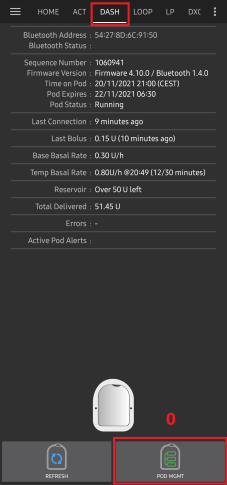
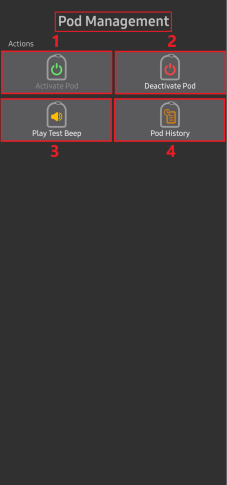
1 - Activate Pod : Primes and activates a new pod.
2 - Deactivate Pod : Deactivates the currently active pod.
3 - Play Test Beep : Plays a single test beep on the pod when pressed.
4 - Pod history : Displays the active pod activity history.
Paramètres Dash
The Dash driver settings are configurable from the top-left hand corner hamburger menu under Config Builder (1)\ ➜\ Pump\ ➜\ Dash\ ➜\ Settings Gear (3) by selecting the radio button (2) titled Dash. Selecting the checkbox (4) next to the Settings Gear (3) will allow the Dash menu to be displayed as a tab in the AAPS interface titled DASH.

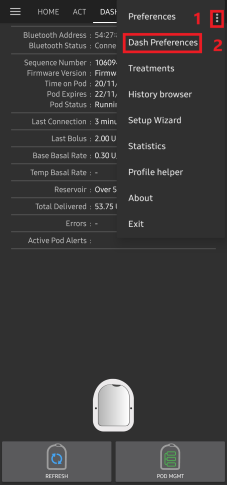
NOTE: A faster way to access the Dash settings is by accessing the 3 dot menu (1) in the upper right hand corner of the DASH tab and selecting Dash preferences (2) from the dropdown menu.
The settings groups are listed below; you can enable or disable via a toggle switch for most entries described below:
NOTE: An asterisk (*) denotes the default setting is enabled.
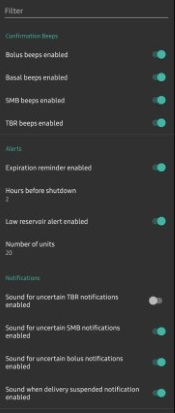
Bips de confirmation
Provides confirmation beeps from the pod for bolus, basal, SMB, and TBR delivery and changes.
Bolus beeps enabled: Enable or disable confirmation beeps when a bolus is delivered.
Basal beeps enabled: Enable or disable confirmation beeps when a new basal rate is set, active basal rate is canceled or current basal rate is changed.
SMB beeps enabled: Enable or disable confirmation beeps when a SMB is delivered.
Bips DBT activés : Active ou désactive les bips de confirmation lorsqu’un DBT est défini ou annulé.
Alertes
Provides AAPS alerts for pod expiration, shutdown, low reservoir based on the defined threshold units.
Note an AAPS notification will ALWAYS be issued for any alert after the initial communication with the pod since the alert was triggered. Dismissing the notification will NOT dismiss the alert UNLESS automatically acknowledge Pod alerts is enabled. To MANUALLY dismiss the alert you must visit the DASH tab and press the Silence ALERTS button.
Expiration reminder enabled: Enable or disable the pod expiration reminder set to trigger when the defined number of hours before shutdown is reached.
Heures avant arrêt : Définit le nombre d’heures avant l’arrêt du pod actif, ce qui déclenchera ensuite l’alerte de rappel d’expiration.
Low reservoir alert enabled: Enable or disable an alert when the pod’s remaining units low reservoir limit is reached as defined in the Number of units field.
Nombre d’unités : Défini le nombre d’unités à partir de laquelle l’alerte Réservoir bas est activée.
Notifications
Provides AAPS notifications and audible phone alerts when it is uncertain if TBR, SMB, or bolus, and delivery suspended events were successful.
NOTE: These are notifications only, no audible beep alerts are made.
Son pour les notifications DBT incertains activé : Activer ou désactiver ce paramètre pour déclencher une alerte audible et une notification visuelle lorsque AAPS n’est pas certain si un DBT a été défini avec succès.
Sound for uncertain SMB notifications enabled: Enable or disable this setting to trigger an audible alert and visual notification when AAPS is uncertain if an SMB was successfully delivered.
Sound for uncertain bolus notifications enabled: Enable or disable this setting to trigger an audible alert and visual notification when AAPS is uncertain if a bolus was successfully delivered.
Sound when delivery suspended notifications enabled: Enable or disable this setting to trigger an audible alert and visual notification when suspend delivery was successfully delivered.
Onglet Actions (ACT)
This tab is well documented in the main AAPS documentation but there are a few items on this tab that are specific to how the Omnipod Dash pod differs from tube based pumps, especially after the processes of applying a new pod.
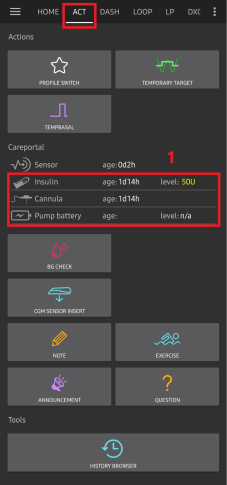
Allez dans l’onglet Actions (ACT) dans l’interface principale AAPS.
Under the Careportal (1) section the Insulin and Cannula filds will have their age reset to 0 days and 0 hours after each pod change. C’est dû à la façon dont la pompe Omnipod est construite et opérationnelle. Puisque le pod insère la canule directement dans la peau au niveau du site d’application pod, il n’y a pas de tubulure traditionnelle dans les pompes Omnipod. Par conséquent, après un changement de pod, l’âge de chacune de ces valeurs sera automatiquement réinitialisé à zéro. L’âge de la pile pompe n’est pas indiqué car la durée de vie de la pile du pod sera toujours plus grande que celle du pod (maximum 80 heures). La pile de la pompe et le réservoir d’insuline sont intégrés à l’intérieur de chaque pod.
Niveau
Insulin Level
Insulin level displayed is the amount reported by Omnipod DASH. However, the pod only reports the actual insulin reservoir level when it is below 50 units. Until then “Above 50 units” will be displayed. The amount reported is not exact: when the pod reports ‘empty’ in most cases the reservoir will still have some additional units of insulin left. The omnipod DASH overview tab will display as described the below:
Above 50 Units - The Pod reports more than 50 units currently in the reservoir.
Below 50 Units - The amount of insulin remaining in the reservoir as reported by the Pod.
Additional note:
SMS - Renvoie la valeur ou 50+U pour les réponses SMS
Nightscout - Envoie la valeur 50 vers Nightscout s’il y a plus de 50 unités (version 14,07 et plus). Les nouvelles versions afficheront la valeur de plus de 50+ si au-dessus de 50 unités.
Résolution de problèmes
Delivery suspended
There is no suspend button anymore. If you want to « suspend » the pod, you can set a zero TBR for x minutes.
During profile switches, dash must suspend delivery before setting the new basal profile. If communication fails between the two commands, then delivery can stay suspended. When this happens:
There will be no insulin delivery, that includes Basal, SMB, Manual bolusing etc.
There might be notification that one of the commands is unconfirmed: this depends on when the failure happened.
AAPS will try to set the new basal profile every 15 minutes.
AAPS will show a notification informing that the delivery is suspended every 15min, if the delivery is still suspended (resume delivery failed).
The Resume delivery button will be active if the user chooses to resume delivery manually.
If AAPS fail to resume delivery on its own (this happens if the Pod is unreachable, sound is muted, etc), the pod will start beeping 4 time every minute for 3 minutes, then repeated every 15 minutes if delivery is still suspended for more than 20minutes.
For unconfirmed commands, « refresh pod status » should confirm/deny them.
Note: When you hear beeps from the pod, do not assume that delivery will continue without checking the phone, delivery might stay suspended, so you need to check !
Erreurs Pod
Pods fail occasionally due to a variety of issues, including hardware issues with the Pod itself. It is best practice not to call these into Insulet, since AAPS is not an approved use case. A list of fault codes can be found here to help determine the cause.
Empêcher l’erreur 49 échecs du pod
This failure is related to an incorrect pod state for a command or an error during an insulin delivery command. This is when the driver and Pod disagree on the actual state. The Pod (out of a build-in safety measure) then reacts with an unrecoverable error code 49 (0x31) ending up with what is know as a “screamer”: the long irritating beep that can only be stopped by punching a hole at the appropriate location at the back of the Pod. The exact origin of a “49 pod failure” often is hard to trace. In situations that are suspected for this failure to occur (for instance on application crashes, running a development version or re-installation).
Alertes Pompe hors de portée
When no communication can be established with the pod for a preconfigured time a “Pump unreachable” alert will be raised. Pump unreachable alerts can be configured by going to the top right-hand side three-dot menu, selecting Preferences\ ➜\ Local Alerts\ ➜\ Pump unreachable threshold [min]. Recommended value is alerting after 120 minutes.
Export Settings
Exporting AAPS settings enables you to restore all your settings, and maybe more importantly, all your Objectives. You may need to restore settings to the “last known working situation” or after uninstalling/reinstalling AAPS or in case of phone loss, reinstalling on the new phone.
Note: The active pod information is included in the exported settings. If you import an « old » exported file, your actual pod will « die ». There is no other alternative. In some cases (like a programmed phone change), you may need to use the exported file to restore AndroisAPS settings while keeping the current active Pod. In this case it is important to only use the recently exported settings file containing the pod currently active.
It is good practice to do an export immediately after activating a pod. This way you will always be able to restore the current active Pod in case of a problem. For instance when moving to another backup phone.
Regularly copy your exported settings to a safe place (as a cloud drive) that can be accessible by any phone when needed (e.g. in case of a phone loss or factory reset of the actual phone).
Import Settings
WARNING Please note that importing settings will possibly import an outdated Pod status. As a result, there is a risk of losing the active Pod! (see Exporting Settings). It is better to only try it when no other options are available.
When importing settings with an active Pod, make sure the export was done with the currently active pod.
Importing while on an active Pod: (you risk losing the Pod!)
Make sure you are importing settings that were recently exported with the currently active Pod.
Import your settings
Check all preferences
Importing (no active Pod session)
Importing any recent export should work (see above)
Import your settings.
Check all preferences.
You may need to Deactivate the « non exixting » pod if the imported settings included any active pod data.
Importing settings that contain Pod state from an inactive Pod
When importing settings containing data for a Pod that is no longer active, AAPS will try to connect with it, which will obviously fail. You can not activate a new Pod in this situation.
To remove the old Pod session “try” to de-activate the Pod. The de-activation will fail. Select “Retry”. After the second or third retry you will get the option to remove the pod. Once the old pod is removed you will be able to activate a new Pod.
Reinstalling AAPS
When uninstalling AAPS you will lose all your settings, objectives and the current Pod session. To restore them make sure you have a recent exported settings file available!
When on an active Pod, make also sure that you have an export for the current Pod session or you will lose the currently active Pod when importing older settings.
Exportez vos paramètres et stockez en une copie dans un endroit sûr.
Uninstall AAPS and restart your phone.
Install the new version of AAPS.
Import your settings
Verify all preferences (optionally import settings again)
Activate a new Pod
When done: Export current settings
Updating AAPS to a newer version
In most cases there is no need to uninstall. You can do an “in-place” install by starting the installation for the new version. This is also possible when on an active Pod session.
Exporter les paramètres.
Install the new AAPS version.
Verify the installation was successful
RESUME the Pod or activate a new Pod.
When done: Export current settings.
Alertes Pilote Omnipod
Please note that the Omnipod Dash driver presents a variety of unique alerts on the Overview tab, most of them are informational and can be dismissed while some provide the user with an action to take to resolve the cause of the triggered alert. A summary of the main alerts that you may encounter is listed below:
Aucun Pod actif Aucune session active de Pod détectée. Cette alerte peut être temporairement rejetée en appuyant sur REPORT ALARME mais elle se déclenchera tant qu’un nouveau pod n’a pas été activé. Once activated this alert is automatically be silenced.
Pod suspendu Alerte informative que le Pod a été suspendu.
Setting basal profile failed : Delivery might be suspended! Veuillez actualiser manuellement l’état du Pod à partir de l’onglet Omnipod et reprendre l’injection si nécessaire.. Alerte informative que le réglage du profil basal du Pod a échoué, et vous devrez appuyer sur Actualiser dans l’onglet Omnipod.
Impossible de vérifier si le bolus SMB a réussi. Si vous êtes sûr que le Bolus n’a pas réussi, vous devez supprimer manuellement l’entrée SMB dans les traitements. Alerte que la commande de bolus SMB n’a pas pu être vérifiée, vous devrez vérifier le champ Dernier bolus dans l’onglet DASH pour voir si le bolus SMB a bien été fait et dans le cas contraire supprimer l’entrée dans l’onglet Traitements.
Incertain si l’action « Bolus/DBT/SMB » est terminée, merci de vérifier manuellement s’il a réussi.
Where to get help for Omnipod DASH driver
All of the development work for the Omnipod DASH driver is done by the community on a volunteer basis; we ask that you to remember that fact and use the following guidelines before requesting assistance:
Niveau 0 : Lisez la section correspondante de cette documentation pour vous assurer que vous comprenez comment la fonctionnalité avec laquelle vous avez des difficultés est censée fonctionner.
Level 1: If you are still encountering problems that you are not able to resolve by using this document, then please go to the #AAPS channel on Discord by using this invite link.
Level 2: Search existing issues to see if your issue has already been reported at Issues if it exists, please confirm/comment/add information on your problem. If not, please create a new issue and attach your log files.
Soyez patient - la plupart des membres de notre communauté sont des bénévoles de bonne nature, et résoudre les problèmes nécessite souvent du temps et de la patience de la part des utilisateurs et des développeurs.