בניית קובץ ה-APK
בנייה עצמית במקום הורדה
AAPS is not available as download due to regulation for medical devices. בנייה עצמית של היישום לשימוש אישי הינה חוקית אך אסור לתת את היישום לאחרים! ראו שאלות נפוצות לפרטים.
הערות חשובות
Please use Android Studio Giraffe“ (2022.3.1) or newer to build the apk.
Windows 32-bit systems are not supported by Android Studio
מפרט מומלץ של מחשב לבניית קובץ apk
| מערכת הפעלה (64 ביט בלבד) | חלונות 8 ומעלה | Mac OS 10.14 ומעלה | כל לינוקס שתומך ב-Gnome, KDE, או Unity DE; GNU C Library 2.31 או מאוחר יותר |
|---|---|---|---|
מעבד (64 ביט בלבד) |
ארכיטקטורת מעבד x86_64; דור שני של Intel Core ומעלה, או מעבד AMD עם תמיכה ב- Windows Hypervisor |
מעבדים מבוססי ARM; דור שני של Intel Core ומעלה תמיכה ב- Windows Hypervisor |
ארכיטקטורת מעבד x86_64; דור שני של Intel Core ומעלה, או מעבד AMD עם תמיכה בווירטואליזציה של AMD (AMD-V) ו-SSSE3 |
RAM |
8GB ומעלה |
||
דיסק קשיח |
לפחות 30GB פנויים. מומלץ SSD. |
||
רזולוציה |
לפחות 1280X800 |
||
אינטרנט |
פס רחב |
||
Please keep in mind that both 64 bit CPU and 64 bit OS are mandatory condition. If your system DOES NOT meet this condition, you have to change affected hardware or software or the whole system. מומלץ מאוד להשתמש ב-SSD (Solid State Disk) במקום HDD (כונן קשיח) כי זמן בניית קובץ ה-APK של התקנת AAPS יתקצר משמעותית. זוהי המלצה ולא דרישה. עם זאת, אין מניעה להשתמש בדיסק קשיח כאשר אתם בונים קובץ apk אך לשים לב שתהליך הבנייה עשוי להימשך זמן רב, אם כי לאחר התחלתה, תוכלו להשאיר אותה פועלת ללא השגחה עד להשלמתה.
מאמר זה מחולק לשני חלקים.
בחלק הסקירה יש הסבר על השלבים הדרושים לבניית קובץ ה-APK.
בחלק המדריך צעד אחר צעד תמצאו את צילומי המסך של תהליך שלם. מכיוון שהגרסאות של Android Studio - סביבת פיתוח התוכנה בה נשתמש לבניית ה-APK - ישתנו מהר מאוד זה לא יהיה זהה להתקנה שלך אבל זה אמור לתת לך נקודת התחלה טובה. Android Studio פועל גם על Windows, Mac OS X ו-Linux וייתכנו הבדלים קטנים בהיבטים מסוימים בין כל פלטפורמה. If you find that something important is wrong or missing, please inform the facebook group ”AAPS users“ or in the Discord chat Android APS so that we can have a look at this.
סקירה כללית
באופן כללי, השלבים של בניית קובץ ה-APK הם:
מדריך שלב אחר שלב
תיאור מפורט של השלבים הדרושים לבניית קובץ ה-APK.
התקינו git (אם לא מותקן כבר)
עקבו אחר המדריך בדף התקנת של git.
התקנת Android Studio
צילומי המסך הבאים נלקחו מגרסת Android Studio Arctic Fox | 2020.3.1. המסכים עשויים להשתנות בגרסאות עתידיות של Android Studio. אף על פי כן, אתם צפויים להיות מסוגלים למצוא את דרככם. אפשר לקבל עזרה מהקהילה.
אחד הדברים החשובים ביותר בעת התקנת Android Studio: היו סבלניים! במהלך ההתקנה וההגדרה Android Studio מוריד הרבה דברים וזה לוקח זמן.
הורידו את Android Studio מכאן והתקינו אותו במחשבכם.
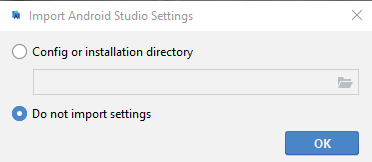
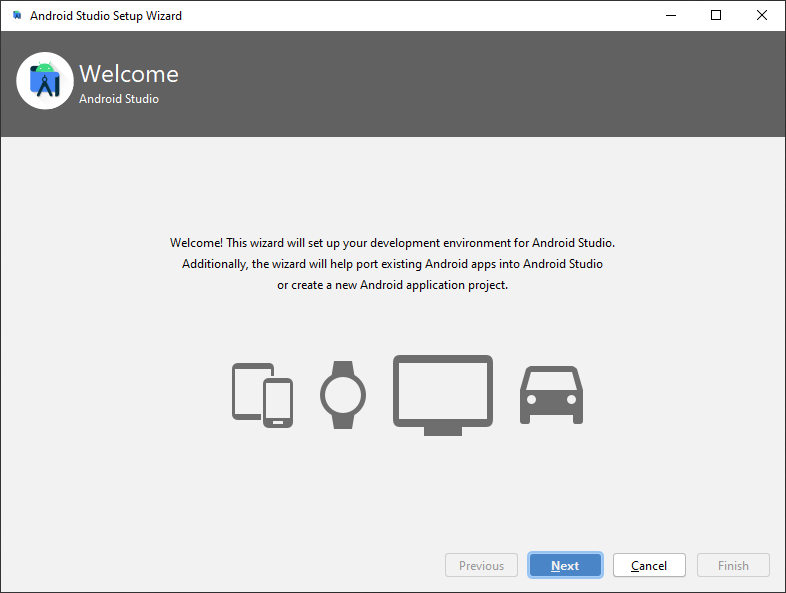
בפעם הראשונה יופיע אשף ההתקנה:
בחרו ”Do not import settings“ מכיוון שלא השתמשתם בו בעבר.
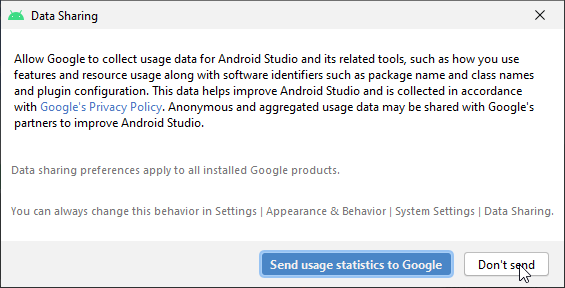
החליטו אם ברצונכם לשתף נתונים עם Google או לא.
במסך הבא לחץ על ”Next“.
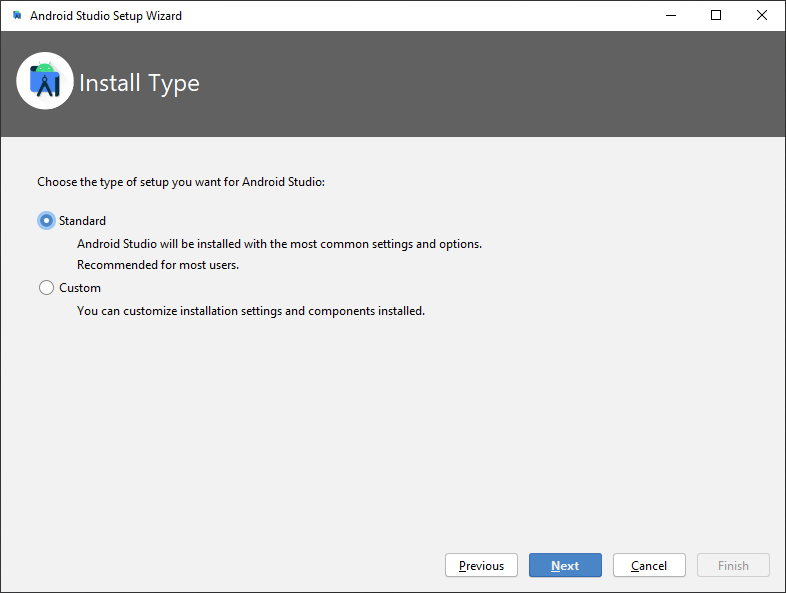
בחר בהתקנה ”Standard“ ולחצו על ”Next“.
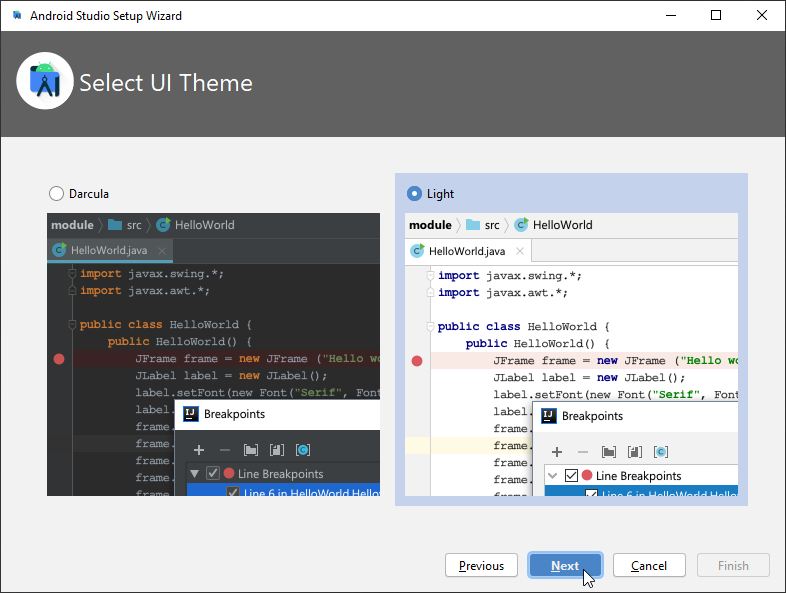
בחרו את ערכת הנושא עבור ממשק המשתמש לנוחיותכם. (במדריך זה השתמשנו ב“Light“.) לאחר מכן לחצו על ”Next“.
הערה: זוהי רק סכמת צבעים. תוכלו לבחור את מה שתרצו (לדוגמה ”דרקולה“ שהוא צבע כהה). לבחירה זו אין השפעה על בניית ה-APK אך צילומי המסך הבאים עשויים להיראות אחרת.
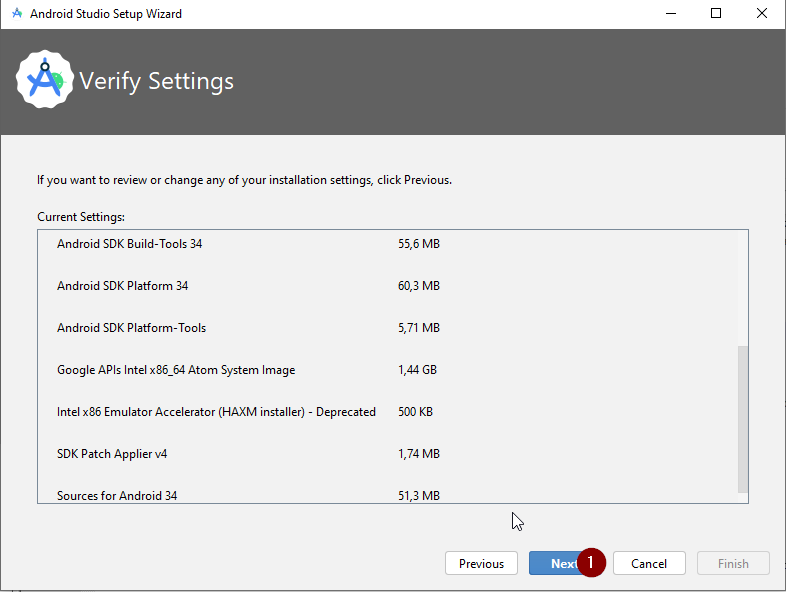
Click ”Next“ on the ”Verify Settings“ dialog.
Click on all three license agreement parts and select ”Agree“. When you have agreed to all, the ”Finish“ button will be enabled and you can ”Finish“.

Wait while Android Studio downloads additional components and be patient. Once everything is downloaded button ”Finish“ turns blue. Click the button now.

Download AAPS code
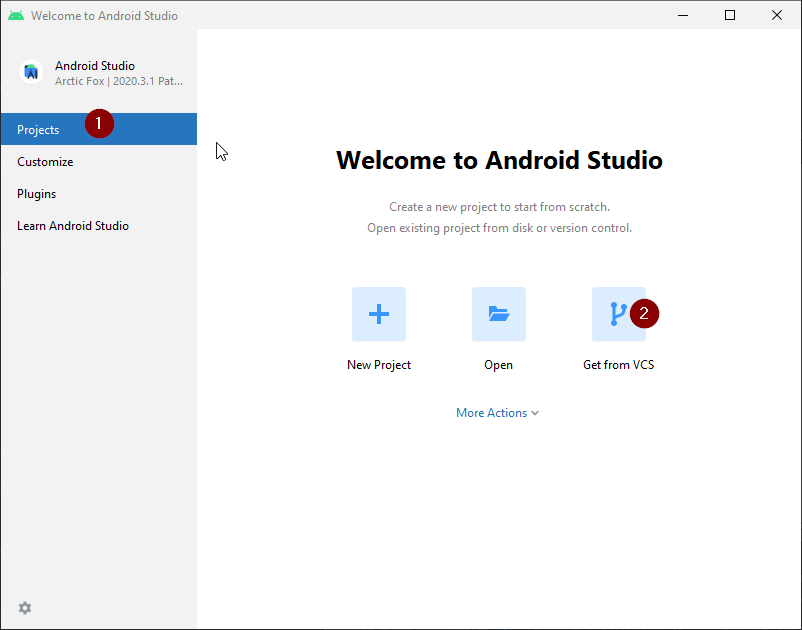
On the Android Studio welcome screen select ”Projects“ (1) on the left and then ”Get from VCS“ (2).
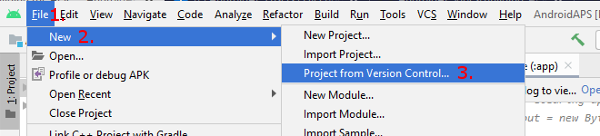
If you already opened Android Studio and do not see the welcome screen anymore select File (1) > New (2) > Project from Version Control… (3)
We will now tell Android Studio were to get the code from:
Make sure you have selected ”Repository URL“ on the left (1).
Check if ”Git“ is selected as version control (2).
Copy and paste the URL
https://github.com/nightscout/AndroidAPSto the main AAPS repository into the URL textbox (3).Choose the directory where you want to save the cloned code (4).
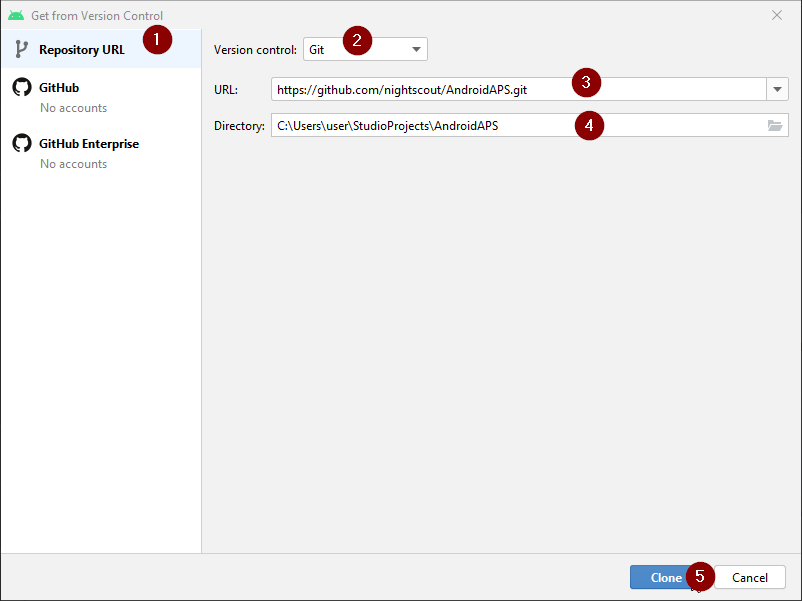
Click button ”Clone“ (5).

Do not click ”Background“ while repository is cloned!
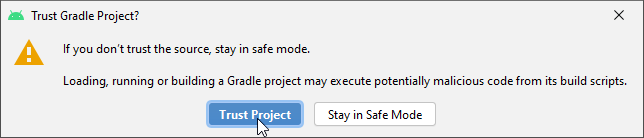
After the repository is cloned successfully, Android Studio will open the cloned project.
You will be asked whether you want to trust the project. Click on ”Trust project“!
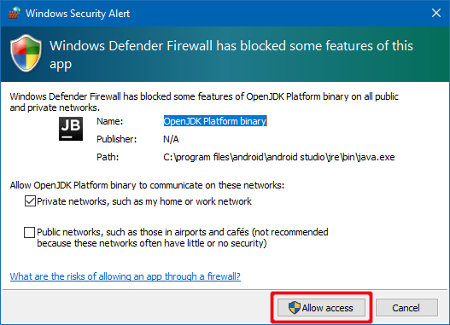
In the status bar at the bottom you will see the information that Android Studio is running background tasks.

Windows only: Grant access if your firewall is asking for permission.
Once the background tasks are finished you will probably see an error saying that errors occurred (1) or (2) or (3).
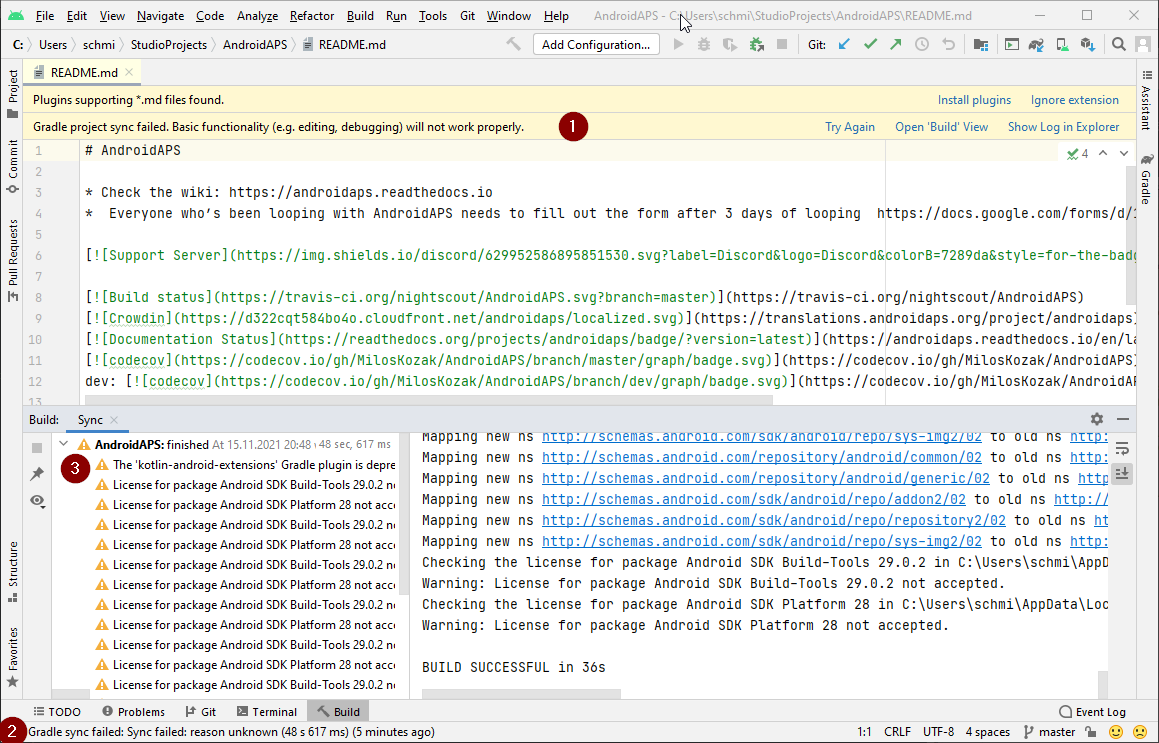
Don’t worry, this will be solved soon!
Set git path in preferences
Make sure git is installed on your computer and you have restarted your computer since installing.
On the Android Studio welcome screen click ”Customize“ (1) on the left and then select the link ”All settings…“ (2):

Windows
As windows user, make sure you have restarted your computer after installing Git.
In the menu, go to File (1) > Settings (2) (or Android Studio > Preferences on Mac).
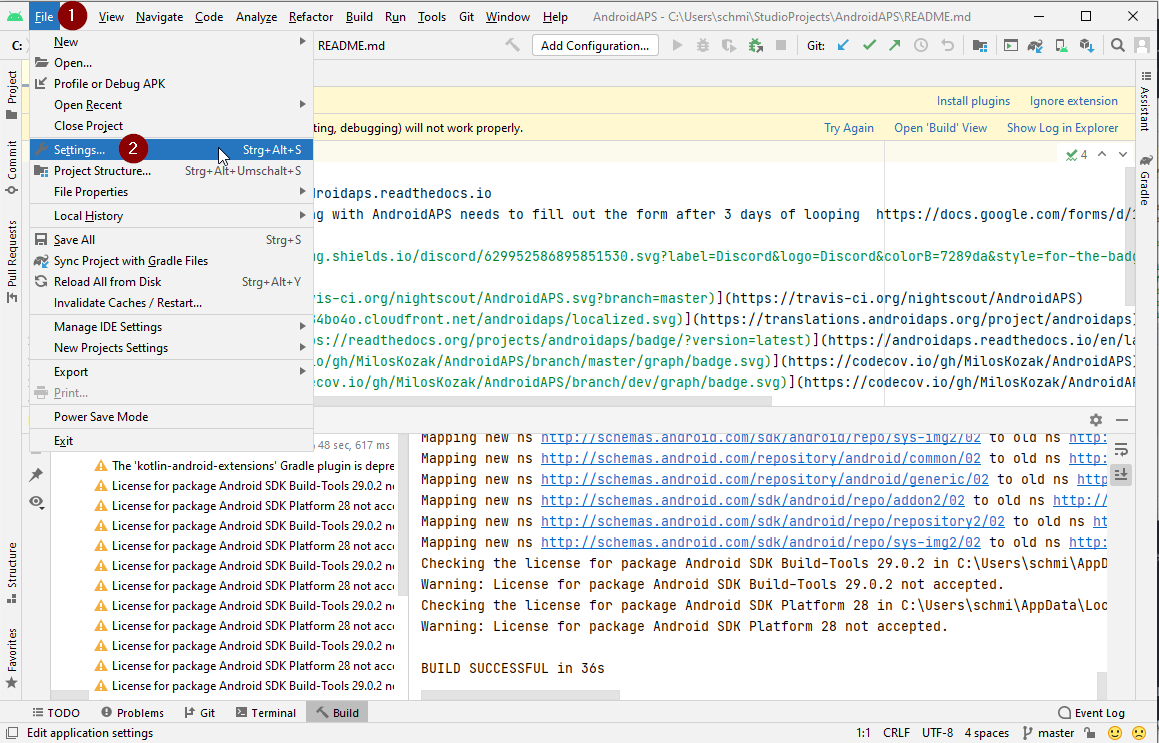
Double-click ”Version Control“ (1) to open the sub-menu.
Click Git (2).
Make sure update method ”Merge“ (3) is selected.
Check if Android Studio can locate path to git.exe automatically by clicking the button ”Test“ (4).

If automatic setting is successful git version will be displayed next to the path.

Eventually git.exe cannot be found automatically or the Test will result in an error (1):

In this case click on the folder icon (2).
Use search function in windows explorer to find ”git.exe“ if you are unsure where git has been installed. You are looking for a file named ”git.exe“, located in \bin folder.
Select path to git.exe and make sure you selected the one in ** \bin\ ** folder (3) and click ”OK“ (4).
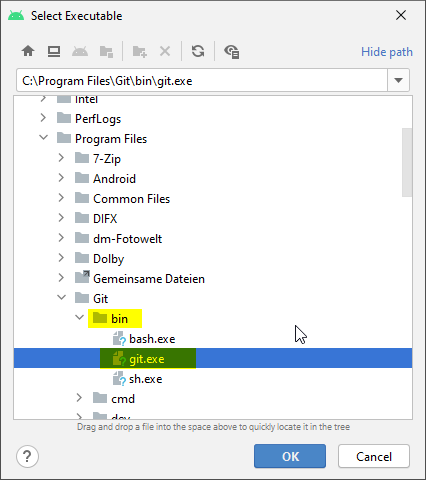
Check your selected git path again with the ”Test“ button as described above.
When the git version is displayed next to the path (see screenshot above), close settings window by clicking ”OK“ button (5).
Mac
Any git version should work. For example https://git-scm.com/download/mac.
Use homebrew to install git:
$ brew install git.For details on installing git see the official git documentation.
If you install git via homebrew there is no need to change any preferences. Just in case: They can be found here: Android Studio - Preferences.
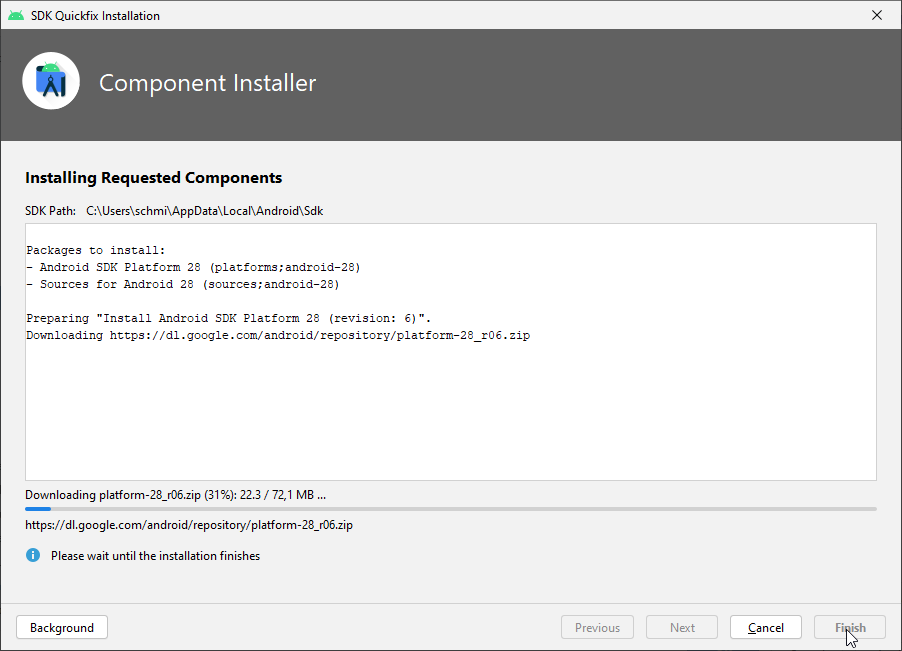
הורדת Android SDK
In the menu, go to File (1) > Settings (2) (or Android Studio > Preferences on Mac).
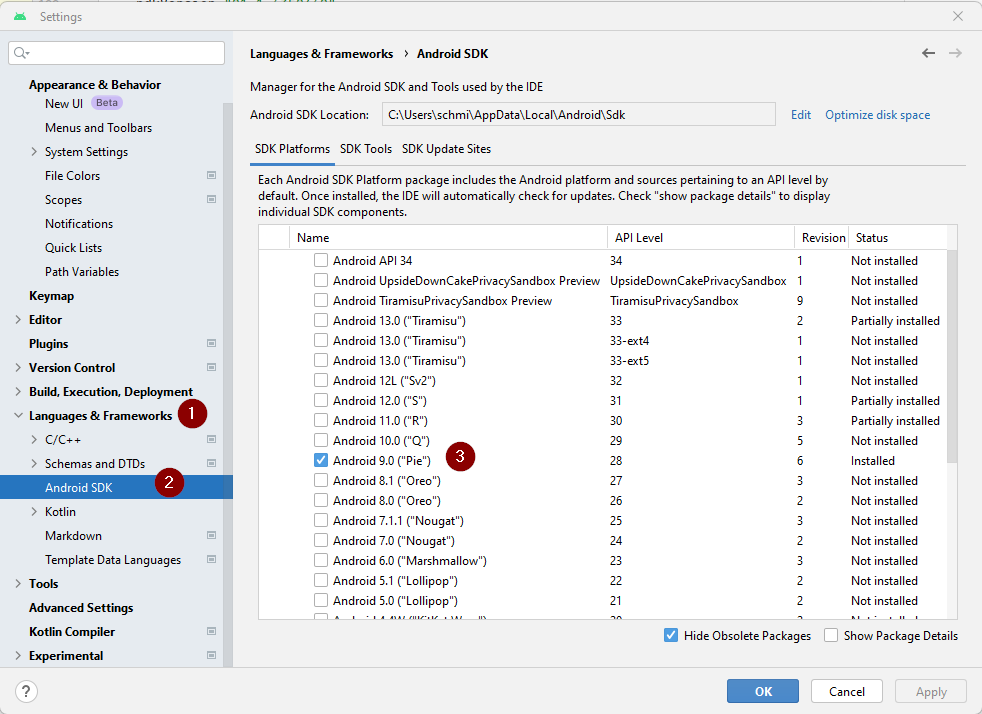
Double-click on Languages & Frameworks to open its submenu (1).
Select Android SDK (2).
Tick the box left of ”Android 9.0 (Pie)“ (3) (API Level 28).
אשרו את ההודעה על ידי לחיצה על »אישור«.
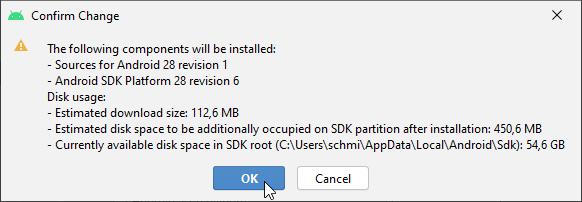
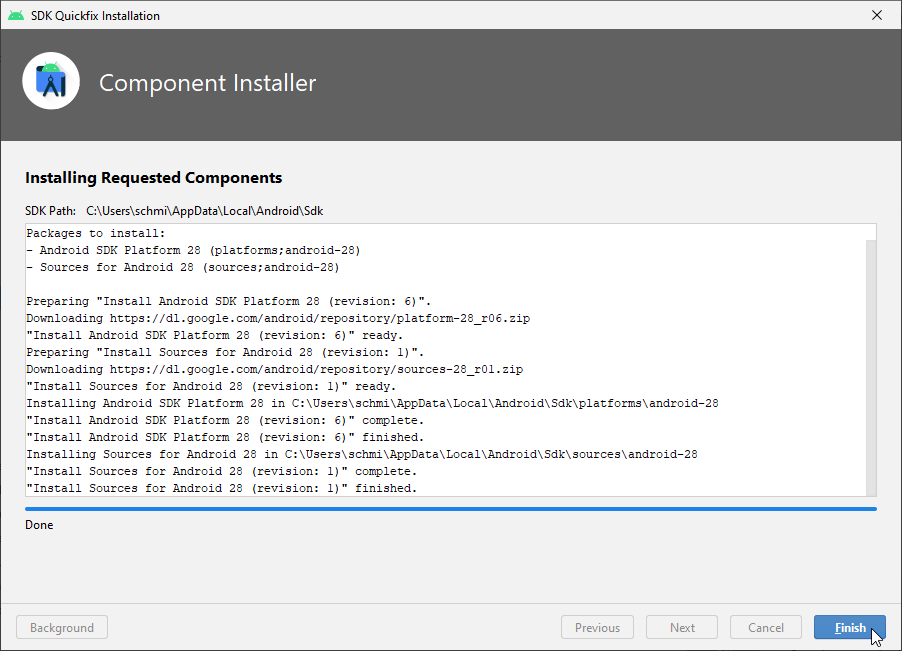
Wait until the SDK download and installation is finished.
When SDK installation is completed the ”Finish“ button will turn blue. Click this button.
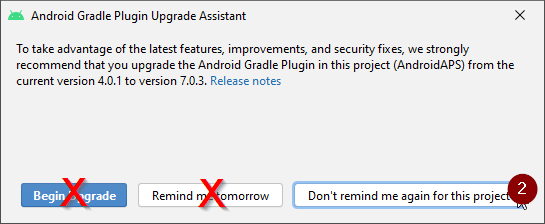
Android Studio might recommend to update the gradle system. Never update gradle! This will lead to difficulties!
If you see an information on the lower right side of your Android Studio window that Android Gradle Plugin is ready to update click on the text ”upgrade“ (1).
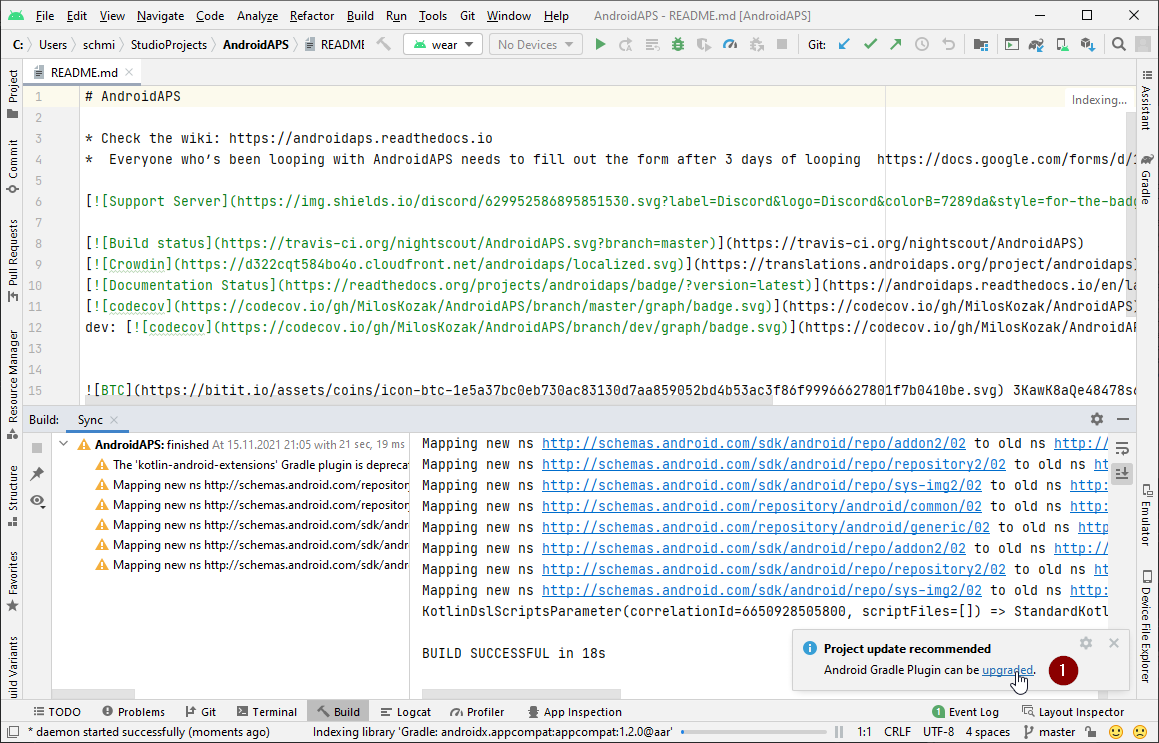
In the dialog box the select ”Don’t remind me again for this project“ (2).
Restart Android Studio before you continue.
יצירת APK חתום
Signing means that you indicate your app to be your own creation but in a digital way as a kind of digital fingerprint within the app itself. That is necessary because Android has a rule that it only accepts signed code to run for security reasons. For more information on this topic, follow this link.
לאחר הפעלת Android Studio, המתינו עד לסיום כל משימות הרקע.
אזהרה: אם עולות שגיאות, אל תמשיכו אל השלבים הבאים. \ אם צריך, עיינו בפתרון בעיות לפיתרון תקלות נפוצות!
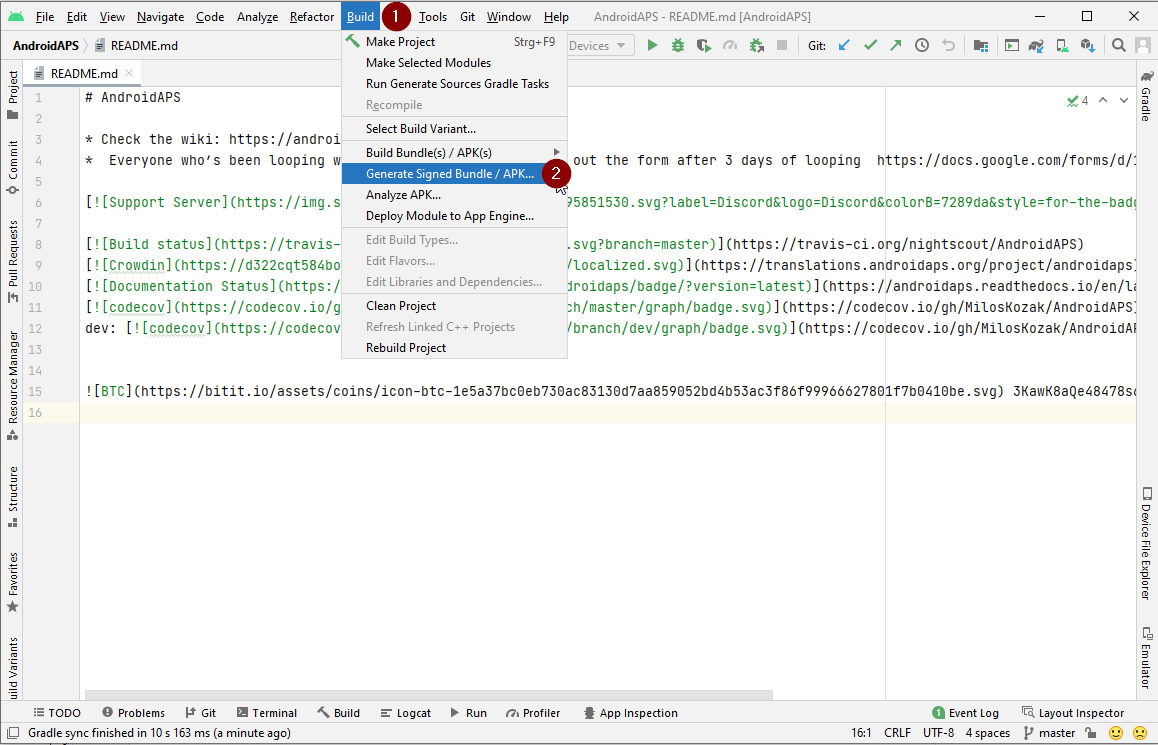
לחצו על ”Build“ (1) בשורת התפריטים ובחרו ”Generate Signed Bundle / APK…“ (2).
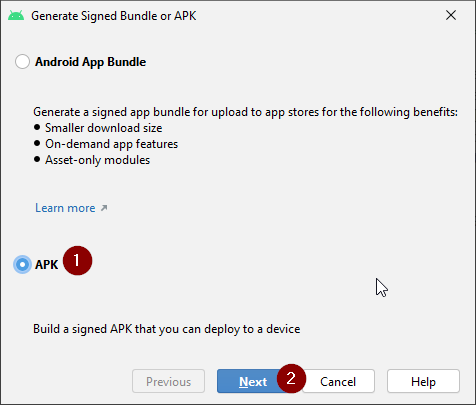
לחצו על ”APK“ (1) במקום ”Android App Bundle“ ולאחר מכן לחצו ”Next“ (2).
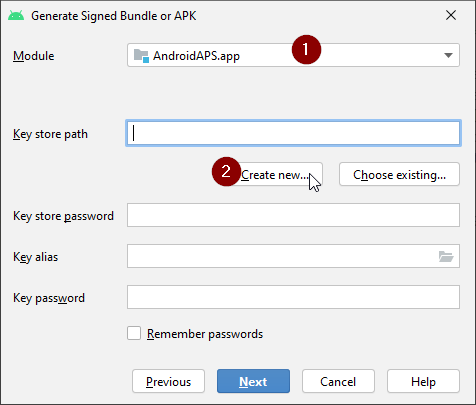
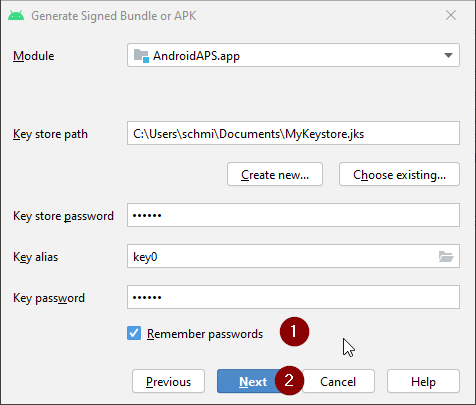
Make sure that module is set to ”AndroidAPS.app“ (1).
לחצו ”Create new“ (2) על מנת להתחיל יצירת ה-key store (מאגר המפתחות).
**הערה: ** בהקשר זה מאגר המפתחות הוא לא יותר מאשר קובץ בו נשמר המידע לחתימת האפליקציה. הוא מוצפן והמידע מאובטח עם סיסמאות.
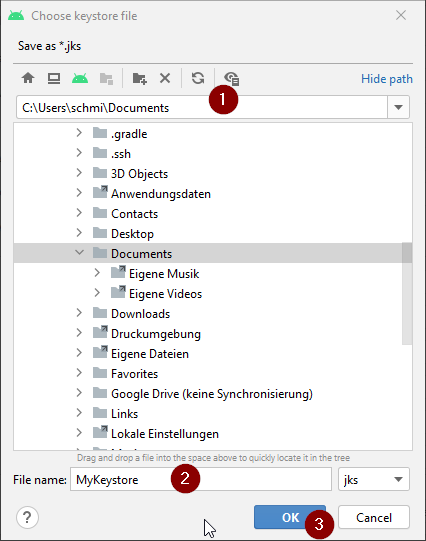
לחצו על צלמית התיקייה על מנת לבחור את הנתיב במחשב לשמירת מאגר המפתחות.
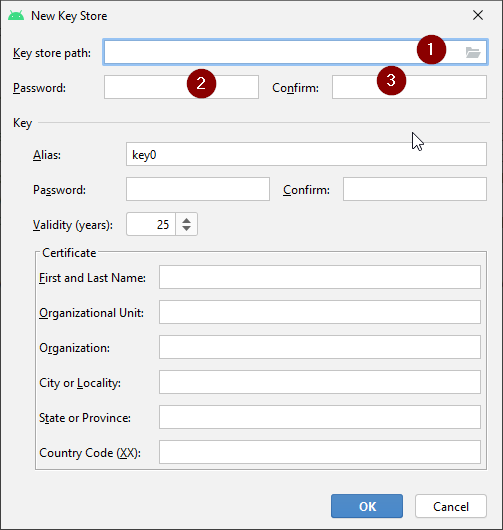
בחרו בנתיב בו מאגר המפתחות יישמר (1).
אזהרה: אל תשמור את המפתח התיקייה בה שמור הפרויקט. אתם חייבים להשתמש בתיקייה שונה! מיקום טוב יכול להיות תיקיית הבית שלכם.
הקלידו שם קובץ למאגר המפתחות (2) ואשרו בלחיצה על ”OK“ (3).
רשמו (2) ואמתו (3) את סיסמת המאגר המפתחות שלכם.
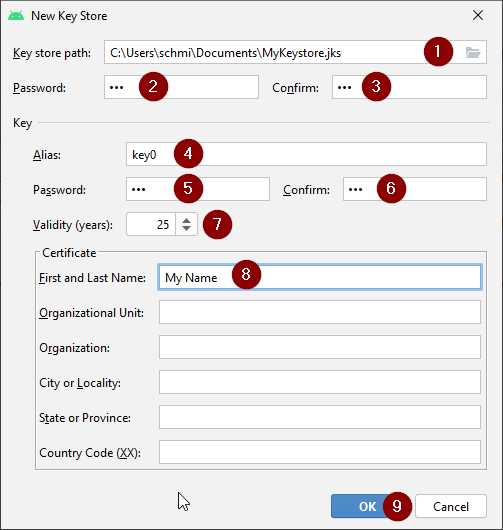
הערה: הסיסמאות למאגר המפתחות לא חייבות להיות מתוחכמות. וודאו שתזכרו את הסיסמאות על ידי שמירתן במקום בטוח. In case you will not remember your passwords in the future, see troubleshooting for lost key store.
רשמו כינוי (4) למאגר המפתחות שלכם. בחרו כל כינוי שתרצו.
רשמו (5) ואמתו (6) את הסיסמה למפתח שלך
התוקף (7) הוא 25 שנה כברירת מחדל. אין חובה לשנות את ערך ברירת המחדל.
חייבים להכניס שם פרטי ושם משפחה (8). כל המידע הנוסף הוא לבחירה.
לחצו על ”OK“ (9) לסיום.
וודאו שסימנתם את התיבה לזכירת הסיסמאות (1). So you don’t have to enter them again next time you build the apk (i.e. when updating to a new AAPS version).
לחצו על ”Next“ (2).
בחרו את ”fullRelease“ (1) כגרסה לבנייה ולחצו על ”Finish“.
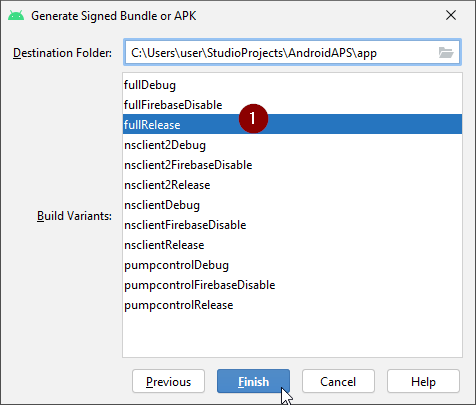
Android Studio יראה ”Gradle Build running“ בתחתית המסך. משימה זו לוקחת זמן, תלוי במחשב ובמהירות חיבור האינטרנט. התאזרו בסבלנות!

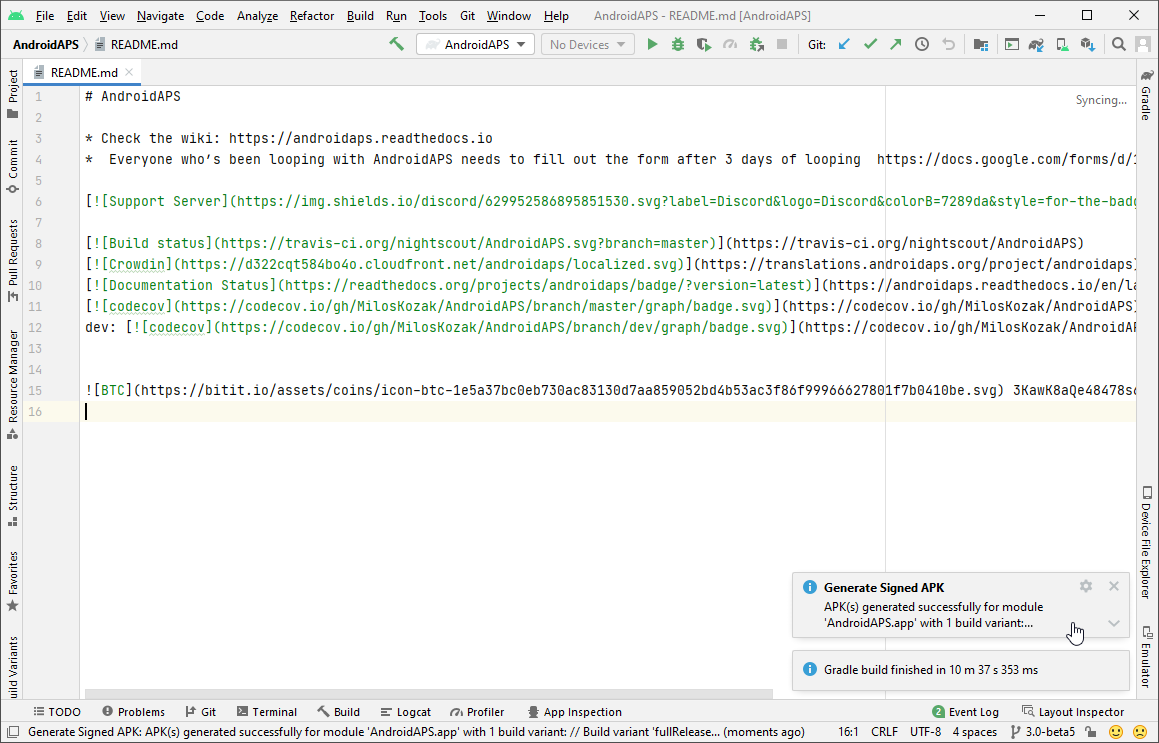
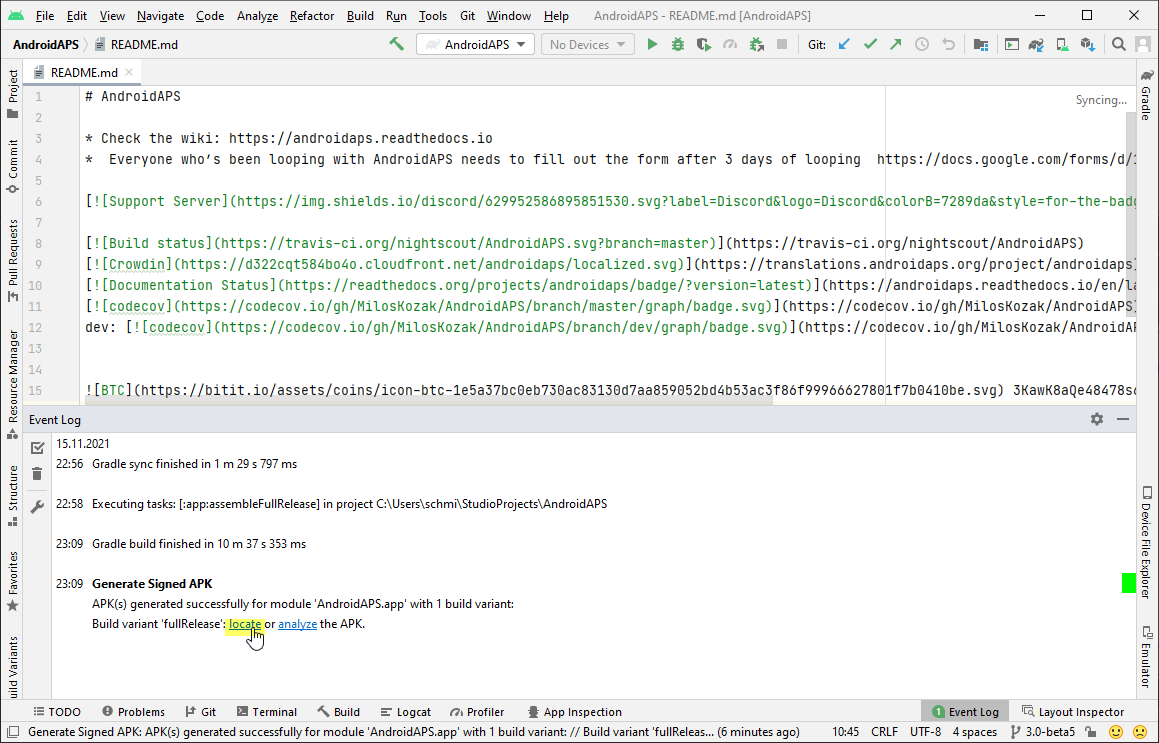
AndroidStudio יציג את ההודעה ”Generate Signed APK“ לאחר סיום בניית האפליקציה.
במקרה שהבנייה לא הסתיימה בהצלחה, פנו לפרק פיתרון בעיות.
לחצו על ההודעות להצגה מורחבת שלהן.
לחצו על הקישור ”locate“.
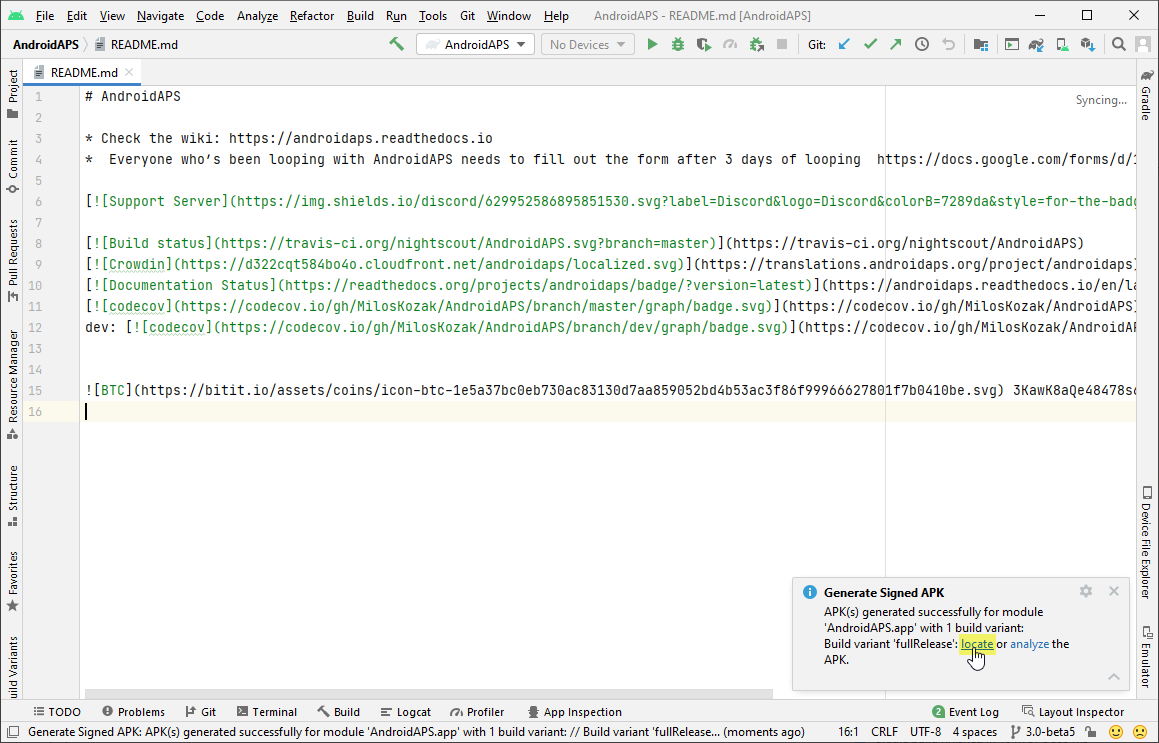
אם ההודעה אינה מוצגת יותר, תוכלו תמיד לפתוח את ה- ”Event log“ ולבחור אותו שם.
מנהל הקבצים במחשבכם ייפתח. נווטו אל הספריה ”full“ (1) > ”release (2).
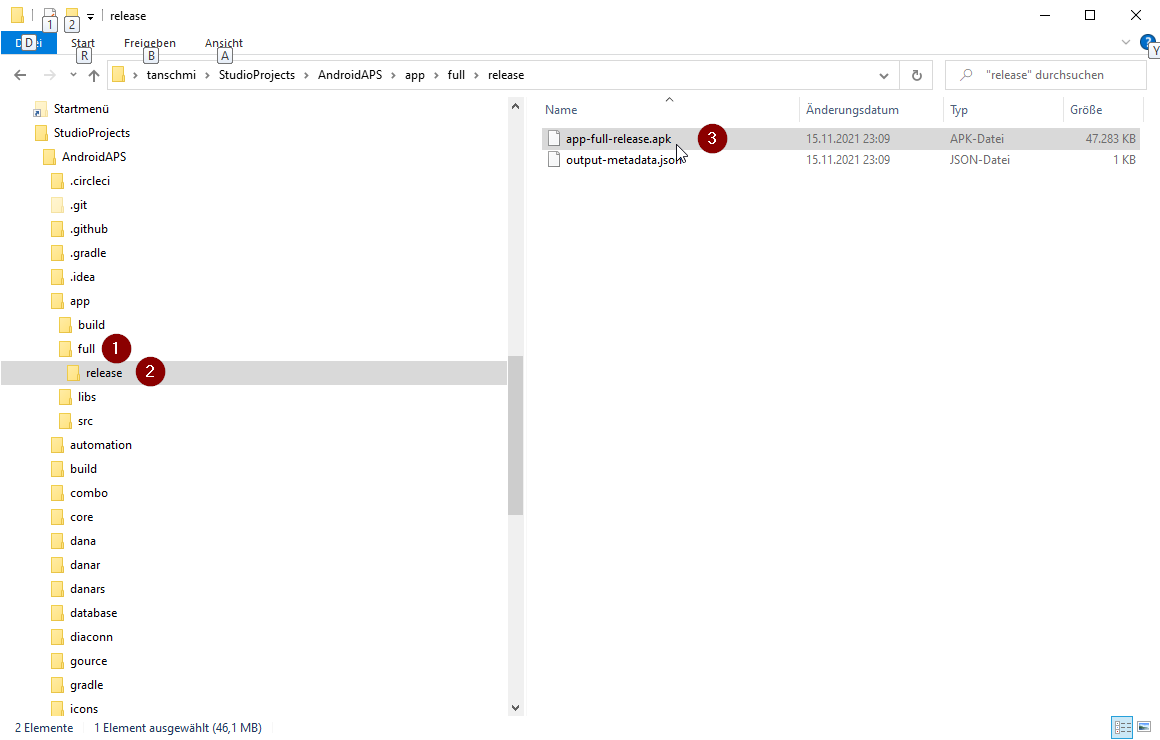
”app-full-release.apk“ (3) הינו הקובץ שאתם מחפשים!
העתיקו את האפליקציה אל הטלפון
Easiest way to transfer app-full-release.apk to your phone is via USB cable or Google Drive. Please note that transfer by mail might cause difficulties and is not the preferred way.
On your phone you have to allow installation from unknown sources. Manuals how to do this can be found on the internet (i.e. here or here).
פתרון בעיות
See separate page troubleshooting Android Studio.