Помпа Omnipod DASH
These instructions are for configuring the Omnipod DASH generation pump (NOT Omnipod Eros), available in AAPS from version 3.0.
Технические характеристики Omnipod DASH
These are the specifications of the Omnipod DASH („DASH“) and what differentiates it from the Omnipod EROS („EROS“):
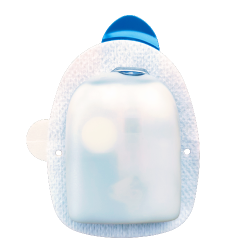
The DASH pods are identified by a blue needle cap (EROS has a clear needle cap). The pods are otherwise identical in terms of physical dimensions.
DASH does not require a BLE link/bridge device (NO RileyLink, OrangeLink, or EmaLink needed).
The DASH’s Bluetooth connection is used only when sending a command (e.g a Bolus), and disconnects right after issuing the command.
No more «no connection to link device / pod» errors with DASH.
AAPS will wait for pod’s accessibility to send commands.
On pod activation, AAPS will find and connect to a new DASH pod.
Expected range from phone: 5-10 meters (YMMV).
Omnipod DASH known AAPS constraints/issues
Android 16 requires AAPS version 3.3.2.1 or later.
General advice is to run AAPS on Android 14 or 16. Android 15 has many reported issues from the community. However, if you do run on Android 15 you will likely need to enable Bluetooth Bonding to successfully activate and use Pods, see General Troubleshooting for more info on the Bonding settings.
Too frequent basal updates may cause basal insulin delivery problems with Omnipod Dash. When using SMB, limit the interval to 5 minutes minimum to avoid this issue.
Dash only supports basal rate in 0.05 U/h steps. If you try to set basal with 0.01 steps in your AAPS profile, AAPS will not give a warning even though the pod will round up the rate into 0.05 steps. If you view POD MGMT/Pod History it will display that 0.05 basal was set. This also means the lowest basal rate allowed by the DASH in AAPS is 0.05U/h.
The activation status of a Pod is stored in the settings file, if you export a settings file with an active pod. Then change to a new pod, then restore the settings from your previous export you will have now restored the old pod activation and removed the new pod activation. This is why we recommend to export settings after each pod activation to allow a restore of that pods activation state if something happens to your rig.
When setting a new basal profile, DASH will suspend delivery before setting the new basal Profile. If there is a communication interruption or error, the basal profile won’t automatically re-start. See section Resuming Insulin Delivery for details.
If alerts are configured, and the pod is about to expire, the pod will keep beeping until alerts are silenced, see Silencing Pod Alerts for details.
There are a number of known issues with Bluetooth which can cause pod activation problems. See Bluetooth Troubleshooting for the known issue and solutions to these problems.
Требования к аппаратному и программному обеспечению
Omnipod DASH is identified by the blue needle cap.
A Compatible Android phone with a Bluetooth Low Energy (BLE) (see Phones for more info), additionally the following information will help guide you on other key considerations around successfully activating and using the DASH on a compatible phone:
The AAPS Omnipod Dash driver connects with the DASH Pod using Bluetooth.
AAPS will automatically establish a new Bluetooth connection to the Pod every time it needs to send a command (e.g a Bolus), after sending the command the Bluetooth connection is immediately disconnected.ПРИМЕЧАНИЕ:
The Bluetooth connection can be interrupted/disturbed by other Bluetooth devices linked to the phone that is running AAPS, like earbuds etc… Devices like this can cause connection errors or pod activation issues on some models of phones. It’s a good idea to review the tested hardware setups list for known working configurations before committing to a new rig built around Omnipod DASH.
There are a number of known issues with Bluetooth which can cause pod activation problems (See Troubleshooting for advice on other Bluetooth issues) specifically the Bluetooth related issues section.
For Android 15 or below: You MUST use Version 3.0 or newer of AAPS using the Build APK instructions, however it’s advisable to run the latest released version.
For Android 16: you MUST use Version 3.3.2.1 or newer of AAPS using the Build APK instructions, due to Android 16 changing how its Bluetooth works. Any version earlier than 3.3.2.1 will likely cause pod failures and/or activation issues.
A supported Continuous Glucose Monitor (CGM)
The instructions below explain how to activate a new pod session using AAPS. You should wait for your current Pod to be close expiry, as you will need to activate a new Pod with AAPS. Once a pod is de-activated it cannot be reused/re-activated, the de-activation is final.
Подготовка к работе
Ensure you have read and understand this whole guide, have read and understand the Before You Begin section, as well as Omnipod and AAPS Constraints and Issues to avoid running into a known problem.
SAFETY FIRST - You SHOULD NOT try to connect AAPS to a pod for the first time without having access to all of the following:
Extra pods (3 or more spare)
Spare Insulin and MDI equipment
A working Omnipod PDM (In case AAPS fails)
Supported Phones are a must! (See Hardware/Software Requirements)
Correct version of AAPS built and installed
Your Omnipod Dash PDM will become redundant after the AAPS Dash driver activates your pod.
Before using AAPS you or your care giver would have had to manage the Pod using the Omnipod PDM (or in some regions a Phone app) to send commands to your DASH (e.g a Bolus).
The DASH can only facilitate a single Bluetooth device (e.g PDM or Phone) connection to manage and send commands.
The device that successfully activates the pod is the only device allowed to communicate with that Pod from that point forward. This means that once you activate a DASH with your Android phone using AAPS, you will no longer be able to use your PDM with that pod! For the time that Pod is active the AAPS Dash driver running on your Android phone is now the new PDM for your pod.
DO NOT Throw away your PDM! It is recommended to keep it around as a backup and for emergencies, for instance when your phone gets lost or AAPS is not working correctly.
Your pod WILL NOT stop delivering insulin when it is not connected to AAPS.
Default basal rates are programmed on the pod on activation as defined in the current active Profile.
As long as AAPS is operational it will send basal rate adjustment commands that run for a maximum of 120 minutes.
When for some reason the pod does not receive any new commands (for instance because communication was lost due to Pod ➜ phone distance) the pod will automatically fall back to default basal rates as defined in your Profile.
AAPS Profile(s) do not support 30 minute basal rate time frames
If you are new to AAPS and are setting up your basal rate Profile for the first time, please be aware that basal rates starting on a half-hour basis are not supported. For example, on your Omnipod PDM, if you have a basal rate of 1.1 units which starts at 09:30 and has a duration of 2 hours ending at 11:30, it is not possible replicate this exact basil Profile in AAPS.
You will need to change this 1.1 unit basal rate to a time range of either 9:00-11:00 or 10:00-12:00. Even though the DASH hardware itself supports the 30 minute basal rate Profile increments, AAPS does NOT support this feature.
0U/h Profile basal rates are NOT supported in AAPS
While the DASH does support a zero basal rate, AAPS uses multiples of the user’s Profile basal rate to determine automated treatment; it cannot function with a zero basal rate.
Instead a temporary zero basal rate can be achieved through the «Disconnect pump» function, or through a combination of Disable Loop/Temp Basal Rate or Suspend Loop/Temp Basal Rate.
NOTE: The lowest basal rate allowed by the DASH in AAPS is 0.05U/h.
Selecting Dash in AAPS
There are two available options to configure Omnipod in AAPS:
Вариант 1: При начальной установке
When installing AAPS for the first time, the Setup Wizard will guide new users through key features and installation requirements for AAPS.
Select “DASH” when you reach Pump selection.
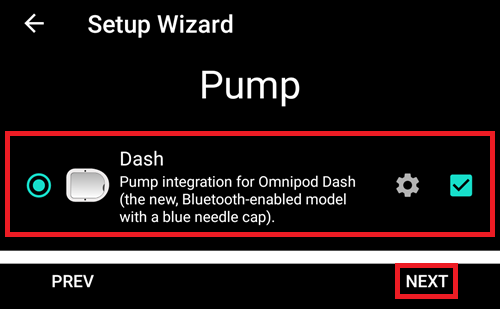
When in doubt you can also select “Virtual Pump” and select “DASH” later, after setting up AAPS (See Option 2).
Вариант 2: Конфигуратор
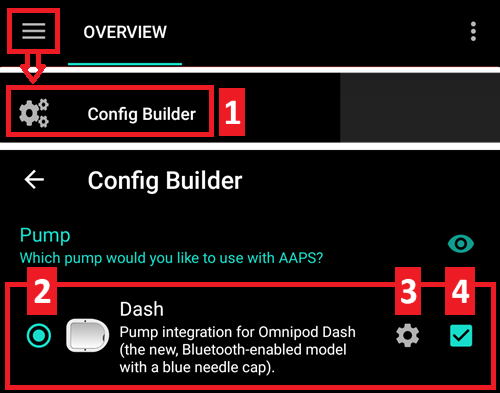
On an existing installation you can select the DASH pump from the Config builder:
On the top-left hand corner hamburger menu select Config Builder (1) ➜ Pump ➜ Dash ➜ Settings Gear (3) by selecting the radio button (2) titled Dash.
Selecting the checkbox (4) next to the Settings Gear (3) will allow the DASH menu to be displayed as a tab in the AAPS interface titled DASH. Checking this box will facilitate your access to the DASH commands when using AAPS.
NOTE: A faster way to access the Dash settings can be found below in the DASH settings section of this document.
Верификация выбора драйвера Omnipod
To verify that you have selected the DASH in AAPS, if you have checked the box (4), swipe to the left from the Overview tab, where you will now see a DASH tab on AAPS. If this box is left unchecked, you’ll find the DASH tab in the hamburger menu upper left.
Настройка помпы Omnipod Dash
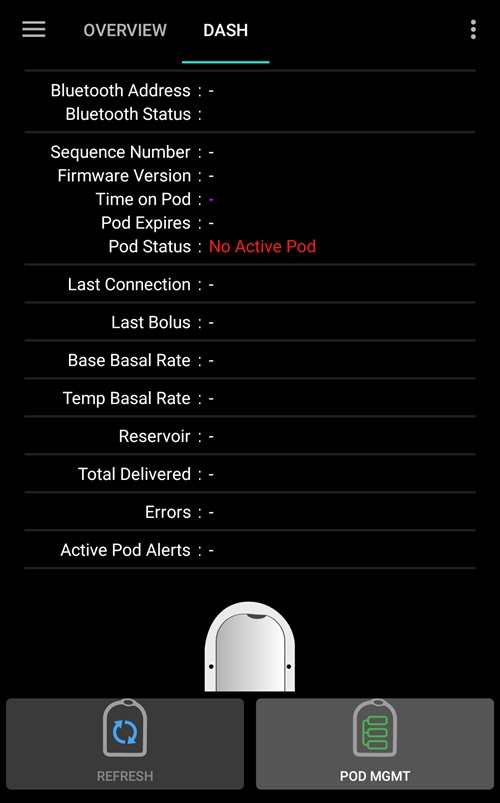
Swipe left to the DASH tab where you will be able to manage all pod functions (some of these functions are not enabled or visible without an active pod session):
![]() „Refresh“ pod connectivity and status, be able to silence pod alarms when the pod beeps
„Refresh“ pod connectivity and status, be able to silence pod alarms when the pod beeps
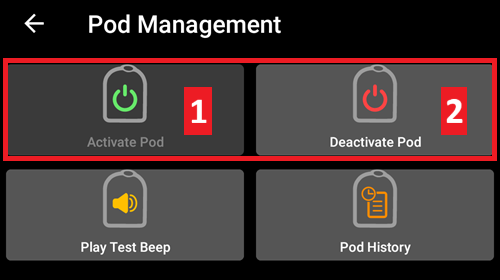
![]() „Pod Management“ (Activate, Deactivate, Play test beep, and Pod history)
„Pod Management“ (Activate, Deactivate, Play test beep, and Pod history)
Активация Pod
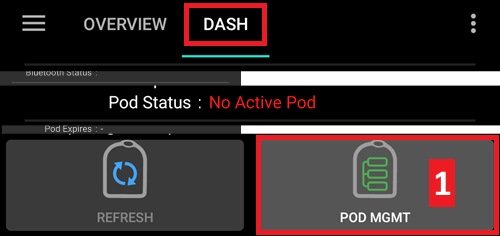
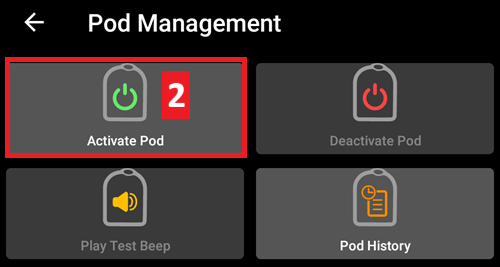
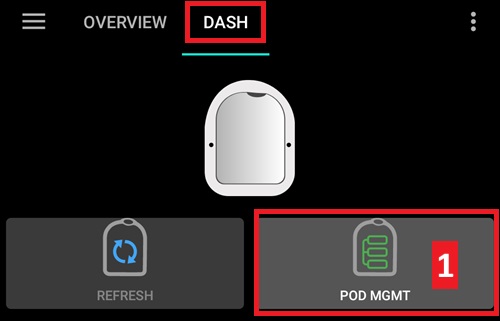
Перейдите на вкладку DASH, нажмите кнопку УПРАВЛЕНИЕ помпой (1), затем нажмите Активировать Pod (2).
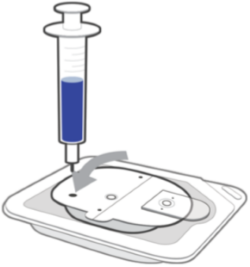
Появится экран Заполнить Pod. Fill a new pod with at least 80 units of insulin and listen for two beeps indicating that the pod is ready to be primed.
NOTE: When calculating the total amount of insulin you need for 3 days, please take into account that priming the pod will use about 3-10 units.
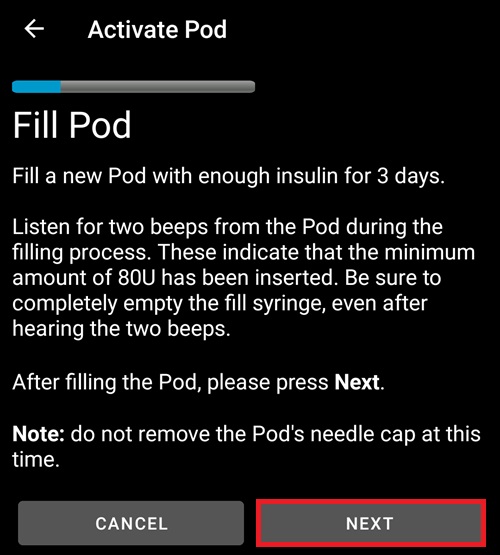
Ensure that the new pod and the phone running AAPS are within close proximity of each other and click the Next button.
NOTE: if the error message below pops up „Could not find an available pod for activation“ (this can happen), do not panic. Click on the Retry button. In most situations activation will continue successfully.
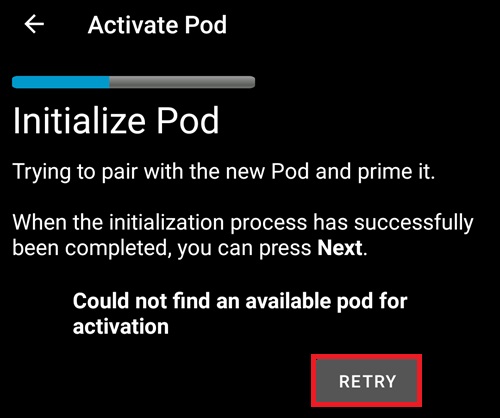
On the Initialize Pod screen, the pod will begin priming (you will hear a click followed by a series of ticking sounds as the pod primes itself).
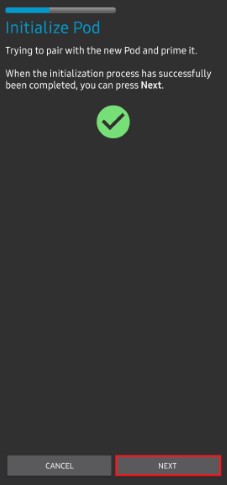
A green checkmark will be shown upon successful priming, and the Next button will become enabled. Нажмите на кнопку Далее для завершения инициализации и появления экрана Подключить Pod.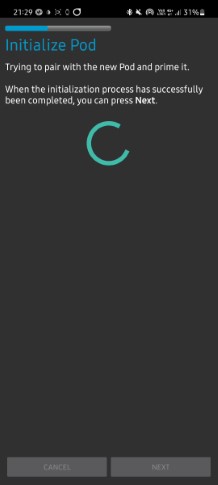
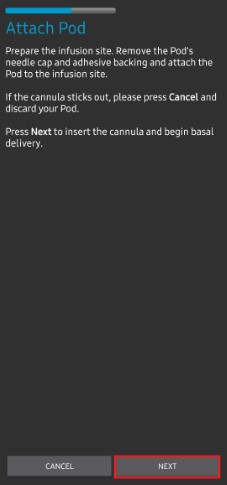
Next, prepare the infusion site ready to receive the new pod. Wash hands to avoid any risk of infection. Clean the infusion site by either using soap and water or an alcohol wipe to disinfect and let the skin air dry completely before proceeding.
If you get skin irritation from the adhesive consider using a Barrier Wipe or Barrier Spray.Remove the pod’s blue plastic needle cap. If you see something that sticks out of the pod or it looks unusual, STOP the process and start with a new pod. If everything looks OK, proceed to take off the white paper backing from the adhesive and stick the pod to the selected site on your body.
По завершении нажмите кнопку Далее.
Теперь появится диалоговое окно Подключить Pod. click on the OK button ONLY if you are ready to deploy the cannula!
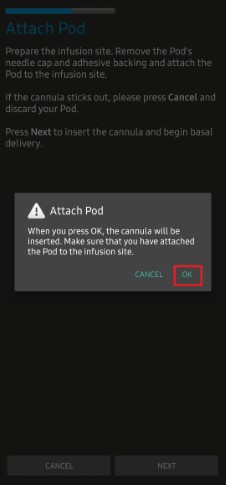
After pressing OK, it may take some time before the DASH responds and inserts the cannula (1-2 minutes maximum). Be patient!
NOTE: Before the cannula is inserted, it is good practice to pinch the skin near the cannula insertion point. Это уменьшает болевые ощущения при вводе иглы и снижает шансы на развитие окклюзий.

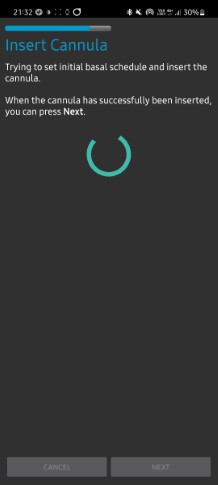
A green checkmark is shown on the screen, and the Next button becomes available to select upon successful cannula insertion.
Click on the Next button.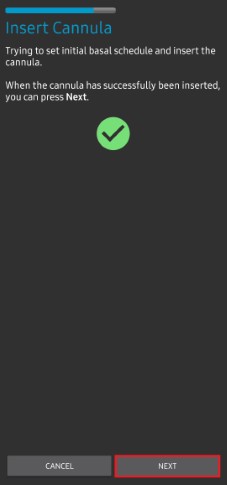
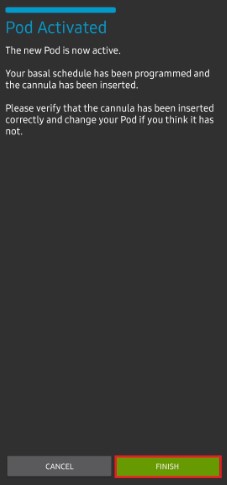
Появится экран Pod активирован.
Нажмите на зеленую кнопку Завершено.
Поздравляем! You have now started a new pod session.
На экране меню управления Pod кнопка Активировать Pod (1) теперь выключена и Деактивировать Pod (2) включена. Это потому, что под активен и вы не можете активировать дополнительный под без деактивации текущего.
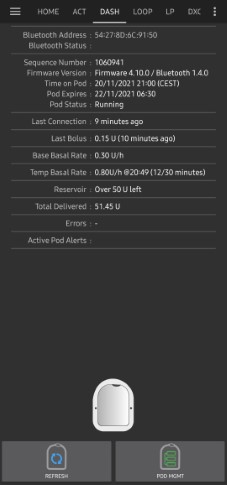
Нажмите на кнопку Назад на телефоне, чтобы вернуться на вкладку DASH, которая теперь отображает текущую информацию о Pod включая скорость базала, наполненность резервуара, введенный инсулин, ошибки и предупреждения.
NOTE: For more details on the information displayed go to the DASH Tab section of this document.
NOTE: It is good practice to export settings AFTER activating the pod. Settings should be exported after each pod change and once a month, ensure you copy the exported settings file to a cloud storage location (e.g. Google Drive) or somewhere off your phone in case you loose your phone (see Export settings).
Деактивация Pod
Under normal circumstances, the expected lifetime of a pod is three days (72 hours) and an additional 8 hours after the pod expiration warning for a total of 80 hours of total pod usage.
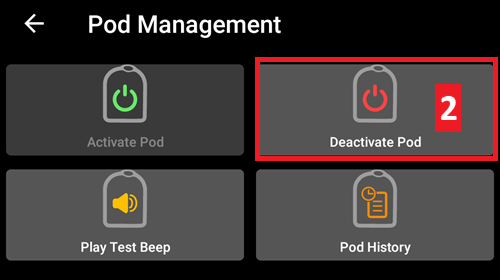
To deactivate a pod (either from expiration or from a pod failure):
Go to the DASH tab, click on the POD MGMT (1) button, on the Pod Management screen click on the Deactivate Pod (2) button.
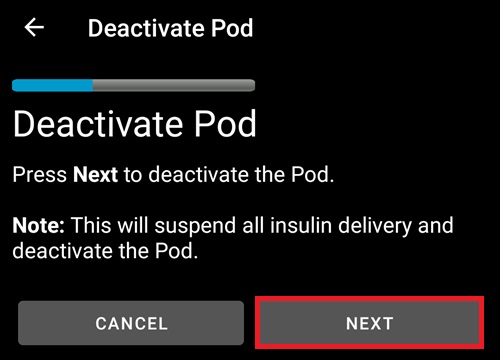
На экране Деактивировать Pod нажмите кнопку Далее для начала процесса деактивации пода.
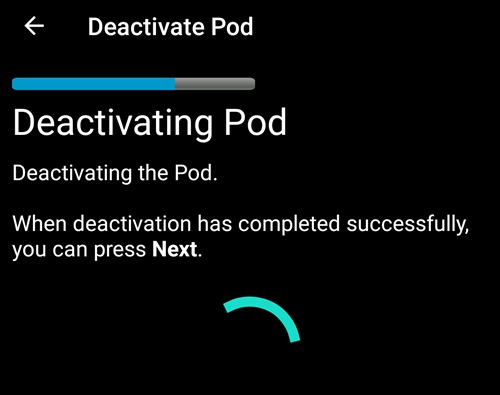
Вы получите подтверждающий звуковой сигнал о том, что деактивация прошла успешно.
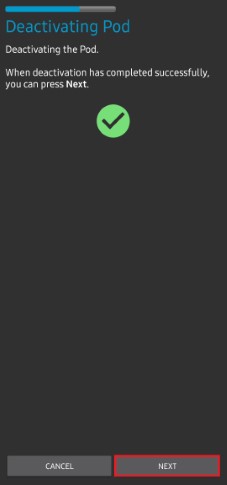
A green checkmark will be displayed upon successful deactivation. Нажмите на кнопку Далее, чтобы отобразился экран Pod деактивирован.
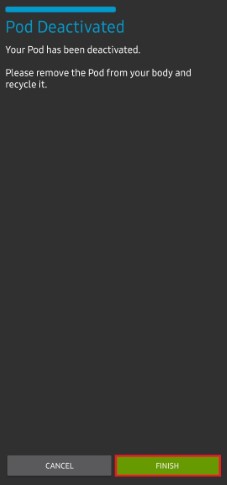
Теперь вы можете удалить свой pod так как активная сессия завершена.
Для возврата на экран Управление помпой Omnipod нажмите на зеленую кнопку.
Теперь вы оказались в меню Управление помпой Omnipodt; нажмите кнопку «Назад» на телефоне, чтобы вернуться на вкладку DASH.
Убедитесь, что Статус помпы: отображает сообщение Нет активных Pod.
Возобновление подачи инсулина
NOTE: During Profile Switches, like when using the PDM, AAPS must suspend delivery on the Pod before setting the new basal Profile. If communication fails between the suspend and resume commands, then delivery can stay suspended, Read Delivery suspended in the troubleshooting section for more details.
When insulin delivery is suspended you will need to issue a command to instruct the active, currently suspended pod to resume insulin delivery. After the command is successfully processed, insulin will resume normal delivery using the current basal rate based on the current time from the active basal Profile. The pod will again accept commands for bolus, TBR, and SMB.
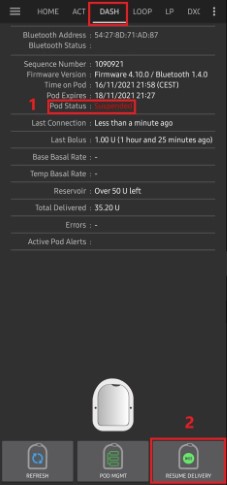
Перейдите на вкладку DASH и убедитесь, что поле статус Pod (1) отображает ПОМПА ОСТАНОВЛЕНА (ПРИОСТАНОВЛЕНО), затем нажмите кнопку ВОЗОБНОВИТЬ ПОДАЧУ(2) для передачи команды на Pod о возобновлении подачи инсулина. В поле Статус Pod (3) будет отображаться ПОДАЧА ВОЗОБНОВЛЕНА.

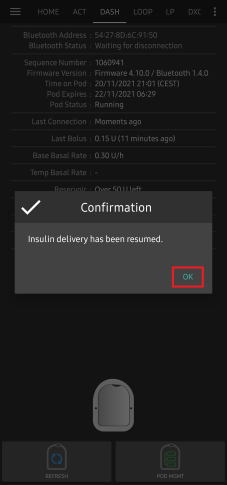
Когда команда Возобновить подачу прошла успешно, в диалоговом окне подтверждения будет показано сообщение Подача инсулина возобновлена. Нажмите OK для подтверждения и продолжения.
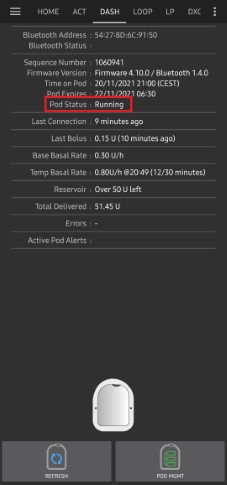
Вкладка DASH обновит поле **статус помпы (1)**и отобразит ВЫПОЛНЯЕТСЯ, кнопка Возобновить подачу больше не будет отображаться
Отключение звуковых оповещений пода
The process below will show you how to acknowledge and dismiss pod beeps when the active pod time reaches the warning time limit before the pod expiration of 72 hours (3 days). This warning time limit is defined in the Hours before shutdown Dash alerts setting. The maximum life of a pod is 80 hours (3 days 8 hours), however Insulet recommends not exceeding the 72 hours (3 days) limit.
NOTE: The SILENCE ALERTS (3) button is only available on the DASH tab when the pod expiration or low reservoir alert has been triggered. If the SILENCE ALERTS button is not visible and you hear beep sounds from the pod, try to „Refresh pod status“.
When the defined Hours before shutdown warning time limit is reached, the pod will issue warning beeps to inform you that it is approaching its expiration time and a pod change will be required soon.
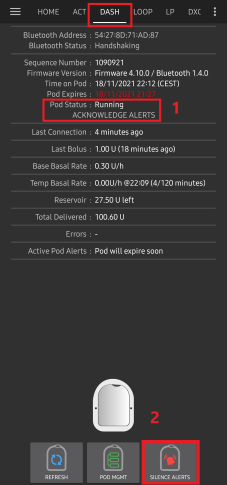
You can verify this on the DASH tab, the Pod expires: (1) field will show the exact time the pod will expire (72 hours after activation), and the text will turn red after this time has passed.
Under the Active Pod alerts (2) field the status message Pod will expire soon is displayed. Также появится кнопка заглушить сигналы оповещения (3).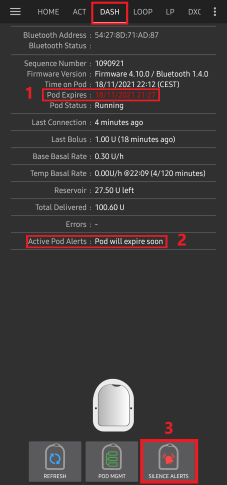
Go to the DASH tab and press the SILENCE ALERTS (2) button. AAPS sends the command to the pod to deactivate the pod expiration warning beeps and updates the Pod status (1) field with ACKNOWLEDGE ALERTS.
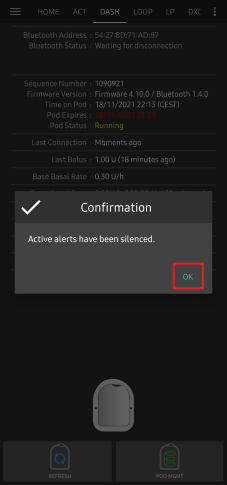
После успешного отключения оповещений активный Pod издаст два сигнала и на экране появится подтверждающее сообщение активные оповещения заглушены. Нажмите кнопку OK для того, чтобы подтвердить действие и убрать диалоговое окно.
Перейдите на вкладку DASH. В поле **оповещения активного Pod ** больше не отображается предупреждение об истечении срока действия.
Просмотр истории Pod
This section explains how to review your active pod history and filter by different action categories. The pod history tool allows you to view the actions and results committed to your currently active pod during its three days (72 - 80 hours) life.
This feature is helpful in verifying boluses, TBRs and basal commands that were sent to the pod. The remaining categories are useful for troubleshooting issues and determining the order of events that occurred leading up to a failure.
NOTE: Only the last command can be uncertain. New commands will not be sent until the last „uncertain“ command becomes „confirmed“ or „denied“. The way to „fix“ uncertain commands is to „refresh pod status“.
Перейдите на вкладку DASH, нажмите на кнопку УПРАВЛЕНИЕ ПОМПОЙ(1) чтобы вызвать меню Управление помпой Omnipod и нажмите на кнопку История Pod(2) для вызова экрана истории.

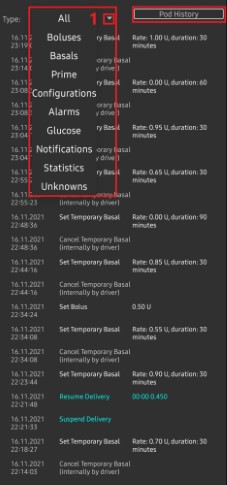
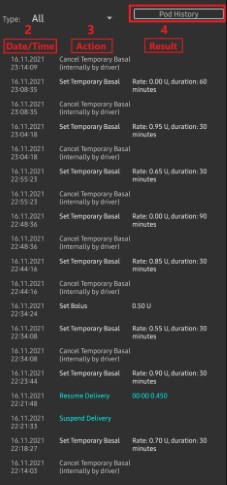
На экране под историей по умолчанию отображается категория Все (1) и показывает Дату и время (2) всех подов Действия (3) и Результаты (4) в обратном хронологическом порядке,. Use your phone’s back button 2 times to return to the DASH tab in the main AAPS interface.
Вкладка DASH
Below is an explanation of the layout and meaning of the icons and status fields on the DASH tab in the main AAPS interface.
NOTE: If any message in the DASH tab status fields report (uncertain), then you will need to press the Refresh button to clear it and refresh the pod status.
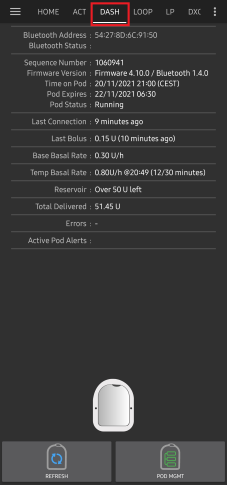
Поля
АдресBluetooth-: Отображает текущий bluetooth адрес подключенного Pod.
Bluetooth Status: Displays the current connection status.
Порядковый Номер Отображает номер последовательности активного POD.
Версия прошивки: Отображает версию прошивки для активного соединения.
Время на Pod: Отображает текущее время на Pod.
Статус Pod: Отображает статус пода.
Прошлое подключение: Отображает время последней связи с Pod.
Только что - меньше 20 секунд назад.
Менее минуты назад - более 20, но менее 60 секунд назад.
1 минуту назад - более 60, но менее 120 секунд (2 мин)
XX минут назад - более 2 минут назад, определяется величиной XX
Предыдущий болюс: Отображает величину болюса, отправленного в активный Pod с указанием в скобках как давно он был подан.
Базовая скорость базала: Отображает базовую скорость, запрограммированную на текущее время из профиля базала.
Временная скорость базала: Отображает текущую временную скорость базала в следующем формате
{ед./час} @{ время начала врем. базала TBR} ({мин. прошло}/{всего минут TBR})
Example:* 0.00U/h @18:25 ( 90/120 minutes)
Резервуар: Показывает 50+ед. когда в резервуаре остается более 50 ед. Ниже 50 ед. показывается точное кол-во единиц.
Всего подано Отображает общее количество единиц инсулина, доставленных из резервуара. Сюда входит инсулин, используемый для активации и заполнения инфузионного набора.
Ошибки: Отображает последнюю возникшую ошибку. Review the Pod history and log files for past errors and more detailed information.
Активные оповещения Pod зарезервировано для текущих оповещений на активном Pod.
Кнопки
![]() Sends a refresh command to the active pod to update communication.
Sends a refresh command to the active pod to update communication.
Используйте для обновления статуса pod и сброса полей статуса, содержащих текст (не подтверждено).
See the Troubleshooting section below for additional information.
![]() Navigates to the Pod management menu.
Navigates to the Pod management menu.
![]() When pressed this will disable the pod alerts beeps and notifications (expiry, low reservoir..).
When pressed this will disable the pod alerts beeps and notifications (expiry, low reservoir..).
Кнопка отображается только после появления предупреждения об истечении срока действия.
После успешного сброса, этот значок не будет отображаться.
![]() Resumes the currently suspended insulin delivery in the active pod.
Resumes the currently suspended insulin delivery in the active pod.
Меню управления помпой
Below is describes the purpose of each icon on the Pod Management menu, accessed by pressing POD MGMT (1) button from the DASH tab.
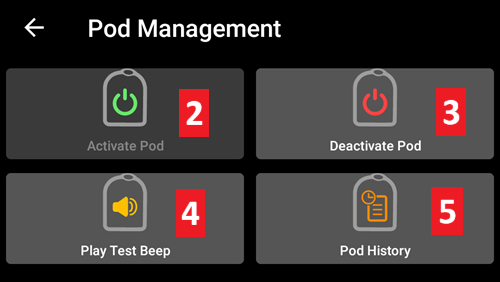
The table below describes each button and it’s function:
Button |
Function |
|---|---|
1 |
Access the Pod Mgmt settings |
2 |
Activate Pod: Primes and activates a new pod. |
3 |
Deactivate Pod: Deactivates the currently active pod. |
4 |
Play Test Beep : Plays a single test beep on the pod when pressed. |
5 |
Pod history : Displays the active pod activity history. |
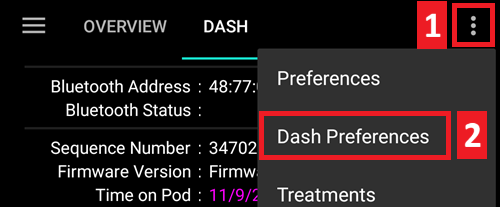
Настройки Dash
The Dash driver settings are configurable from the top-left hand corner hamburger menu under Config Builder (1) ➜ Pump Dash ➜ Settings Gear (3) by selecting the radio button (2) titled Dash. Selecting the checkbox (4) next to the Settings Gear (3) will allow the Dash menu to be displayed as a tab in the AAPS interface titled DASH.
NOTE: A faster way to access the Dash settings is by accessing the 3 dot menu (1) in the upper right hand corner of the DASH tab and selecting Dash preferences (2) from the dropdown menu.
The settings groups are listed below; you can enable or disable via a toggle switch for most entries described below:
NOTE: An asterisk (*) denotes the default setting is enabled.
Звуковые сигналы подтверждения
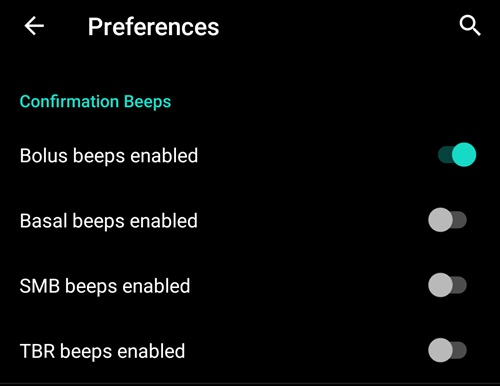
Provides confirmation beeps from the pod for bolus, basal, SMB, and TBR delivery and changes.
Bolus beeps enabled: Enable or disable confirmation beeps when a bolus is delivered.
Basal beeps enabled: Enable or disable confirmation beeps when a new basal rate is set, active basal rate is canceled or current basal rate is changed.
SMB beeps enabled: Enable or disable confirmation beeps when a SMB is delivered.
TBR beeps enabled: Enable or disable confirmation beeps when a TBR is set or canceled.
Оповещения
Provides AAPS alerts for pod expiration, shutdown, low reservoir based on the defined threshold units.
NOTE: an AAPS notification will ALWAYS be issued for any alert after the initial communication with the pod since the alert was triggered. Dismissing the notification will NOT dismiss the alert UNLESS automatically acknowledge Pod alerts is enabled. To MANUALLY dismiss the alert you must visit the DASH tab and press the Silence ALERTS button.
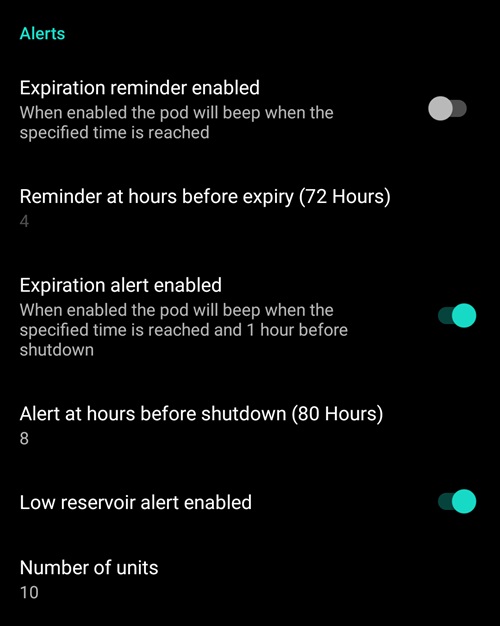
Expiration reminder enabled: Enable or disable the pod expiration reminder set to trigger when the defined number of hours before shutdown is reached.
Hours before shutdown: Defines the number hours before the active pod shutdown occurs, which will then trigger the expiration reminder alert.
Low reservoir alert enabled: Enable or disable an alert when the pod’s remaining units low reservoir limit is reached as defined in the Number of units field.
Number of units: The number of units at which to trigger the pod low reservoir alert.
Уведомления
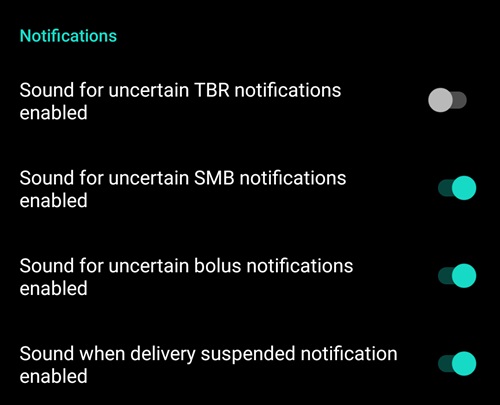
The Notification section allows the user to select their preferred notifications and audible phone alerts when AAPS is uncertain about the status of TBR, SMB, or bolus, and when delivery suspended events were successful.
NOTE: These are notifications only, no audible beep alerts are made.
Sound for uncertain TBR notifications enabled: Enable or disable this setting to trigger an audible alert and visual notification when AAPS is uncertain if a TBR was successfully set.
Sound for uncertain SMB notifications enabled: Enable or disable this setting to trigger an audible alert and visual notification when AAPS is uncertain if an SMB was successfully delivered.
Sound for uncertain bolus notifications enabled: Enable or disable this setting to trigger an audible alert and visual notification when AAPS is uncertain if a bolus was successfully delivered.
Sound when delivery suspended notifications enabled: Enable or disable this setting to trigger an audible alert and visual notification when suspend delivery was successfully delivered.
Вкладка Действия (ACT)
This tab is well documented in the main AAPS documentation but there are a few items on this tab that are specific to how the DASH differs from tube based pumps, especially after the processes of applying a new pod.
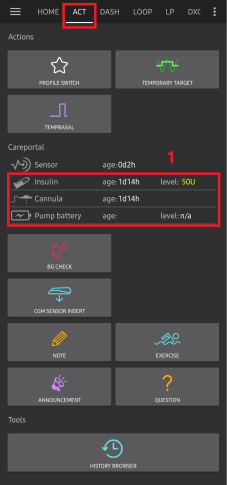
Go to the Actions (ACT) tab in the main AAPS interface.
Under the Careportal (1) section the Insulin and Cannula fields will have their age reset to 0 days and 0 hours after each pod change. Это происходит из-за устройства и принципа работы Omnipod. Так как Pod вводит катетер непосредственно в кожу на месте установки, в помпах Omnipod не применяется традиционная трубка. Поэтому после замены пода значение каждой из этих величин автоматически сбрасывается на нольВозраст батареи помпыне отображается поскольку он всегда больше срока работы пода (максимум 80 часов). Батарея помпы и резервуар инсулина в каждом поде свои.
Уровень
Insulin Level
Insulin level displayed is the amount reported by DASH. However, the pod only reports the actual insulin reservoir level when it is below 50 units. Until then “Above 50 units” will be displayed. The amount reported is not exact: when the pod reports ‘empty’ in most cases the reservoir will still have some additional units of insulin left.
The DASH overview tab will display as described the below:
Above 50 Units - The pod reports more than 50 units currently in the reservoir.
Ниже 50 ед.- Количество инсулина, остающегося в резервуаре по данным, полученным от Pod.
Additional note:
SMS - В SMS сообщается реальный остаток в ед. или 50+ед
Nightscout - при более чем 50 единиц в Nightscout выгружается значение 50 ед.(версия 14.07 и старше). Более новые версии покажут 50 + когда более 50 единиц.
Устранение неполадок
This section covers common known issues and solutions for Omnipod DASH use with AAPS. There is also General Troubleshooting section in the documentation that should be reviewed as it covers relevant topics for some Pod issues too.
Where to get help for DASH
All of the development work for the DASH is done by the community on a volunteer basis; please keep this in mind and use the following guidelines before requesting assistance:
Уровень 0: Прочитайте соответствующий раздел этой документации, чтобы удостовериться, что вы понимаете, как должна работать функция, с которой вы испытываете трудности.
Уровень 1: Если вы все еще сталкиваетесь с проблемами, которые не можете решить, изучая документацию, перейдите в канал #AAPS на Discord с помощью этой ссылки-приглашения. There are also numerous Facebook and other groups you can ask in too (see Getting Help)
Уровень 2: Найдите, есть ли ваш случай среди существующих проблем, и если есть, подтвердите/прокомментируйте/добавьте информацию о нем. Если нет, создайте новый вопрос и приложите свои лог-файлы.
Будьте терпеливы - решения проблем часто требуют времени и терпения как от пользователей, так и от разработчиков.
When requesting help come prepared with the following information to help those in the community with your specific questions and problems:
Android phone make and model
Android OS version (e.g 15 or 16)
Did you recently upgrade your Android OS version?
The version of AAPS you are running
Plain english description of the problem you are facing considering some of the following things
Was it working before now?
When did it work or not work?
Did you make any changes to configuration or profile settings?
Did you pair a new bluetooth device?
Did you upgrade or install a new app?
How long was it working before it stopped working?