Omnipod DASH
These instructions are for configuring the Omnipod DASH generation pump (NOT Omnipod Eros), available in AAPS from version 3.0.
Omnipod DASH Spezifikationen
Hier finden sich die besonderen Merkmale des Omnipod DASH („DASH“) und dessen Unterschiede zum Omnipod EROS („EROS“):
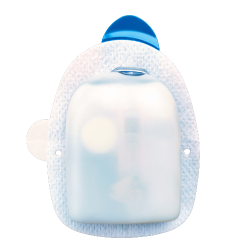
The DASH pods are identified by a blue needle cap (EROS has a clear needle cap). Die Pods sind ansonsten in Bezug auf deren Abmessungen identisch.
DASH benötigt keinen BLE-Link ein sog. Bridge Device (es wird KEIN RileyLink, OrangeLink oder EmaLink gebraucht).
The DASH’s Bluetooth connection is used only when sending a command (e.g a Bolus), and disconnects right after issuing the command.
Keine Verbindungsfehler „Verbindung zum Gerät / Pod“ mehr beim DASH.
AAPS wartet zum Senden der Befehle bis der Pod erreichbar ist.
Bei Aktivierung des Pods wird AAPS den neuen DASH-Pod finden und sich mit ihm verbinden.
Expected range from phone: 5-10 meters (YMMV).
Omnipod DASH known AAPS constraints/issues
Android 16 requires AAPS version 3.3.2.1 or later.
General advice is to run AAPS on Android 14 or 16. Android 15 has many reported issues from the community. However, if you do run on Android 15 you will likely need to enable Bluetooth Bonding to successfully activate and use Pods, see General Troubleshooting for more info on the Bonding settings.
Too frequent basal updates may cause basal insulin delivery problems with Omnipod Dash. When using SMB, limit the interval to 5 minutes minimum to avoid this issue.
Dash only supports basal rate in 0.05 U/h steps. If you try to set basal with 0.01 steps in your AAPS profile, AAPS will not give a warning even though the pod will round up the rate into 0.05 steps. If you view POD MGMT/Pod History it will display that 0.05 basal was set. This also means the lowest basal rate allowed by the DASH in AAPS is 0.05U/h.
The activation status of a Pod is stored in the settings file, if you export a settings file with an active pod. Then change to a new pod, then restore the settings from your previous export you will have now restored the old pod activation and removed the new pod activation. This is why we recommend to export settings after each pod activation to allow a restore of that pods activation state if something happens to your rig.
When setting a new basal profile, DASH will suspend delivery before setting the new basal Profile. If there is a communication interruption or error, the basal profile won’t automatically re-start. See section Resuming Insulin Delivery for details.
If alerts are configured, and the pod is about to expire, the pod will keep beeping until alerts are silenced, see Silencing Pod Alerts for details.
There are a number of known issues with Bluetooth which can cause pod activation problems. See Bluetooth Troubleshooting for the known issue and solutions to these problems.
Hardware- und Software-Anforderungen
Omnipod DASH is identified by the blue needle cap.
A Compatible Android phone with a Bluetooth Low Energy (BLE) (see Phones for more info), additionally the following information will help guide you on other key considerations around successfully activating and using the DASH on a compatible phone:
The AAPS Omnipod Dash driver connects with the DASH Pod using Bluetooth.
AAPS will automatically establish a new Bluetooth connection to the Pod every time it needs to send a command (e.g a Bolus), after sending the command the Bluetooth connection is immediately disconnected.HINWEIS:
The Bluetooth connection can be interrupted/disturbed by other Bluetooth devices linked to the phone that is running AAPS, like earbuds etc… Devices like this can cause connection errors or pod activation issues on some models of phones. It’s a good idea to review the tested hardware setups list for known working configurations before committing to a new rig built around Omnipod DASH.
There are a number of known issues with Bluetooth which can cause pod activation problems (See Troubleshooting for advice on other Bluetooth issues) specifically the Bluetooth related issues section.
For Android 15 or below: You MUST use Version 3.0 or newer of AAPS using the Build APK instructions, however it’s advisable to run the latest released version.
For Android 16: you MUST use Version 3.3.2.1 or newer of AAPS using the Build APK instructions, due to Android 16 changing how its Bluetooth works. Any version earlier than 3.3.2.1 will likely cause pod failures and/or activation issues.
A supported Continuous Glucose Monitor (CGM)
The instructions below explain how to activate a new pod session using AAPS. You should wait for your current Pod to be close expiry, as you will need to activate a new Pod with AAPS. Once a pod is de-activated it cannot be reused/re-activated, the de-activation is final.
Bevor Du anfängst
Ensure you have read and understand this whole guide, have read and understand the Before You Begin section, as well as Omnipod and AAPS Constraints and Issues to avoid running into a known problem.
SAFETY FIRST - You SHOULD NOT try to connect AAPS to a pod for the first time without having access to all of the following:
Extra pods (3 or more spare)
Spare Insulin and MDI equipment
A working Omnipod PDM (In case AAPS fails)
Supported Phones are a must! (See Hardware/Software Requirements)
Correct version of AAPS built and installed
Your Omnipod Dash PDM will become redundant after the AAPS Dash driver activates your pod.
Before using AAPS you or your care giver would have had to manage the Pod using the Omnipod PDM (or in some regions a Phone app) to send commands to your DASH (e.g a Bolus).
The DASH can only facilitate a single Bluetooth device (e.g PDM or Phone) connection to manage and send commands.
The device that successfully activates the pod is the only device allowed to communicate with that Pod from that point forward. This means that once you activate a DASH with your Android phone using AAPS, you will no longer be able to use your PDM with that pod! For the time that Pod is active the AAPS Dash driver running on your Android phone is now the new PDM for your pod.
DO NOT Throw away your PDM! It is recommended to keep it around as a backup and for emergencies, for instance when your phone gets lost or AAPS is not working correctly.
Your pod WILL NOT stop delivering insulin when it is not connected to AAPS.
Default basal rates are programmed on the pod on activation as defined in the current active Profile.
As long as AAPS is operational it will send basal rate adjustment commands that run for a maximum of 120 minutes.
When for some reason the pod does not receive any new commands (for instance because communication was lost due to Pod ➜ phone distance) the pod will automatically fall back to default basal rates as defined in your Profile.
AAPS Profile(s) do not support 30 minute basal rate time frames
If you are new to AAPS and are setting up your basal rate Profile for the first time, please be aware that basal rates starting on a half-hour basis are not supported. For example, on your Omnipod PDM, if you have a basal rate of 1.1 units which starts at 09:30 and has a duration of 2 hours ending at 11:30, it is not possible replicate this exact basil Profile in AAPS.
You will need to change this 1.1 unit basal rate to a time range of either 9:00-11:00 or 10:00-12:00. Even though the DASH hardware itself supports the 30 minute basal rate Profile increments, AAPS does NOT support this feature.
0U/h Profile basal rates are NOT supported in AAPS
While the DASH does support a zero basal rate, AAPS uses multiples of the user’s Profile basal rate to determine automated treatment; it cannot function with a zero basal rate.
Instead a temporary zero basal rate can be achieved through the „Disconnect pump“ function, or through a combination of Disable Loop/Temp Basal Rate or Suspend Loop/Temp Basal Rate.
NOTE: The lowest basal rate allowed by the DASH in AAPS is 0.05U/h.
DASH in AAPS auswählen
There are two available options to configure Omnipod in AAPS:
Option 1: Neue Installation
When installing AAPS for the first time, the Setup Wizard will guide new users through key features and installation requirements for AAPS.
Select “DASH” when you reach Pump selection.
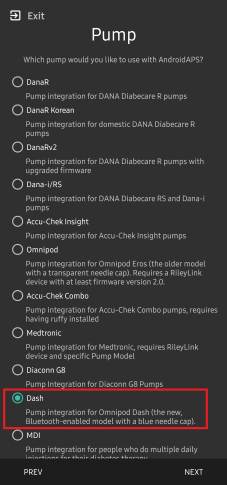
When in doubt you can also select “Virtual Pump” and select “DASH” later, after setting up AAPS (See Option 2).
Option 2: Der Konfigurations-Generator
Bei einer vorhandenen Installation von AAPS kannst Du DASH als Pumpe unter „Konfiguration“ auswählen:
On the top-left hand corner hamburger menu select Config Builder (1) ➜ Pump ➜ Dash ➜ Settings Gear (3) by selecting the radio button (2) titled Dash.
Wenn Du das Kontrollkästchen (4) neben dem Zahnrad (3) wählst, wird das DASH-Menü als Registerkarte im AAPS-Interface mit dem Titel DASH als eigener Tab angezeigt. Wenn Du dieses Kästchen aktivierst, wird der Zugriff auf die DASH-Befehle bei der Verwendung von AAPS erleichtert.
NOTE: A faster way to access the Dash settings can be found below in the DASH settings section of this document.

Überprüfung der Omnipod-Treiberauswahl
To verify that you have selected the DASH in AAPS, if you have checked the box (4), swipe to the left from the Overview tab, where you will now see a DASH tab on AAPS. Wenn diese Option nicht aktiviert ist, finden Sie die DASH Registerkarte links oben im Hamburger-Menü.
DASH Konfiguration
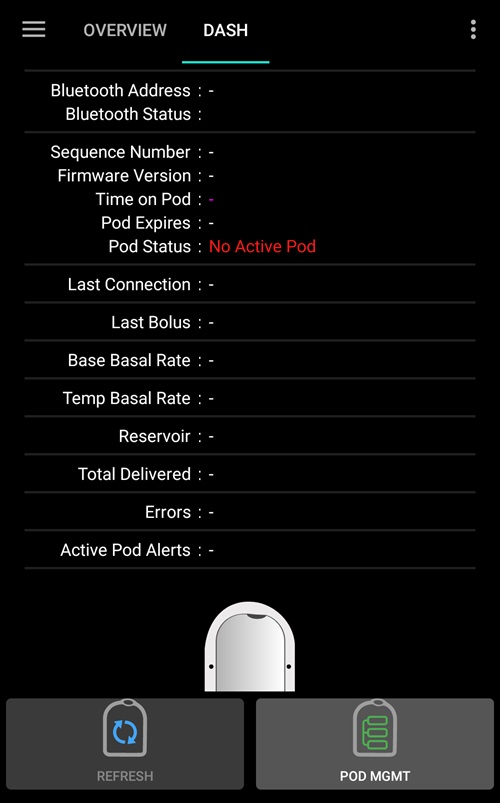
Swipe left to the DASH tab where you will be able to manage all pod functions (some of these functions are not enabled or visible without an active pod session):
![]() „Aktualisieren“ von Pod-Verbindungen und -Status, Abstellen von Alarmen, wenn der Pod piept
„Aktualisieren“ von Pod-Verbindungen und -Status, Abstellen von Alarmen, wenn der Pod piept
![]() „Pod-Management“ (Aktivieren, Deaktivieren, Testsignal und Pod-Historie)
„Pod-Management“ (Aktivieren, Deaktivieren, Testsignal und Pod-Historie)
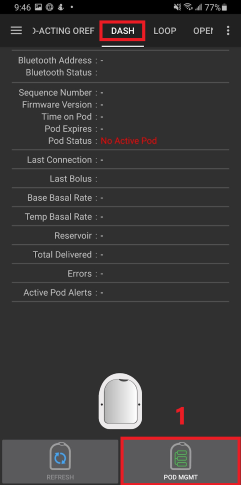
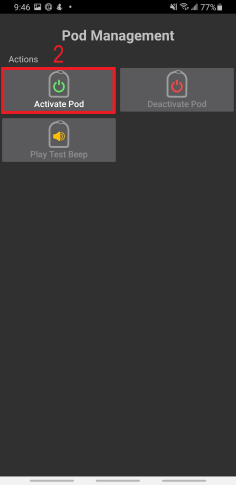
Pod aktivieren
Navigiere zur Registerkarte DASH und klicke auf den POD MGMT (1) Button und dann auf Pod aktivieren (2).
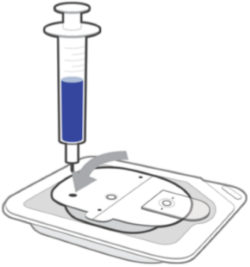
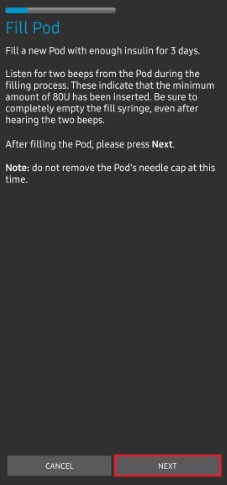
Der Pod füllen Bildschirm wird angezeigt. Fill a new pod with at least 80 units of insulin and listen for two beeps indicating that the pod is ready to be primed.
NOTE: When calculating the total amount of insulin you need for 3 days, please take into account that priming the pod will use about 3-10 units.
Stelle sicher, dass der neue Pod und das Smartphone, auf dem AAPS läuft, nah beieinander liegen und klicke auf den Button Weiter.
HINWEIS: wenn die Fehlermeldung „Konnte keinen verfügbaren Pod für die Aktivierung finden“ (das kann passieren) erscheint: keine Panik. Klicke auf Erneut bzw. <0>Wiederholen</0>. In den meisten Fällen wird die Aktivierung dann erfolgreich fortgesetzt.
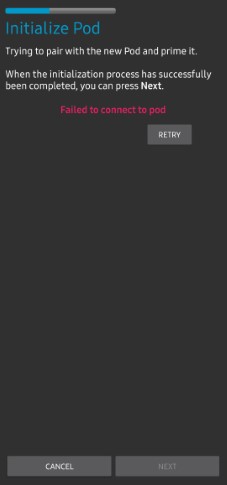
On the Initialize Pod screen, the pod will begin priming (you will hear a click followed by a series of ticking sounds as the pod primes itself).
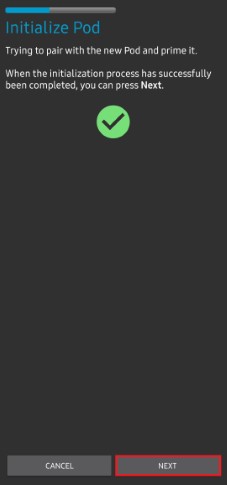
A green checkmark will be shown upon successful priming, and the Next button will become enabled. Klicke auf den Weiter Button, um die Initialisierung des Pods abzuschließen; anschließend wird der Pod anlegen Bildschirm angezeigt.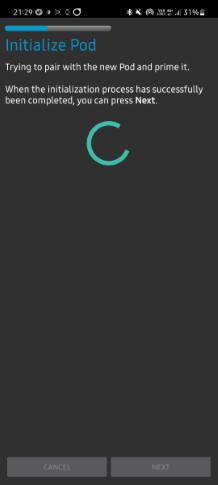
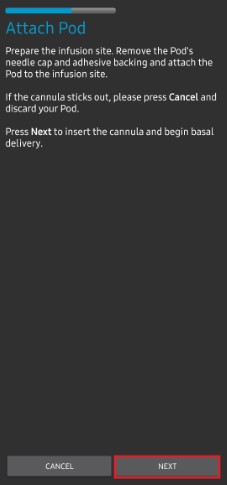
Als nächstes bereite die Infusionsstelle für den neuen Pod vor. Wasche Dir die Hände, um jegliche Infektionsgefahr zu vermeiden. Clean the infusion site by either using soap and water or an alcohol wipe to disinfect and let the skin air dry completely before proceeding.
If you get skin irritation from the adhesive consider using a Barrier Wipe or Barrier Spray.Entferne die blaue Nadelkappe aus Kunststoff. If you see something that sticks out of the pod or it looks unusual, STOP the process and start with a new pod. If everything looks OK, proceed to take off the white paper backing from the adhesive and stick the pod to the selected site on your body.
Wenn du fertig bist, klicke auf den Weiter Button.
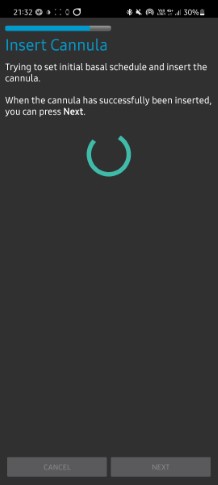
Das Pod anlegen Dialogfenster wird nun angezeigt. click on the OK button ONLY if you are ready to deploy the cannula!
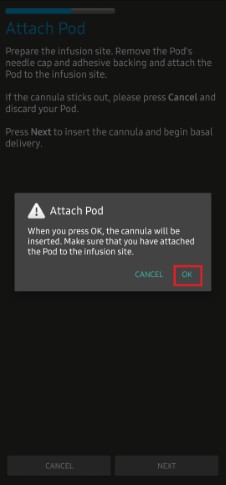
Nachdem Du OK gedrückt hast, kann es einige Zeit dauern, bis der DASH reagiert und die Kanülen legt (maximal 1-2 Minuten). Be patient!
NOTE: Before the cannula is inserted, it is good practice to pinch the skin near the cannula insertion point. Dies sorgt für eine sanfte Einführung der Nadel und verringert die Gefahr einer Verstopfung.

A green checkmark is shown on the screen, and the Next button becomes available to select upon successful cannula insertion.
Click on the Next button.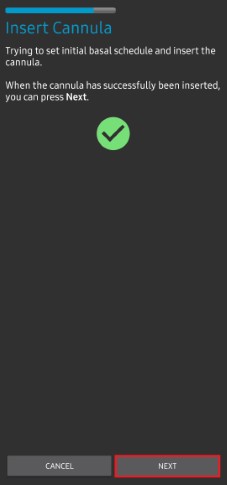
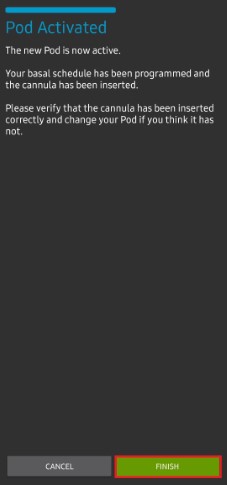
Der Pod aktiviert Bildschirm wird angezeigt.
Klicke auf den grünen Beenden Button.
Glückwunsch! Du hast jetzt eine neue Pod-Sitzung gestartet.
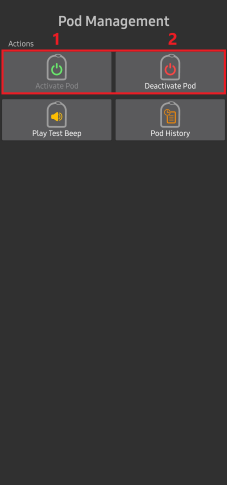
Der Menübildschirm Pod Management sollte nun den Aktiviere Pod (1) Button als deaktiviert und den Deaktiviere Pod (2) Button als aktiviert angezeigen. Dies liegt daran, dass jetzt ein Pod aktiv ist und du keinen zusätzlichen Pod aktivieren kannst, ohne zuerst den aktuell aktiven Pod zu deaktivieren.
Klicke auf den Zurück-Knopf auf deinem Smartphone, um zum Tab-Bildschirm DASH zurückzukehren, auf dem jetzt Informationen zu deiner aktiven Pod-Sitzung angezeigt werden, einschließlich der aktuellen Basalrate, Pod Reservoir Level, abgegebenem Insulin, Pod Fehlern und Warnungen.
NOTE: For more details on the information displayed go to the DASH Tab section of this document.
NOTE: It is good practice to export settings AFTER activating the pod. Settings should be exported after each pod change and once a month, ensure you copy the exported settings file to a cloud storage location (e.g. Google Drive) or somewhere off your phone in case you loose your phone (see Export settings).
Pod deaktivieren
Under normal circumstances, the expected lifetime of a pod is three days (72 hours) and an additional 8 hours after the pod expiration warning for a total of 80 hours of total pod usage.
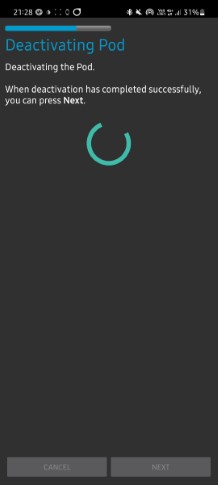
Gehe wie folgt vor, um einen Pod zu deaktivieren (entweder vor dem Ablaufen der Nutzungsdauer oder wegen eines Pod-Fehlers):
Go to the DASH tab, click on the POD MGMT (1) button, on the Pod Management screen click on the Deactivate Pod (2) button.
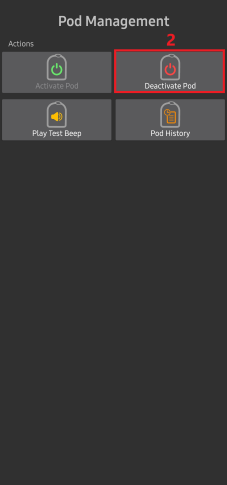
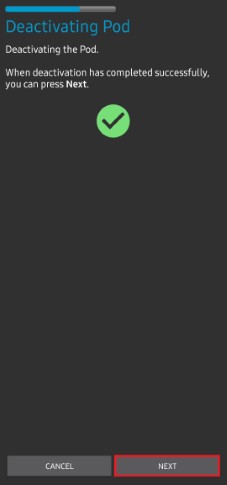
Auf dem Bildschirm Pod deaktivieren, klicke auf die Weiter Taste, um die Deaktivierung des Pods zu starten.
Du erhältst vom Pod ein Piepen als Bestätigung, dass die Deaktivierung erfolgreich war.
A green checkmark will be displayed upon successful deactivation. Klicke auf Weiter um die Deaktivierung des Pods abzuschließen.
Du kannst nun deinen Pod entfernen, da die aktive Sitzung beendet wurde.
Klicke auf den grünen Knopf, um zum Bildschirm Pod Management zurückzukehren.
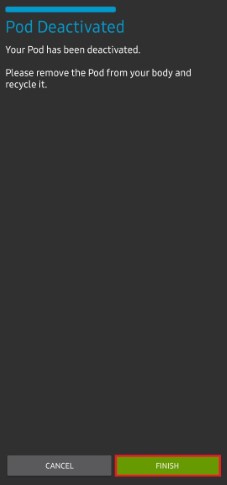
Du bist jetzt wieder im Pod Management Menü; drücke die Zurück-Taste auf Deinem Smartphone um zur Registerkarte DASH zurückzukehren.
Überprüfe, ob das Feld Pod Status die Nachricht Kein aktiver Pod anzeigt.
Insulinabgabe fortsetzen
NOTE: During Profile Switches, like when using the PDM, AAPS must suspend delivery on the Pod before setting the new basal Profile. If communication fails between the suspend and resume commands, then delivery can stay suspended, Read Delivery suspended in the troubleshooting section for more details.
When insulin delivery is suspended you will need to issue a command to instruct the active, currently suspended pod to resume insulin delivery. Nachdem der Befehl erfolgreich verarbeitet wurde, wird die normale Insulinabgabe mit der aktuellen Basalrate fortgesetzt. Grundlage dafür ist das zu dieser Zeit aktive Basalprofil. Der Pod akzeptiert dann wieder Befehle für Bolus, TBRund SMB.
Gehe zur Registerkarte DASH und stelle sicher, dass der Pod Status (1) unterbrochen anzeigt, drücke dann die Abgabe fortsetzen (2) Taste, um den aktuellen Pod anzuweisen, die normale Insulinabgabe fortzusetzen. Eine Nachricht RESUME DELIVERY wird im Feld Pod Status (3) angezeigt.
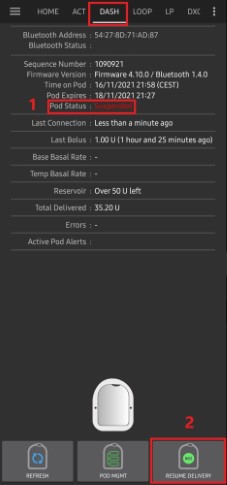
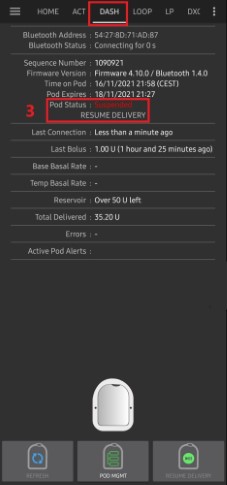
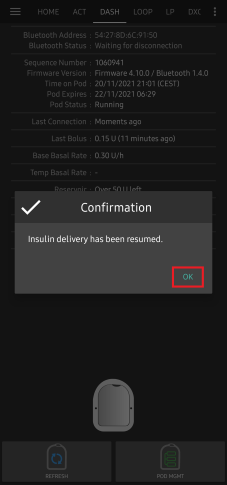
Wenn der Befehl zur Fortsetzung der Insulinabgabe erfolgreich war, wird in einem Bestätigungsdialog die Nachricht Insulinabgabe wieder aufgenommen. angezeigt. Klicke OK um zu bestätigen und fortzufahren.
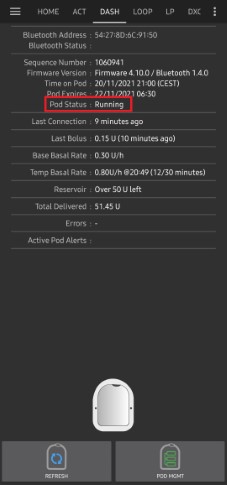
In der Registerkarte DASH wird das Feld Pod Status (1) aktualisiert, es zeigt In Betrieb an und die Insulinabgabe fortsetzen Schaltfläche wird nicht mehr angezeigt.
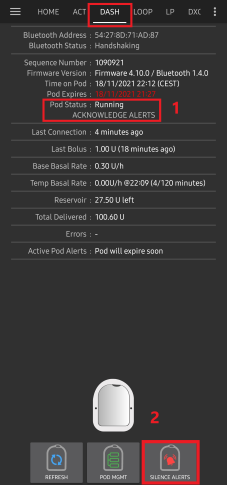
Pod Alarme stummschalten
In dem folgenden Prozess wird gezeigt, wie Warntöne bestätigt und stummgeschaltet werden können, die auftreten, wenn die Laufzeit des aktiven Pods den Grenzwert für die Warnung vor dem Ablauf von 72 Stunden (3 Tage) erreicht. Dieser Grenzwert für die Laufzeit ist unter Stunden bis zum Podende in den DASH-Einstellungen ‚Alarme‘ definiert. Die maximale Nutzungsdauer eines Pods beträgt 80 Stunden (3 Tage und 8 Stunden), dennoch empfiehlt der Hersteller, 72 Stunden (3 Tage) nicht zu überschreiten.
NOTE: The SILENCE ALERTS (3) button is only available on the DASH tab when the pod expiration or low reservoir alert has been triggered. If the SILENCE ALERTS button is not visible and you hear beep sounds from the pod, try to ‚Refresh pod status‘.
When the defined Hours before shutdown warning time limit is reached, the pod will issue warning beeps to inform you that it is approaching its expiration time and a pod change will be required soon.
You can verify this on the DASH tab, the Pod expires: (1) field will show the exact time the pod will expire (72 hours after activation), and the text will turn red after this time has passed.
Under the Active Pod alerts (2) field the status message Pod will expire soon is displayed. Dadurch wird auch die Schaltfläche Alarme stummschalten (3) angezeigt.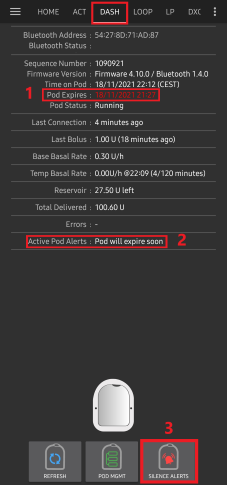
Go to the DASH tab and press the SILENCE ALERTS (2) button. AAPS sendet den Befehl an den Pod, um die Ablaufwarnung des Pods zu unterdrücken und aktualisiert das Feld Pod Status (1) mit Aktive Alarme stummgeschaltet.
Nach erfolgreicher Stummschaltung der Alarme werden 2 Pieptöne vom aktiven Pod ausgegeben und ein Bestätigungsdialog zeigt die Nachricht Aktive Alarme stummgeschaltet. Drücke OK, um den Dialog zu bestätigen und zu schließen.
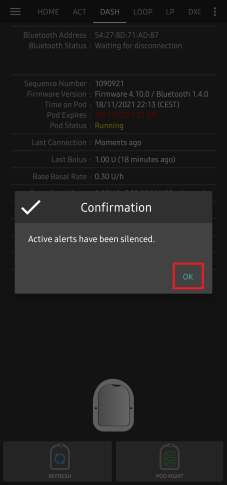
Wechsele zur Registerkarte DASH. Im Feld Aktive Pod-Warnungen wird keine Warnmeldung mehr angezeigt und der aktive Pod gibt keine Pieptöne zur Warnung mehr ab.
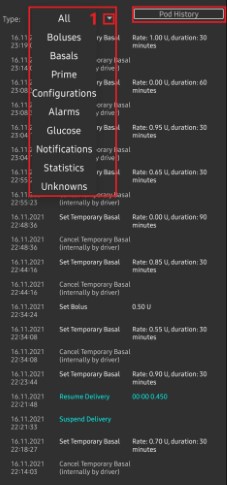
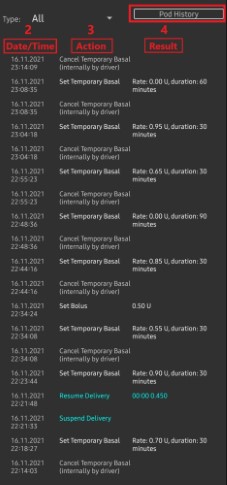
Anzeige Pod-Historie
In diesem Abschnitt wird erklärt, wie Du Deine Pod-Historie überprüfen und nach verschiedenen Aktionskategorien filtern kannst. Mit dem Werkzeug ‚Pod Historie‘ kannst Du die Aktionen und Ergebnisse deines jeweils aktiven Pod während dessen dreitägigem Lebenszyklus (72 - 80 Stunden) ansehen.
Diese Funktion ist hilfreich bei der Überprüfung von Bolus-, TBR- und Basalraten-Befehlen, die an den Pod gesendet wurden. Die übrigen Kategorien sind hilfreich bei der Problembehebung und zur Bestimmung der Reihenfolge von Ereignissen, die zu einem Fehler geführt haben.
NOTE: Only the last command can be uncertain. New commands will not be sent until the last ‚uncertain‘ command becomes ‚confirmed‘ or ‚denied‘. The way to ‚fix‘ uncertain commands is to ‚refresh pod status‘.
Gehe zur Registerkarte DASH und klicke auf POD MGMT (1) und dann auf dem Pod Management Bildschirm klicke auf den Pod Historie (2) Button.
Auf dem Pod Historie Bildschirm wird als Standard die Kategorie Alle (1) angezeigt. Sie zeigt Datum und Zeit (2) aller Pod Aktionen (3) und Ergebnisse (4) in umgekehrter chronologischer Reihenfolge. Drücke 2 Mal die Zurück-Taste des Smartphones, um zur Registerkarte DASH im AAPS-Bildschirm zurückzukehren.
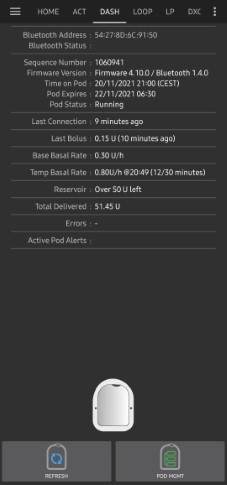
Registerkarte DASH
Im Folgenden werden die Anordnung und die Bedeutung der Symbole und Statusfelder auf der Registerkarte DASH des AAPS-Hauptbildschims erläutert.
NOTE: If any message in the DASH tab status fields report (uncertain), then you will need to press the Refresh button to clear it and refresh the pod status.
Felder
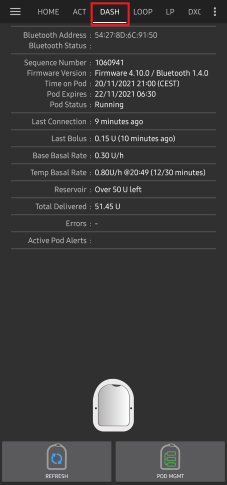
Bluetooth-Adresse: Zeigt die aktuelle Bluetooth-Adresse des verbundenen Pods an.
Bluetooth Status: Displays the current connection status.
Laufnede Nummer: Zeigt die Seriennummer des aktiven POD an.
Firmware-Version: Zeigt die Firmware-Version für die aktive Verbindung an.
Zeit auf dem Pod: Zeigt die aktuelle Zeit auf dem Pod.
Pod Status: Zeigt den Pod Status an.
Letzte Verbindung: Zeigt die Zeit der letzten Kommunikation mit dem Pod an.
gerade eben vor weniger als 20 Sekunden.
vor weniger als einer Minute vor mehr als 20 Sekunden, aber weniger als 60 Sekunden.
vor 1 Minute vor mehr als 60 Sekunden, aber weniger als 120 Sekunden (2 min).
vor XX Minuten vor mehr als 2 Minuten, definiert durch den Wert von XX.
Letzter Bolus: Zeigt die Dosierung des letzten Bolus an, der an den aktiven Pod gesendet wurde und in Klammern, wie lange es her ist, dass er abgegeben wurde.
Basis-Basalrate: Zeigt die Basalrate an, die für den aktuellen Zeitpunkt im Basalratenprofil programmiert wurde.
Temporäre Basalrate: Zeigt die aktuell laufende temporäre Basalrate im folgenden Format an
{Einheiten pro Stunde} @{TBR Startzeit} ({Minuten aktiv}/{Gesamtlaufzeit TBR in Minuten})
Example:* 0.00U/h @18:25 ( 90/120 minutes)
Reservoir: Zeigt 50+ IE übrig an, wenn mehr als 50 Einheiten im Reservoir vorhanden sind. Unter 50 IE werden die exakten Einheiten angezeigt.
Insgesamt abgegeben: Zeigt die Gesamtzahl der aus dem Reservoir abgegebenen Insulineinheiten an. Dies schließt Insulin ein, das zum Aktivieren und Befüllen verwendet wurde.
Fehler: Zeigt den letzten Fehler an. Review the Pod history and log files for past errors and more detailed information.
Aktive Pod-Warnungen: Zeigt jeweils aktuelle Warnungen auf dem aktiven Pod.
Schaltflächen
![]() Sends a refresh command to the active pod to update communication.
Sends a refresh command to the active pod to update communication.
Verwende diese Option, um den Pod-Status zu aktualisieren und die Statusfelder zu erneuern, die den Text ‚unsicher‘ enthalten.
See the Troubleshooting section below for additional information.
![]() Navigates to the Pod management menu.
Navigates to the Pod management menu.
![]() When pressed this will disable the pod alerts beeps and notifications (expiry, low reservoir..).
When pressed this will disable the pod alerts beeps and notifications (expiry, low reservoir..).
Der Button wird nur angezeigt, wenn die aktuelle Zeit des Pods nach dem Pod-Ablaufdatum liegt.
Nach erfolgreicher Bestätigung wird dieses Symbol nicht mehr angezeigt.
![]() Resumes the currently suspended insulin delivery in the active pod.
Resumes the currently suspended insulin delivery in the active pod.
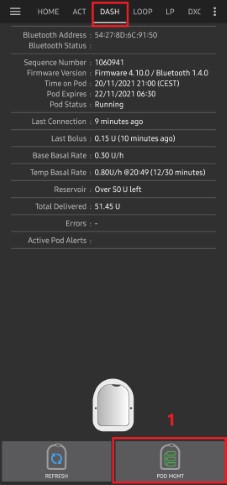
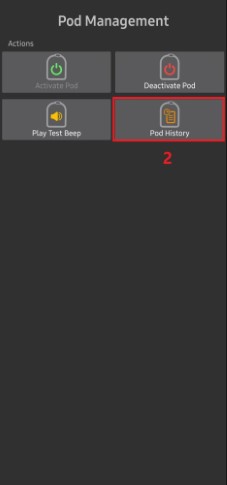
Pod Management Menu
Below is describes the purpose of each icon on the Pod Management menu, accessed by pressing POD MGMT (1) button from the DASH tab.
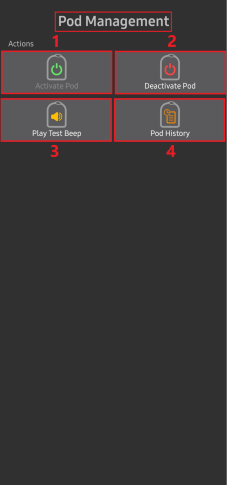
The table below describes each button and it’s function:
Button |
Function |
|---|---|
1 |
Access the Pod Mgmt settings |
2 |
Activate Pod: Primes and activates a new pod. |
3 |
Deactivate Pod: Deactivates the currently active pod. |
4 |
Play Test Beep : Plays a single test beep on the pod when pressed. |
5 |
Pod history : Displays the active pod activity history. |
DASH-Einstellungen
The Dash driver settings are configurable from the top-left hand corner hamburger menu under Config Builder (1) ➜ Pump Dash ➜ Settings Gear (3) by selecting the radio button (2) titled Dash. Wenn Du das Kontrollkästchen (4) neben dem Zahnrad (3) aktivierst, wird das DASH-Menü als Registerkarte im AAPS-Interface mit dem Titel DASH als eigener Tab angezeigt.
HINWEIS: Einen schnelleren Zugriff auf die DASH-Einstellungen erlaubt das 3-Punkt-Menü (1) in der oberen rechten Ecke der Registerkarte DASH und die Auswahl DASH-Einstellungen (2) aus dem Dropdown-Menü.
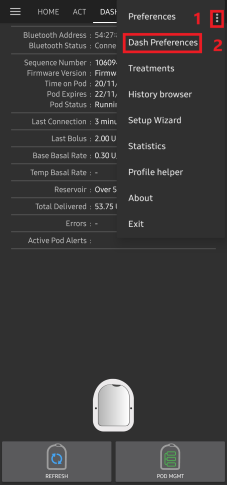
Die Einstellungen sind nach Gruppen sortiert unten aufgelistet. Du kannst die meisten der Einstellungen über einen Kippschalter aktivieren oder deaktivieren:
NOTE: An asterisk (*) denotes the default setting is enabled.
Bestätigungstöne
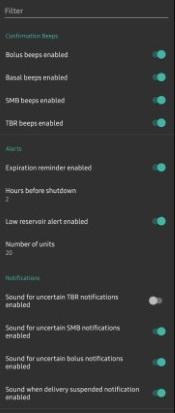
Bestätigt mit Signaltönen des Pods die Abgabe und Änderung von Bolus, Basalrate, SMB und TBR.
Bolus beeps enabled: Enable or disable confirmation beeps when a bolus is delivered.
Basal beeps enabled: Enable or disable confirmation beeps when a new basal rate is set, active basal rate is canceled or current basal rate is changed.
SMB beeps enabled: Enable or disable confirmation beeps when a SMB is delivered.
TBR beeps enabled: Enable or disable confirmation beeps when a TBR is set or canceled.
Alarme
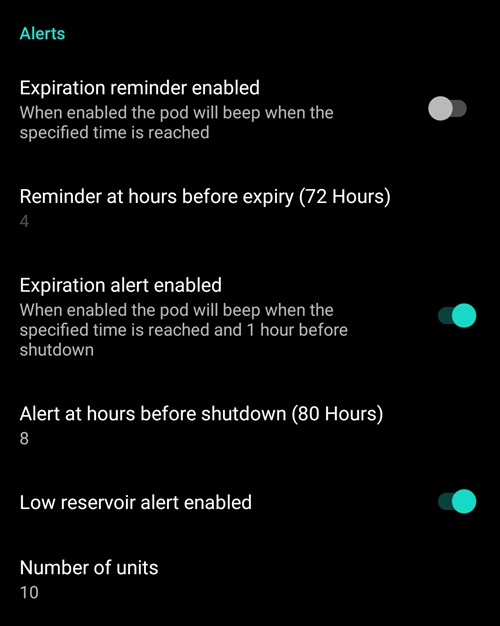
Einstellungen für AAPS-Alarme für Ablauferinnerung, Zeit bis Pod-Ende und niedrigen Reservoirstand basierend auf den definierten Schwellwerten.
NOTE: an AAPS notification will ALWAYS be issued for any alert after the initial communication with the pod since the alert was triggered. Wenn Du die Benachrichtigung löschst, wird der Alarm NICHT gelöscht, AUSSER wenn die automatische Bestätigung von Pod-Alarmen aktiviert ist. Um den Alarm MANUELL zu löschen, musst Du auf der Registerkarte DASH den Alarm stummschalten Button drücken.
Expiration reminder enabled: Enable or disable the pod expiration reminder set to trigger when the defined number of hours before shutdown is reached.
Hours before shutdown: Defines the number hours before the active pod shutdown occurs, which will then trigger the expiration reminder alert.
Low reservoir alert enabled: Enable or disable an alert when the pod’s remaining units low reservoir limit is reached as defined in the Number of units field.
Number of units: The number of units at which to trigger the pod low reservoir alert.
Benachrichtigungen
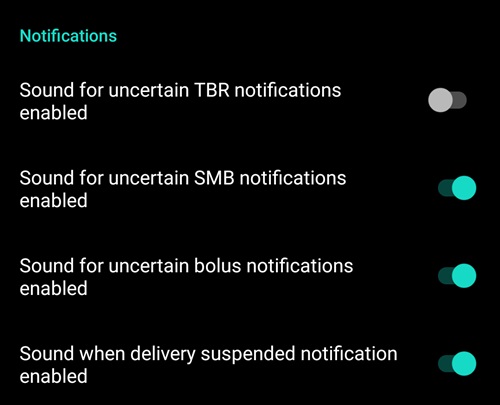
The Notification section allows the user to select their preferred notifications and audible phone alerts when AAPS is uncertain about the status of TBR, SMB, or bolus, and when delivery suspended events were successful.
NOTE: These are notifications only, no audible beep alerts are made.
Sound for uncertain TBR notifications enabled: Enable or disable this setting to trigger an audible alert and visual notification when AAPS is uncertain if a TBR was successfully set.
Sound for uncertain SMB notifications enabled: Enable or disable this setting to trigger an audible alert and visual notification when AAPS is uncertain if an SMB was successfully delivered.
Sound for uncertain bolus notifications enabled: Enable or disable this setting to trigger an audible alert and visual notification when AAPS is uncertain if a bolus was successfully delivered.
Sound when delivery suspended notifications enabled: Enable or disable this setting to trigger an audible alert and visual notification when suspend delivery was successfully delivered.
Aktionen (AKT) Tab
This tab is well documented in the main AAPS documentation but there are a few items on this tab that are specific to how the DASH differs from tube based pumps, especially after the processes of applying a new pod.
Go to the Actions (ACT) tab in the main AAPS interface.
Unter dem Abschnitt Careportal (1) werden in der Rubrik für Insulin und Kanüle die zugehörigen Felder für das Alter nach jedem Wechsel auf 0 Tage und 0 Stunden zurückgesetzt. Das liegt daran, wie die Omnipod-Pumpe gebaut ist und funktioniert. Da der Pod die Kanüle direkt in die Haut am Ort der Pod-Anwendung einführt, wird bei Omnipod-Pumpen kein herkömmlicher Schlauch verwendet. Nach einem Podwechsel wird das Alter jedes dieser Werte daher automatisch auf Null zurückgesetzt. Das Alter der Pumpenbatterie wird nicht angegeben, da die Batterie im Pod immer länger hält, als die Lebensdauer des Pods (maximal 80 Stunden). Die Pumpenbatterie und das **Insulinreservoir ** sind immer im Pod enthalten.
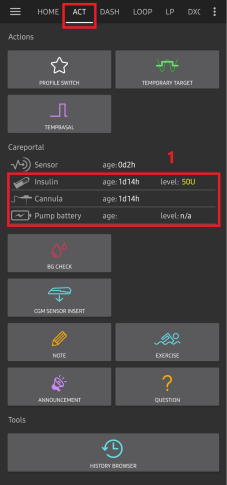
Level
Insulin Level
Der angezeigte Insulinlevel ist der vom DASH gemeldete Betrag der verbleibenden Einheiten. Der Pod meldet allerdings den tatsächlichen Insulinlevel erst dann, wenn er unter 50 Einheiten liegt. Bis dahin wird „Über 50 Einheiten“ angezeigt. Die gemeldete Menge ist nicht genau: Wenn der Pod „leer“ meldet, wird das Reservoir in den meisten Fällen noch einige zusätzliche Einheiten Insulin enthalten.
Auf der Registerkarte DASH wird die Übersicht wie unten beschrieben angezeigt:
Mehr als 50 IE verbleibend - Der Pod meldet mehr als 50 Einheiten im Reservoir.
Unter 50 Einheiten - Die Menge an Insulin, die noch im Reservoir vorhanden ist, wie vom Pod gemeldet.
Sonstiges
SMS - Aus dem Pod übernommener Wert oder 50+ IE für SMS-Antworten
Nightscout - Lädt den Wert 50 hoch, wenn mehr als 50 Einheiten angezeigt werden (Nightscout Version 14.07 und älter). Neuere Versionen melden einen Wert von 50+, wenn sich mehr als 50 Einheiten im Reservoir befinden.
Problembehandlung
This section covers common known issues and solutions for Omnipod DASH use with AAPS. There is also General Troubleshooting section in the documentation that should be reviewed as it covers relevant topics for some Pod issues too.
Wo ich Hilfe zum DASH finde
Die gesamte Entwicklungsarbeit für den DASH wird von der Community durch Freiwillige geleistet; bitte berücksichtige das und gehe durch die folgenden Schritte bevor Du um Hilfe bittest:
Level 0: Lies den entsprechenden Abschnitt dieser Dokumentation um sicherzustellen, dass du verstehst, wie die Funktion, mit der Du Schwierigkeiten hast, funktionieren soll.
Level 1: Wenn Du immer noch Probleme, die Du mit diesem Dokument nicht lösen kannst, haben solltest, gehe **Discord-**Kanal #AAPS. Nutze dazu diesen Einladungslink https://discord.gg/4fQUWHZ4Mw. There are also numerous Facebook and other groups you can ask in too (see Getting Help)
Level 2: Durchsuche bereits bestehende ‚Issues‘, um zu sehen, ob Dein Problem bereits in den Issues gemeldet wurde. Falls es bereits vorhanden ist, bestätige/kommentiere/ergänze bitte Informationen zu Deinem Problem. Wenn nicht, erstelle bitte ein neues Issue und füge Deine Protokolldateien (Logs) hinzu.
Sei geduldig - die meisten Mitglieder unserer Community sind gutmütige Freiwillige und die Lösung von Problemen erfordert oft Zeit und Geduld von Nutzern und Entwicklern.
When requesting help come prepared with the following information to help those in the community with your specific questions and problems:
Android phone make and model
Android OS version (e.g 15 or 16)
Did you recently upgrade your Android OS version?
The version of AAPS you are running
Plain english description of the problem you are facing considering some of the following things
Was it working before now?
When did it work or not work?
Did you make any changes to configuration or profile settings?
Did you pair a new bluetooth device?
Did you upgrade or install a new app?
How long was it working before it stopped working?