Remote control of AAPS
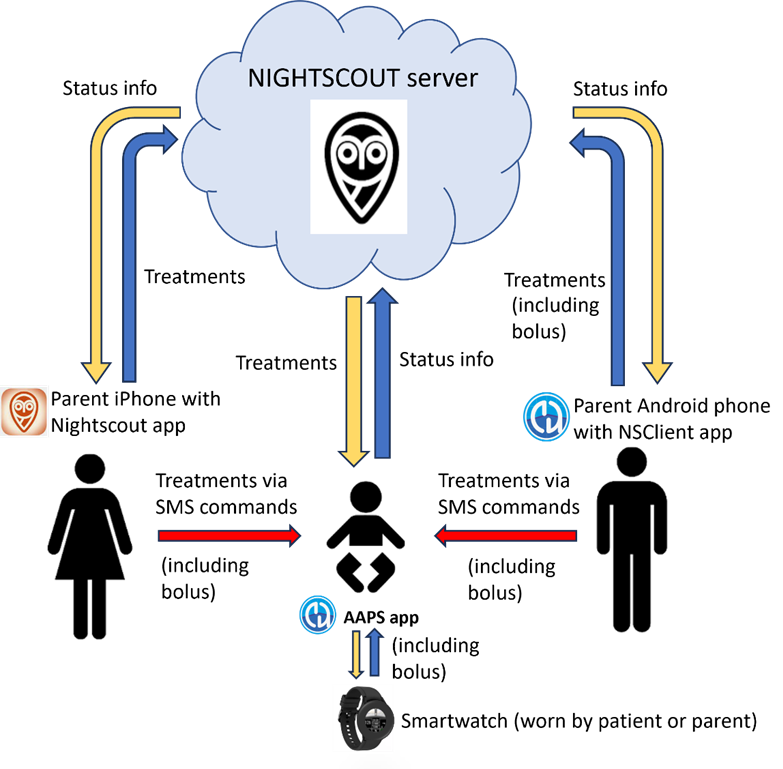
There are four highly effective tools for remotely managing AAPS:
SMS commands (follower phone can be either Android or iOS),
NS Client (follower phone is Android)
Nightscout (Android, iOS or other computer/device).
Smartwatches (Android)
The first three are mostly appropriate for carers/parents, but smartwatches are very useful for carers/parents and for adults with diabetes themselves.
Considerations when setting up remote control of AAPS for a child
Think about how you will keep the child’s phone in range of their pump and CGM. This can be challenging with children who are too young to be responsible for a phone. Ensuring you select an AAPS phone with a good bluetooth connection range and finding a comfortable way for the child to carry the pump and phone - if they are old/big enough to have the phone on them - (e.g. a SPI Belt may help.
Take your time to set-up and test commands with your child next to you, before starting remote treatment and monitoring. Many parents choose school holidays or weekends.
Make sure other caregivers/teachers are aware of your child’s treatment plan and work out how adding in remote control is going to work with/enhance the existing plan.
Many parents find it helpful to have a separate line of communication with childcare providers, for example a cheap small teacher “follow” phone.
Examples for school care plans for children of different ages can be found in the “files section” of the AAPS Facebook page.
What is your emergency plan for when remote control does not work (i.e. network problems or lost bluetooth connection)? Always consider what will happen with AAPS if you suddenly can’t send a new command. AAPS overwrites the pump basal, ISF and ICR with the current profile values. Only use temporary profile switches (i.e. with a set time duration) if switching to a stronger insulin profile, in case your remote connection is disrupted. Then the pump will revert to the original profile when the time expires.
1) SMS Commands
You can control AAPS remotely via text (SMS) message through a feature known as SMS Commands. SMS commands can be sent to AAPS by any type of phone (iPhone/Android).
SMS commands are really useful:
For routine remote control
If you want to remotely bolus insulin
In a region of poor internet reception, where text messages are able to get through, but data/internet phone reception is limited. This is very useful when going to remote areas (e.g. camping, skiing).
If your other methods of remote control (Nightscout/NSClient) are temporarily not working
SMS command safety
If you enable SMS Communicator in AAPS, consider that the phone which is set up to give remote commands could be stolen, and/or used by someone else. Always lock your phone handset with at least a PIN. A strong password and/ or biometric lock are highly recommended, and ensure this is different from your APK Master password (the password which is required to change AAPS settings) . A second phone number must be enabled for SMS commands to work, even if you only have one primary caregiver/follower. You can then use the second number to temporarily disable SMS communicator (with the command “SMS stop”) if your main caregiver/parent phone is compromised. Versions of AAPS 2.7 and newer also use an Authenticator app).
Different types of SMS commands
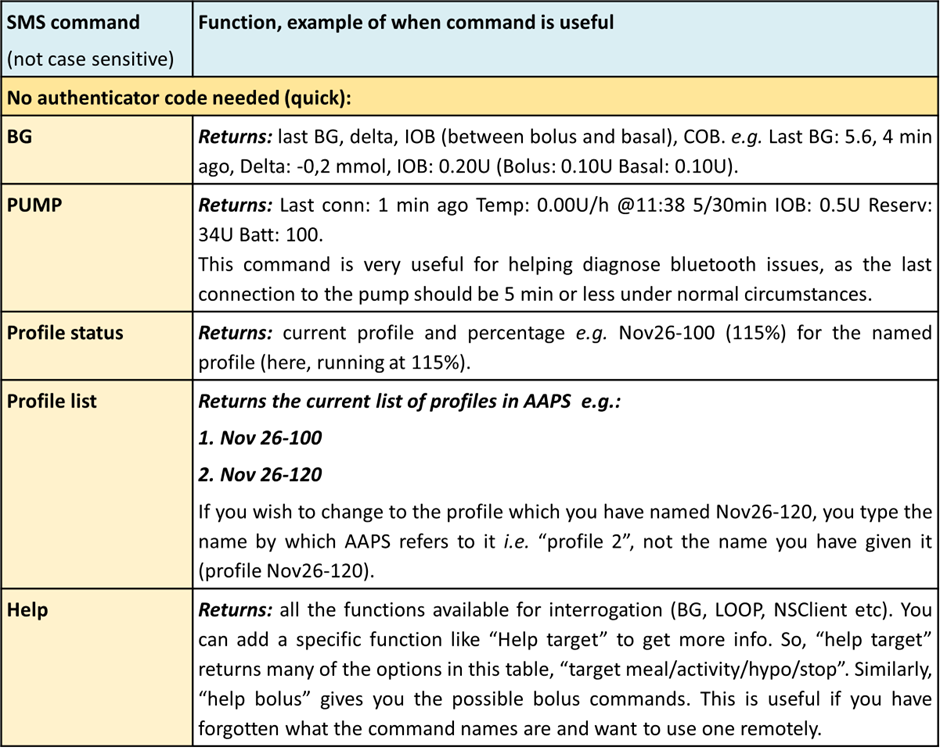
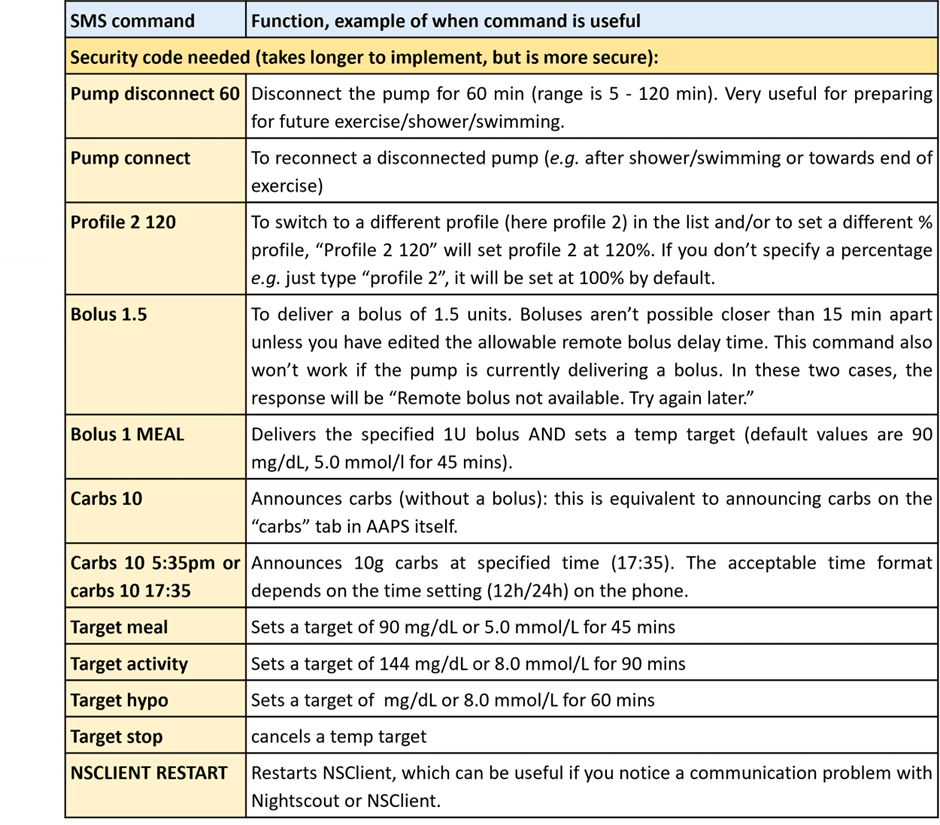
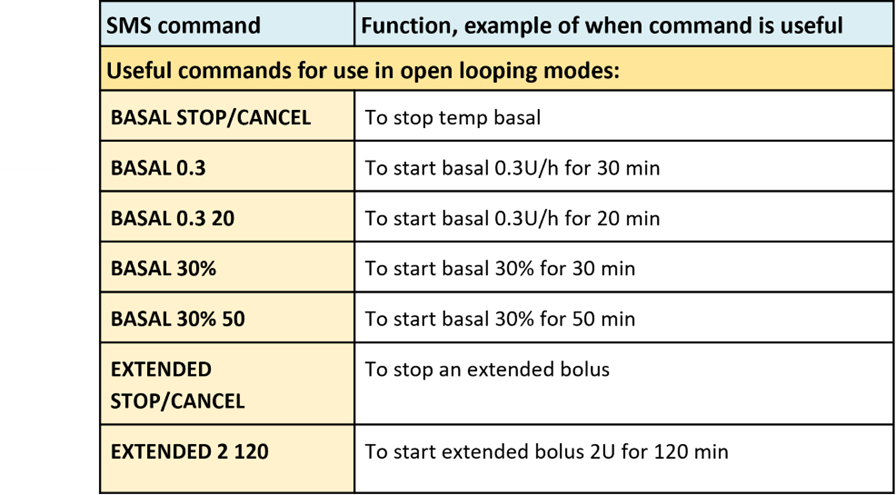
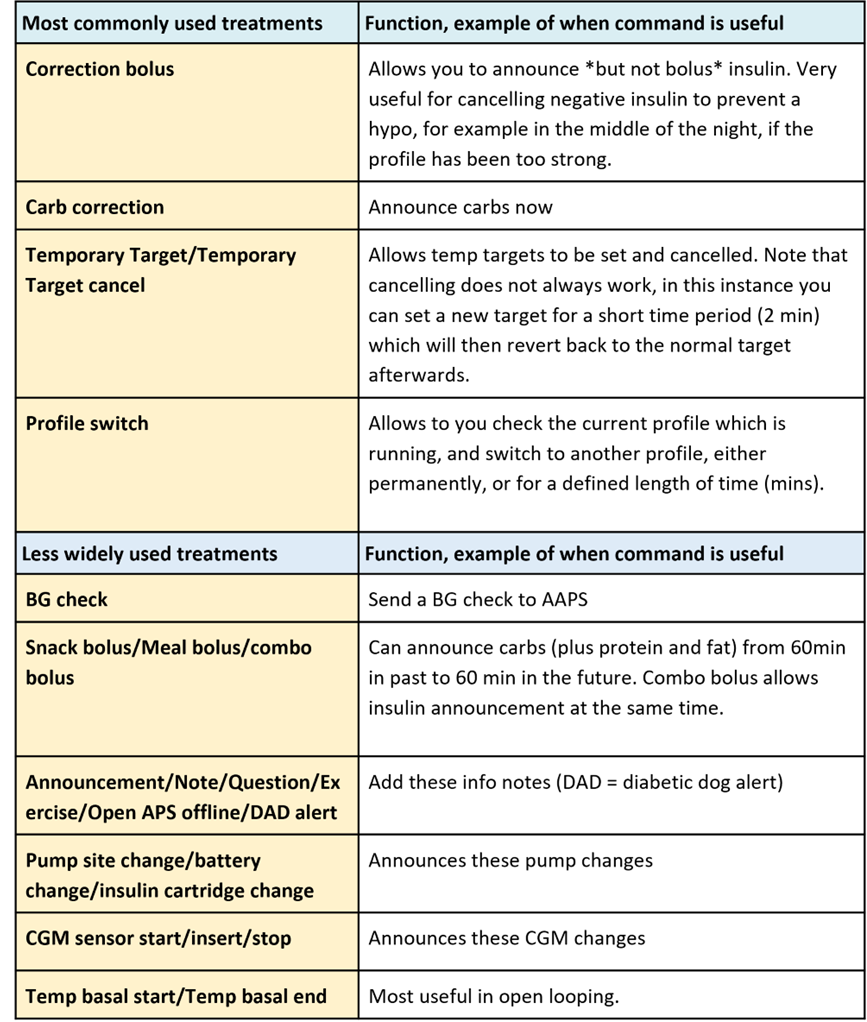
The SMS Commands Table below shows all the possible SMS commands. Example values are given, to aid understanding. The commands have the same range of possible values (targets, percent profile etc.) which are allowable in the AAPS app itself. The commands below have been listed by how commonly used they are likely to be, the first two tables should have most of the SMS commands you need with full looping.
SMS commands tables

Authentication or not?
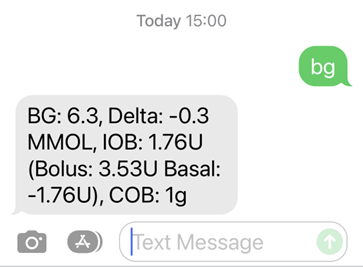
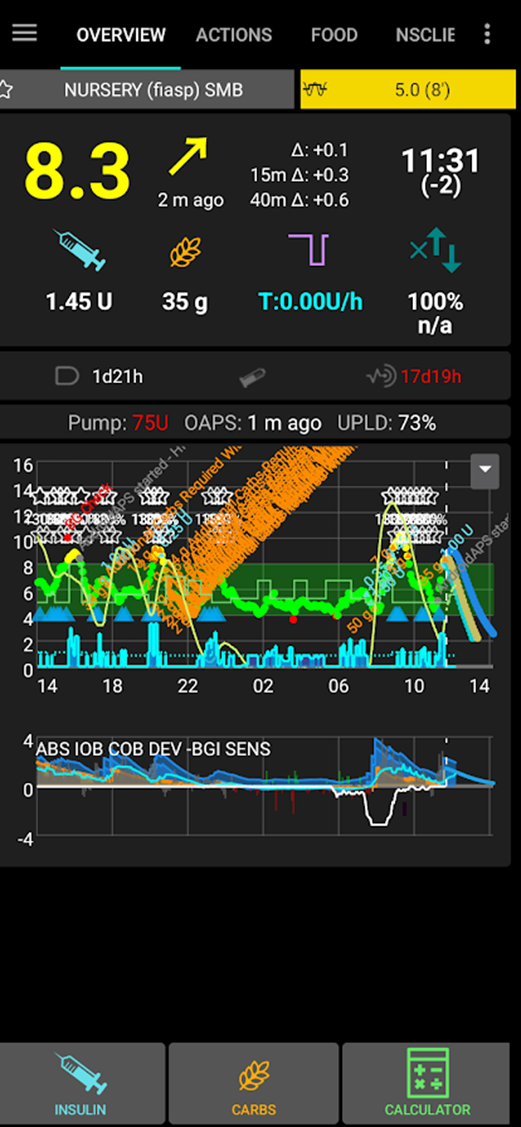
You may notice from the table above that some SMS commands give an immediate response, and some SMS commands require authenticating with a security code from an additional app and a PIN (see below (link for more detail). A simple enquiry like “bg” (which requests an update on current glucose) is quick to type, doesn’t need authenticating, and returns the AAPS status information shown below:

Commands which need more security require a code to be entered, for example:
How to set up SMS commands
The overall process is as follows:
1) Download an authenticator (caregiver phone)
2) Check phone settings (AAPS phone)
3) Date and time synching (caregiver and AAPS phone)
4) AAPS settings (APPS phone)
5) Testing SMS commands works (caregiver and AAPS phone)
Let’s get started!
Download an authenticator: On the caregiver phone, download (from the App store or Google play) and install one authenticator of your choice from the list below:
Google Authenticator - Android / iOS
These Authenticator apps produce a time-limited, one-time 6-digit password, similar to mobile banking or shopping. You can use an alternative Authenticator app, as long as it supports RFC 6238 TOTP tokens. The Microsoft Authenticator does not work.
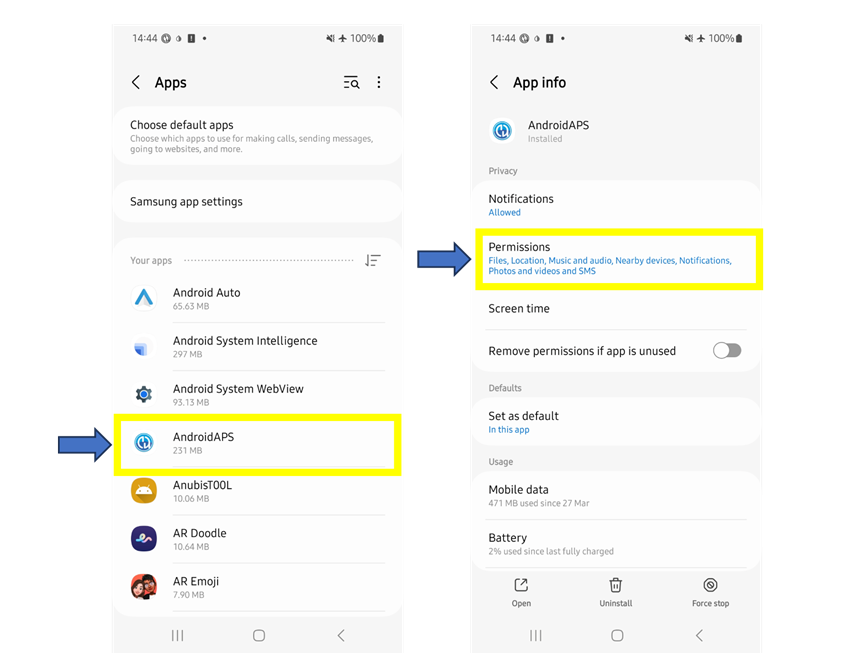
Check phone settings: In the AAPS phone settings go to Apps > AndroidAPS > Permissions > SMS > Allow SMS
Date and time synching: In both the AAPS phone and the caregiver phone, check the date and time are synched. Exactly how you do this depends on your specific handsets, you may need to try out different settings.
Example (for Samsung S23 handset): Settings – general management – date and time- automatic date and time
Some options may be greyed out, due to needing admin via a family account if the phone has been set up as a child account. This date and time setting is called “set automatically” on a caregiver/parent iPhone. If you are not sure if you have synched the handsets, don’t worry, you can set up the SMS commands and troubleshoot afterwards if it seems to be causing problems (ask for help if needed).
AAPS settings:
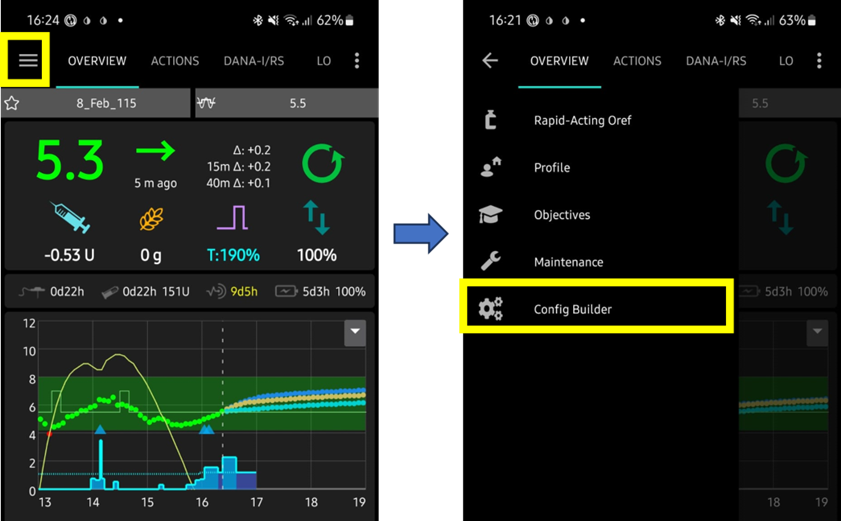
i) Now that the phone settings have been checked, in the AAPS app itself, use the left hand hamburger menu to navigate to Config Builder:
ii) Enable “SMS communicator” by checking the boxes, then click the “cog” to get to the SMS communicator preferences screen:
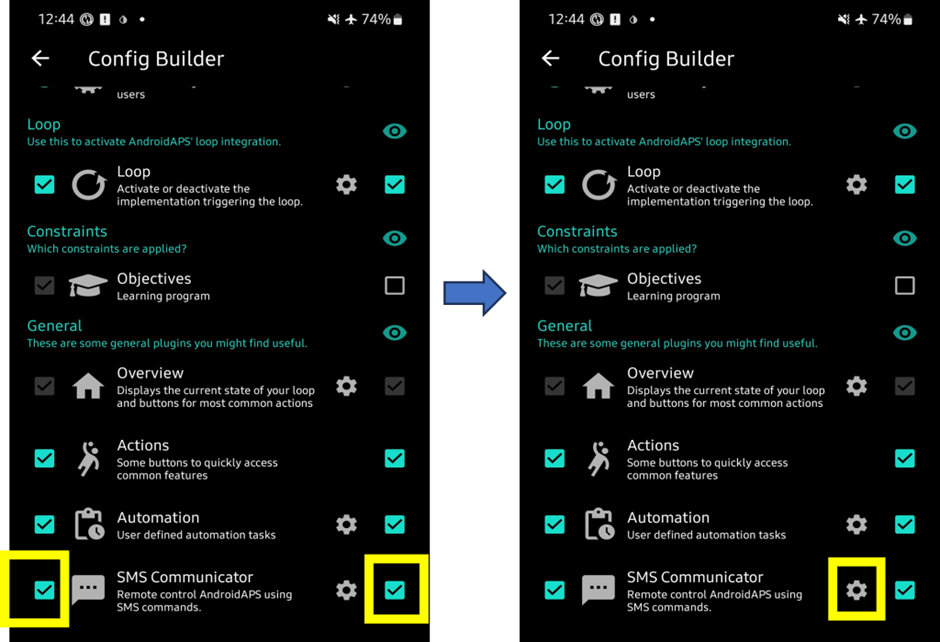
Note - as an alternative route to Config Builder, you can also use the new “SMS Communicator tab” at the top of the AAPS screen, then right click on the custom right hand hamburger menu for that page, to get to the SMS communicator preferences screen.
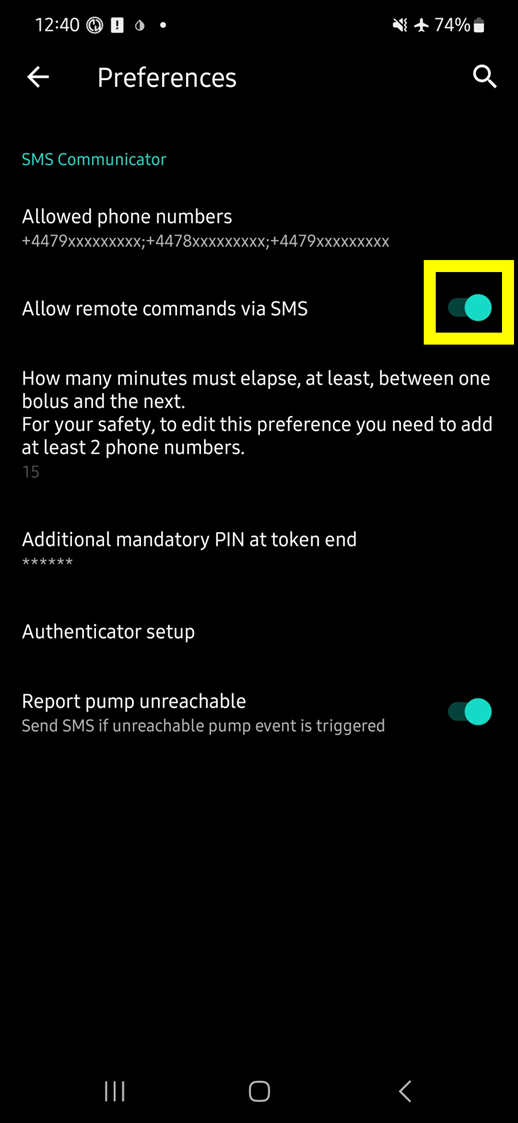
iii) On the preferences screen enable “allow remote commands via SMS”:
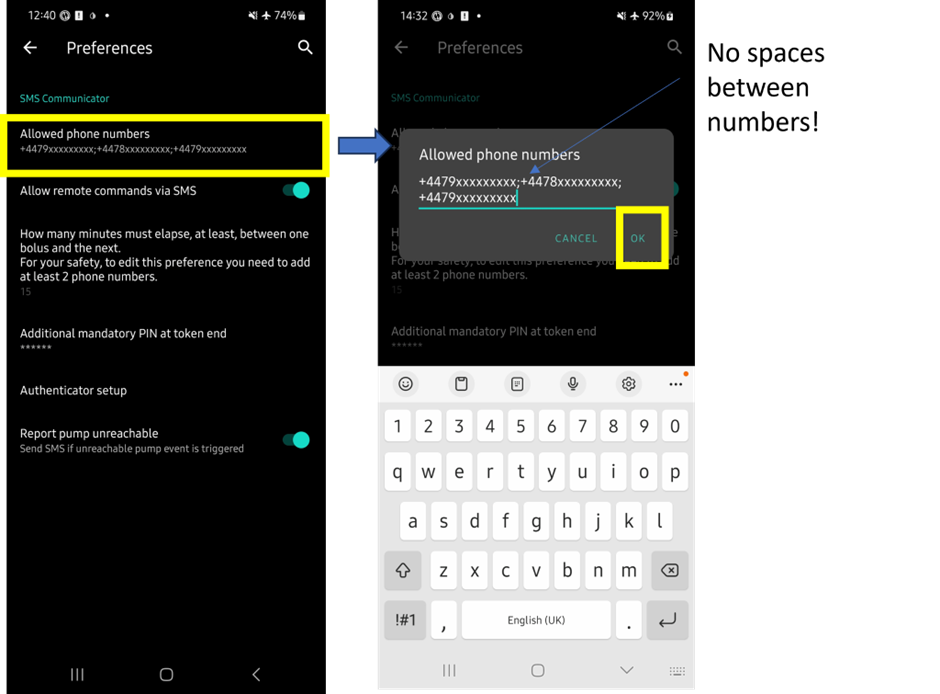
iv) Enter the caregiver phone number(s). Include the country code and exclude the first “0” of the phone number, as shown in these examples:
UK phone number: +447976304596
US phone number: +11234567890
FR phone number: +33612344567
etc.
Note that the “+” in front of the number may or may not be required based on your location. To determine this, send a sample text which will show the received format in the SMS Communicator tab.
If you have more than one phone number to add, separate them by semicolons, with NO space between numbers (this is critical!). Select “OK”:
v) Choose a PIN which you (and any other caregivers) are going to use at the end of the authenticator code when the SMS command is sent.
PIN requirements are:
•3 to 6 digits
•not the same digits (i.e. 1111 or 1224)
•not sequential numbers (i.e. 1234)

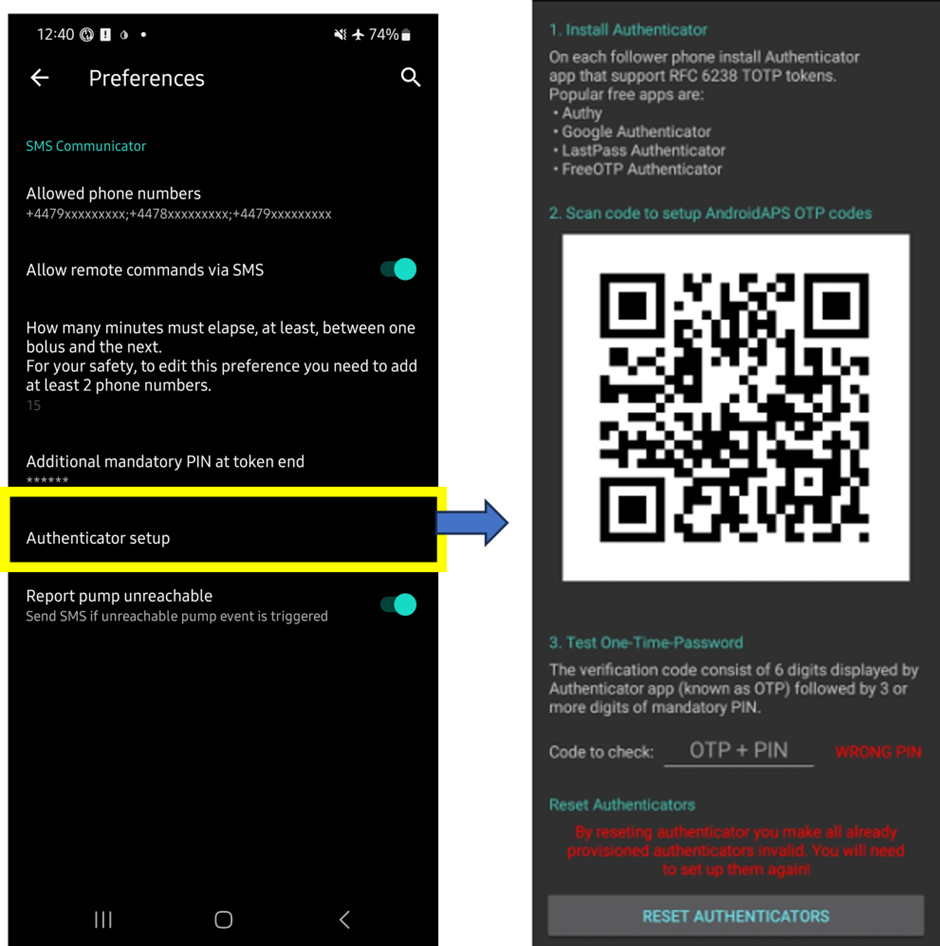
vi) On the preferences screen select “Authenticator setup”
● Follow the step-by-step instructions on the screen.
● Open your installed authenticator app on the caregiver’s phone set up a new connection and
● Use the caregiver phone to scan the QR code provided by AAPS, when prompted.
● Test the one-time passcode from the authenticator app on the caregiver phone followed by your PIN:
Example:
The token from the authenticator app is 457051
Your mandatory PIN is 2401
Code to check: 4570512401
If the entry is correct, the red text “WRONG PIN” will change automatically to a green “OK”. The process is now complete, there is no “OK” button you need to press after entering the code:
You should now be set up with SMS commands.
First steps using SMS commands
To check you have set everything up correctly, test the connection by typing “bg” as an SMS message from the caregiver phone to the AAPS phone. You should get a response similar to that shown here:
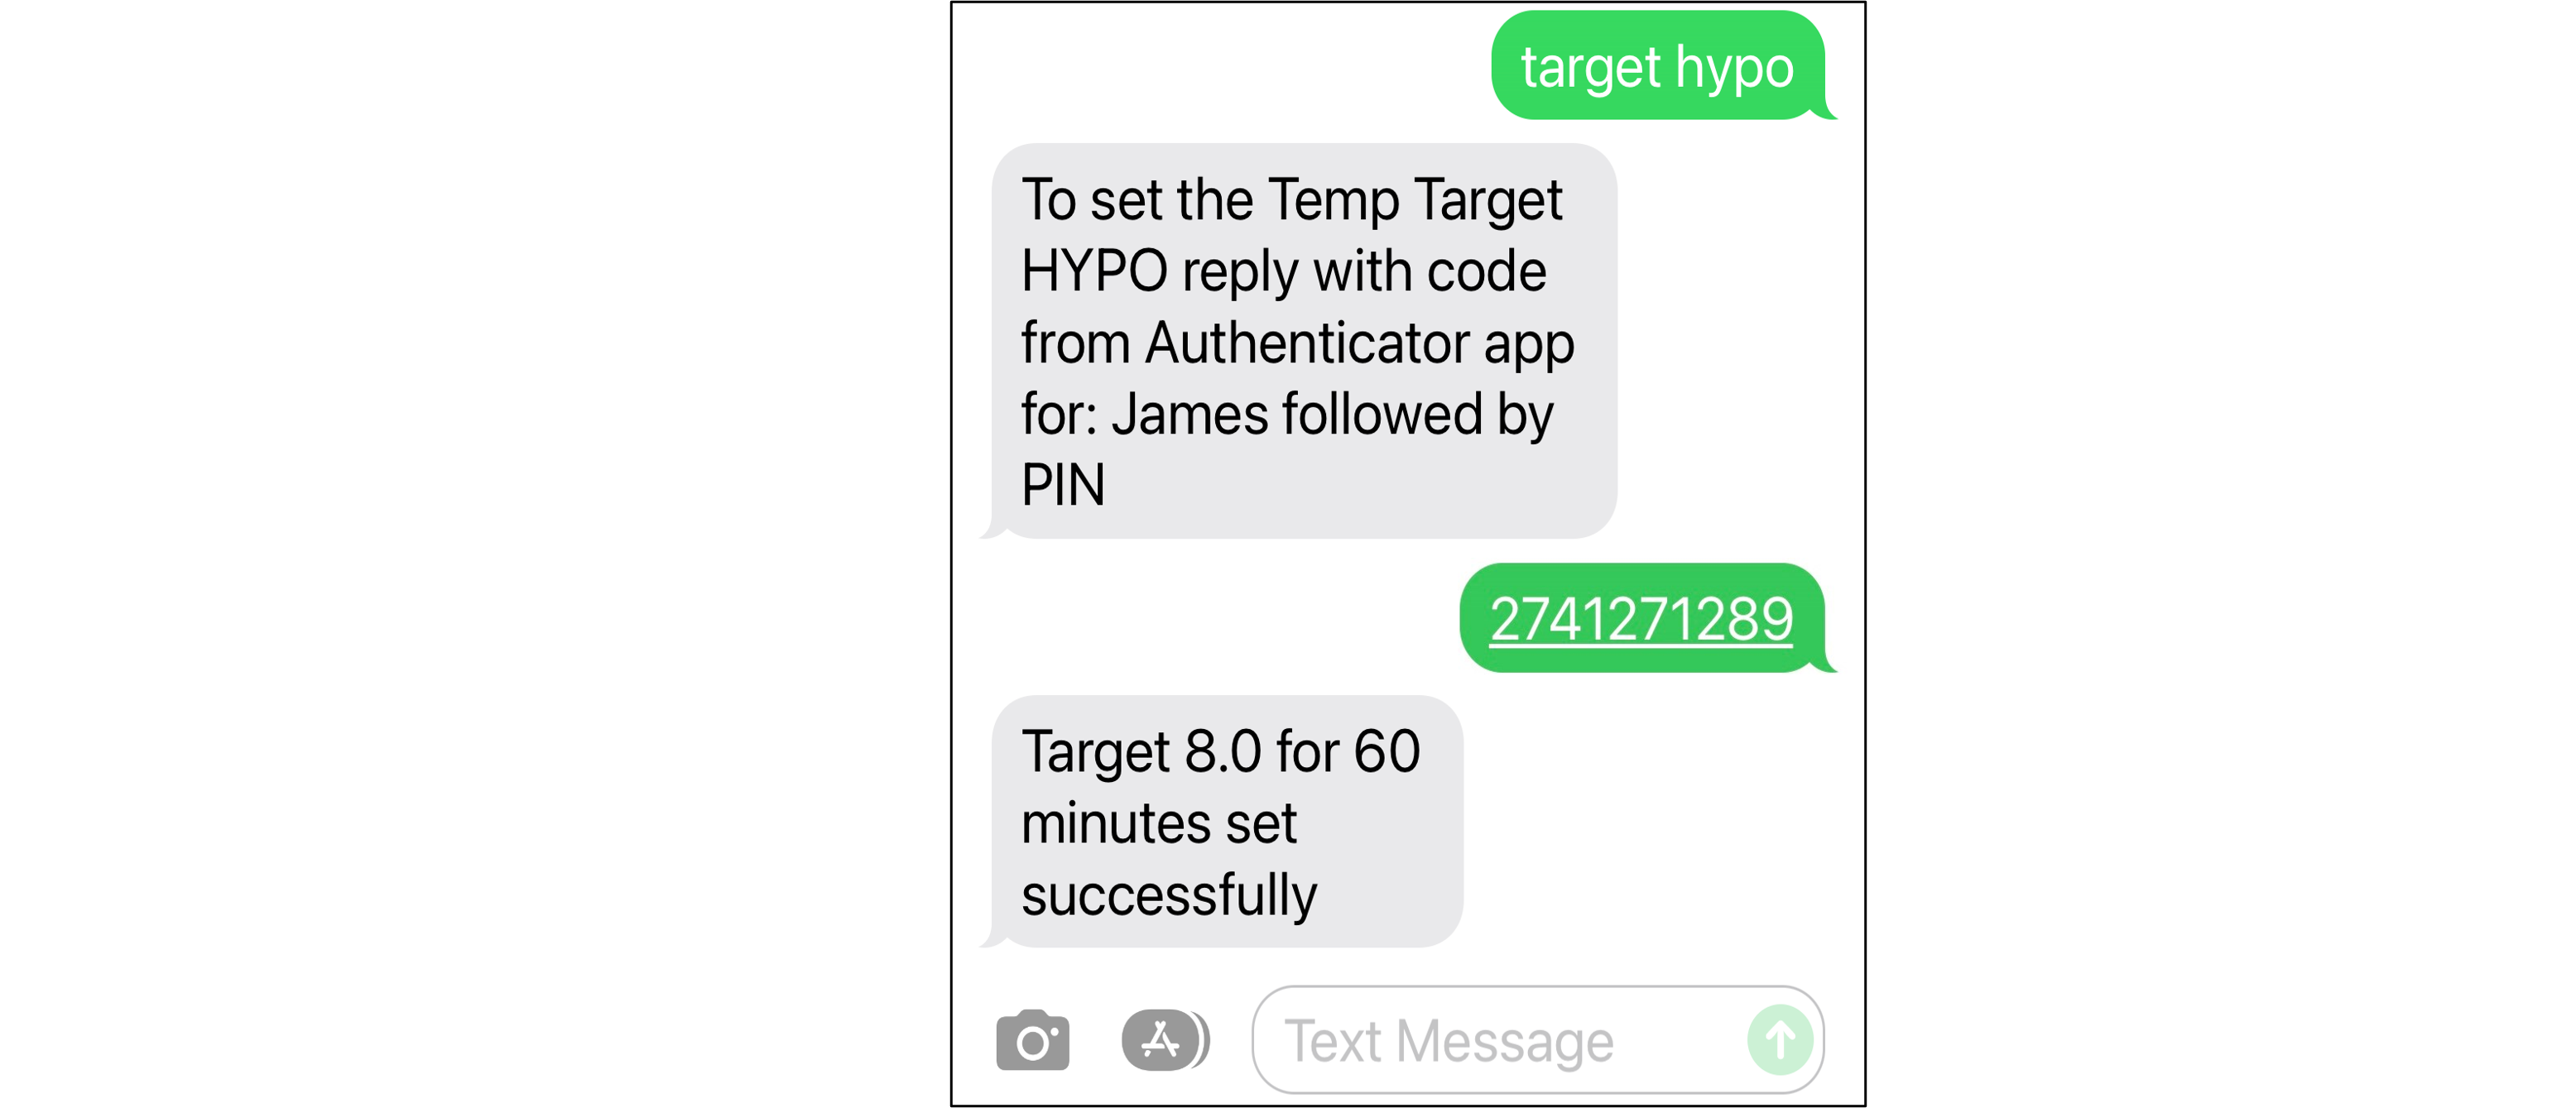
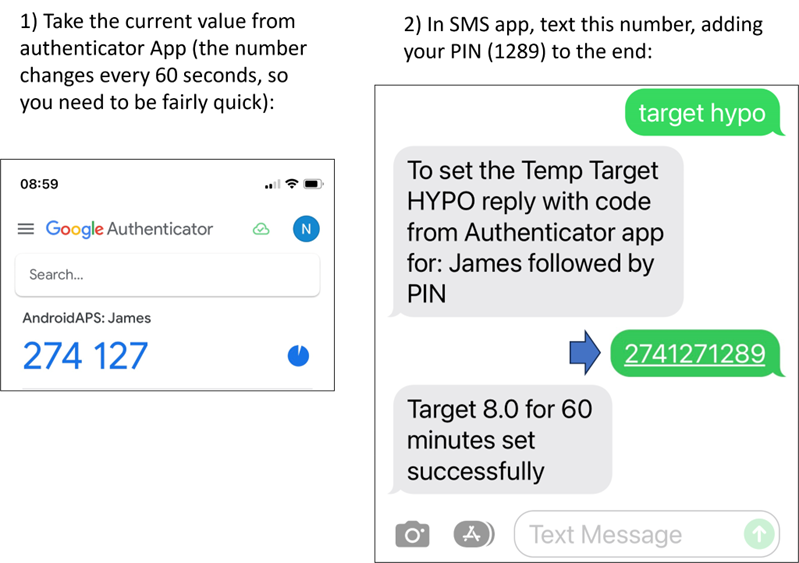
Now try an SMS command that requires the authenticator. To do this, send a text from the caregiver’s phone with the required command to theAAPS phone (e.g. “target hypo”). The caregiver’s phone will receive a text back, prompting you to enter the six-digit authenticator password from the authenticator app, followed by an additional secret PIN known only to caregivers/followers (a string of ten digits in total, assuming your PIN is only 4 digits).
This example is shown below, with the SMS command “target hypo” to set a hypo temp target:
● In this example, your PIN is 1289
● Code from your authenticator app is 274127
● When prompted, text 2741271289
Commands must be sent in English. The response should be in your local language. When you try sending an SMS command for the first time, try it in the presence of the AAPS phone, to see how it works:
The caregiver’s phone will receive a SMS in reply from AAPS to confirm if the remote SMS command has been carried out successfully. There are several possible reasons the command may not be successful:
● SMS commands setup isn’t complete/correct
● You sent a command which had an incorrect format (like “disconnect pump 45” instead of “pump disconnect 45”)
● You used an incorrect, or expired authenticator code (it is usually good to wait a few seconds for a fresh code, if the current one is about to expire)
● The code+PIN was OK, but there was a delay in the SMS leaving/arriving, which led AAPS to calculate that the authenticator code had expired
● The AAPS phone is out of range/contact with the pump
● The system is already busy delivering a bolus
If your command is successful, you will receive a reply to confirm this. If there is a problem you will receive an error message.
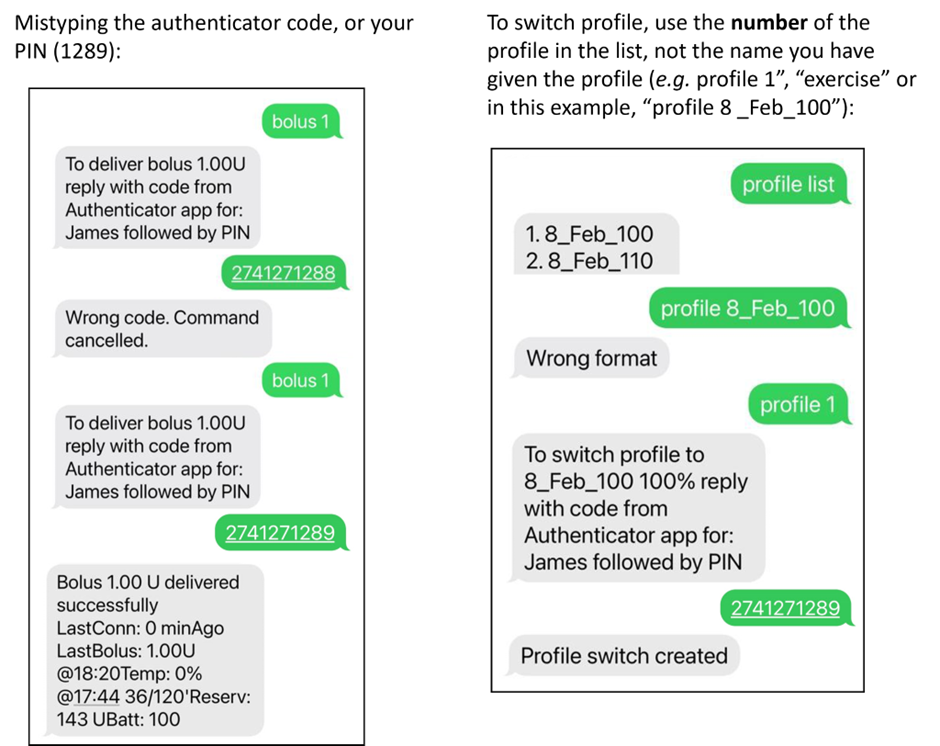
Common errors are shown in the examples below:
Additional safety notes on SMS commands
The default minimum time delay between bolus commands is 15 minutes. For safety reasons, you have to add at least two authorised phone numbers to change this to a shorter time delay. If you try to remotely bolus again within 15 minutes of the previous bolus, you will receive the response “Remote bolus not available. Try again later”
If you want to remove the ability of a caregiver phone to send SMS commands, use the emergency button “RESET AUTHENTICATORS” in AAPS (see preferences screenshot above, link) or send the SMS command “SMS stop”. By resetting authenticators you make ALL the caregivers’ phones invalid. You will need to set them up again.
Delivering mealtime boluses through SMS commands
Remote bolusing of insulin can only be done via SMS Commands, it cannot be actioned through NightScout or NSClient. Carbs however, can be announced through any of the three methods. It is not possible to send both carbs and insulin commands in one single SMS message. These commands must be sent separately as follows:
Send the insulin bolus (e.g.“bolus 2” will command a bolus of 2 units) through SMS commands is equivalent to using the “syringe” icon in AAPS.
Send the carbs (e.g. “carbs 20” will announce 20g of carbs). This is equivalent to using the “carbs” tab in AAPS.
The order in which you send these commands is important. If you announce a large amount of carbs by any route, and have SMBs enabled, AAPS may immediately respond by giving a partial bolus of insulin. So, if you then try to send an insulin bolus after announcing the carbs, you may have a frustrating delay and a “bolus in progress” message, and you then need to check what has been given as an SMB. Or, if you do not realise an SMB is being delivered, and your own subsequent bolus is also successful, too much insulin may be delivered for the meal overall. Therefore, if bolusing for meals remotely, always send the insulin bolus before the carb announcement. If you prefer, you can use a combination of Nightscout or NSClient with SMS commands. Carbs can be announced through Nightscout without any authentication (see instructions sub section below) , and are therefore quicker than SMS commands.
SMS commands troubleshooting and FAQ
Q: What can’t we do with SMS commands?
You cannot set a temporary profile switch (so for example, setting “profile exercise“ for 60 minutes), although you can permanently switch to “profile exercise”. Temporary profiles switches can instead be set through Nightscout or NSClient.
You cannot cancel automations or set user-defined targets but there are approximate solutions: As an example, imagine the normal profile target is 5.5. You have set an automation in AAPS, to always set a high target of 7.0 between 2.30pm and 3.30pm because of a sports class in school, and a condition of the automation is that “no temp target exists”. This week, you have been told at short notice that the sports class is cancelled, and is being replaced by a pizza-eating session, but your kid is already at school with the AAPS phone. If the high temporary target of 7.0 is started by the automation and you cancel it (on the AAPS phone, or remotely) the conditions for the automation are still met and AAPS will simply set the high target again, a minute later.
If you did have access to the AAPS phone, you could uncheck/modify the automation, or, if you don’t want to do that, you could simply set a new temp target of 5.6 for 60 min under the Actions Tab or by pressing on the target tab. This would prevent the automation from setting the high target of 7.0.
If you don’t have access to the AAPS phone SMS commands can be used for an approximate fix: for example, by using the command “target meal” to set a target of 5.0 for 45 mins (other default targets are 8.0 for activity or hypo, see Table). However, with SMS commands you cannot specify a specific value target value (of 5.6 for 60 minutes, for example), you would need to use NSClient or Nightscout to do this.
Q: What happens if I change my mind about a command I have just sent?
AAPS will only deliver on the most recent command. So, if you type “bolus 1.5”, and then, without authenticating, you send a new command “bolus 1”, it will ignore the earlier 1.5 command. AAPS will always send the caregiver’s phone a response to confirm what the SMS command is before you are prompted to enter the authentication code, as well as a response following the action.
If you don’t get a response to an SMS command it could be for one of these reasons:
The message has not got through to the phone (network issues).
AAPS is still in the process of processing the request (e.g. a bolus, which can take some time to deliver depending on your bolus rate).
The AAPS phone does not have good bluetooth connection to the pump when the command is received, and the command has failed (this usually creates an alarm on the AAPS phone). You cannot stop a command once it has been authenticated. Many commands (apart from bolusing and carb announcements) can be easily reversed, or actions taken to mitigate the effects. For errors in bolusing and carb announcements, you can still take action. For example, if you have announced 20g carbs but your child only eats 10g and you (or an onhand caregiver) is unable to delete the treatment in the AAPS phone directly, you could set a high temporary target, or set a reduced profile, to encourage AAPS to be less aggressive.
Q. Why am I getting multiple SMS texts of the same message?
If you receive the same message repeatedly (e.g. a profile switch) you may have accidentally set up a looping condition with other apps. This could be xDrip+, for example. If so, please ensure that xDrip+ (or any other app) does not upload treatments to NightScout.
Q. I’ve just set up SMS commands and I am now getting far too many text messages. Can I reduce the frequency, or make them stop?
Using SMS commands may generate a lot of automated messages from the AAPS phone to the caregiver’s phone. You will also receive messages, for example “basal profile in pump updated” if you have automations set up in AAPS. It can be useful to have unlimited SMS allowance on your AAPS phone plan (and for each caregiver phone used) if a lot of SMS will be sent, and to deactivate SMS notifications, alarms or vibrations on all phones. It is not possible to use SMS commands and not receive these updates. Because of this, you may want an alternative way to communicate directly with your child (if they are old enough), instead of SMS. Common alternative communication apps used by AAPS caregivers include Whatsapp, Lime, Telegram, and Facebook Messenger.
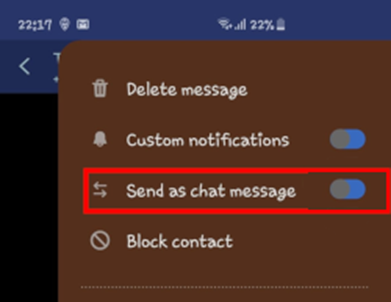
Q. Why are SMS commands not working on my Samsung phone?
There was a report of SMS commands stopping after an update on a Samsung Galaxy S10 phone. This was solved by disabling ‘send as chat message’.
Q. How can I fix issues with the Android Messages App?
If you are having issues sending or receiving SMS commands with the Android Messages app, disable end-to-end encryption on both caregiver and dependent’s phones:
● Open the specific SMS conversation in Messages
● Select the options ellipsis in the top right corner
● select “Details”
● Activate “Only send SMS and MMS messages”
2) NSClient
If you have a caregiver/parent Android phone you can directly download and install the NSClient app. NSClient looks very similar in appearance to AAPS itself, offering the caregiver tabs that will remotely action commands in AAPS:
There are 2 versions of the app you can download, NSClient & NSClient2. The only difference between the two versions is the app name. This allows you to install the NSClient app twice on the same phone, to follow two different people or Nightscout accounts at the same time.
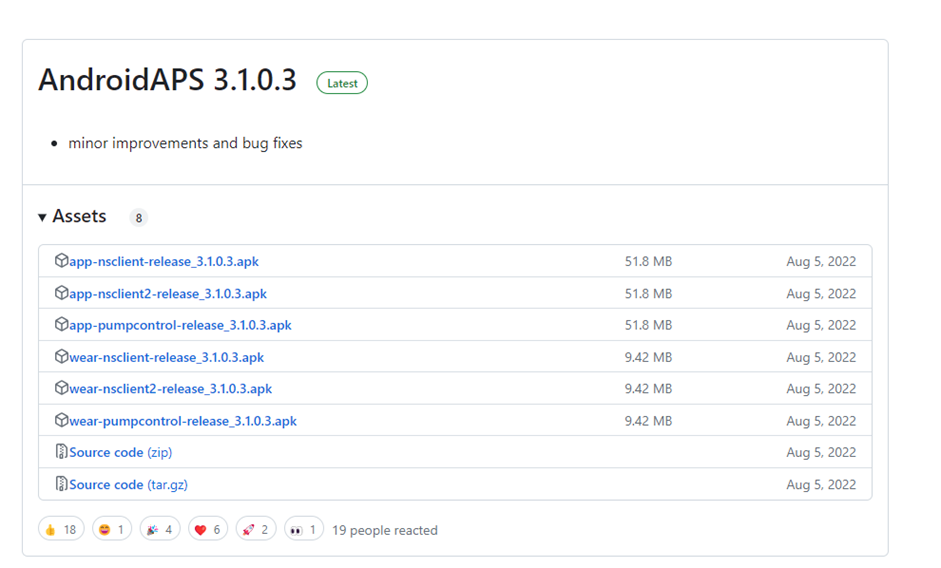
To download NSClient, click on app-nsclient-release-3.1.0.3.apk
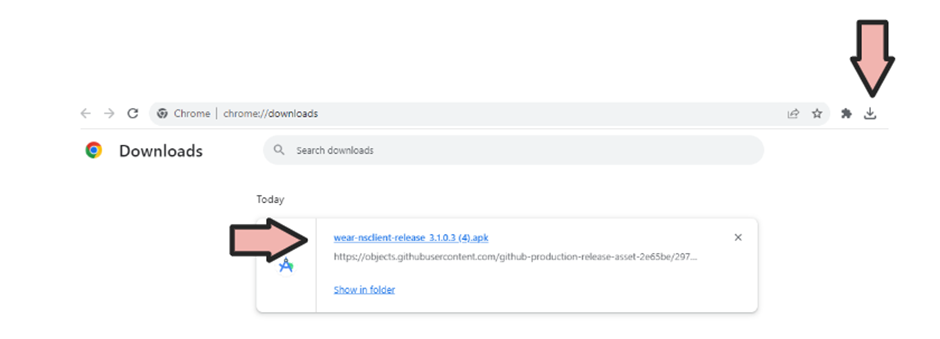
Then go to downloads on your computer. On Windows, -downloads_ will show the right hand ribbon:
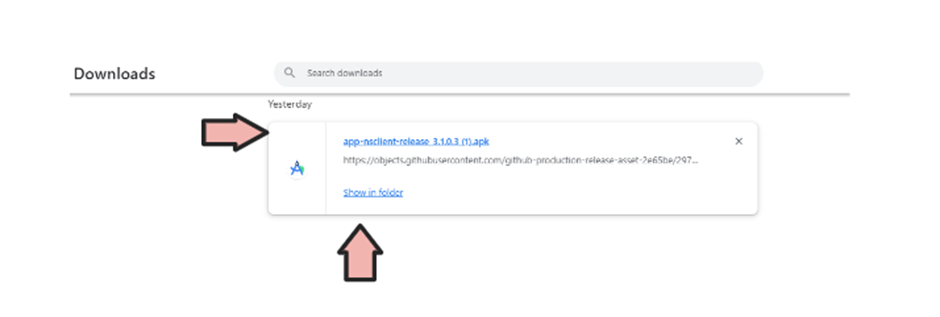
Once downloaded, click show in folder
The apk can now be either:
Transferred by a USB cable onto the follower phone; or Dragged into G drive folder, and then added onto the follower phone by clicking on app-nsclient-release-3.1.0.3.apk
Features of NSClient include:
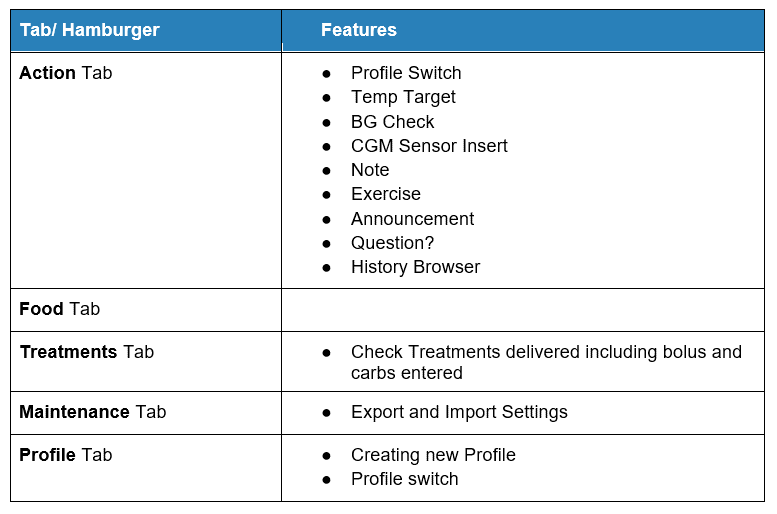
NSClient allows the caregiver to make many of the adjustments that are allowed directly in AAPS (excluding insulin boluses) remotely, via the mobile or internet network. The main benefits of NSClient are the speed and ease with which caregivers/parents can use it to remotely control APPS. NSClient can be much faster than entering SMS Commands, if delivering a command which would require authentication. Commands entered on NSClient are uploaded onto Nightscout.
Remote control through NSClient is only recommended if your synchronization is working well (i.e. you don’t see unwanted data changes like self-modification of TT, TBR etc) see release notes for Version 2.8.1.1 for further details.
NS Client with smartwatch options
A smartwatch can be a very useful tool for helping to manage AAPS with kids. A couple of different configurations are possible. If NSClient is installed on the parents phone, the NSClient WearOS app can be downloaded and installed on a compatible smartwatch which is connected to the parent’s phone. This will show current BG, loop status and allow carb entry, temp targets and profile changes. It will NOT allow bolusing from the WearOS app. You can read more about Smartwatches here.
3) Nightscout
As well as Nightscout being a server in “the Cloud”, there is also a dedicated Nightscout app which can be downloaded directly from the App Store on your iPhone. If you have an Android follower phone, there is not a dedicated Nightscout app and it is better to use NSClient, or, if you only want to follow, and not send treatments you can download and install the Nightwatch app from the Playstore.
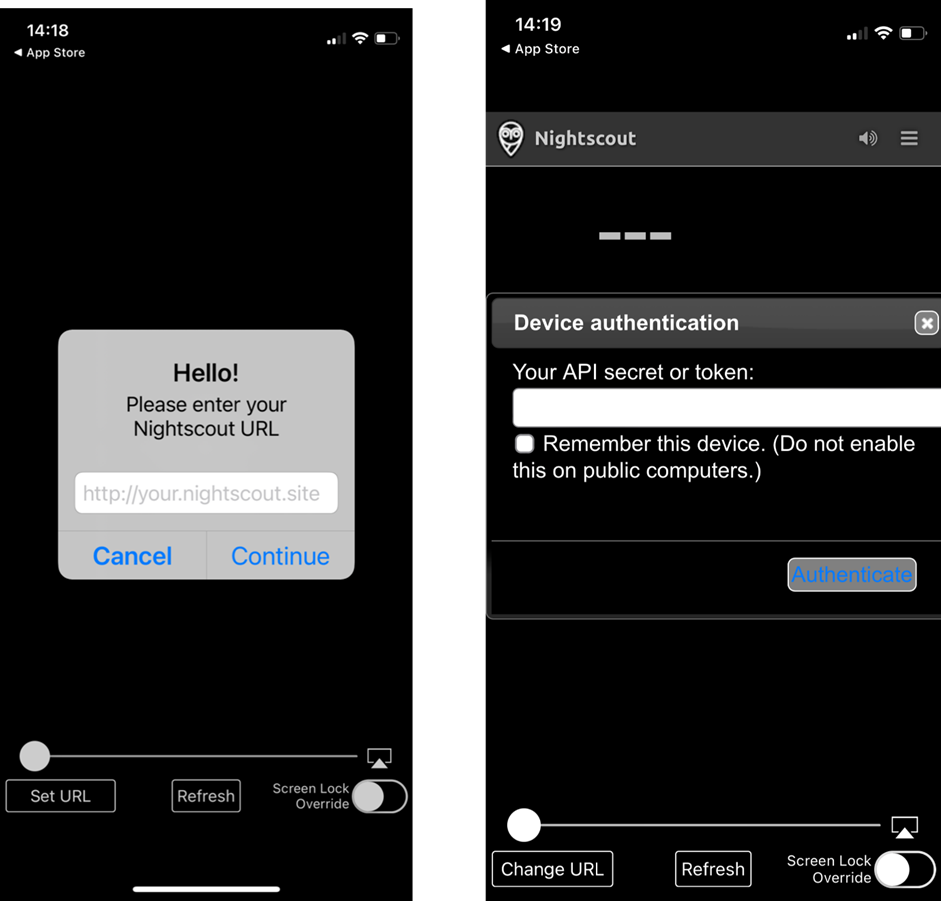
Once you have installed the Nightscout app on your iPhone, open the app and follow the set-up prompts, entering your Nightscout address (see below, left). The form of this may vary depending on how your Nightscout is hosted. (e.g. http://youraddresshere.herokuapp.com). Then enter your Nightscout API secret (see below, right). If not prompted for your API password, then you need to enter this by clicking on the padlock at the top of the app:
More info on setup is available directly from Nightscout
When you first log in, you will have a very simple display (below, left). Customise the display options, by selecting the “hamburger” in the top right and scrolling down:
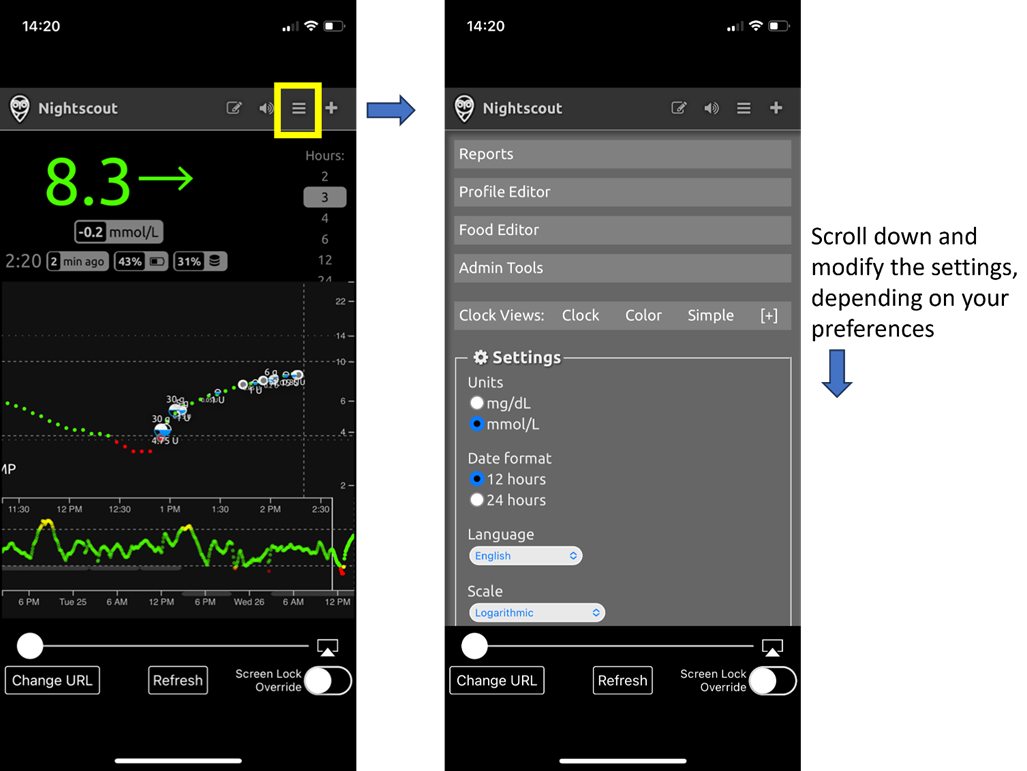
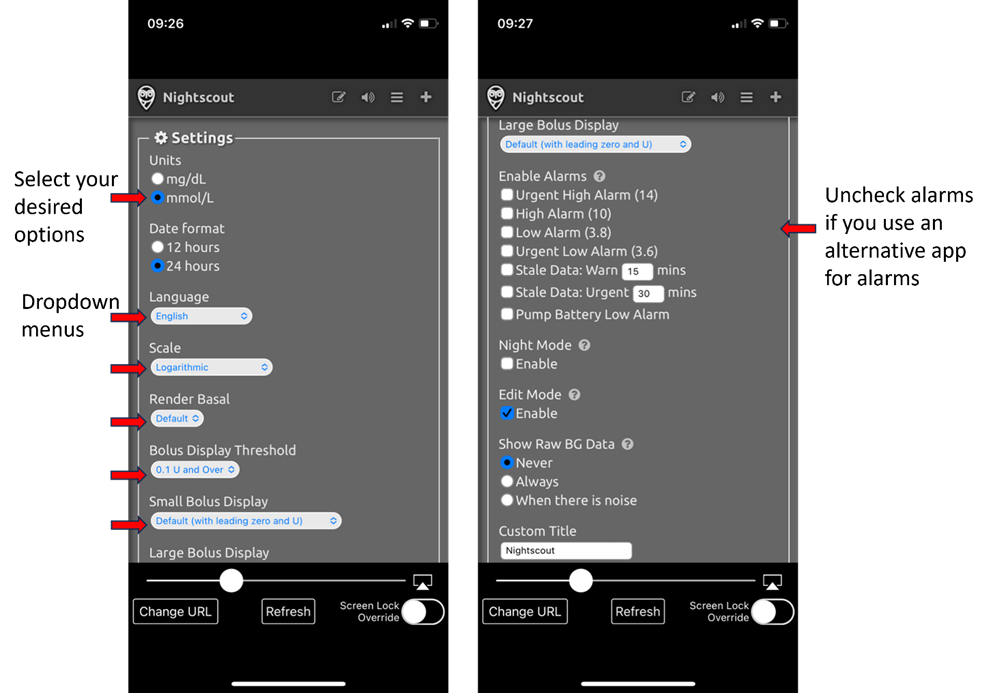
Scroll down through to “Settings”. You may wish to change the “scale” to “linear” as the default for the BG display is logarithmic, and under “render basal” select “default” so that the pump basal shows up. Continue to scroll down until you get to “show plugins”. You need to make sure “careportal” is checked, and can also select various other metrics (most useful are: IOB, care portal, pump, cannula age, insulin age, basal profile and OpenAPS).
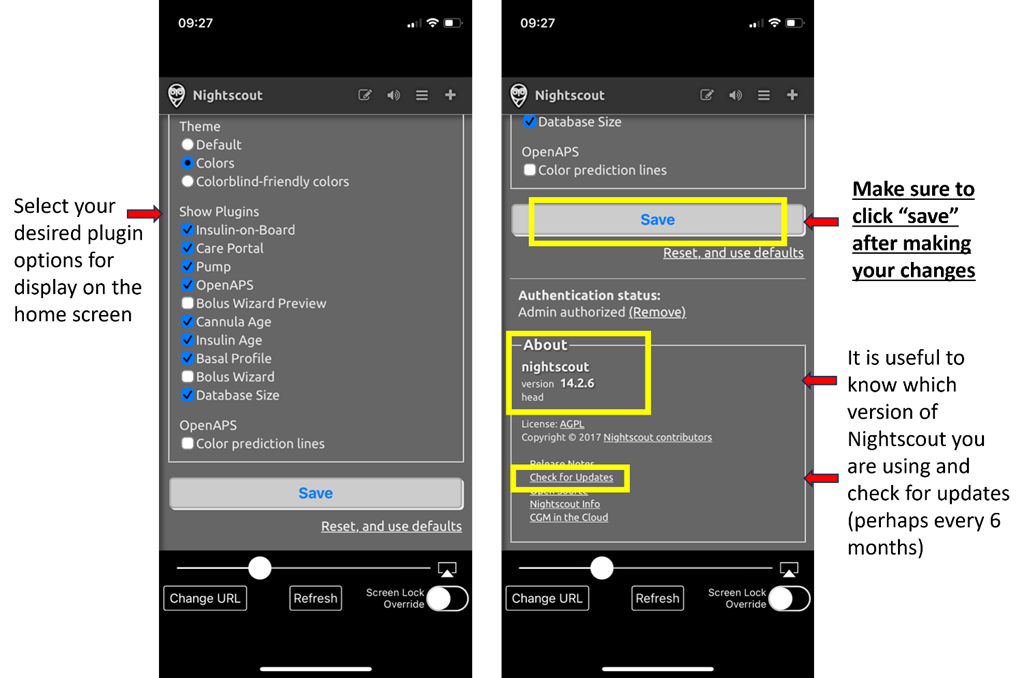
Importantly, you now need to click “save” at the bottom for these changes to take effect.
After pressing “save” the app will return to your main Nightscout screen which will look a little like this:
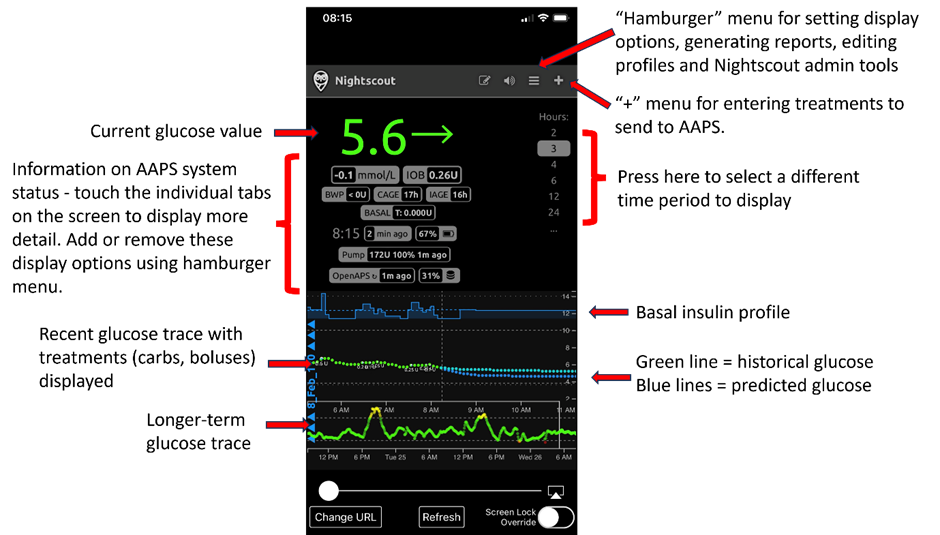
Looking in more detail at the top left menu of the Nightscout app:

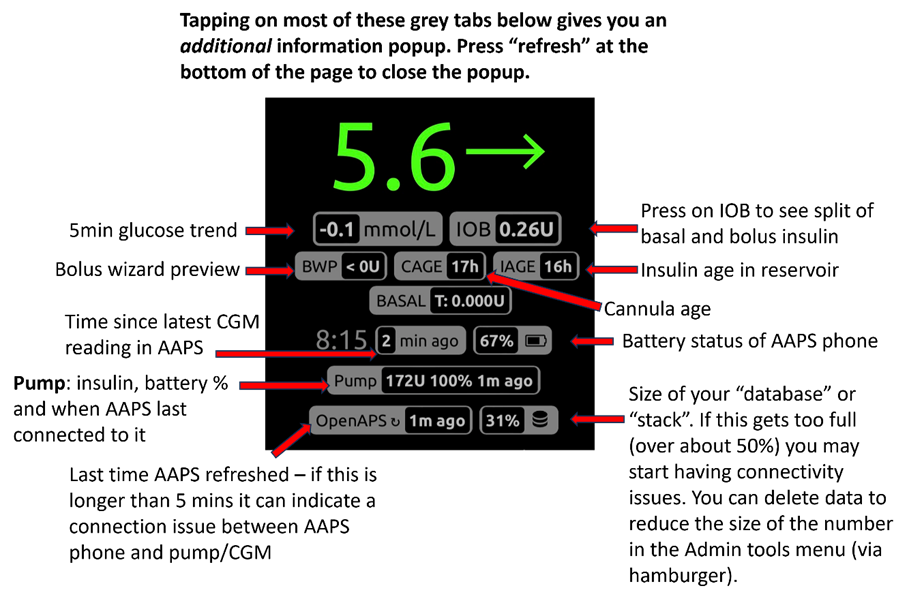
There is a huge amount of information on the status of the AAPS system in the grey tabs (and even more information is revealed if you tap the tab) on this screen:
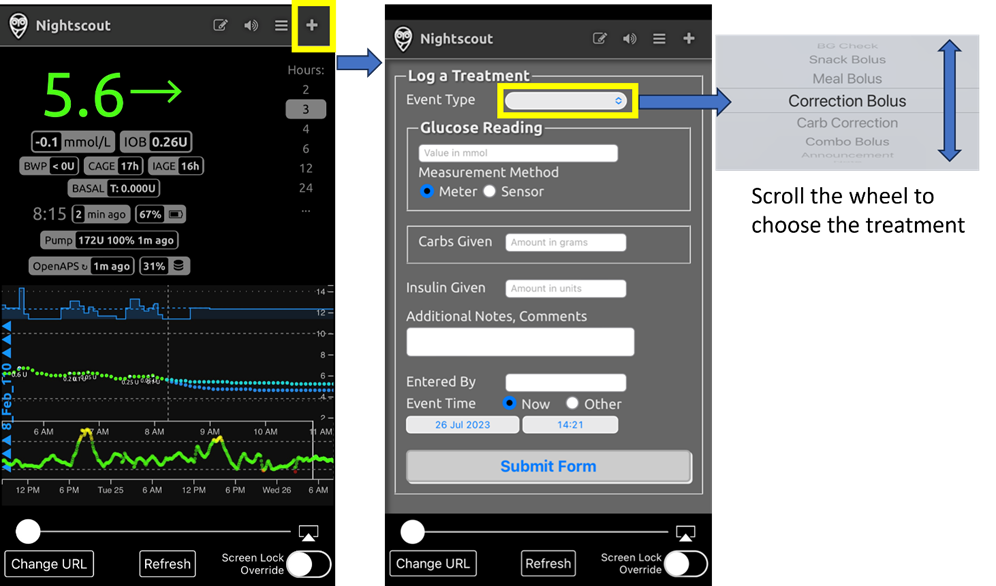
Sending treatments through the Nightscout app to AAPS
To set-up sending treatments from the Nightscout app to AAPS, on the main AAPS phone, go into the NSclient tab in the AAPS app. Open the right-hand dot menu, and open NSclientpreferences – synchronisation and select the relevant options in this menu. Set it to receive the different commands (temporary targets, etc) and also to synchronise profiles. If things don’t seem to be synchronised, go back to the NSclient tab and select “full synchronisation” and wait a few minutes.
Nightscout on your iPhone has all the same functions as Nightscout on your PC. It allows you to send many commands to AAPS, but it does not allow you to send insulin boluses.
Cancelling negative insulin to avoid repeat hypos
Although you cannot actually bolus insulin, you can however “announce” insulin through Nightscout as a “correction bolus”, although it is not delivered. Because AAPS now takes that fake insulin bolus into account, announcing insulin actually works to make AAPS less aggressive, and can be useful for cancelling negative insulin and preventing lows in the event that your profile has been too strong (for example due to prior exercise). You will want to check this for yourself in the presence of the AAPS phone, in case your Nightscout setup differs.
Some of the most useful Nightscout commands are described in the table below.
Nightscout command table
Read more about Nightscout options here
Tips for getting the most out of the Nightscout app
1). If you get “stuck” on a page and want to be able to see the main screen again, just click “refresh” (bottom middle) and this will take you back to the Nightscout homepage with the BG graph.
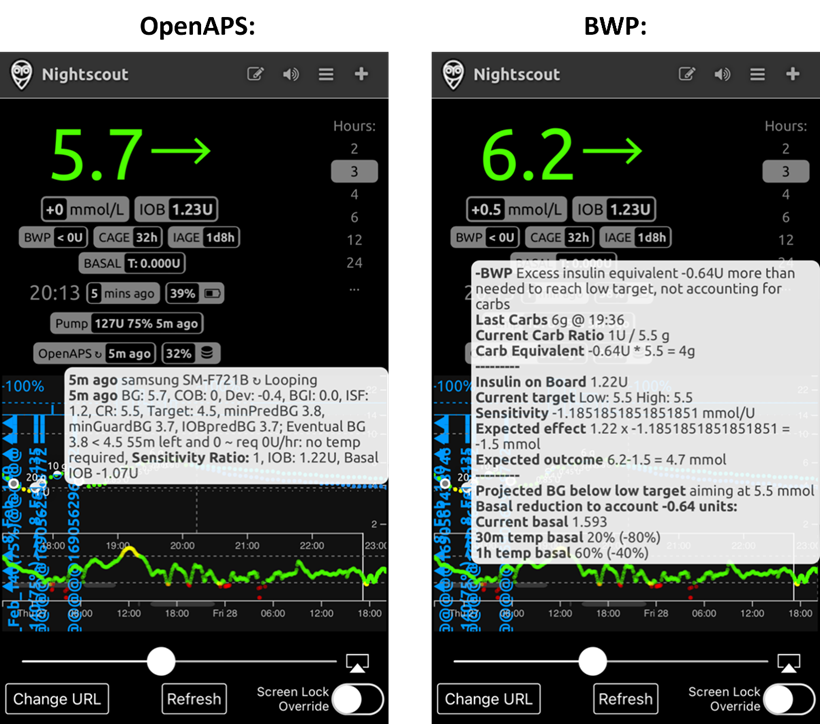
To see the current profile which is running on the phone, press the various icons on the screen above the graph. More info (current carb ratio, sensitivity and timezone etc.) can be seen by pressing “basal” and “OpenAPS” gives info about the profile and current target etc. Both the phone battery% and the pump battery % can also be monitored. BWP gives information on what the algorithm thinks will happen in the future, given the IOB and COB.
4) Smartwatches
This section is currently being updated, the scheduled release is the weekend of 7th Oct 2023….watch this space! The existing section on smartwatches can be found in Smartwatches