Bienvenido/a a la documentación de AAPS
Latest Release
4 June 2026 : Version 3.4.2.3 is out. Check the Release Notes to see what’s new and follow the instructions in the update manual to update.
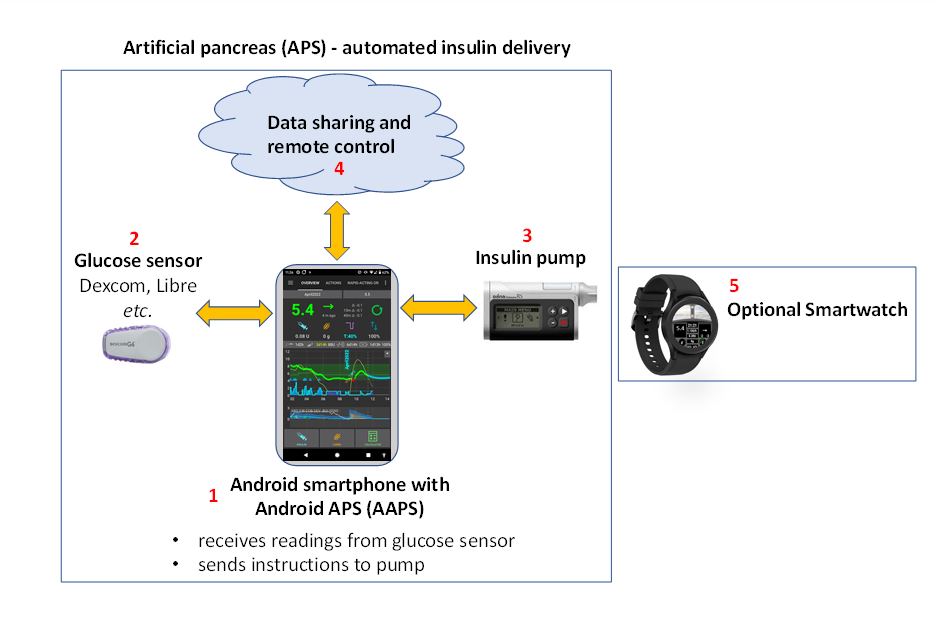
Android APS (AAPS) is an open source app for people living with insulin-dependent diabetes. It is an artificial pancreas system (APS) which runs on Android smartphones. AAPS uses an OpenAPS software algorithm and aims to do what a real pancreas does: keep blood sugar levels within healthy limits by using automated insulin dosing. To use AAPS you need three compatible devices: (1) an Android phone, (2) a continuous glucose monitor (CGM), and (3) a FDA/CE approved insulin pump. Optionally you will need cloud services (4) to remote control AAPS, share your data and store them in a reporting server, then also (5) a smartwatch.
This documentation explains how to setup and use AAPS. You can navigate through the AAPS documentation either through the menu on the left (and the handy «Search docs» function), or by using the index at the bottom of this page.
Overview of the AAPS documentation («The docs»)
Section 2) Getting Started, the Introduction explains the general concept of what an artificial pancreas system (APS) is designed to do. It outlines the background of looping in general, why AAPS was developed, compares AAPS to other systems, and addresses safety. It gives suggestions about how to talk to your clinical team about AAPS, explains why you need to build the AAPS app yourself rather than just downloading it, and gives an overview of the typical connectivity of an AAPS system. It also addresses accessibility, and who is likely to benefit from AAPS.
Preparing for AAPS gives more detail about safety considerations, and the phones, CGMs (Continuous Glucose Monitors) and insulin pumps which are compatible with AAPS. It gives an overview of the process you will go through, and provides an approximate timeline for gaining full functionality of AAPS. This section gets you technically prepared to assemble your AAPS setup as quickly and efficiently as possible. The subsection CGM Configuration explains how to optimse CGM setup and what smoothing options are best.
Now that you have a solid understanding of the process, you can start assembling your AAPS loop.
Section 3) Setting up AAPS contains step-by-step instructions to do this. It covers choosing and setting up your reporting server (Nightscout or Tidepool) so you can review and share your data, getting ready for building the AAPS app, building the AAPS app and transferring the AAPS app to your phone. It also covers setting up the AAPS app using the setup Wizard, linking it with your CGM app, and either a real or virtual insulin pump, as well as linking AAPS to your reporting server. You are then slowly introduced to the full usage of what AAPS has to offer via a safe and carefully calibrated step-by-step process designed to make sure that you/your child are thoroughly familiar and comfortable navigating all the different levels and menu configurations before graduating on the next phase, commonly referred to as the next «Objective», until you are have enough experience to begin using the more advanced options available within the app. These Objectives are specially designed in such a way that will gradually unlock more possibilities of AAPS and switch from Open Loop to Closed Loop.
Section 4) Daily life with AAPS covers key AAPS features, to help you use (and customise) AAPS. This including understanding the screens, carbs-on-board, sensitivity, profile switching, temp targets, extended carbs (or eCarbs), automations, and DynamicISF. It also covers frequent topics like how to manage different types of meals, how to deal with cannula and sensor changes, smartphone updates, daylight saving changes, and travelling with AAPS and sports. Common questions and answers are located within the troubleshooting section.
Section 5) Remote AAPS features highlights a real strength of AAPS. There are a wide range of possibilities for remotely sending commands to, or simply following the data from AAPS. This is equally useful for carers who want to use AAPS for minors, and for adults with diabetes who either want to monitor their sugars (and other metrics) more conveniently than just on their phone (on a watch, in the car etc.), or wish to have significant others to also monitor the data. This section also provides guidance for using Android Auto so you can view glucose levels in the car.
Section 6) Wear OS smartwatches gives information and procedures to use an Android Wear OS smartwatch with the dedicated AAPS watchfaces or custom watchfaces, either as a remote control of your phone or just a display indicator.
Section 7) Maintenance of AAPS covers how to export and backup your settings (which is very important in case you lose/break your phone), gives the latest version notes and details how to update AAPS. You can expect that there will be one new version and 2-3 required updates per year. You are required to do these updates as with all software, as any minor bugs are ironed out, and improvements to AAPS are made. There is a dedicated «updating» troubleshooting section with the common queries.
Section 8) Getting Help should help direct you to the best places to go to find general help with AAPS. This is very important so that you can get in touch with others as quickly as possible, clarify questions and solve the usual pitfalls. A lot of people are already using AAPS successfully, but everyone has a question at some point that they couldn’t solve on their own. Due to the large number of users, the response times to questions are usually very quick, typically only a few hours. Don’t worry about asking for help, there is no such thing as a dumb question! Animamos a los usuarios de cualquier nivel de experiencia a hacer todas las preguntas que consideren necesarias para ayudarlos a ponerse en marcha de manera segura. This section includes general troubleshooting for AAPS and AAPSClient (a companion following app) as well as explaining how to send your AAPS data (logfiles) to the developers for investigation, if you think a technical issue with AAPS needs looking at.
Section 9) covers Advanced AAPS options such as how to progress from using AAPS for hybrid-closed looping (bolusing for meals etc.) to full closed looping (no bolusing), and details development and engineering modes. Most users get on just fine with the main or «Master» AAPS version without looking into these options, this section is for users who already have good control and are looking to further improve their setup.
In section 10) How to support AAPS we provide information so that you can support this project. You can donate money, equipment or expertise. You can suggest/make changes to the documentation yourself, help with translation of the documentation and provide your data through the Open Humans project.
Section 11) Resources, contains archived or additional documentation, including a subsection for clinicians who have expressed interest in open source artificial pancreas technology such as AAPS, or for patients who want to share such information with their clinicians, this topic is also addressed in the introduction. More diabetes and looping references and resources are also contained in this section. It includes the Glossary, a list of the acronyms (or short-term names) used throughout AAPS. This is where to go to find out what the terms ISF or TT, stand for, for example.
Interested in getting started with AAPS? Read more about AAPS in the Introduction.
SAFETY NOTICE
The safety of AAPS relies on the safety features of your hardware (phone, pump, CGM). Only use a fully functioning FDA/CE approved insulin pump and CGM. Do not use broken, modified or self-built insulin pumps or CGM receivers. Only use original consumable supplies (inserters, cannulas and insulin reservoirs) approved by the manufacturer for use with your pump and CGM. Using untested or modified supplies can cause inaccuracy and insulin dosing errors, resulting in significant risk to the user.
Do not use AAPS if you take SGLT-2 inhibitors (gliflozins), as they lower blood sugar levels. You increase the risk diabetic ketoacidosis (DKA) due to reduced insulin delivery and hypoglycemia due to lowered blood sugar levels.
Disclaimer
All information and code described here is for informational and educational purposes only. Use Nightscout and AAPS at your own risk, and do not use the information or code to make medical decisions. Actualmente Nightscout no dispone de HIPAA privacy compliance.
Use of code from github.com is without warranty or formal support of any kind. Por favor revise el repositorio de Licencia para más detalles.
All product and company names, trademarks, servicemarks, registered trademarks, and registered servicemarks are the property of their respective holders. Su uso aquí es informativo y no implica afiliación o pago por ello.
AAPS has no association with, and is not endorsed by: SOOIL, Dexcom, Accu-Chek, Roche Diabetes Care, Insulet or Medtronic.
AAPS Documentation Index
1) Change language
2) Getting started
- Introduction to AAPS
- ¿Qué es un sistema de páncreas artificial?
- ¿Qué significa lazo cerrado híbrido?
- ¿Cómo y por qué comenzó el lazo cerrado (looping)?
- ¿Qué es Android APS (AAPS)?
- ¿Cuáles son los componentes básicos de AAPS?
- ¿Cuáles son las ventajas del sistema AAPS?
- Specific advantages include:
- 1) Safety built-in
- 2) Hardware flexibility
- 3) Highly customisable, with wide parameters
- 4) Remote monitoring
- 5) Remote control
- 6) No commercial constraints, due to open application interfaces
- 7) Detailed app interface
- 8) Accessibility and affordability
- 9) Support
- 10) Predictability, transparency and safety
- 11) Access to advanced features through development (dev) modes including full closed loop
- 12) Ability to contribute yourself to further improvements
- Specific advantages include:
- ¿Cómo se compara AAPS con los bolis (MDI) y el lazo abierto?
- ¿Cómo se compara AAPS con otros sistemas de lazo cerrado?
- ¿AAPS utiliza inteligencia artificial o algún algoritmo de aprendizaje?
- Which system is right for me or my dependant?
- ¿Es seguro usar sistemas de código abierto como AAPS?
- ¿Cómo puedo abordar la discusión sobre AAPS con mi equipo médico?
- Why can’t I just download AAPS and use it straight away?
- What is the connectivity of the AAPS system?
- How does AAPS get continually developed and improved?
- Who can benefit from AAPS?
- What benefits can I get from AAPS?
- Preparing for AAPS
- Finding your way around the documentation
- La seguridad primero
- Technical safety
- Medical safety
- No SGLT-2 inhibitors
- Key principles of looping with AAPS
- What are we going to build and install?
- How long will it take to set everything up?
- Requirements
- Component Overview
- - Compatible pumps
- - Compatible CGMs
- - Compatible phones
- - Compatible watches
3) Setting up AAPS
- Setting up the reporting server
- - Nightscout
- - Tidepool
- Building AAPS
- - Browser Build
- Construyela tú mismo en lugar de descargarla
- Device and software specifications for building AAPS
- 1. AAPS personal fork
- 2. Preparation Steps
- AAPS-CI GitHub Actions to Build the AAPS APK
- AAPS-CI Troubleshooting
- If you want to add a specific commit to your branch, please use cherry-pick.
- CI KeyStore Export
- - Android Studio Build
- - CLI Build
- Transferring and Installing AAPS
- Setup Wizard
- Welcome message
- License agreement
- Required permissions
- Master password
- Units (mg/dL <-> mmol/L)
- Display settings
- Synchronization with the reporting server and more
- Patient name
- Patient type
- Used insulin
- Blood sugar source
- Perfil
- Insulin pump
- APS algorithm
- Detección sensibilidad
- Start Objective 1
- Restart AAPS to validate settings
- Your AAPS Profile
- Change AAPS configuration
- - Config Builder
- - Preferences
- General
- Protección
- Inicio
- Keep screen on
- Buttons
- Asistente Rápido
- Default temp targets
- Fill/Prime standard insulin amounts
- Range for visualization
- Shorten tab titles
- Show notes field in treatments dialogs
- Luces de estado
- Deliver this part of bolus wizard result
- Old glycemia time threshold
- Enabled bolus advisor
- Enabled bolus reminder
- Advanced Settings (Overview)
- Treatment safety
- Loop
- Advanced Meal Assist (AMA) or Super Micro Bolus (SMB)
- Ajustes absorción
- Pump
- Configuración de la bomba
- Tidepool
- NSClient
- NSClientV3
- Comunicaciones SMS
- Automatización
- Alarma local
- Maintenance settings
- Open Humans
- Completing the objectives
- Backup your settings
- Objective 1: Setting up visualization and monitoring, analyzing basals and ratios
- Objective 2: Learn how to control AAPS
- Objetivo 3: Demuestra tus conocimientos
- Objetivo 4: Iniciar en un lazo abierto
- Objetivo 5: Comprensión de su lazo abierto, incluidas sus recomendaciones basales temporales
- Objetivo 6: Empezando a cerrar el lazo con Baja Glucosa Suspender
- Objective 7: Tuning the closed loop, raising maxIOB above 0 and gradually lowering BG targets
- Objective 8: Adjust basals and ratios if needed, and then enable Autosens
- Objective 9: Enabling additional oref1 features for daytime use, such as super micro bolus (SMB)
- Objective 10: Automation
- Go back in objectives
4) Daily Life with AAPS
- AAPS Screens
- The Homescreen
- Asistente de bolo (Calculadora)
- Pestaña de Acciones
- Perfil de Insulina
- Estado de la bomba de insulina
- Loop, AMA o SMB
- Perfil
- Automatización
- NSClient
- Origen de glucosa - xDrip+, Dexcom (BYODA),…
- Tratamientos
- Historial
- Statistics
- Profile Helper
- Key AAPS Features
- Loop mode
- Autosens
- Super Micro Bolus (SMB)
- Advanced Meal Assist (AMA)
- Overview of hard-coded limits
- COB calculation
- ¿Cómo calcula la AAPS el valor de los carbohidratos (COB)?
- Carb Sensitivity Factor
- Carbs Sensitivity - Oref1
- Carbs Sensitivity - WeightedAverage
- Detección de valores erróneos de carbohidratos (COB)
- Corrección manual de los carbohidratos introducidos
- Carb correction - how to delete a Carb entry from Treatments
- Sensitivity detection
- Profile Switch & Profile Percentage
- Temp-Targets
- ¿Qué son los objetivos temporales y como puedo ajustarlos y configurarlos?
- Where can I select a Temp-Target?
- Where can I change the default Temp-Target and override with my own preferences?
- How do I cancel a Temp-Target?
- How do I select a “Default-Temp-Targets”
- Objetivo temporal ante Hipoglucemia
- Actividad con Objetivo-Temporal
- Comer pronto objetivo-temporal
- How do I turn off SMB during Temp-Targets?
- Extended carbs
- Automations
- What is an Automation?
- How Automation can help
- Key considerations before starting with Automations
- When can I start using Automation?
- Where are Automations located in AAPS?
- How can I set up an Automation?
- Safety limits
- Correct use of negative values
- Automation Triggers
- Acción
- The order of the Automations in the list matters
- How to delete Automation rules
- Examples of Automations
- Automating Preference Settings Export
- Automation Logs
- Troubleshooting
- Troubleshooting
- Alternatives to Automations
- Dynamic ISF
- AAPS for children
- Pumps and cannulas
- Timezone traveling & Daylight Saving Time
5) Remote AAPS features
- Remote monitoring
- Remote control
- SMS Commands
- La seguridad primero
- Configurar comandos SMS
- SMS commands usage
- Comandos
- Troubleshooting and FAQ
- What can’t we do with SMS commands?
- What happens if I change my mind about a command I have just sent?
- Why didn’t I get a response to an SMS command?
- No response whatsoever for SMS commands
- Errors carrying out commands
- How can I stop a command once it has been authenticated?
- Múltiples SMS
- I am getting far too many text messages from SMS Commands. Can I reduce the frequency, or make them stop?
- Following Only
- Android Auto
6) Wear OS Smartwatches
- AAPS for Wear OS
- Use the smartwatch
- Wear OS Versions and compatibility
- How to set up a Samsung Galaxy 4 smartwatch with AAPS
- Basic smartwatch familiarity
- Setting up a Samsung account
- Transferring the AAPS Wear app onto your AAPS phone
- Setting up the connection between the watch and the phone from AAPS
- Changing to an AAPS Watchface on your WearOS watch
- AAPSv2 watchface - Legend
- Remote control
- AAPS Watchfaces
- Configuration
- Accessing main menu of AAPS
- Settings (in wear watch)
- Complications
- Wear OS Tiles
- How to add Tiles
- Always on
- Snooze Alert shortcut
- Performance and battery life tips
- Troubleshooting the wear app:
- Additional AAPS custom watchfaces are also available
- Build your own watchface
- Custom watchfaces reference
- Custom Watchface Format
- JSON Structure
- How to build/design your first Watchface
- Advanced features
- Key and KeyValue reference
- Exchange site custom watchfaces
7) Maintenance of AAPS
- Export/Import Settings
- Reviewing your data
- AAPS Release Notes
- Versión de Android y versión de AAPS
- Versión de WearOS
- Version for 3.4.2.3
- Version 3.4.2.2
- Version 3.4.2.1
- Version 3.4.2.0
- Version 3.4.1.0
- Version 3.4.0.0
- Version 3.3.2.1
- Version 3.3.2.0
- Version 3.3.1.3
- Version 3.3.1.2
- Version 3.3.1.0
- Version 3.3.0.0
- Version 3.2.0.4
- Version 3.2.0.0 dedicada a @Philoul
- Versión 3.1.0
- Versión 3.0.0
- Versión 2.8.2
- Versión 2.8.1.1
- Versión 2.8.0
- Versión 2.7.0
- Versión 2.6.1.4
- Versión 2.6.1.3
- Versión 2.6.1.2
- Versión 2.6.1.1
- Versión 2.6.1
- Versión 2.6.0
- Versión 2.5.1
- Versión 2.5.0
- Versión 2.3
- Versión 2.2.2
- Versión 2.2
- Versión 2.1
- Versión 2.0
- Version 1.0
- Documentation updates
- March 2026
- January 2025
- December 2025
- October 2025
- August 2025
- May 2025
- January 2025
- December 2024
- November 2024
- October 2024
- February 2022
- January 2022
- December 2021
- November 2021
- October 2021
- September 2021
- June 2021
- April 2021
- March 2021
- February 2021
- January 2021
- December 2020
- Octubre 2020
- Septiembre 2020
- June 2020
- May 2020
- April 2020
- March 2020
- February 2020
- January 2020
- Diciembre 2019
- Noviembre 2019
- Octubre 2019
- Septiembre 2019
- Agosto 2019
- Updating to a new version of AAPS
- - Browser Update
- - Android Studio Update
8) Getting Help
- Where can I get help with AAPS
- General troubleshooting
- - Bluetooth troubleshooting
- Profile Tuning Guide
- Troubleshooting Android Studio
- Perdida de almacén de claves
- Gradle Sync failed
- Generate Signed APK generated successfully with 0 build variants
- App was created with compiler/kotlin warnings
- No CGM data is received by AAPS
- Apk not installed
- Apk installed but old version
- None of the above worked
- Worst case scenario
- Accessing logfiles
9) Advanced AAPS options
- Full Closed Loop
- What to expect?
- General considerations why (not to) move from HCL to FCL
- Well-tuned hybrid closed loop
- Fast insulin (Lyumjev, Fiasp)
- Prerequisites
- Meal-related limitations
- Preparing for activity/sports
- Hurdles for kids
- Enabling boosted SMBs: safety
- Meal detection/your Automations for boosting
- Hypo prevention
- Troubleshooting
- Dev branch
- Autotune
10) How to support AAPS
- How to help
- Editing the docs
- General
- Sintaxis del código
- Tables
- Style Guide
- Contents
- 1. English language writing tips
- Use language that is appropriate for the reader
- Privacy/licensing concerns:
- Keep sentences short, get to the point
- Don’t be afraid to give instructions
- Mostly use active verbs, rather than passive verbs
- Avoid nominalisations
- Use lists where appropriate
- Mythbusting
- Optimizing writing style by purpose
- 2. AAPS-specific writing/updating notes
- 3. Useful References
- Translating the app and docs
- State of translations
- Open Humans Uploader
11) Resources
- Glossary
- FAQ
- General
- APS algorithm
- Other settings
- Frequent questions on Discord and their answers…
- My problem is not listed here.
- My problem is not listed here but I found the solution
- AAPS stops everyday around the same time.
- How to organize my backups ?
- I have problems, errors building the app.
- I’m stuck on an objective and need help.
- How to reset the password in AAPS v2.8.x ?
- How to reset the password in AAPS v3.x
- My link/pump/pod is unresponsive (RL/OL/EmaLink…)
- Build error: file name too long
- Alert: Running dev version. Closed loop is disabled
- Where can I find settings files?
- How to configure battery savings?
- Pump unreachable alerts several times a day or at night.
- Where can I delete treatments in AAPS v3 ?
- Configuring and Using the AAPSClient remote app
- I have a red triangle / AAPS won’t enable closed loop / Loops stays in LGS / I have a yellow triangle
- Can I move an active DASH Pod to other hardware?
- Procedure I follow in this:
- How do I import settings from earlier versions of AAPS into AAPS v3 ?
- General diabetes and looping resources
- Dedicated Google account for AAPS (optional)
- How to set up a dedicated Google account for AAPS
- Go to https://account.google.com
- Enter your NEW dedicated account details:
- Enter your persona:
- Choose your NEW email address & password
- Enter a phone number which can receive the SMS verification
- Enter the recovery email address
- Finish setting up the account
- Customize the new profile display
- Open the Gmail website on both windows to configure the new account
- In the new Gmail account (bottom window), open Gmail settings…
- Setup forwarding…
- Verify the forwarded email address
- Archive forwarded emails in the new dedicated Gmail account (bottom window)
- How to set up a dedicated Google account for AAPS
- For Clinicians (outdated)
- The steps for building a DIY Closed Loop:
- How A DIY Closed Loop Works
- How data is gathered:
- How does it know what to do?
- Examples of AAPS algorithm decision making:
- Here are examples of the purple prediction lines, and how they might differ:
- Here are examples of different time frames that influence the needed adjustments to insulin delivery:
- Scenario 1 - Zero Temp for safety
- Scenario 2 - Zero temp for safety
- Scenario 3 - More insulin needed
- Scenario 4 - Low temping for safety
- Optimizing settings and making changes
- OpenAPS
- Summary