AAPS Omnipod Insulin Pump Driver Documentation
These instructions are for configuring the Omnipod Eros generation pump (NOT Omnipod Dash). The Omnipod driver is available as part of AAPS (AAPS) as of version 2.8.
תוכנה זו היא חלק מפתרון לבלב מלאכותי DIY ואינו מוצר אך דורש ממכם לקרוא, ללמוד ולהבין את המערכת, כולל את אופן השימוש בה. האחריות על השימוש במערכת היא עליכם בלבד.
Hardware and Software Requirements
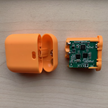
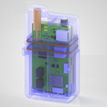
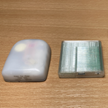
Pod Communication Device
Component that bridges communication from your AAPS enabled phone to Eros generation pods.
DiaLink - Contact Info
LoopLink Website - Contact Info - Untested
 Mobile Phone Device
Component that will operate AAPS and send control commands to the Pod communication device.
Supported Omnipod driver Android phone with a version of AAPS 2.8 and related components setup
 Insulin Delivery Device
Component that will interpret commands received from the Pod communication device originating from your AAPS enable phone.
A new Omnipod pod (Eros generation - NOT DASH)
These instructions will assume that you are starting a new pod session; if this is not the case, please be patient and attempt to begin this process on your next pod change.
לפני שמתחילים
SAFETY FIRST - do not attempt this process in an environment where you cannot recover from an error (extra pods, insulin, charged RileyLink, and phone devices are must-haves).
Your Omnipod PDM will no longer work after the AAPS Omnipod driver activates your pod. Previously you used your Omnipod PDM to send commands to your Omnipod Eros pod. An Omnipod Eros pod only allows a single device to send communication to it. המכשיר שמפעיל את הפוד הוא המכשיר היחיד שמורשה לתקשר איתו מאותה נקודה ואילך. This means that once you activate an Omnipod Eros pod with your RileyLink through the AAPS Omnipod driver, you will no longer be able to use your PDM with your pod. The AAPS Omnipod driver with the RileyLink is now your acting PDM. This does NOT mean you should throw away your PDM, it is recommended to keep it around as a backup, and for emergencies with AAPS is not working correctly.
You can configure multiple RileyLinks, but only one selected RileyLink at a time can communicate with a pod. The AAPS Omnipod driver supports the ability to add multiple RileyLinks in the RileyLink configuration, however, only one RileyLink at a time can be selected to be used for sending and receiving communication.
Your pod will not shut off when the RileyLink is out of range. When your RileyLink is out of range or the signal is blocked from communicating with the active pod, your pod will continue to deliver basal insulin. Upon activating a pod, the basal profile defined in AAPS will be programmed into the new pod. Should you lose contact with the pod, it will revert to this basal profile. You will not be able to issue new commands until the RileyLink comes back in range and re-establishes the connection.
30 min Basal Rate Profiles are NOT supported in AAPS. If you are new to AAPS and are setting up your basal rate profile for the first time please be aware that basal rates starting on a half hour are not supported and you will need to adjust your basal rate profile to start on the hour. For example, if you have a basal rate of say 1.1 units which starts at 09:30 and has a duration of 2 hours ending at 11:30, this will not work. You will need to update this 1.1 unit basal rate to a time range of either 9:00-11:00 or 10:00-12:00. Even though the 30 min basal rate profile increments are supported by the Omnipod hardware itself, AAPS is not able to take them into account with its algorithms currently.
Enabling the Omnipod Driver in AAPS
You can enable the Omnipod driver in AAPS in two ways:
Option 1: The Setup Wizard
After installing a new version of AAPS, the Setup Wizard will start automatically. This will also occur during in place upgrades. If you already have exported your settings from a previous installation you can exit the Setup Wizard and import your old settings. For new installations proceed below.
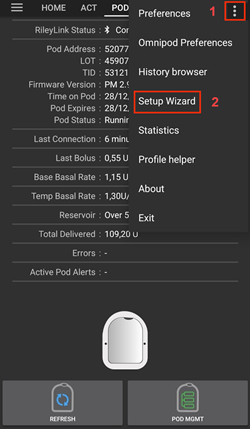
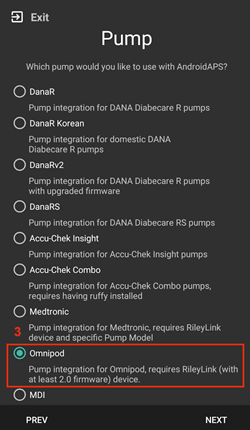
Via the AAPS Setup Wizard (2) located at the top right-hand corner three-dot menu (1) and proceeding through the wizard menus until you arrive at the Pump screen. Then select the Omnipod radio button (3) .
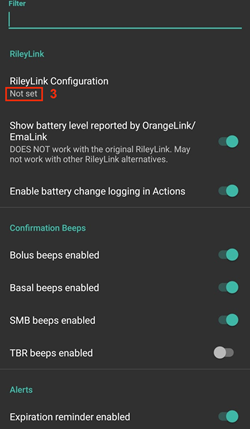
On the same screen, below the pump selection, the Omnipod Driver Settings are displayed, under the RileyLink Configuration add your RileyLink device by pressing the Not Set text.
On the RileyLink Selection screen press the Scan button and select your RileyLink by scanning for all available Bluetooth devices and selecting your RileyLink from the list. When properly selected you are returned to the pump driver selection screen displaying the Omnipod driver settings showing your selected RileyLink with the MAC address listed.
Press the Next button to proceed with the rest of the Setup Wizard. It can take up to one minute for the selected RileyLink to initialize and the Next button to become active.
Detailed steps on how to setup your pod communication device are listed below in the RileyLink Setup Section.
OR
אפשרות 2: בונה התצורה
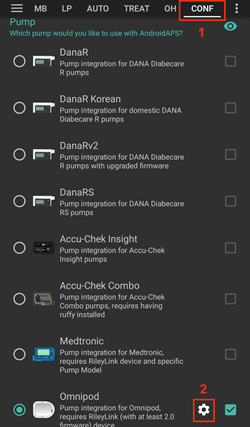
Via the top-left hand corner hamburger menu under Config Builder (1) ➜Pump➜Omnipod by selecting the radio button (2) titled Omnipod. Selecting the checkbox (4) next to the Settings Gear (3) will display the Omnipod menu as a tab in the AAPS interface titled POD. This is referred to in this documentation as the Omnipod (POD) tab.
NOTE: A faster way to access the Omnipod settings can be found below in the Omnipod Settings section of this document.


אימות בחירת מנהל התקן Omnipod
Note: If you have exited the Setup Wizard early without selecting your RileyLink, the Omnipod Driver is enabled but you will still need to select your RileyLink. You may see the Omnipod (POD) tab appear as it does below
To verify that you have enabled the Omnipod driver in AAPS swipe to the left from the Overview tab, where you will now see an Omnipod or POD tab.
Omnipod Configuration
Please swipe left to the Omnipod (POD) tab where you will be able to manage all pod and RileyLink functions (some of these functions are not enabled or visible without an active pod session):
Refresh Pod connectivity and status
Pod Management (Activate, Deactivate, Play test beep, RileyLink Stats and Pod history)
RileyLink Setup
If you already successfully paired your RileyLink in the Setup Wizard or steps above, then proceed to the Activating a Pod Section below.
Note: A good visual indicator that the RileyLink is not connected is that the Insulin and Calculator buttons on the HOME tab will be missing. This will also occur for about the first 30 seconds after AAPS starts, as it is actively connecting to the RileyLink.
Ensure that your RileyLink is fully charged and powered on.
After selecting the Omnipod driver, identify and select your RileyLink from Config Builder (1) ➜Pump➜Omnipod➜Gear Icon (Settings) (2) ➜RileyLink Configuration (3) by pressing the Not Set or MAC Address (if present) text.
Ensure your RileyLink battery is charged and it is positioned in close proximity (~30 cm away or less) to your phone for AAPS to identify it by its MAC address. Once selected, you can proceed to activate your first pod session. Use the back button on your phone to return to the main AAPS interface.
On the RileyLink Selection screen press the Scan (4) button to initiate a bluetooth scan. Select your RileyLink (5) from the list of available Bluetooth devices.


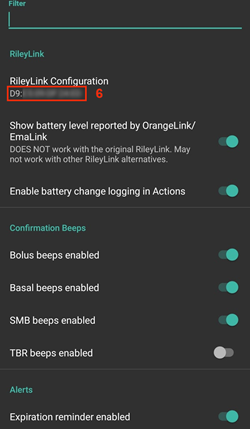
After successful selection you are returned to the Omnipod Settings page listing your currently selected RileyLink’s MAC Address (6).
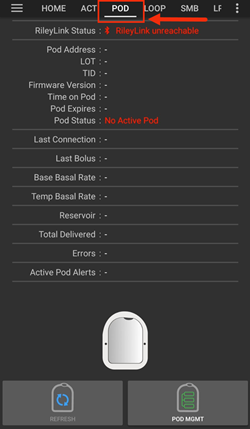
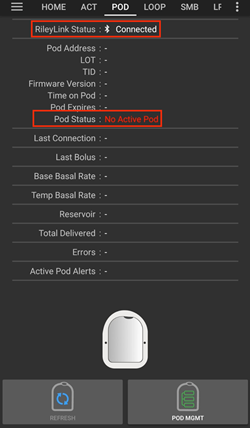
Verify that in the Omnipod (POD) tab that the RileyLink Status (1) appears as Connected. The Pod status (2) field should show No active Pod; if not, please attempt the previous step or exit AAPS to see if this refreshes the connection.
Activating a Pod
Before you can activate a pod please ensure you have properly configured and connected your RileyLink connection in the Omnipod settings
REMINDER: Pod communication occurs at limited ranges for pod activation pairing due to security safety measures. Before pairing the Pod’s radio signal is weaker, however after it has been paired it will operate at full signal power. During these procedures, make sure that your pod is within close proximity (~30 cm away or less) but not on top of or right next to the RileyLink.*
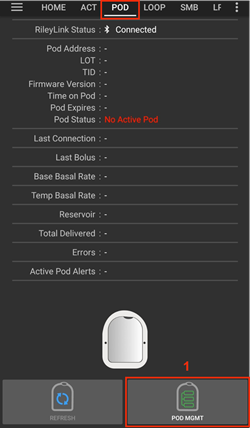
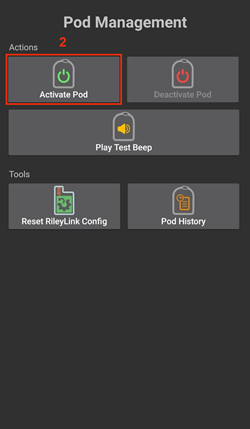
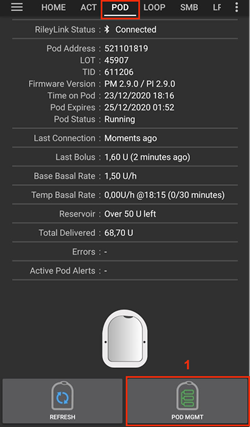
Navigate to the Omnipod (POD) tab and click on the POD MGMT (1) button, and then click on Activate Pod (2).
מסך מילוי פוד מוצג. מלאו פוד חדש עם לפחות 80 יחידות אינסולין והקשיבו לשני צפצופים המעידים על כך שהפוד מוכן להדבקה. When calculating the total amount of insulin you need for 3 days, please take into account that priming the pod will use 12 to 15 units.
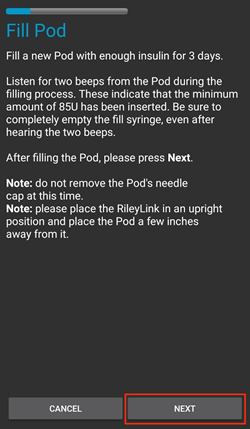
Ensure the new pod and RileyLink are within close proximity of each other (~30cm or less) and click the Next button.
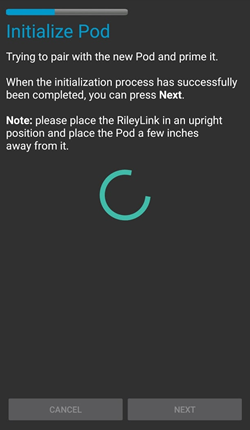
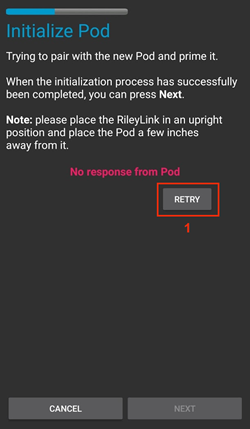
במסך אתחול פוד, הפוד יתחיל להתכונן להדבקה (אתם תשמעו קליק ואחריו סדרה של צלילי תקתוק). If RileyLink is out of range of the pod being activated, you will receive an error message No response from Pod. If this occurs, move the RileyLink closer (~30 cm away or less) to but not on top of or right next to the Pod and click the Retry (1) button.
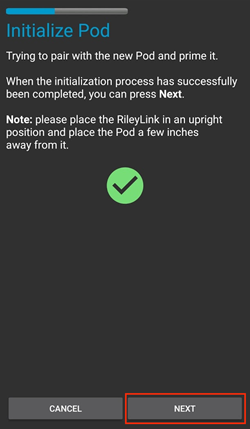
Upon successful priming a green checkmark will be shown and the Next button will become enabled. לחצו על הבא כדי להשלים את תיחול התרמיל ולהציג את מסך הצמד פוד.
לאחר מכן, הכינו את אתר ההדבקה של הפוד החדש. Remove the pod’s plastic needle cap and white paper backing from the adhesive and apply the pod to your usually selected site on your body. לסיום, לחצו על הבא.
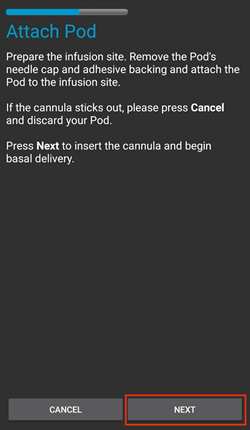
תיבת הדו-שיח הצמד פוד תופיע כעת. ONLY click on the OK button if you are ready to deploy the cannula.

After pressing OK, it may take some time before the Omnipod responds and inserts the cannula (1-2 minutes maximum), so be patient.
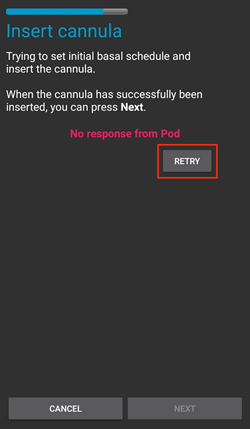
If RileyLink is out of range of the pod being activated, you will receive an error message No response from Pod. If this occurs, move the RileyLink closer (~30 cm away or less) to but not on top of or right next to the Pod and click the Retry button.
If the RileyLink is out of Bluetooth range or does not have an active connection to the phone, you will receive an error message No response from RileyLink. If this occurs, move the RileyLink closer to the phone and click the Retry button.
הערה: לפני החדרת הקנולה, מומלץ לצבוט את העור בסביבת נקודת ההחדרה. זה מבטיח החדרה חלקה של המחט ומפחית את הסיכויים לפתח חסימות.
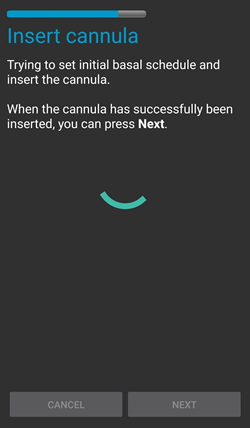

יופיע V ירוק, ולחצן הבא יופעל לאחר החדרת מוצלחת של הקנולה. לחצו על הבא.
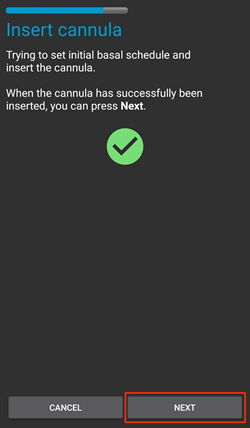
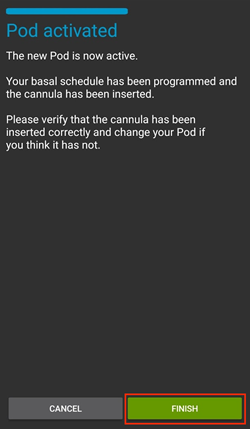
מסך הפוד הופעל מוצג. לחצו על סיום. מזל טוב! הפעלתם את הפוד.
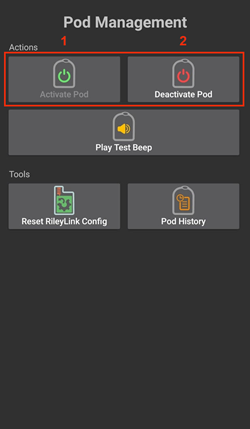
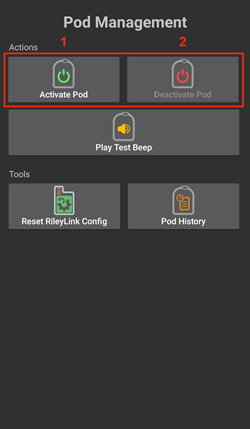
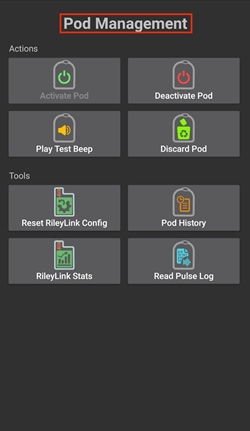
The Pod management menu screen should now display with the Activate Pod (1) button disabled and the Deactivate Pod (2) button enabled. הסיבה לכך היא שהפוד פעיל כעת ולא ניתן להפעיל פוד נוסף מבלי להשבית את הפוד הנוכחי.
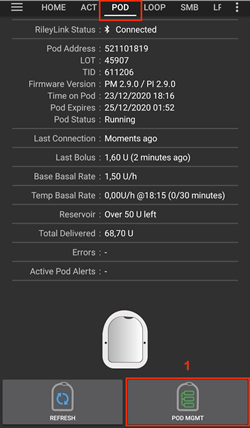
Click on the back button on your phone to return to the Omnipod (POD) tab screen which will now display Pod information for your active pod session, including current basal rate, pod reservoir level, insulin delivered, pod errors and alerts.
For more details on the information displayed go to the Omnipod (POD) Tab section of this document.

Deactivating a Pod
Under normal circumstances, the life of a pod should run for three days (72 hours) and an additional 8 hours after the pod expiration warning for a total of 80 hours of pod usage.
כיצד להשבית את הפוד (מתוקף התפוגה או בעקבות כשל של הפוד):
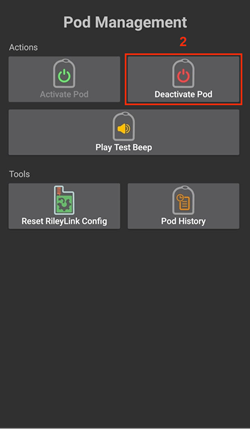
Go to the Omnipod (POD) tab, click on the POD MGMT (1) button, on the Pod management screen click on the Deactivate Pod (2) button.

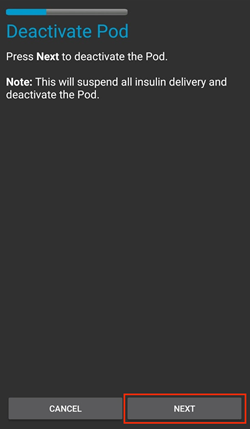
On the Deactivate Pod screen, first, make sure the RileyLink is in close proximity to the pod but not on top of or right next to the pod, then click on the Next button to begin the process of deactivating the pod.
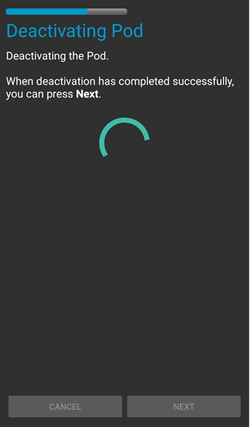
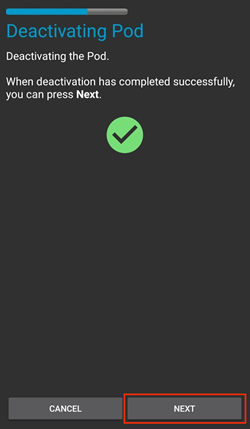
The Deactivating Pod screen will appear, and you will receive a confirmation beep from the pod that deactivation was successful.
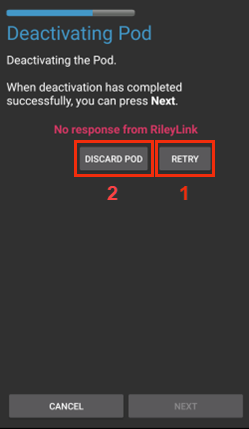
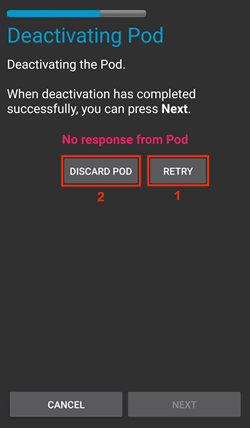
IF deactivation fails and you do not receive a confirmation beep, you may receive a No response from RileyLink or No response from Pod message. Please click on the Retry (1) button to attempt deactivation again. If deactivation continues to fail, please click on the Discard Pod (2) button to discard the Pod. כעת תוכלו להסיר את הפוד כיוון שפעילותו הושבתה. If your Pod has a screaming alarm, you may need to manually silence it (using a pin or a paperclip) as the Discard Pod (2) button will not silence it.
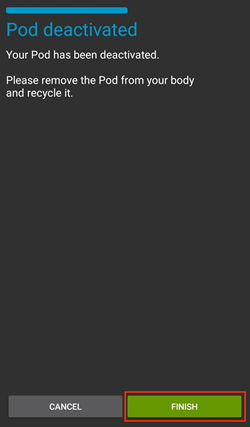
סימון ירוק יופיע לאחר השבתה מוצלחת. לחצו על הבא כדי לעבור אל המסך ”הפוד הושבת“. כעת תוכלו להסיר את הפוד כיוון שפעילותו הושבתה.
Click on the green button to return to the Pod management screen.
You are now returned to the Pod management menu press the back button on your phone to return to the Omnipod (POD) tab. Verify that the RileyLink Status: field reports Connected and the Pod status: field displays a No active Pod message.

הפסקה וחידוש אספקת האינסולין
The process below will show you how to suspend and resume insulin pump delivery.
NOTE - if you do not see a SUSPEND button, then it has not been enabled to display in the Omnipod (POD) tab. Enable the Show Suspend Delivery button in Omnipod tab setting in the Omnipod settings under Other.
Suspending Insulin Delivery
Use this command to put the active pod into a suspended state. In this suspended state, the pod will no longer deliver any insulin. This command mimics the suspend function that the original Omnipod PDM issues to an active pod.
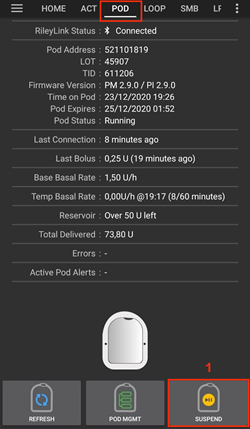
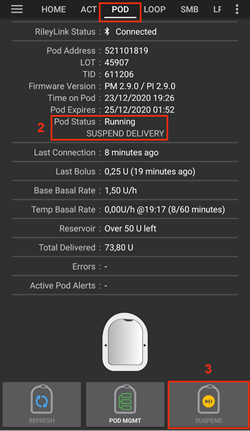
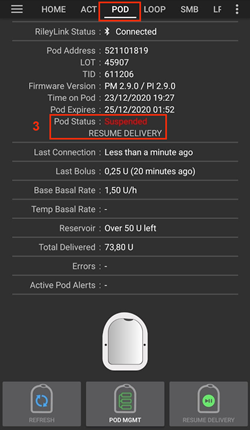
Go to the Omnipod (POD) tab and click on the SUSPEND (1) button. The suspend command is sent from the RileyLink to the active pod and the SUSPEND (3) button will become greyed out. The Pod status (2) will display SUSPEND DELIVERY.
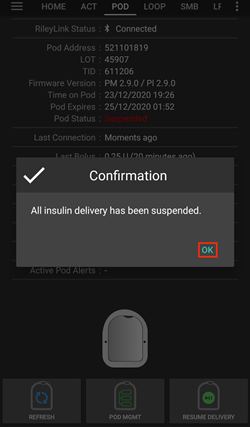
When the suspend command is successfully confirmed by the RileyLink a confirmation dialog will display the message All insulin delivery has been suspended. לחצו על אישור כדי להמשיך.
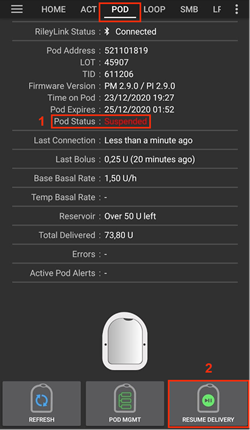
Your active pod has now suspended all insulin delivery. The Omnipod (POD) tab will update the Pod status (1) to Suspended. The SUSPEND button will change to a new Resume Delivery (2) button
חידוש הזרקת האינסולין
השתמשו בפקודה זו כדי להנחות את הפוד הפעיל כעת לחדש את אספקת האינסולין. לאחר עיבוד הפקודה, מתן האינסולין יחודש לפי המינון הבזאלי הנוכחי בהתאם להגדרתו בפרופיל. הפוד יקבל שוב פקודות עבור בולוס, מינון בזאלי זמני ו-SMB.
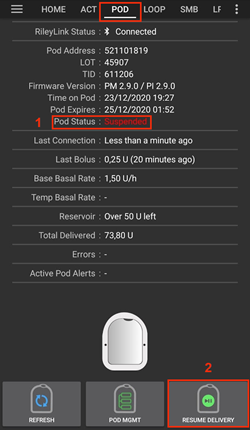
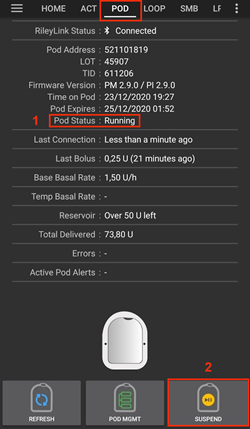
Go to the Omnipod (POD) tab and ensure the Pod status (1) field displays Suspended, then press the Resume Delivery (2) button to start the process to instruct the current pod to resume normal insulin delivery. A message RESUME DELIVERY will display in the Pod status (3) field, signifying the RileyLink is actively sending the command to the suspended pod.
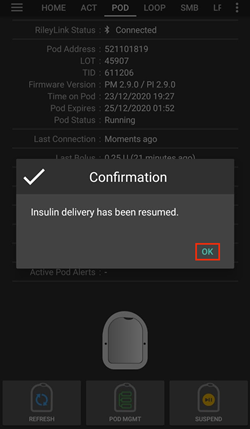
When the Resume delivery command is successfully confirmed by the RileyLink a confirmation dialog will display the message Insulin delivery has been resumed. לחצו על אישור כדי להמשיך.
The Omnipod (POD) tab will update the Pod status (1) field to display RUNNING, and the Resume Delivery button will now display the SUSPEND (2) button.
Acknowledging Pod Alerts
NOTE - if you do not see an ACK ALERTS button, it is because it is conditionally displayed on the Omnipod (POD) tab ONLY when the pod expiration or low reservoir alert has been triggered.
The process below will show you how to acknowledge and dismiss pod beeps that occur when the active pod time reaches the warning time limit before the pod expiration of 72 hours (3 days). This warning time limit is defined in the Hours before shutdown Omnipod alerts setting. The maximum life of a pod is 80 hours (3 days 8 hours), however Insulet recommends not exceeding the 72 hour (3 days) limit.
NOTE - If you have enabled the ”Automatically acknowledge Pod alerts“ setting in Omnipod Alerts, this alert will be handled automatically after the first occurrence and you will NOT need to manually dismiss the alert.
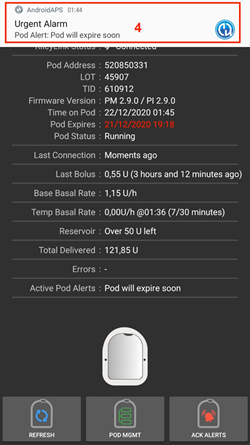
When the defined Hours before shutdown warning time limit is reached, the pod will issue warning beeps to inform you that it is approaching its expiration time and a pod change will soon be required. You can verify this on the Omnipod (POD) tab, the Pod expires: (1) field will show the exact time the pod will expire (72 hours after activation) and the text will turn red after this time has passed, under the Active Pod alerts (2) field where the status message Pod will expire soon is displayed. This trigger will display the ACK ALERTS (3) button. A system notification (4) will also inform you of the upcoming pod expiration
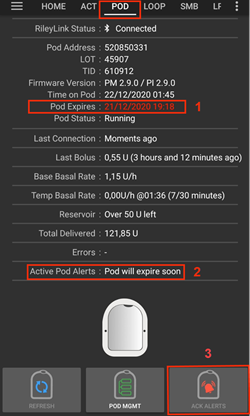
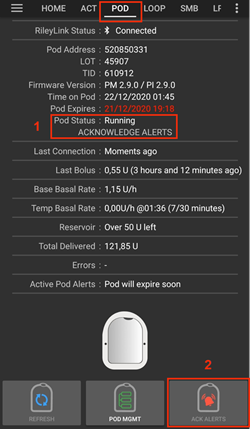
Go to the Omnipod (POD) tab and press the ACK ALERTS (2) button (acknowledge alerts). The RileyLink sends the command to the pod to deactivate the pod expiration warning beeps and updates the Pod status (1) field with ACKNOWLEDGE ALERTS.
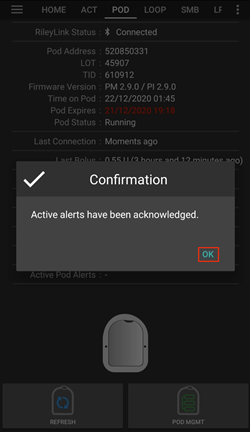
Upon successful deactivation of the alerts, 2 beeps will be issued by the active pod and a confirmation dialog will display the message Activate alerts have been acknowledged. לחצו על אישור כדי לאשר ולבטל את תיבת הדו-שיח.
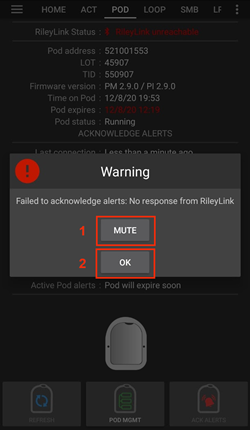
If the RileyLink is out of range of the pod while the acknowledge alerts command is being processed a warning message will display 2 options. Mute (1) will silence this current warning. OK (2) will confirm this warning and allow the user to try to acknowledge alerts again.
Go to the Omnipod (POD) tab, under the Active Pod alerts field, the warning message is no longer displayed and the active pod will no longer issue pod expiration warning beeps.
הצגת היסטוריית הפוד
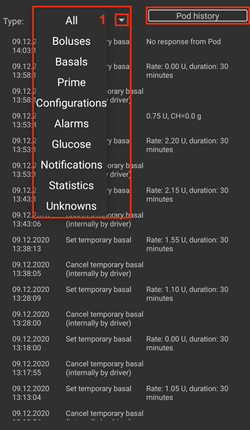
פרק זה מתאר כיצד לבדוק את היסטוריית הפודים ולסנן לפי קטגוריות פעולה שונות. The pod history tool allows you to view the actions and results committed to your currently active pod during its three day (72 - 80 hours) life.
This feature is useful for verifying boluses, TBRs, basal changes that were given but you may be unsure if they completed. The remaining categories are useful in general for troubleshooting issues and determining the order of events that occurred leading up to a failure.
NOTE: Uncertain commands will appear in the pod history, however due to their nature you cannot ensure their accuracy.
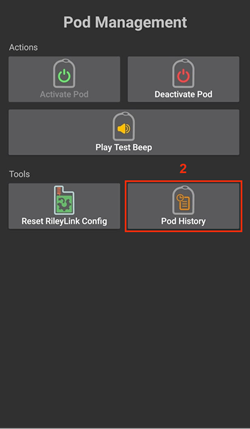
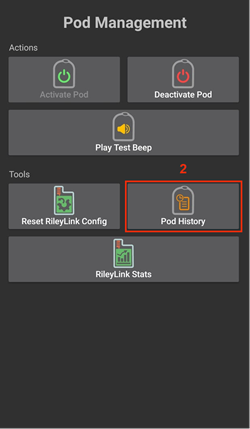
Go to the Omnipod (POD) tab and press the POD MGMT (1) button to access the Pod management menu and then press the Pod history (2) button to access the pod history screen.
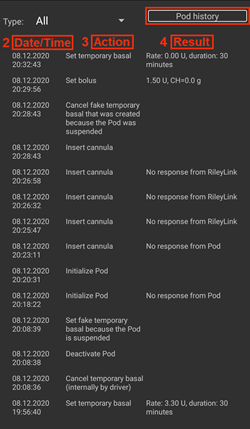
On the Pod history screen, the default category of All (1) is displayed showing the Date and Time (2) of all pod Actions (3) and Results (4) in reverse chronological order. Use your phone’s back button 2 times to return to the Omnipod (POD) tab in the main AAPS interface.
View RileyLink Settings and History
This section shows you how to review the settings of your active pod and RileyLink along with the communication history of each. This feature, once accessed, is split into two sections: Settings and History.
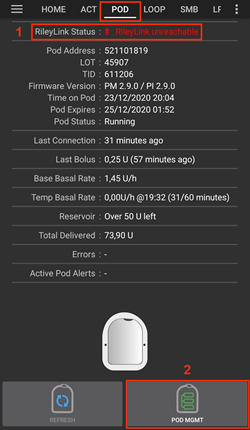
The primary use of this feature is when your pod communication device is out of the Bluetooth range of your phone after a period of time and the RileyLink status reports RileyLink unreachable. The REFRESH button on the main Omnipod (POD) tab will manually attempt to re-establish Bluetooth communication with the currently configured RileyLink in the Omnipod settings.
In the event the REFRESH button on the main Omnipod (POD) tab does not restore the connection to the pod communication device, please follow the additional steps below for a manual reconnection.
Manually Re-establish Pod Communication Device Bluetooth Communication
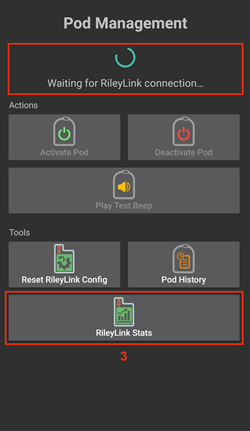
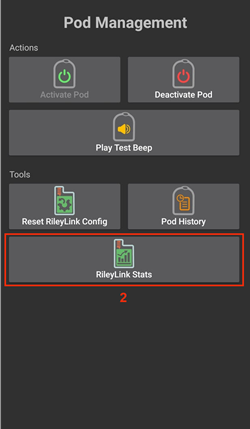
From the Omnipod (POD) tab when the RileyLink Status: (1) reports RileyLink unreachable press the POD MGMT (2) button to navigate to the Pod Management menu. On the Pod Management menu you will see a notification appear actively searching for a RileyLink connection, press the RileyLink stats (3) button to access the RileyLink settings screen.
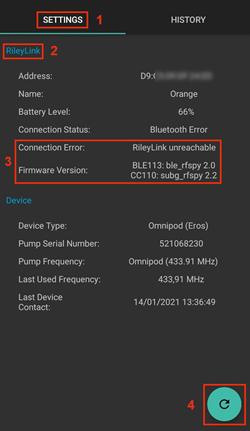
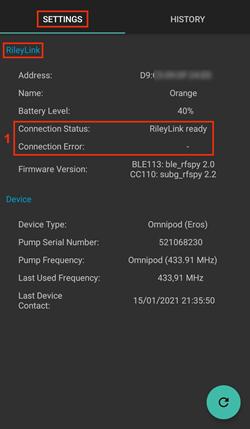
On the RileyLink Settings (1) screen under the RileyLink (2) section you can confirm both the Bluetooth connection status and error in the Connection Status and Error: (3) fields. A Bluetooth Error and RileyLink unreachable status should be shown. Start the manual Bluetooth reconnection by pressing the refresh (4) button in the lower right corner.
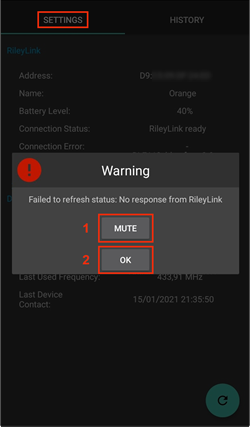
If the pod communication device is unresponsive or out of range of the phone while the Bluetooth refresh command is being processed a warning message will display 2 options.
Mute (1) will silence this current warning.
OK (2) will confirm this warning and allow the user to try to re-establish the Bluetooth connection again.
If the Bluetooth connection does not re-establish, try manually turning off and then back on the Bluetooth function on your phone.
After a successful RileyLink Bluetooth reconnection the Connection Status: (1) field should report RileyLink ready. Congratulations, you have now reconnected your configured pod communication device to AAPS!
Pod Communication Device and Active Pod Settings
This screen will provide information, status, and settings configuration information for both the currently configured pod communication device and the currently active Omnipod Eros pod.
Go to the Omnipod (POD) tab and press the POD MGMT (1) button to access the Pod management menu, then press the RileyLink stats (2) button to view your currently configured RileyLink (3) and active pod Device (4) settings.

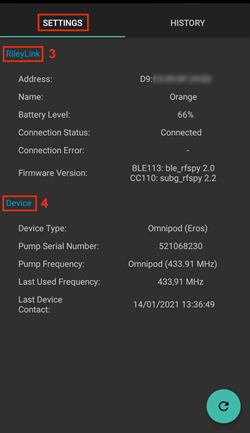
RileyLink (3) fields
Address: MAC address of the selected pod communication device defined in the Omnipod Settings.
Name: Bluetooth identification name of the selected pod communication device defined in your phone’s Bluetooth settings.
Battery Level: Displays the current battery level of the connected pod communication device
Connected Device: Model of the Omnipod pod currently communicating with the pod communication device
Connection Status: The current status of the Bluetooth connection between the pod communication device and the phone running AAPS.
Connection Error: If there is an error with the pod communication device Bluetooth connection details will be displayed here.
Firmware Version: Current firmware version installed on the actively connected pod communication device.
Device (4) fields - With an Active Pod
Device Type: The type of device communicating with the pod communication device (Omnipod pod pump)
Device Model: The model of the active device connected to the pod communication device (the current model name of the Omnipod pod, which is Eros)
Pump Serial Number: Serial number of the currently activated pod
Pump Frequency: Communication radio frequency the pod communication device has tuned to enable communication between itself and the pod.
Last Used frequency: Last known radio frequency the pod used to communicate with the pod communication device.
Last Device Contact: Date and time of the last contact the pod made with the pod communication device.
Refresh button manually refresh the settings on this page.
RileyLink and Active Pod History
This screen provides information in reverse chronological order of each state or action that either the RileyLink or currently connected pod is in or has taken. The entire history is only available for the currently active pod, after a pod change this history will be erased and only events from the newly activated pod will be recorded and shown.
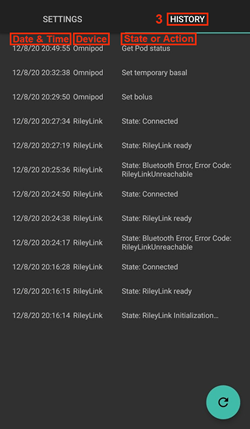
Go to the Omnipod (POD) tab and press the POD MGMT (1) button to access the Pod Management menu, then press the Pod History (2) button to view the Settings and History screen. Click on the HISTORY (3) text to display the entire history of the RileyLink and currently active pod session.
שדות
Date & Time: In reverse chronological order the timestamp of each event.
Device: The device to which the current action or state is referring.
State or Action: The current state or action performed by the device.
Omnipod (POD) Tab
Below is an explanation of the layout and meaning of the icons and status fields on the Omnipod (POD) tab in the main AAPS interface.
NOTE: If any message in the Omnipod (POD) tab status fields report (uncertain) then you will need to press the Refresh button to clear it and refresh the pod status.

שדות
RileyLink Status: Displays the current connection status of the RileyLink
RileyLink Unreachable - pod communication device is either not within Bluetooth range of the phone, powered off or has a failure preventing Bluetooth communication.
RileyLink Ready - pod communication device is powered on and actively initializing the Bluetooth connection
Connected - pod communication device is powered on, connected and actively able to communicate via Bluetooth.
Pod address: Displays the current address in which the active pod is referenced
LOT: Displays the LOT number of the active pod
TID: Displays the serial number of the pod.
Firmware Version: Displays the firmware version of the active pod.
Time on Pod: Displays the current time on the active pod.
Pod expires: Displays the date and time when the active pod will expire.
Pod status: Displays the status of the active pod.
Last connection: Displays the last time communication with the active pod was achieved.
לפני כמה רגעים - לפני פחות מ-20 שניות.
לפני פחות מדקה - יותר מעשרים שניות אך פחות מ-60 שניות.
לפני דקה אחת - יותר מ-60 שניות אך פחות מ-120 שניות (2 דקות)
לפני XX דקות - לפני יותר משתי דקות ככתוב בערך XX
Last bolus: Displays the dosage of the last bolus sent to the active pod and how long ago it was issued in parenthesis.
בזאלי בסיסי: מציג את המינון הבזאלי המתוכנת עבור השעה הנוכחית בפרופיל הבזאלי.
מינון בזאלי זמני: מציג את המינון הבזאלי הזמני הפועל כעת בפורמט הבא:
Units / hour @ time TBR was issued (minutes run / total minutes TBR will be run)
לדוגמה: 0.00 יח«\שעה @ 18:25 (90/120 דקות)
מכל: מציג מעל 50+U כאשר נותרו יותר מ -50 יחידות במכל. Below this value the exact units are displayed in yellow text.
סה“כ שהוזרק: מציג את המספר הכולל של יחידות האינסולין שהוזרקו. Note this is an approximation as priming and filling the pod is not an exact process.
שגיאות: מציג את השגיאה האחרונה. Review the Pod history, RileyLink history and log files for past errors and more detailed information.
התראות פוד פעילות: שדה השמור להתראות הפועלות כרגע על הפוד הפעיל. Normally used when pod expiration is past 72 hours and native pod beep alerts are running.
Icons
REFRESH:
Sends a refresh command to the active pod to update communication
השתמשו כדי לרענן את מצב הפוד ולבטל סטטוסים המכילים את הטקסט ”(לא ודאי)“.
See the Troubleshooting section below for additional information.
POD MGMT:
Navigates to the Pod management menu
ACK ALERTS:

When pressed this will disable the pod expiration beeps and notifications.
Button is displayed only when pod time is past expiration warning time Upon successful dismissal, this icon will no longer appear.
SET TIME:

When pressed this will update the time on the pod with the current time on your phone.
SUSPEND:

Suspends the active pod
RESUME DELIVERY:

Resumes the currently suspended, active pod
תפריט ניהול הפוד
Below is an explanation of the layout and meaning of the icons on the Pod Management menu accessed from the Omnipod (POD) tab.
Activate Pod
Primes and activates a new pod
Deactivate Pod
Deactivates the currently active pod.
A partially paired pod ignores this command.
Use this command to deactivate a screaming pod (error 49).
If the button is disabled (greyed out) use the Discard Pod button.
Play test beep

Plays a single test beep on the pod when pressed.
Discard pod

Deactivates and discards the pod state of an unresponsive pod when pressed.
Button is only displayed when very specific cases are met as proper deactivation is no longer possible:
A pod is not fully paired and thus ignores deactivate commands.
A pod is stuck during the pairing process between steps
A pod simply does not pair at all.
Pod history

Displays the active pod activity history
RileyLink stats:

Navigates to the RileyLink Statistics screen displaying current settings and RileyLink Connection history
Settings - displays RileyLink and active pod settings information
History - displays RileyLink and Pod communication history
Reset RileyLink Config
When pressed this button resets the currently connected pod communication device configuration.
When communication is started, specific data is sent to and set in the RileyLink > - Memory Registers are set > - Communication Protocols are set > - Tuned Radio Frequency is set
See additional notes at the end of this table
Read pulse log:

Sends the active pod pulse log to the clipboard
Reset RileyLink Config Notes
The primary usage of this feature is when the currently active pod communication device is not responding and communication is in a stuck state.
If the pod communication device is turned off and then back on, the Reset RileyLink Config button needs to be pressed, so that it sets these communication parameters in the pod communication device configuration.
If this is NOT done then AAPS will need to be restarted after the pod communication device is power cycled.
This button DOES NOT need to be pressed when switching between different pod communication devices
Omnipod Settings
The Omnipod driver settings are configurable from the top-left hand corner hamburger menu under Config Builder➜Pump➜Omnipod➜Settings Gear (2) by selecting the radio button (1) titled Omnipod. Selecting the checkbox (3) next to the Settings Gear (2) will allow the Omnipod menu to be displayed as a tab in the AAPS interface titled OMNIPOD or POD. This is referred to in this documentation as the Omnipod (POD) tab.

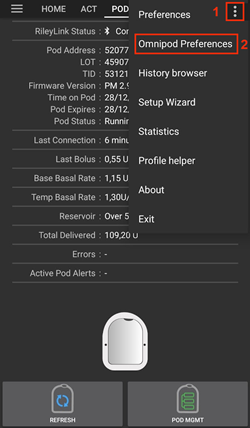
NOTE: A faster way to access the Omnipod settings is by accessing the 3 dot menu (1) in the upper right hand corner of the Omnipod (POD) tab and selecting Omnipod preferences (2) from the dropdown menu.
להלן קבוצות ההגדרות; תוכלו להפעילן או להשביתן באמצעות מתגים שיש לרוב ההגדרות המתוארות להלן:
NOTE: An asterisk (*) denotes the default for a setting is enabled.
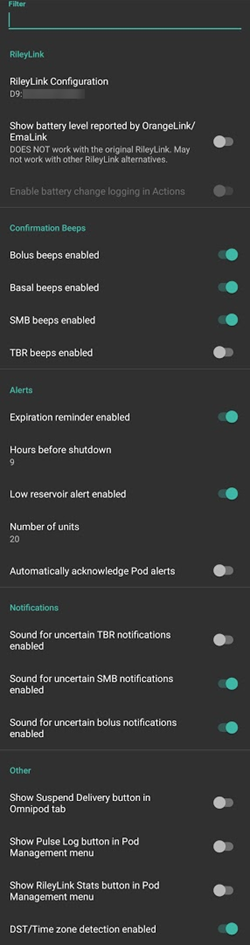
RileyLink - ריילילינק
Allows for scanning of a pod communication device. The Omnipod driver cannot select more than one pod communication device at a time.
Show battery level reported by OrangeLink/EmaLink/DiaLink: Reports the actual battery level of the OrangeLink/EmaLink/Dialink. It is strongly recommended that all OrangeLink/EmaLink/DiaLink users enable this setting.
DOES NOT work with the original RileyLink.
May not work with RileyLink alternatives.
Enabled - Reports the current battery level for supported pod communication devices.
Disabled - Reports a value of n/a.
Enable battery change logging in Actions: In the Actions menu, the battery change button is enabled IF you have enabled this setting AND the battery reporting setting above. Some pod communication devices now have the ability to use regular batteries which can be changed. This option allows you to note that and reset battery age timers.
צפצופי אישור
מספק צפצופי אישור מהפוד על ביצוע בולוס, שינויים במינון הבזאלי, בזאלי זמני, SMB ושינויים אחרים.
*Bolus beeps enabled: Enable or disable confirmation beeps when a bolus is delivered.
*Basal beeps enabled: Enable or disable confirmation beeps when a new basal rate is set, active basal rate is canceled or current basal rate is changed.
*SMB beeps enabled: Enable or disable confirmation beeps when a SMB is delivered.
צפצופי בזאלי זמני מופעלים: הפעלת או השבתת צפצופי אישור כאשר בזאלי זמני מופעל או מבוטל.
התראות
Provides AAPS alerts and Nightscout announcements for pod expiration, shutdown, low reservoir based on the defined threshold units.
שימו לב כי הודעת AAPS תינתן תמיד לכל התראה לאחר התקשורת הראשונית עם הפוד מאז הופעלה ההתראה. דחיית ההודעה לא תבטל את ההתראה, אלא אם כן מופעל אישור התראות פוד אוטומטי. To MANUALLY dismiss the alert you must visit the Omnipod (POD) tab and press the ACK ALERTS button.
*Expiration reminder enabled: Enable or disable the pod expiration reminder set to trigger when the defined number of hours before shutdown is reached.
שעות לפני כיבוי: מגדיר את מספר השעות לפני כיבוי הפוד הפעיל, שלאחר מכן תופעל תזכורת לתפוגה.
*Low reservoir alert enabled: Enable or disable an alert when the pod’s remaining units low reservoir limit is reached as defined in the Number of units field.
מספר יחידות: מספר היחידות בהן מופעלת התראת המכל הנמוך.
Automatically acknowledge Pod alerts: When enabled a notification will still be issued however immediately after the first pod communication contact since the alert was issued it will now be automatically acknowledged and the alert will be dismissed.
הודעות
Provides AAPS notifications and audible phone alerts when it is uncertain if TBR, SMB, or bolus events were successful.
הערה: אלה הן התראות בלבד, לא מתבצעות התראות מסוג צפצופים.
התראת צליל של בזאלי זמני לא ברור מאופשרת: הפעילו או השביתו הגדרה זו כדי להפעיל התראה קולית והתראה חזותית כאשר AAPS לא בטוח אם מינון בזאלי זמני הוגדר בהצלחה.
*Sound for uncertain SMB notifications enabled: Enable or disable this setting to trigger an audible alert and visual notification when AAPS is uncertain if an SMB was successfully delivered.
*Sound for uncertain bolus notifications enabled: Enable or disable this setting to trigger an audible alert and visual notification when AAPS is uncertain if a bolus was successfully delivered.
אחר
Provides advanced settings to assist debugging.
Show Suspend Delivery button in Omnipod tab: Hide or display the suspend delivery button in the Omnipod (POD) tab.
Show Pulse log button in Pod Management menu: Hide or display the pulse log button in the Pod Management menu.
Show RileyLink Stats button in Pod Management menu: Hide or display the RileyLink Stats button in the Pod Management menu.
*DST/Time zone detect on enabled: allows for time zone changes to be automatically detected if the phone is used in an area where DST is observed.
Switching or Removing an Active Pod Communication Device (RileyLink)
With many alternative models to the original RileyLink available (such as OrangeLink or EmaLink) or the need to have multiple/backup versions of the same pod communication device (RileyLink), it becomes necessary to switch or remove the selected pod communication device (RileyLink) from Omnipod Setting configuration.
The following steps will show how to Remove and existing pod communication device (RileyLink) as well as Add a new pod communication device. Executing both Remove and Add steps will switch your device.
Access the RileyLink Selection menu by selecting the 3 dot menu (1) in the upper right hand corner of the Omnipod (POD) tab and selecting Omnipod preferences (2) from the dropdown menu. On the Omnipod Settings menu under RileyLink Configuration (3) press the Not Set (if no device is selected) or MAC Address (if a device is present) text to open the RileyLink Selection menu.
Remove Currently Selected Pod Communication Device (RileyLink)
This process will show how to remove the currently selected pod communication device (RileyLink) from the Omnipod Driver settings.
Under RileyLink Configuration press the MAC Address (1) text to open the RileyLink Selection menu.

On the RileyLink Selection menu the press Remove (2) button to remove your currently selected RileyLink (3)
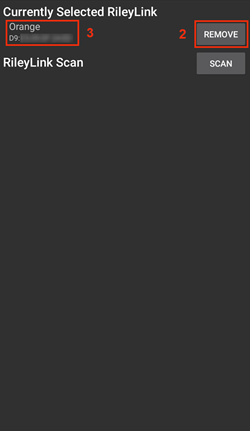
At the confirmation prompt press Yes (4) to confirm the removal of your device.

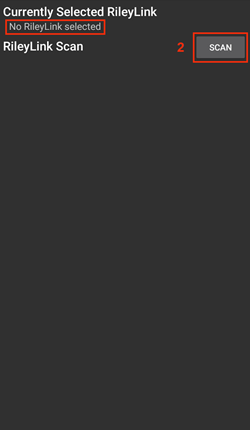
You are returned to the Omnipod Setting menu where under RileyLink Configuration you will now see the device is Not Set (5). Congratulations, you have now successfully removed your selected pod communication device.

Add Currently Selected Pod Communication Device (RileyLink)
This process will show how to add a new pod communication device to the Omnipod Driver settings.
Under RileyLink Configuration press the Not Set (1) text to open the RileyLink Selection menu.

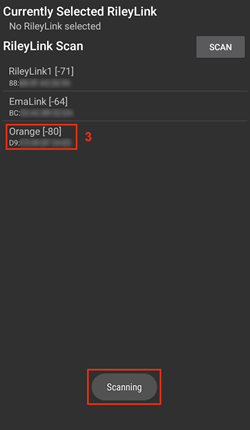
Press the Scan (2) button to start scanning for all available Bluetooth devices.
Select your RileyLink (3) from the list of available devices and you will be returned to the Omnipod Settings menu displaying the MAC Address (4) of your newly selected device. Congratulations you have successfully selected your pod communication device.

לשונית פעולות (ACT)
This tab is well documented in the main AAPS documentation but there are a few items on this tab that are specific to how the Omnipod pod differs from tube based pumps, especially after the processes of applying a new pod.
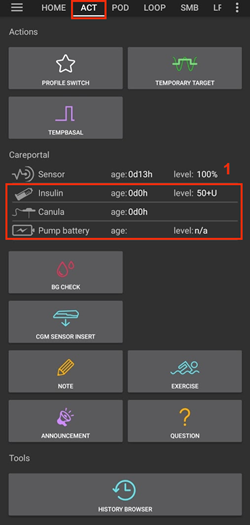
עברו ללשונית פעולות (ACT) מהמסך הראשי של AAPS.
Under the Careportal (1) section the following 3 fields will have their age reset to 0 days and 0 hours after each pod change: Insulin and Cannula. זה נעשה בגלל האופן שבו משאבת אומניפוד בנויה ופועלת. סוללת המשאבה ויתרת האינסולין נמצאים בעצמם בתוך כל פוד. מכיוון שהפוד מחדיר את הצינורית ישירות לעור באתר הדבקתו, אין שימוש בצינור מסורתי במשאבות אומניפוד. לכן לאחר החלפת פוד, הגיל של כל אחד מהערכים הללו יתאפס אוטומטית. גיל סוללת המשאבה אינו מדווח מכיוון שהסוללה בפוד תמיד תהיה יותר מאורך חיי הפוד (80 שעות לכל היותר).
Levels
יתרת אינסולין
Reporting of the amount of insulin in the Omnipod Eros Pod is not exact. This is because it is not known exactly how much insulin was put in the pod, only that when the 2 beeps are triggered while filling the pod that over 85 units have been injected. A Pod can hold a maximum of 200 units. Priming can also introduce variance as it is not and exact process. With both of these factors, the Omnipod driver has been written to give the best approximation of insulin remaining in the reservoir.
Above 50 Units - Reports a value of 50+U when more than 50 units are currently in the reservoir.
Below 50 Units - Reports an approximate calculated value of insulin remaining in the reservoir.
SMS - מחזירה ערך או 50+U בתגובות של SMS
נייטסקאוט - העלאת ערך של 50 כאשר מעל 50 יחידות לנייטסקאוט (גרסה 14.07 ומעלה). גרסאות חדשות יותר ידווחו על ערך של 50+ כאשר מעל 50 יחידות.
Battery Level
Battery level reporting is a setting that can be enabled to return the current battery level of pod communication devices, such as the OrangeLink, EmaLink or DiaLink. The RileyLink hardware is not capable of reporting its battery level. The battery level is reported after each communication with the pod, so when charging a linear increase may not be observed. A manual refresh will update the current battery level. When a supported Pod communication device is disconnected a value of 0% will be reported.
RileyLink hardware is NOT capable of reporting battery level
”Show battery level reported by OrangeLink/EmaLink/DiaLink“ Setting MUST be enabled in the Omnipod settings to report battery level values
Battery level reporting ONLY works for OrangeLink, EmaLink and DiaLink Devices
Battery Level reporting MAY work for other devices (excluding RileyLink)
SMS - Returns current battery level as a response when an actual level exists, a value of n/a will not be returned
Nightscout - Battery level is reported when an actual level exists, a value of n/a will not be reported
פתרון בעיות
שגיאות בפוד
פודים נכשלים מדי פעם בשל מגוון בעיות, כולל בעיות חומרה של הפוד עצמו. הנוהג הטוב ביותר הוא לא להודיע אותם למשווק המשאבה, מכיוון ש- AAPS אינו מקרה שימוש מאושר. A list of fault codes can be found here to help determine the cause.
מניעת שגיאה 49 - כישלונות פוד
כשל זה קשור למצב פוד שגוי עבור פקודה או שגיאה במהלך פקודת אספקת אינסולין. We recommend users to switch to the Nightscout client to upload only (Disable sync) under the Config Builder➜General➜NSClient➜cog wheel➜Advanced Settings to prevent possible failures.
התראות המשאבה אינה נגישה
It is recommended that pump unreachable alerts be configured to 120 minutes by going to the top right-hand side three-dot menu, selecting Preferences➜Local Alerts➜Pump unreachable threshold [min] and setting this to 120.
Import Settings from previous AAPS
Please note that importing settings has the possibility to import an outdated Pod status. As a result, you may lose an active Pod. It is therefore strongly recommended that you do not import settings while on an active Pod session.
Deactivate your pod session. Verify that you do not have an active pod session.
ייצאו את ההגדרות שלך ושמרו עותק במקום בטוח.
Uninstall the previous version of AAPS and restart your phone.
Install the new version of AAPS and verify that you do not have an active pod session.
Import your settings and activate your new pod.
התראות פוד
please note that the Omnipod driver presents a variety of unique alerts on the Overview tab, most of them are informational and can be dismissed while some provide the user with an action to take to resolve the cause of the triggered alert. להלן סיכום של ההתראות העיקריות בהן אתם עשויים להיתקל:
No active Pod
No active Pod session detected. ניתן לבטל התראה זו זמנית על ידי לחיצה על השתקה אך היא תמשיך לפעול כל עוד לא הופעל פוד חדש. Once activated this alert is automatically silenced.
Pod suspended
Informational alert that Pod has been suspended.
Setting basal profile failed. Delivery might be suspended! נא לרענן ידנית את סטטוס הפוד בלשונית Omnipod ולחדש את ההזרקה במידת הצורך.
התראה אינפורמטיבית על כך שהגדרת הפרופיל הבזאלי של פוד נכשלה, ויהיה עליכם ללחוץ על רענן בלשונית DASH.
לא ניתן לאמת אם בולוס SMB הצליח. אם אתם בטוחים שהבולוס לא הצליח, עליכם למחוק את ערך SMB באופן ידני מטיפולים.
Alert that the SMB bolus success could not be verified, you will need to verify the Last bolus field on the Omnipod tab to see if SMB bolus succeeded and if not remove the entry from the Treatments tab.
לא בטוח אם ”בולוס/בזאלי זמני/SMB“ הושלם, אנא ודאו ידנית אם הוא הצליח.
Due to the way that the RileyLink and Omnipod communicate, situations can occur where it is uncertain if a command was successfully processed. The need to inform the user of this uncertainty was necessary.
Below are a few examples of when an uncertain notification can occur.
Boluses - Uncertain boluses cannot be automatically verified. The notification will remain until the next bolus but a manual pod refresh will clear the message. By default alerts beeps are enabled for this notification type as the user will manually need to verify them.
TBRs, Pod Statuses, Profile Switches, Time Changes - a manual pod refresh will clear the message. By default alert beeps are disabled for this notification type.
Pod Time Deviation - When the time on the pod and the time your phone deviates too much then it is difficult for AAPS loop to function and make accurate predictions and dosage recommendations. If the time deviation between the pod and the phone is more than 5 minutes then AAPS will report the pod is in a Suspended state under Pod status with a HANDLE TIME CHANGE message. An additional Set Time icon will appear at the bottom of the Omnipod (POD) tab. Clicking Set Time will synchronize the time on the pod with the time on the phone and then you can click the RESUME DELIVERY button to continue normal pod operations.
Best Practices
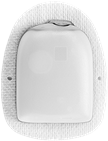
Optimal Omnipod and RileyLink Positioning
The antenna used on the RileyLink to communicate with an Omnipod pod is a 433 MHz helical spiral antenna. Due to its construction properties it radiates an omni directional signal like a three dimensional doughnut with the z-axis representing the vertical standing antenna. This means that there are optimal positions for the RileyLink to be placed, especially during pod activation and deactivation routines.

(Fig 1. Graphical plot of helical spiral antenna in an omnidirectional pattern)
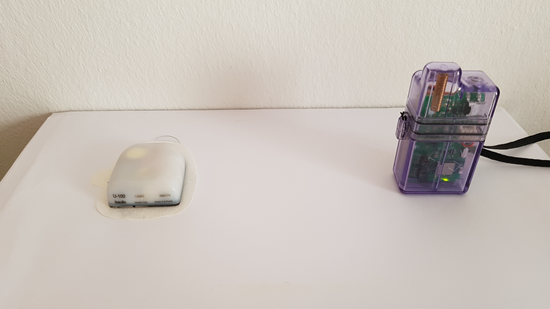
Because of both safety and security concerns, pod activation has to be done at a range closer (~30 cm away or less) than other operations such as giving a bolus, setting a TBR or simply refreshing the pod status. Due to the nature of the signal transmission from the RileyLink antenna it is NOT recommended to place the pod directly on top of or right next to the RileyLink.
The image below shows the optimal way to position the RileyLink during pod activation and deactivation procedures. The pod may activate in other positions but you will have the most success using the position in the image below.
Note: If after optimally positioning the pod and RileyLink communication fails, this may be due to a low battery which decreases the transmission range of the RileyLink antenna. To avoid this issue make sure the RileyLink is properly charged or connected directly to a charging cable during this process.
Where to get help for Omnipod driver
All of the development work for the Omnipod driver is done by the community on a volunteer basis; we ask that you please be considerate and use the following guidelines when requesting assistance:
רמה 0 קראו את הסעיף הרלוונטי בתיעוד זה כדי להבטיח שאתם מבינים כיצד להשתמש במה שאתם מתקשים איתו.
רמה 1: אם אתם עדיין נתקלים בבעיות שאתם לא מצליחים לפתור באמצעות מסמך זה, אנא עברו לערוץ #androidaps ב-Discord באמצעות קישור ההזמנה.
Level 2: Search existing issues to see if your issue has already been reported; if not, please create a new issue and attach your log files.
היו סבלניים - רוב חברי הקהילה שלנו מורכבים ממתנדבים בעלי אופי טוב, ופתרון בעיות דורש לעתים קרובות זמן וסבלנות מצד המשתמשים והמפתחים כאחד.