Omnipod DASH
These instructions are for configuring the Omnipod DASH generation pump (NOT Omnipod Eros), available in AAPS from version 3.0.
מפרט Omnipod DASH
These are the specifications of the Omnipod DASH (»DASH«) and what differentiates it from the Omnipod EROS (»EROS«):
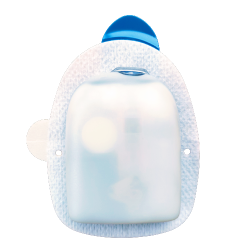
The DASH pods are identified by a blue needle cap (EROS has a clear needle cap). The pods are otherwise identical in terms of physical dimensions.
DASH does not require a BLE link/bridge device (NO RileyLink, OrangeLink, or EmaLink needed).
The DASH’s Bluetooth connection is used only when sending a command (e.g a Bolus), and disconnects right after issuing the command.
No more ”no connection to link device / pod“ errors with DASH.
AAPS will wait for pod’s accessibility to send commands.
On pod activation, AAPS will find and connect to a new DASH pod.
Expected range from phone: 5-10 meters (YMMV).
Omnipod DASH known AAPS constraints/issues
Android 16 requires AAPS version 3.3.2.1 or later.
General advice is to run AAPS on Android 14 or 16. Android 15 has many reported issues from the community. However, if you do run on Android 15 you will likely need to enable Bluetooth Bonding to successfully activate and use Pods, see General Troubleshooting for more info on the Bonding settings.
Temporary Basal rate changes (which occur frequently when the loop is active, especially overnight) result in under-delivery of insulin. This is effectively a hardware limitation of the Omnipod DASH. The issue has been addressed in AAPS 3.4.2.3, but the functionality is currently opt-in. Follow the Basal Drift Fix Instructions instructions to enable it. For more information regarding the fix see Github Issue - 4783 for more info.
Dash only supports basal rate in 0.05 U/h steps. If you try to set Basal with 0.01 steps in your AAPS profile, AAPS will not give a warning even though the pod will round up the rate into 0.05 steps. If you view POD MGMT/Pod History it will display that 0.05 basal was set. This also means the lowest basal rate allowed by the DASH in AAPS is 0.05U/h.
The activation status of a Pod is stored in the settings file, if you export a settings file with an active pod. Then change to a new pod, then restore the settings from your previous export you will have now restored the old pod activation and removed the new pod activation. This is why we recommend to export settings after each pod activation to allow a restore of that pods activation state if something happens to your rig.
When setting a new basal profile, DASH will suspend delivery before setting the new basal Profile. If there is a communication interruption or error, the basal profile won’t automatically re-start. See section Resuming Insulin Delivery for details.
If alerts are configured, and the pod is about to expire, the pod will keep beeping until alerts are silenced, see Silencing Pod Alerts for details.
There are a number of known issues with Bluetooth which can cause pod activation problems. See Bluetooth Troubleshooting for the known issue and solutions to these problems.
דרישות חומרה ותוכנה
Omnipod DASH is identified by the blue needle cap.
A Compatible Android phone with a Bluetooth Low Energy (BLE) (see Phones for more info), additionally the following information will help guide you on other key considerations around successfully activating and using the DASH on a compatible phone:
The AAPS Omnipod Dash driver connects with the DASH Pod using Bluetooth.
AAPS will automatically establish a new Bluetooth connection to the Pod every time it needs to send a command (e.g a Bolus), after sending the command the Bluetooth connection is immediately disconnected.הערות:
The Bluetooth connection can be interrupted/disturbed by other Bluetooth devices linked to the phone that is running AAPS, like earbuds etc… Devices like this can cause connection errors or pod activation issues on some models of phones. It’s a good idea to review the tested hardware setups list for known working configurations before committing to a new rig built around Omnipod DASH.
There are a number of known issues with Bluetooth which can cause pod activation problems (See Troubleshooting for advice on other Bluetooth issues) specifically the Bluetooth related issues section.
For Android 15 or below: You MUST use Version 3.0 or newer of AAPS using the Build APK instructions, however it’s advisable to run the latest released version.
For Android 16: you MUST use Version 3.3.2.1 or newer of AAPS using the Build APK instructions, due to Android 16 changing how its Bluetooth works. Any version earlier than 3.3.2.1 will likely cause pod failures and/or activation issues.
A supported Continuous Glucose Monitor (CGM)
The instructions below explain how to activate a new pod session using AAPS. You should wait for your current Pod to be close expiry, as you will need to activate a new Pod with AAPS. Once a pod is de-activated it cannot be reused/re-activated, the de-activation is final.
לפני שמתחילים
Ensure you have read and understand this whole guide, have read and understand the Before You Begin section, as well as Omnipod and AAPS Constraints and Issues to avoid running into a known problem.
SAFETY FIRST - You SHOULD NOT try to connect AAPS to a pod for the first time without having access to all of the following:
Extra pods (3 or more spare)
Spare Insulin and MDI equipment
A working Omnipod PDM (In case AAPS fails)
Supported Phones are a must! (See Hardware/Software Requirements)
Correct version of AAPS built and installed
Your Omnipod Dash PDM will become redundant after the AAPS Dash driver activates your pod.
Before using AAPS you or your care giver would have had to manage the Pod using the Omnipod PDM (or in some regions a Phone app) to send commands to your DASH (e.g a Bolus).
The DASH can only facilitate a single Bluetooth device (e.g PDM or Phone) connection to manage and send commands.
The device that successfully activates the pod is the only device allowed to communicate with that Pod from that point forward. This means that once you activate a DASH with your Android phone using AAPS, you will no longer be able to use your PDM with that pod! For the time that Pod is active the AAPS Dash driver running on your Android phone is now the new PDM for your pod.
DO NOT Throw away your PDM! It is recommended to keep it around as a backup and for emergencies, for instance when your phone gets lost or AAPS is not working correctly.
Your pod WILL NOT stop delivering insulin when it is not connected to AAPS.
Default basal rates are programmed on the pod on activation as defined in the current active Profile.
As long as AAPS is operational it will send basal rate adjustment commands that run for a maximum of 120 minutes.
When for some reason the pod does not receive any new commands (for instance because communication was lost due to Pod ➜ phone distance) the pod will automatically fall back to default basal rates as defined in your Profile.
AAPS Profile(s) do not support 30 minute basal rate time frames
If you are new to AAPS and are setting up your basal rate Profile for the first time, please be aware that basal rates starting on a half-hour basis are not supported. For example, on your Omnipod PDM, if you have a basal rate of 1.1 units which starts at 09:30 and has a duration of 2 hours ending at 11:30, it is not possible replicate this exact Basal Profile in AAPS.
You will need to change this 1.1 unit basal rate to a time range of either 9:00-11:00 or 10:00-12:00. Even though the DASH hardware itself supports the 30 minute basal rate Profile increments, AAPS does NOT support this feature.
0U/h Profile basal rates are NOT supported in AAPS
While the DASH does support a zero basal rate, AAPS uses multiples of the user’s Profile basal rate to determine automated treatment; it cannot function with a zero basal rate.
Instead a temporary zero basal rate can be achieved through the ”Disconnect pump“ function, or through a combination of Disable Loop/Temp Basal Rate or Suspend Loop/Temp Basal Rate.
NOTE: The lowest basal rate allowed by the DASH in AAPS is 0.05U/h.
Selecting Dash in AAPS
There are two available options to configure Omnipod in AAPS:
Option 1: New installations
When installing AAPS for the first time, the Setup Wizard will guide new users through key features and installation requirements for AAPS.
Select “DASH” when you reach Pump selection.

When in doubt you can also select “Virtual Pump” and select “DASH” later, after setting up AAPS (See Option 2).
Option 2: The Config Builder
On an existing installation you can select the DASH pump from the Config builder:
On the top-left hand corner hamburger menu select Config Builder (1) ➜ Pump ➜ Dash ➜ Settings Gear (3) by selecting the radio button (2) titled Dash.
Selecting the checkbox (4) next to the Settings Gear (3) will allow the DASH menu to be displayed as a tab in the AAPS interface titled DASH. Checking this box will facilitate your access to the DASH commands when using AAPS.
NOTE: A faster way to access the Dash settings can be found below in the DASH settings section of this document.

Verification of Omnipod Driver Selection
To verify that you have selected the DASH in AAPS, if you have checked the box (4), swipe to the left from the Overview tab, where you will now see a DASH tab on AAPS. If this box is left unchecked, you’ll find the DASH tab in the hamburger menu upper left.
תצורת Dash
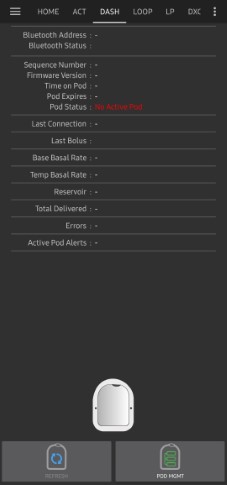
Swipe left to the DASH tab where you will be able to manage all pod functions (some of these functions are not enabled or visible without an active pod session):
![]() »Refresh« pod connectivity and status, be able to silence pod alarms when the pod beeps
»Refresh« pod connectivity and status, be able to silence pod alarms when the pod beeps
![]() »Pod Management« (Activate, Deactivate, Play test beep, and Pod history)
»Pod Management« (Activate, Deactivate, Play test beep, and Pod history)
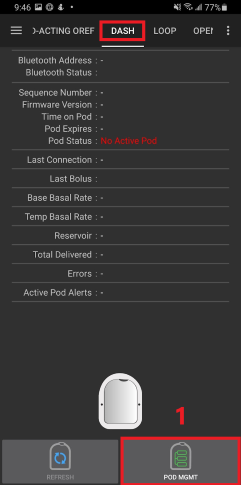
Activate Pod
נווטו אל הלשונית DASH ולחצו על הלחצן ניהול פוד (1), ולאחר מכן לחצו על הפעל פוד (2).
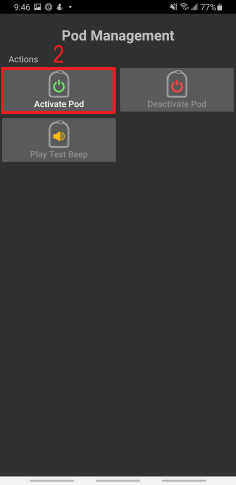
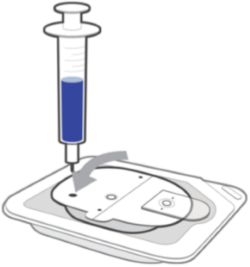
מסך מילוי פוד מוצג. Fill a new pod with at least 80 units of insulin and listen for two beeps indicating that the pod is ready to be primed.
NOTE: When calculating the total amount of insulin you need for 3 days, please take into account that priming the pod will use about 3-10 units.
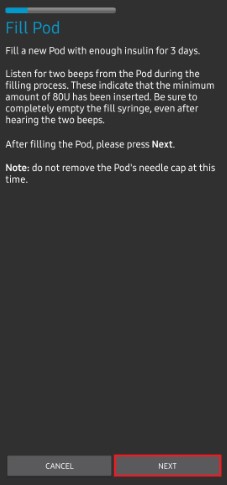
Ensure that the new pod and the phone running AAPS are within close proximity of each other and click the Next button.
NOTE: if the error message below pops up »Could not find an available pod for activation« (this can happen), do not panic. Click on the Retry button. In most situations activation will continue successfully.
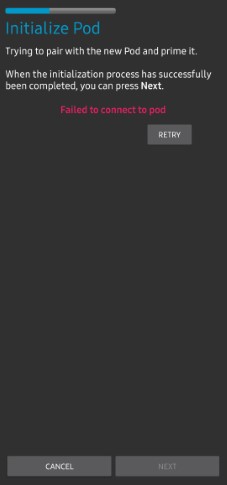
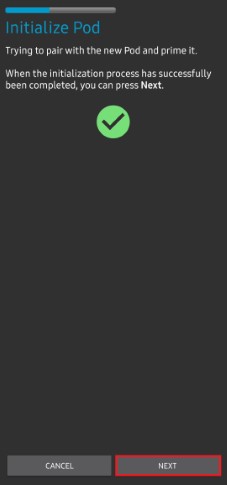
On the Initialize Pod screen, the pod will begin priming (you will hear a click followed by a series of ticking sounds as the pod primes itself).
A green checkmark will be shown upon successful priming, and the Next button will become enabled. לחצו על הבא כדי להשלים את תיחול התרמיל ולהציג את מסך הצמד פוד.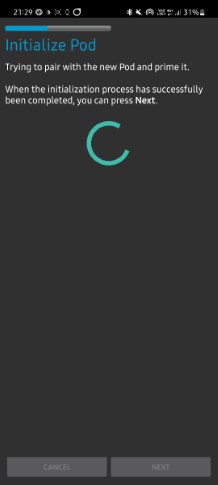
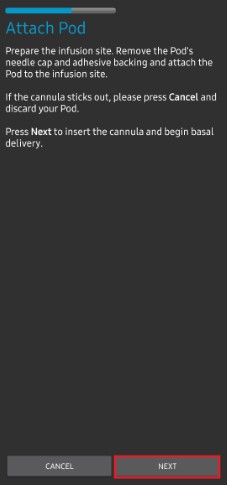
Next, prepare the infusion site ready to receive the new pod. Wash hands to avoid any risk of infection. Clean the infusion site by either using soap and water or an alcohol wipe to disinfect and let the skin air dry completely before proceeding.
If you get skin irritation from the adhesive consider using a Barrier Wipe or Barrier Spray.Remove the pod’s blue plastic needle cap. If you see something that sticks out of the pod or it looks unusual, STOP the process and start with a new pod. If everything looks OK, proceed to take off the white paper backing from the adhesive and stick the pod to the selected site on your body.
לסיום, לחצו על הבא.
תיבת הדו-שיח הצמד פוד תופיע כעת. click on the OK button ONLY if you are ready to deploy the cannula!
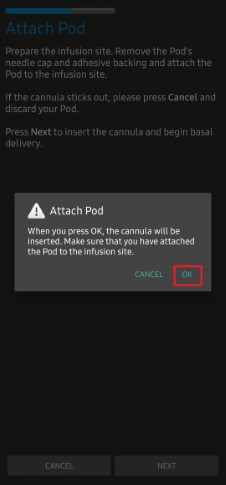
After pressing OK, it may take some time before the DASH responds and inserts the cannula (1-2 minutes maximum). Be patient!
NOTE: Before the cannula is inserted, it is good practice to pinch the skin near the cannula insertion point. זה מבטיח החדרה חלקה של המחט ומפחית את הסיכויים לפתח חסימות.

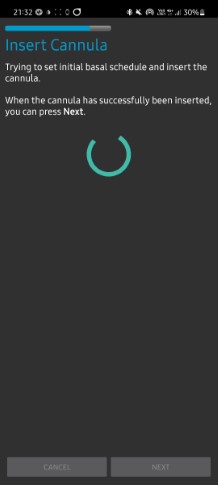
A green checkmark is shown on the screen, and the Next button becomes available to select upon successful cannula insertion.
Click on the Next button.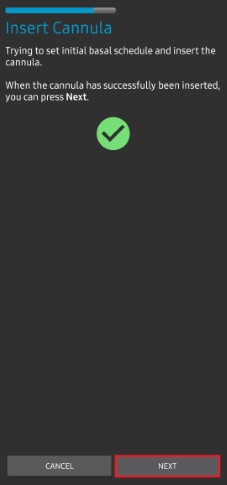
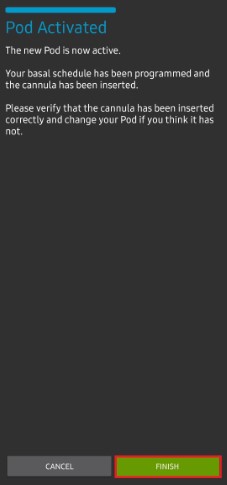
מסך הפוד הופעל מוצג.
לחצו על סיום.
מזל טוב! You have now started a new pod session.
במסך התפריט ניהול פוד הכפתור הפעל פוד (1) אמור להיות מושבת והכפתור כבה פוד (2) אמור להיות מאופשר. הסיבה לכך היא שהפוד פעיל כעת ולא ניתן להפעיל פוד נוסף מבלי להשבית את הפוד הנוכחי.
לחצו על כפתור החזרה בטלפון כדי לחזור ללשונית DASH שתציג כעת מידע על הפוד הנוכחי, כולל המינון הבזאלי הנוכחי, רמת מכל האינסולין, אינסולין שהוזרק, שגיאות של הפוד והתראות.
NOTE: For more details on the information displayed go to the DASH Tab section of this document.

NOTE: It is good practice to export settings AFTER activating the pod. Settings should be exported after each pod change and once a month, ensure you copy the exported settings file to a cloud storage location (e.g. Google Drive) or somewhere off your phone in case you loose your phone (see Export settings).
Deactivate Pod
Under normal circumstances, the expected lifetime of a pod is three days (72 hours) and an additional 8 hours after the pod expiration warning for a total of 80 hours of total pod usage.
To deactivate a pod (either from expiration or from a pod failure):
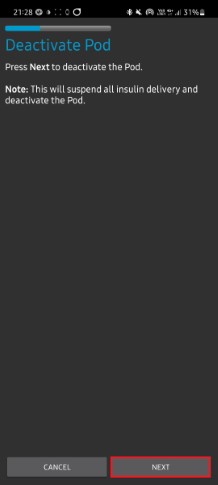
Go to the DASH tab, click on the POD MGMT (1) button, on the Pod Management screen click on the Deactivate Pod (2) button.

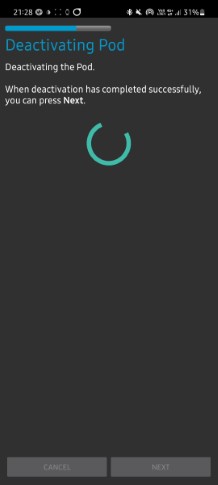
במסך כבה פוד, לחצו על הבא כדי להתחיל בתהליך של השבתת הפוד.
אתם תשמעו צפצוף אישור מהפוד שהכיבוי הצליח.
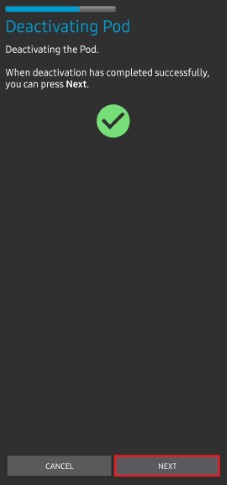
A green checkmark will be displayed upon successful deactivation. לחצו על הבא כדי לעבור אל המסך ”הפוד הושבת“.
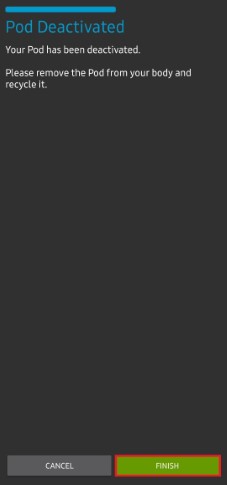
כעת תוכלו להסיר את הפוד כיוון שפעילותו הושבתה.
לחצו על הכפתור הירוק כדי לחזור למסך ניהול הפוד.
בתפריט ניהול פוד; לחצו כפתור »הקודם« של הטלפון כדי לחזור ללשונית DASH.
ודאו שהשדה סטטוס הפוד: מציג הודעת אין פוד פעיל.
Resuming Insulin Delivery
NOTE: During Profile Switches, like when using the PDM, AAPS must suspend delivery on the Pod before setting the new basal Profile. If communication fails between the suspend and resume commands, then delivery can stay suspended, Read Delivery suspended in the troubleshooting section for more details.
When insulin delivery is suspended you will need to issue a command to instruct the active, currently suspended pod to resume insulin delivery. After the command is successfully processed, insulin will resume normal delivery using the current basal rate based on the current time from the active basal Profile. The pod will again accept commands for bolus, TBR, and SMB.
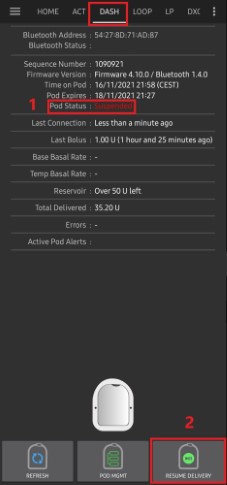
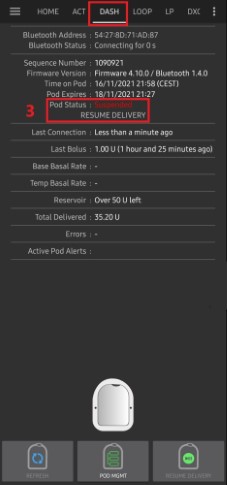
נווטו אל הלשונית DASH וודאו שהשדה סטטוס הפוד (1) מציג את מופסק, לאחר מכן הקישו על חידוש הזרקה (2) כדי להתחיל בתהליך הוראה לפוד הנוכחי לחדש את הזרקת האינסולין. ההודעה חידוש הזרקה תוצג בשדה סטטוס הפוד (3).
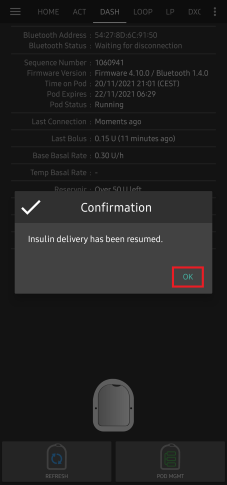
כאשר הפקודה »חידוש הזרקה« מצליחה, תיבת דו-שיח לאישור תציג את ההודעה מתן האינסולין חודש. לחצו על אישור כדי להמשיך.
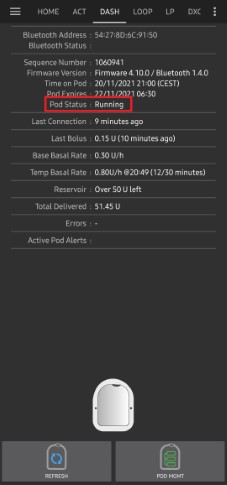
הלשונית DASH תעדכן את השדה סטטוס הפוד (1) ויוצג פועל, והלחצן חידוש הזרקה לא יוצג יותר
Silencing Pod Alerts
The process below will show you how to acknowledge and dismiss pod beeps when the active pod time reaches the warning time limit before the pod expiration of 72 hours (3 days). This warning time limit is defined in the Hours before shutdown Dash alerts setting. The maximum life of a pod is 80 hours (3 days 8 hours), however Insulet recommends not exceeding the 72 hours (3 days) limit.
NOTE: The SILENCE ALERTS (3) button is only available on the DASH tab when the pod expiration or low reservoir alert has been triggered. If the SILENCE ALERTS button is not visible and you hear beep sounds from the pod, try to »Refresh pod status«.
When the defined Hours before shutdown warning time limit is reached, the pod will issue warning beeps to inform you that it is approaching its expiration time and a pod change will be required soon.
You can verify this on the DASH tab, the Pod expires: (1) field will show the exact time the pod will expire (72 hours after activation), and the text will turn red after this time has passed.
Under the Active Pod alerts (2) field the status message Pod will expire soon is displayed. כעת יופעל הלחצן השתקת התראות (3).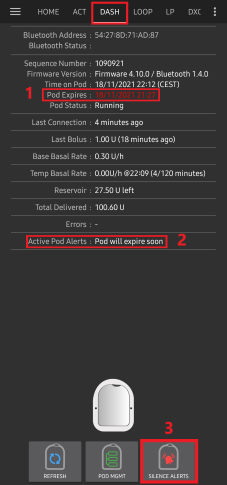
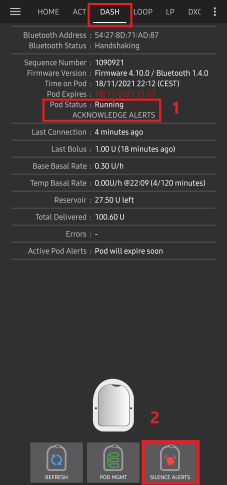
Go to the DASH tab and press the SILENCE ALERTS (2) button. AAPS sends the command to the pod to deactivate the pod expiration warning beeps and updates the Pod status (1) field with ACKNOWLEDGE ALERTS.
לאחר השבתה מוצלחת של ההתראות, שני צפצופים יישמעו על ידי הפוד הפעיל ותיבת דו-שיח תציג את ההודעה הפעלת ההתראות הושתקה. לחצו על אישור כדי לאשר ולבטל את תיבת הדו-שיח.
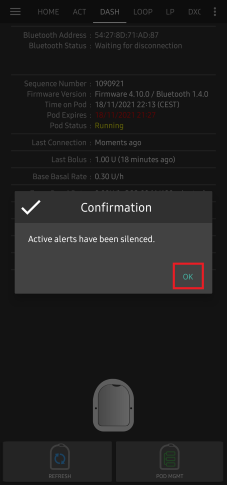
נווטו ללשונית DASH. תחת התראות פוד פעילות, הודעת האזהרה אינה מוצגת עוד והפוד כבר לא יוציא צפצופי אזהרת תפוגה.
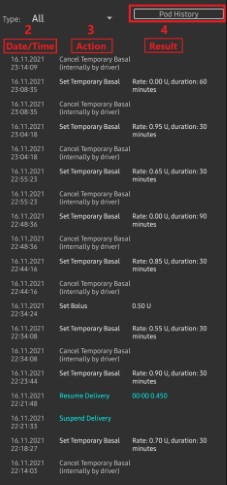
View Pod History
This section explains how to review your active pod history and filter by different action categories. The pod history tool allows you to view the actions and results committed to your currently active pod during its three days (72 - 80 hours) life.
This feature is helpful in verifying boluses, TBRs and basal commands that were sent to the pod. The remaining categories are useful for troubleshooting issues and determining the order of events that occurred leading up to a failure.
NOTE: Only the last command can be uncertain. New commands will not be sent until the last »uncertain« command becomes »confirmed« or »denied«. The way to »fix« uncertain commands is to »refresh pod status«.
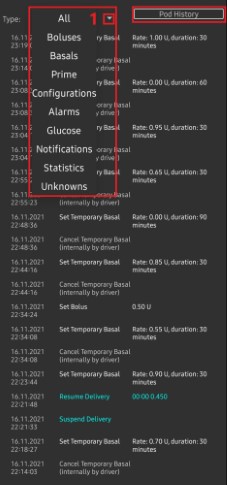
נווטו ללשונית DASH ולחצו על ניהול הפוד (1) ולאחר מכן בחרו היסטוריית פוד (2) כדי לפתוח את מסך היסטוריית הפוד.

במסך היסטוריית הפוד, קטגוריית ברירת המחדל של הכל (1) מוצגת ומציגה את התאריך והשעה (2) של כל פעולות (3) הפוד ותוצאות (4) בסדר כרונולוגי הפוך. Use your phone’s back button 2 times to return to the DASH tab in the main AAPS interface.
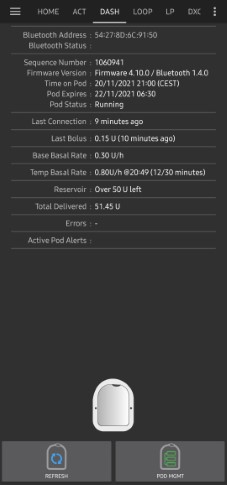
לשונית DASH
Below is an explanation of the layout and meaning of the icons and status fields on the DASH tab in the main AAPS interface.
NOTE: If any message in the DASH tab status fields report (uncertain), then you will need to press the Refresh button to clear it and refresh the pod status.
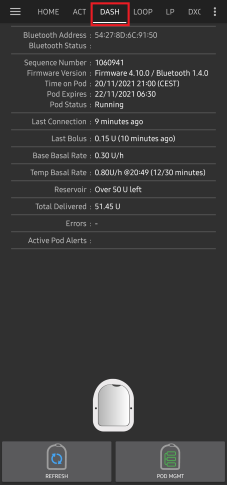
Fields
כתובת בלוטות«: מציג את כתובת הבלוטות« הנוכחית של הפוד המחובר.
Bluetooth Status: Displays the current connection status.
מספר רצף: מציג את מספר הרצף של הפוד הפעיל.
גרסת קושחה: מציג את גרסת הקושחה החיבור הפעיל.
השעה בפוד: מציג את השעה הנוכחית בפוד.
סטטוס הפוד: מציג את מצב הפוד.
חיבור אחרון: מציג את מועד התקשורת האחרון עם הפוד.
לפני כמה רגעים - לפני פחות מ-20 שניות.
לפני פחות מדקה - יותר מעשרים שניות אך פחות מ-60 שניות.
לפני דקה אחת - יותר מ-60 שניות אך פחות מ-120 שניות (2 דקות)
לפני XX דקות - לפני יותר משתי דקות ככתוב בערך XX
בולוס אחרון: מציג את המינון של הבולוס האחרון שהפוד הזריק ולפני כמה זמן, בסוגריים.
בזאלי בסיסי: מציג את המינון הבזאלי המתוכנת עבור השעה הנוכחית בפרופיל הבזאלי.
מינון בזאלי זמני: מציג את המינון הבזאלי הזמני הפועל כעת בפורמט הבא:
יחידות\שעה @ מועד תחילת בזאלי זמני (משך הבזאלי הזמני)
Example:* 0.00U/h @18:25 ( 90/120 minutes)
מכל: מציג מעל 50+U כאשר נותרו יותר מ -50 יחידות במכל. כשיש פחות מ-50 יחידות, יתרתן מוצגת במדוייק.
סה“כ שהוזרק: מציג את המספר הכולל של יחידות האינסולין שהוזרקו. זה כולל אינסולין המשמש להפעלה ולתיחול.
שגיאות: מציג את השגיאה האחרונה. Review the Pod history and log files for past errors and more detailed information.
התראות פוד פעילות: שדה השמור להתראות הפועלות כרגע על הפוד הפעיל.
Buttons
![]() Sends a refresh command to the active pod to update communication.
Sends a refresh command to the active pod to update communication.
השתמשו כדי לרענן את מצב הפוד ולבטל סטטוסים המכילים את הטקסט ”(לא ודאי)“.
See the Troubleshooting section below for additional information.
![]() Navigates to the Pod management menu.
Navigates to the Pod management menu.
![]() When pressed this will disable the pod alerts beeps and notifications (expiry, low reservoir..).
When pressed this will disable the pod alerts beeps and notifications (expiry, low reservoir..).
הלחצן מוצג רק לאחר אזהרת התפוגה של הפוד.
לאחר קבלת ההתראה, אייקון זה יפסיק להופיע.
![]() Resumes the currently suspended insulin delivery in the active pod.
Resumes the currently suspended insulin delivery in the active pod.
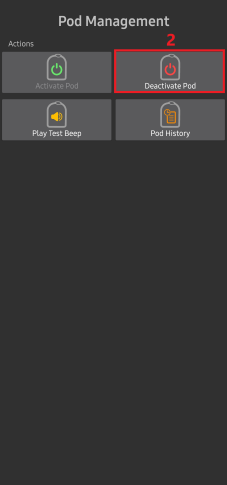
Pod Management Menu
Below is describes the purpose of each icon on the Pod Management menu, accessed by pressing POD MGMT (1) button from the DASH tab.
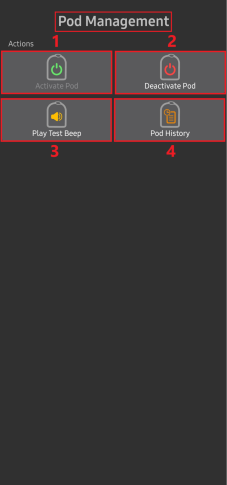
The table below describes each button and it’s function:
Button |
Function |
|---|---|
1 |
Access the Pod Mgmt settings |
2 |
Activate Pod: Primes and activates a new pod. |
3 |
Deactivate Pod: Deactivates the currently active pod. |
4 |
Play Test Beep : Plays a single test beep on the pod when pressed. |
5 |
Pod history : Displays the active pod activity history. |
הגדרות Dash
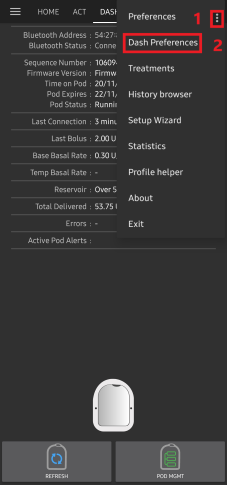
The Dash driver settings are configurable from the top-left hand corner hamburger menu under Config Builder (1) ➜ Pump Dash ➜ Settings Gear (3) by selecting the radio button (2) titled Dash. Selecting the checkbox (4) next to the Settings Gear (3) will allow the Dash menu to be displayed as a tab in the AAPS interface titled DASH.
NOTE: A faster way to access the Dash settings is by accessing the 3 dot menu (1) in the upper right hand corner of the DASH tab and selecting Dash preferences (2) from the dropdown menu.
The settings groups are listed below; you can enable or disable via a toggle switch for most entries described below:
NOTE: An asterisk (*) denotes the default setting is enabled.
Confirmation beeps

Provides confirmation beeps from the pod for bolus, basal, SMB, and TBR delivery and changes.
Bolus beeps enabled: Enable or disable confirmation beeps when a bolus is delivered.
Basal beeps enabled: Enable or disable confirmation beeps when a new basal rate is set, active basal rate is canceled or current basal rate is changed.
SMB beeps enabled: Enable or disable confirmation beeps when a SMB is delivered.
TBR beeps enabled: Enable or disable confirmation beeps when a TBR is set or canceled.
Alerts
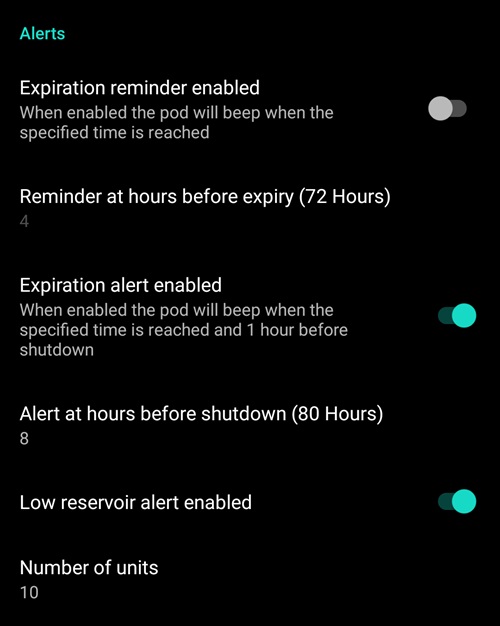
Provides AAPS alerts for pod expiration, shutdown, low reservoir based on the defined threshold units.
NOTE: an AAPS notification will ALWAYS be issued for any alert after the initial communication with the pod since the alert was triggered. Dismissing the notification will NOT dismiss the alert UNLESS automatically acknowledge Pod alerts is enabled. To MANUALLY dismiss the alert you must visit the DASH tab and press the Silence ALERTS button.
Expiration reminder enabled: Enable or disable the pod expiration reminder set to trigger when the defined number of hours before shutdown is reached.
Hours before shutdown: Defines the number hours before the active pod shutdown occurs, which will then trigger the expiration reminder alert.
Low reservoir alert enabled: Enable or disable an alert when the pod’s remaining units low reservoir limit is reached as defined in the Number of units field.
Number of units: The number of units at which to trigger the pod low reservoir alert.
Notifications
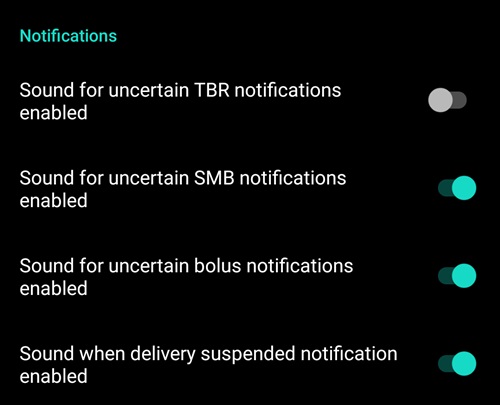
The Notification section allows the user to select their preferred notifications and audible phone alerts when AAPS is uncertain about the status of TBR, SMB, or bolus, and when delivery suspended events were successful.
NOTE: These are notifications only, no audible beep alerts are made.
Sound for uncertain TBR notifications enabled: Enable or disable this setting to trigger an audible alert and visual notification when AAPS is uncertain if a TBR was successfully set.
Sound for uncertain SMB notifications enabled: Enable or disable this setting to trigger an audible alert and visual notification when AAPS is uncertain if an SMB was successfully delivered.
Sound for uncertain bolus notifications enabled: Enable or disable this setting to trigger an audible alert and visual notification when AAPS is uncertain if a bolus was successfully delivered.
Sound when delivery suspended notifications enabled: Enable or disable this setting to trigger an audible alert and visual notification when suspend delivery was successfully delivered.
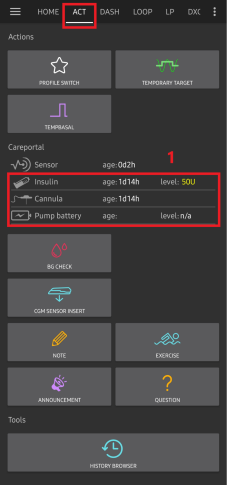
לשונית פעולות (ACT)
This tab is well documented in the main AAPS documentation but there are a few items on this tab that are specific to how the DASH differs from tube based pumps, especially after the processes of applying a new pod.
Go to the Actions (ACT) tab in the main AAPS interface.
Under the Careportal (1) section the Insulin and Cannula fields will have their age reset to 0 days and 0 hours after each pod change. זה נעשה בגלל האופן שבו משאבת אומניפוד בנויה ופועלת. מכיוון שהפוד מחדיר את הצינורית ישירות לעור באתר הדבקתו, אין שימוש בצינור מסורתי במשאבות אומניפוד. לכן לאחר החלפת פוד, הגיל של כל אחד מהערכים הללו יתאפס אוטומטית. גיל סוללת המשאבה אינו מדווח מכיוון שהסוללה בפוד תמיד תהיה יותר מאורך חיי הפוד (80 שעות לכל היותר). סוללת המשאבה ויתרת האינסולין נמצאים בעצמם בתוך כל פוד.
Level
Insulin Level
Insulin level displayed is the amount reported by DASH. However, the pod only reports the actual insulin reservoir level when it is below 50 units. Until then “Above 50 units” will be displayed. The amount reported is not exact: when the pod reports ‘empty’ in most cases the reservoir will still have some additional units of insulin left.
The DASH overview tab will display as described the below:
Above 50 Units - The pod reports more than 50 units currently in the reservoir.
מתחת ל-50 יחידות - כמות האינסולין שנותרה במכל כפי שדווח על ידי הפוד.
Additional note:
SMS - מחזירה ערך או 50+U בתגובות של SMS
נייטסקאוט - העלאת ערך של 50 כאשר מעל 50 יחידות לנייטסקאוט (גרסה 14.07 ומעלה). גרסאות חדשות יותר ידווחו על ערך של 50+ כאשר מעל 50 יחידות.
Known Issues Workarounds
This section covers common workarounds and settings that need to be changed to enable a feature to work around a community reported issue that has a fix. E.g. the Basal drift enable process is documented here.
Basal Drift Fix Instructions
The Omnipod Dash pump has a limitation that can cause it to deliver less basal insulin than AAPS expects, see Issue #4783 for more technical details.
The Dash uses an internal timer to determine when a basal pulse of 0.05 U is delivered. Once the timer interval elapses, the pulse is delivered. However, this timer is restarted whenever a basal rate change occurs e.g when AAPS sends a new Basal rate.
When used in combination with looping, this leads to under-delivery of basal insulin, as the algorithm updates the basal rate on the pump frequently.
The issue is most apparent during the night. During daytime operation, SMBs often result in a basal rate of 0, which masks the effect. In observed usage, this results in approximately 10% of the expected Total Daily Dose (TDD) not being delivered over a 24-hour period. Additionally, glucose targets are often not reached overnight, particularly after meals with prolonged glucose impact (e.g. pasta).
NOTE: This issue is especially important to understand for people on very small dosages of insulin, Children for example.
Enable Basal Drift Fix in AAPS
You must be running AAPS Version 3.4.2.3 or later for this feature.
The Basal Drift Fix is not enabled by default on AAPS.
To enable it:
Create an empty file named
omnipod_drift_compensation(2) in theextra(1) subfolder of your phone AAPS directory.
NOTE: Ensure you check in the AAPS settings where your AAPS Directory is, and that you placed the file in the correct one, a number of several have been caught out putting the file into the wrong folder.
Restart AAPS. This must be done for it to recognise the file is present and enable the drift compensation feature.
Please visit this Github issue #4783 and thumbs up the first post indicating you are using this feature, we need this data to help demonstrate the feature is widely used. Once there is significant community adoption the removal of the enable file will be possible, we appreciate your support here.
Troubleshooting
This section covers common known issues and solutions for Omnipod DASH use with AAPS. There is also General Troubleshooting section in the documentation that should be reviewed as it covers relevant topics for some Pod issues too.
Bluetooth related issues
For known issues with Bluetooth connections, dropouts of pump/pods, or activation and connection issues Bluetooth Troubleshooting
Delivery suspended
אין יותר כפתור של הפסקת הזרקה. If you want to ”suspend“ the pod, you can set a zero TBR for x minutes.
During Profile Switches, DASH must suspend delivery before setting the new basal Profile. אם התקשורת נכשלת בין שתי הפקודות, אז ניתן להשהות את ההזרקה. כשזה קורה:
לא יהיה מתן אינסולין, כולל בזאלי, SMB, בולוס ידני וכו«.
ייתכן שתהיה הודעה על כך שאחת הפקודות אינה מאושרת: זה תלוי במועד התרחשות הכשל.
AAPS will try to set the new basal profile every 15 minutes.
AAPS will show a notification informing that the delivery is suspended every 15 minutes, if the delivery is still suspended (resume delivery failed).
The Resume delivery button will be active if the user chooses to resume delivery manually.
If AAPS fails to resume delivery on its own (this happens if the pod is unreachable, sound is muted, etc), the pod will start beeping 4 times every minute for 3 minutes, then repeated every 15 minutes if delivery is still suspended for more than 20 minutes.
עבור פקודות לא ודאיות, ”רענון סטטוס הפוד“ אמור לאשר\לדחות אותן.
NOTE: When you hear beeps from the pod, do not assume that delivery will continue without checking the phone, delivery might stay suspended, so you need to check !
Pod Failures
Pods fail occasionally due to a variety of issues, including hardware issues with the Pod itself.
It is best practice not to raise support / replacement cases with Insulet, since AAPS is not an approved method of using the Pods.
A list of fault codes can be found here to help determine the cause.
Preventing error 49 pod failures
This failure is related to an incorrect pod state for a command or an error during an insulin delivery command. This is when the driver and Pod disagree on the actual state. The Pod (out of a built-in safety measure) then reacts with an unrecoverable error code 49 (0x31) ending up with what is know as a “screamer”: the long irritating beep that can only be stopped by punching a hole at the appropriate location at the back of the Pod. The exact origin of a “49 pod failure” often is hard to trace. In situations that are suspected for this failure to occur (for instance on application crashes, running a development version or re-installation).
Pump Unreachable Alerts
When no communication can be established with the pod for a pre-configured time a “Pump unreachable” alert will be raised. Pump unreachable alerts can be configured by going to the top right-hand side three-dot menu, selecting Preferences ➜ Local Alerts ➜ Pump unreachable threshold [min]. Recommended value is alerting after 120 minutes.
Export Settings
Exporting AAPS settings enables you to restore all your settings, and maybe more importantly, all your Objectives. You may need to restore settings to the “last known working situation” or after uninstalling/reinstalling AAPS or in case of phone loss, reinstalling on the new phone.
NOTE: The active pod information is included in the exported settings. If you import an ”old“ exported file, your actual pod will ”die“. There is no other alternative. In some cases (like a programmed phone change), you may need to use the exported file to restore AAPS« settings while keeping the current active Pod. In this case it is important to only use the recently exported settings file containing the pod currently active.
It is good practice to do an export immediately after activating a pod. This way you will always be able to restore the current active pod in case of a problem. For instance when moving to another backup phone.
Regularly (after each export preferably) copy your exported settings to a safe place (a cloud drive e.g. Google Drive) that is accessible by any phone when needed. This allows you to restore to a phone from anywhere in case of a phone loss or factory reset of your phone while you are not at home.
Import Settings
WARNING: Please note that importing settings will possibly import an outdated Pod status (depending when you made the last export/backup).
As a result, there is a risk of losing the active Pod! (see Exporting Settings).
Only try an import when no other options are available.
When importing settings with an active Pod, make sure the export was done with the currently active pod.
Importing while on an active Pod: (you risk losing the Pod!)
Make sure you are importing settings that were recently exported with the currently active Pod!
ייבאו את ההגדרות.
בדיקת על ההגדרות.
Importing (no active Pod session)
ייבוא כל קובץ מיוצא עדכני אמור לעבוד (ראה למעלה)
ייבאו את ההגדרות.
בדיקת על ההגדרות.
You may need to Deactivate the ”non existing“ pod if the imported settings included any active pod data.
Importing settings that contain Pod state from an inactive Pod
When importing settings containing data for a Pod that is no longer active, AAPS will try to connect with it, which will obviously fail. You can not activate a new Pod in this situation.
To remove the old pod session:
“try” to de-activate the Pod. The de-activation will likely fail.
Select “Retry”.
After the second or third retry you will get the option to remove the pod.
Once the old pod is removed you will be able to activate a new pod.
Generic error: java.lan.illegalStateException: Trying to set a Bluetooth Address to ***, but it is already set to ***.
If you receive this error when attempting to Initialize a new pod AAPS fails as it still has settings for an old pod stored in configuration.
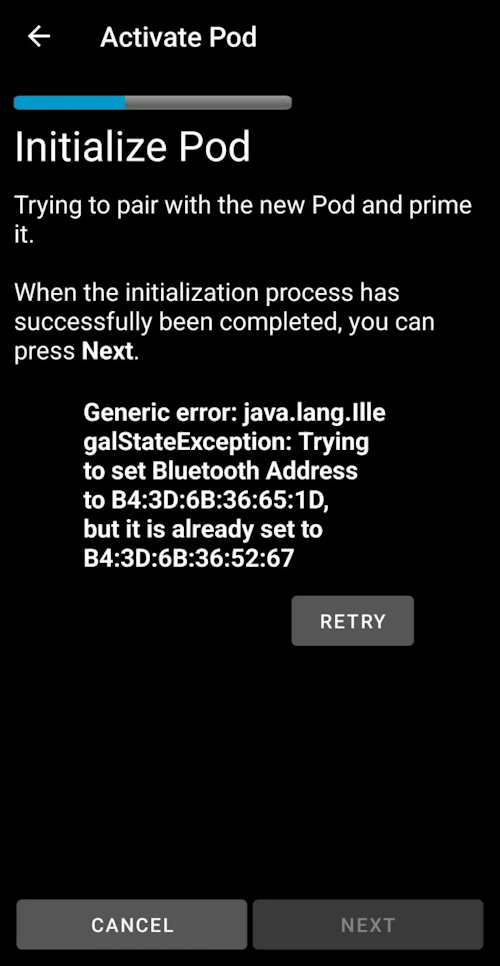
This can happen if you restore from a backup, or a pod deactivation fails.
To resolve keep clicking on RETRY until a Discard option is shown, then discard. This procedure should work for De-Activating a pod too.
You should now be able to Activate a new pod.
Reinstalling AAPS
When uninstalling AAPS you will lose all your settings, objectives and the current Pod session. To restore them make sure you have a recent exported settings file available!
When on an active Pod, make sure that you have an export for the current pod session or you will lose the currently active pod when importing older settings.
Export your settings and store a copy in a safe place (e.g Google Drive).
Uninstall AAPS and restart your phone.
Install the new version of AAPS.
ייבאו את ההגדרות.
Verify all preferences (optionally import settings again).
Activate a new pod.
לבסוף: ייצאו קובץ הגדרות.
Updating AAPS to a newer version
In most cases there is no need to uninstall. You can do an “in-place” install by starting the installation for the new version. This is also possible when on an active Pod session.
ייבאו את ההגדרות.
Install the new AAPS version.
ודאו שההתקנה הצליחה
RESUME the Pod or activate a new pod.
לבסוף: ייצאו קובץ הגדרות.
Omnipod driver alerts
The Omnipod Dash driver presents a variety of unique alerts on the Overview tab, most of them are informational and can be dismissed while some provide the user with an action requiring their input to resolve the cause of the triggered alert.
A summary of the main alerts that you may encounter is listed below:
No active Pod session detected. ניתן לבטל התראה זו זמנית על ידי לחיצה על השתקה אך היא תמשיך לפעול כל עוד לא הופעל פוד חדש. Once activated this alert is automatically silenced.
Pod suspended Informational alert that pod has been suspended.
Setting basal Profile failed : Delivery might be suspended! נא לרענן ידנית את סטטוס הפוד בלשונית Omnipod ולחדש את ההזרקה במידת הצורך. Informational alert that the Pod basal Profile setting has failed, and you will need to hit Refresh on the Omnipod tab.
Unable to verify whether SMB bolus succeeded. אם אתם בטוחים שהבולוס לא הצליח, עליכם למחוק את ערך SMB באופן ידני מטיפולים. Alert that the SMB bolus command success could not be verified, you will need to verify the Last bolus field on the DASH tab to see if SMB bolus succeeded and if not remove the entry from the Treatments tab.
לא בטוח אם ”בולוס/בזאלי זמני/SMB“ הושלם, אנא ודאו ידנית אם הוא הצליח.
Where to get help for DASH
All of the development work for the DASH is done by the community on a volunteer basis; please keep this in mind and use the following guidelines before requesting assistance:
רמה 0 קראו את הסעיף הרלוונטי בתיעוד זה כדי להבטיח שאתם מבינים כיצד להשתמש במה שאתם מתקשים איתו.
רמה 1: אם אתם עדיין נתקלים בבעיות שאתם לא מצליחים לפתור באמצעות מסמך זה, אנא עברו לערוץ #androidaps ב-Discord באמצעות קישור ההזמנה. There are also numerous Facebook and other groups you can ask in too (see Getting Help)
Level 2: Search existing issues to see if your issue has already been reported at Issues if it exists, please confirm/comment/add information on your problem. If not, please create a new issue and attach your log files.
היו סבלניים - רוב חברי הקהילה שלנו מורכבים ממתנדבים בעלי אופי טוב, ופתרון בעיות דורש לעתים קרובות זמן וסבלנות מצד המשתמשים והמפתחים כאחד.
When requesting help come prepared with the following information to help those in the community with your specific questions and problems:
Android phone make and model
Android OS version (e.g 15 or 16)
Did you recently upgrade your Android OS version?
The version of AAPS you are running
Plain english description of the problem you are facing considering some of the following things
Was it working before now?
When did it work or not work?
Did you make any changes to configuration or profile settings?
Did you pair a new bluetooth device?
Did you upgrade or install a new app?
How long was it working before it stopped working?