Completing the Objectives
AAPS has a series of objectives that you need to complete to progress from basic open looping to hybrid closed looping and full AAPS functionality. Completing the objectives ensures:
You have configured everything correctly in your AAPS setup
You have learned about the essential features of AAPS
You have a basic understanding of what your system is doing, and therefore why you can trust it.
Note
Regularly export your AAPS settings after completing each objective!
We strongly recommend that you export your settings after completing each objective. This exporting process creates a settings (.json) file which you should keep backed-up in one or more safe places (e.g. Google Drive, hard disk, email attachment etc.). This ensures that you keep your progress through the objectives, and if you accidentally delete your progress, you can simply re-load it by importing a recent settings file. Having a backup settings file is also required if you want to change your AAPS smartphone for any reason (upgrading/lost/broken phone etc.)
The settings file will save not only your progress through the objectives, but also your own customised AAPS settings such as max bolus etc.
If you do not have a backup copy of your settings, if anything happens to your AAPS smartphone you will need to start the objectives from the beginning again.
Overall the objectives take around 6 weeks to complete (see how long will it take? for a detailed breakdown) from configuring AAPS on your smartphone to “basic” hybrid closed looping (from objective 1 to objective 8), so, although you can proceed up to objective 5 using a virtual pump (and using some other method of insulin delivery in the meantime), having to re-complete all the objectives because for example, you lost your smartphone, is still something you really want to avoid.
As well as progressing through the objectives, if you want, you can also remove your progress and go back to an earlier objective.
Objective 1: Setting up visualization and monitoring, analysing basals and ratios
AAPS checks if your basic technical setup is working.
If not you have to reconfigure until the basic technical setup works for AAPS.
Select the correct CGMS/FGMS in Config Builder. See BG Source for more information.
Select the correct Pump in Config Builder to ensure your pump can communicate with AAPS. Select virtual pump if you are using a pump model with no AAPS driver for looping, or if you want to work through the early objectives while using another system for insulin delivery. See insulin pump for more information.
Follow instructions in Nightscout page to ensure Nightscout can receive and display this data.
Note that URL in NSClient must be without “/api/v1/” at the end - see NSClient settings in Preferences.
Note - You may need to wait for the next sensor glucose reading to arrive before AAPS will recognise it.
Objective 2: Learn how to control AAPS
Perform several actions in AAPS as described in this objective.
Click on the orange text “Not completed yet” to access the to-dos.
Links will be provided to guide you, in case you are not familiar with a specific action yet.
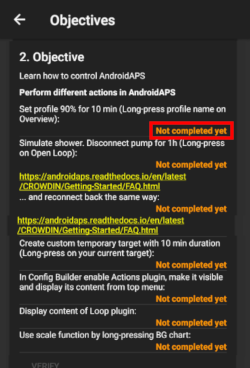
Tasks to complete Objective 2 are:
Set your profile to 90% for a duration of 10 min (Hint: Long press your profile name on the OVERVIEW screen) (Note: AAPS does not accept basal rates below 0.05U/hr. If your profile includes any rates 0.06U/hr or lower you will need to create a new profile with higher basal rates before completing this task. Switch back to your normal profile after completing this task.)
Simulate “taking a shower” by disconnecting your pump in AAPS for a duration of 1h (Hint: press the loop icon on the OVERVIEW screen to open the Loop dialogue)
End “taking a shower” by reconnecting your pump (Hint: press the “disconnected”-icon to open the loop dialog)
Create a custom temporary target with a duration of 10 min (Hint: press the target bar on the OVERVIEW screen to bring up the temporary target dialog)
Activate the ACTIONS plugin in CONFIG BUILDER to make it appear on the top scrollable menu bar (Hint: Go to CONFIG BUILDER and scroll down to ‘General”)
Display the LOOP plugin’s content
Scale the BG-Chart to be able to look at larger or smaller timeframes: toggling between 6h, 12h, 18h 24h of past data (Hint: Tap the chart)
Objective 3: Prove your knowledge
Pass a multiple-choice exam testing your AAPS knowledge.
Some users find Objective 3 to be the most difficult objective to complete. Please do read the AAPS documents in conjunction with the questions. If you are genuinely stuck after researching the AAPS documents, please search the Facebook group for “Objective 3” (because it is likely that your question has been asked- and answered - before). If you are still stuck, ask in a post on either the Facebook or Discord group. These groups can provide friendly hints, or redirect you to the relevant part of the AAPS documents.
To proceed with Objective 3, click on the orange text “Not completed yet” to access the relevant question. Please read each question carefully and select your answer(s).
To reduce the number of decisions you are asked to make while in Open Loop, set a wide target range e.g. 90 - 150 mg/dl or 5.0 - 8.5 mmol/l.
You might want to set a wider upper limit, or even disable Open Loop, at night.
For each question, there may be more than one answer that is correct! If an incorrect answer is selected, the question will be time-locked for a certain amount of time (60 minutes) before you can go back and answer the question again. Be aware that the order of the answers may have changed when you next try to answer, this is to make sure you read them carefully and really understand the validity (or not) of each response.
When AAPS is installed for the first time, you will have to complete the whole of Objective 3 before moving on to Objective 4. Each objective is required to be completed in sequential order. New features will gradually be unlocked as progress is made through the objectives.
What happens if new question(s) are added to an Objective when I update to a newer version of AAPS?
From time to time, new features are added to AAPS which may require a new question to be added to the Objectives, particularly Objective 3. As a result, any new question added to Objective 3 will be marked as “incomplete” because AAPS will require you to action this. Do not worry, as each Objective is independent, you will not lose the existing functionality of AAPS, providing the other Objectives remain completed.
Objective 4: Starting on an open loop
The purpose of this objective is to recognise how often AAPS will evaluate the basal rate’s impact on glucose levels, and recommend temporary basal rate adjustments. As part of this objective, you will activate open looping for the first time, and will perform 20 proposed temporary basal rate changes manually on your pump. Furthermore, you will observe temporary and default temporary targets’ impact (e.g. for activity or hypo treatments). If you are not familiar with setting a temporay basal rate change in AAPS yet, please refer to the ACTIONS tab.
Estimated time to complete this objective: 7 days. This is a mandatory wait time. You can’t proceed to the next Objective, even if you enacted all basal rate changes already.
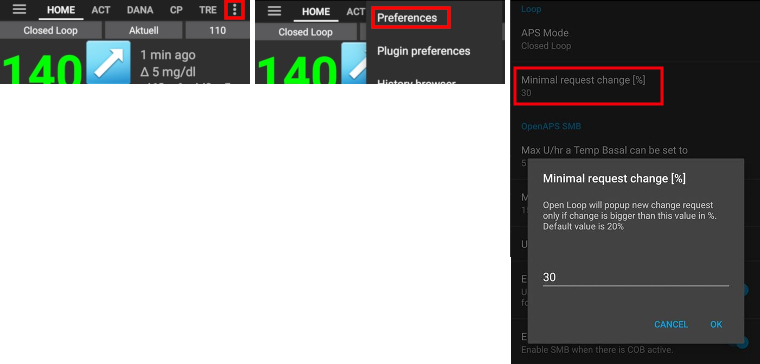
Select Open Loop either from the “Preferences” menu or by presssing and holding the Loop icon on the top left of the OVERVIEW screen.
Walk through the Preferences to set it up for you (scroll down to “Loop/APS Mode” and select “Open Loop”.
Manually enact at least 20 of the temporary basal rate suggestions over a period of 7 days; key them into your (physical) pump and confirm in AAPS that you have accepted them. Ensure these basal rate adjustments show up in AAPS and Nightscout.
Enable temp targets if necessary. After treating a hypo use hypo temp targets to prevent the system from overcorrecting upon the bounce back.
Reduce number of notifications
To reduce the number of proposed basal rate changes while in Open Loop set a wider target range like 90-150 mg/dl or 5.0-8.5 mmol/l.
You might even consider to raise your upper limit (or disable Open Loop) at night.
You can set a minimum percentage for recommended basal rate changes to change the number of triggered notifications.
Objective 5: Understanding your open loop, including its temp basal recommendations
As part of Objective 5 you will start to understand how temporary basal recommendations are derived. This includes the determination of basal logic, analyzing the impact by observing prediction lines in AAPS OVERVIEW/Nightscout and looking at detailed calculations shown on your OPENAPS tab.
Estimated time to complete this objective: 7 days.
This Objective requires you to determine and set your “Max U/h a temp basal can be set to” (max-basal) value as described in OpenAPS-features. This value can be set in Preferences > OpenAPS. Make sure this safety setting is set in both AAPS and your insulin pump.
You might want to set your target higher than usual until you are comfortable with the calculations and settings.
AAPS allows:
a low target to be a minimum of 4 mmol/l (72 mg/dl) or maximum of 10 mmol/l (180 mg/dl)
a high target to be a minimum of 5 mmol/l (90 mg/dl) and maximum of 15 mmol/l (225 mg/dl)
a temporary target as a single value can be anywhere in the range of 4 mmol/l to 15 mmol/l (72 mg/dl to 225 mg/dl)
Your target is a core value. All calculations are based on it. It is different from a target range which you usually aim to keep your blood glucose values in. If your target is very wide (say, 3 or more mmol/l [50 mg/dl or more] wide), you will often find little AAPS action. This is because sensor glucose is predicted to be somewhere in that wide range, and thus temporary basal rate changes are rarely suggested.
You may want to experiment with adjusting your targets being in a tighter range (say, 1 or less mmol/l [20 mg/dl or less] wide) and observe a resulting system behaviour.
You can adjust (widen or tighten) the graph’s green area, representing your target range, by entering different values in Preferences > Range for Visualisation.

If you have been using a virtual pump, change to a real insulin pump now!
If you are open looping with a virtual pump stop here. Only click verify at the end of this Objective once you have changed to using a “real” physical pump.

Objective 6: Starting to close the loop with Low Glucose Suspend

Closed loop will not correct high BG values in objective 6 as it is limited to low glucose suspend only!
You will still need to correct high BG values by yourself (manually with corrections by pump or pen)!
As part of Objective 6 you will close the loop and activate its Low Glucose Suspend (LGS) mode while max IOB is set to zero. You have to remain in LGS mode for 5 days to complete this objective. You should use this time to check if your profile settings are accurate and don’t trigger LGS events too often.
Estimated time to complete this objective: 5 days.
It’s crucial that your current profile (basal, ISF, IC) is well tested before you close your loop in Low Glucose Suspend mode. Incorrect profile settings might force you into hypo situations which have be treated manually. An accurate profile will help to avoid needing low glucose treatments during the 5 days period.
If you still observe frequent or severe low glucose episodes consider refining your DIA, basal, ISF and carb ratios.
During objective 6, AAPS will take care of setting maxIOB to zero. This override will be reversed when moving to objective 7.
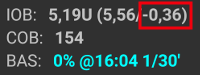
This means that when you are on Objective 6, if sensor glucose levels are dropping, AAPS will reduce basal insulin delivery for you. If sensor glucose levels are rising, AAPS will only increase the basal rate above your profile value if basal IOB is negative as a result of from a previous Low Glucose Suspend. Otherwise, AAPS will not increase basal above your current profile value, even if glucose levels are rising. This caution is to avoid hypos as you are learning to use AAPS.
As a consequence, you have to handle high glucose values with manual insulin bolus corrections.
If your basal IOB is negative (see screenshot below) a temporary basal rate (TBR) > 100% can be triggered in objective 6.
Set your target range slightly higher than you usually would aim at, just to be safe and to add a safety buffer.
Enable ‘Low Glucose Suspend’ mode by pressing and holding the Loop icon at the top right corner of the OVERVIEW screen and selecting the Loop - LGS mode icon.
Watch active temporary basals by looking at the turquoise basal text on the OVERVIEW screen or the turquoise basal render as part of the OVERVIEW graph.
You may temporarily experience spikes following treated hypos without being able to increase basals on the rebound.
Objective 7: Tuning the closed loop, raising maxIOB above 0 and gradually lowering BG targets
To complete Objective 7 you have to close your loop and raise your maxIOB. maxIOB was zeroed out automatically in objective 6. This is now reverted. AAPS will start to use your defined maxIOB value to correct high glucose values.
Estimated time to complete this objective: 1 day.
Select ‘Closed Loop’ either from Preferences or by pressing and holding the Loop icon at the top right corner of the OVERVIEW screen, over a period of 1 day.
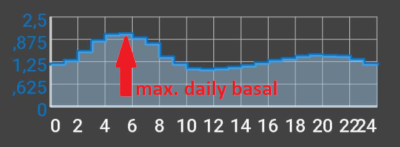
Raise your ‘Maximum total IOB OpenAPS can’t go over’ (in OpenAPS called ‘max-iob’) above 0. The default recommendation is “average mealbolus + 3x max daily basal” (for the SMB algorithm) or “3x max daily basal” (for the AMA algorithm) but you should slowly work up to this maximum until you know your settings work for you (max daily basal = the maximum hourly value in any time segment of the day).
This recommendation should be seen as a starting point. If you set it to the 3x and you are seeing AAPS giving too much insulin as glucose levels rise, then lower the “Maximum total IOB OpenAPS can’t go over” value. Alternatively, if you are very resistant, raise it very cautiously.
Once confident on how much IOB suits your looping patterns, reduce your targets to your desired level.
Objective 8: Adjust basals and ratios if needed, and then enable autosens
As part of this objective you will revist your profile’s performance and will use autosens functionality as an indicator for wrong settings.
Estimated time to complete this objective: 7 days.
You can use autotune as a one off to check your basals remain accurate or do a traditional basal test.
Enable autosens over a period of 7 days and watch OVERVIEW’s graph white line showing your insulin sensitivity rising or falling due to exercise or hormones etc. and keep an eye on the OpenAPS report tab which shows AAPS adjusting the basals and/or targets accordingly.
Objective 9: Enabling additional oref1 features for daytime use, such as super micro bolus (SMB)
In this objective you will tackle and use “Super Micro Bolus (SMB)” as one core functionality. After working through the mandatory readings you will have a good understanding of what SMBs are, how these work, reasonable starting point with SMBs and why basal is set to zero temporarily after SMBs are given (zero-temping). Estimated time to complete this objective: 28 days.
The SMB section in this documentation and oref1 coverage in the openAPSdocs are must-reads to understand SMB and the concept of zero-temping.
Once done, you raise maxIOB to get SMBs working well. maxIOB now includes all IOB, not just accumulated basal. This threshold pauses SMBs until IOB drops below this value (e.g. maxIOB is set to 7 U and a bolus of 8 U is given to cover a meal: SMBs will be paused and not given unless IOB drops below 7 U). A good start is setting maxIOB = average mealbolus + 3x max daily basal (max daily basal = the maximum hourly value in any time segment of the day - see objective 7 as reference)
Change “min_5m_carbimpact”-parameter (Preferences > Absorbtion settings > min_5m_carbimpact) to 8 as you move from an OpenAPS AMA algorithm to OpenAPS SMB. For AMAs the default value is 3. Read more about this setting here
Objective 10: Automation
You have to start Objective 10 to be able to use Automations.
Read the documentation page Automation first.
Set-up the most basic automation rule; for example trigger an Android notification in few minutes:
Select the notification tab
From the top right 3 dots menu, select add rule
Give a task name “My first automation notification”
“edit” “condition”
click the “+” symbol to add the first trigger
select “Time” & “OK”, it will create a default entry AT TODAY HOUR:MINUTE
click the MINUTE portion to edit the time such that it triggers in a few minutes. Then click ok to close
click “ok” to close the Triggers screen
“ADD” an “Action”
select “Notification”, “OK”
click “Notification” to edit the message(Msg), enter something like “Ny first automation”
wait until the time triggers the notification (note that depanding on your phone, it can be a few minutes late)
Experiment with setting up a more useful automation.
The documentation page gives a few examples, and you can search for “automation” screenshots on the Facebook group. Since most people eat the same thing for breakfast at the same time every morning before school/work, a fairly common use-case can be to set a “before-breakfast-target” to set a slightly lower temporary target 30 minutes before having breakfast. In such case, your condition is likely to include “recurring time” which consists of selecting specific days of the week (Monday, Tuesday, Wednesday, Thursday, Friday) and a specific time (06:30 am). The action will consists of “Start temp target” with a target value and a 30 minutes duration.
Objective 11: Enabling additional features for daytime use, such as Dynamic Senstivity plugin (DynISF).
Ensure that SMB is functioning properly
Read the documentation concerning Dynamic ISF here
Search the Facbook and Discord groups for discussions around Dynamic ISF and read about other users experiences and recommendations.
Enable the DynamicISF plugin and identify the appropriate calibration for your body’s uniqueness. It is advisable to begin with a value lower than 100% for safety reasons.
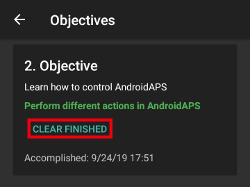
Go back in objectives
If you want to go back in objectives progress for whatever reason you can do so by clicking at “clear finished”.
Objectives in Android APS before version 3.0
One objective was removed when AAPS version 3.0 was released. Users of Android APS version 2.8.2.1 who are on older Android software (i.e. earlier than version 9) will be using an older set of Objectives which can be found here.