Dépannage d’Android Studio
Fichier de clés perdu
If you use the same keystore when updating AAPS you do not have to uninstall the previous version on your smartphone. That’s why it is recommended to store the keystore in a safe place.
If you try to install the apk, signed with a different keystore than before, you will get an error message explaining that the installation failed!
In the event that you cannot trace your old keystore or password, proceed as follows:
Exportez les paramètres sur votre ancien téléphone.
Copiez le fichier de configuration de votre téléphone vers un emplacement externe (par ex. votre ordinateur, un service cloud…).
Generate a new version of the signed apk as described on the Update guide and transfer it to your phone.
Uninstall previous AAPS version on your phone.
Install new AAPS version on your phone.
Importez les paramètres pour restaurer vos objectifs et votre configuration.
If you can’t find these on your phone, copy them from the external storage to your phone.
Vérifiez vos options d’optimisation de la batterie et désactivez-les à nouveau.
Continuez à boucler.
Gradle Sync en échec
Gradle Sync can fail for various reasons. When you receive a message saying that “gradle sync failed”, open the « Build » tab (1) at the bottom of Android Studio and check what error message (2) is displayed.

Important: Après avoir suivi les instructions pour votre problème spécifique, vous devez déclencher la synchronisation gradle à nouveau.
Uncommitted changes
If you receive a failure message like this one:
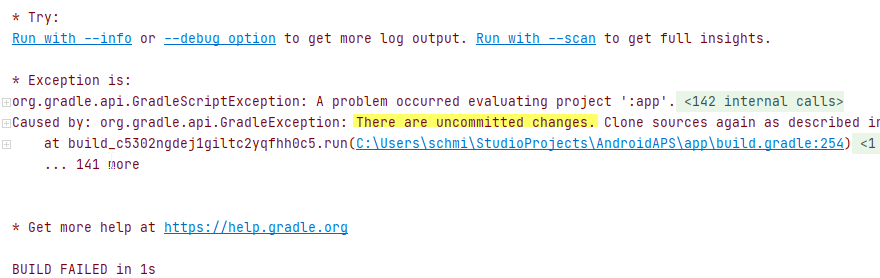
Build file 'C:\Data\50-Android\AndroidAPS\app\build.gradle.kts' line: 243

There are uncommitted changes.
Clone sources again as described in wiki and do not allow gradle update
Étape 1 - Vérifiez l’installation de git
Ouvrez l’onglet Terminal (1) en bas d’Android Studio, copiez le texte suivant et collez le dans le terminal.
git --version
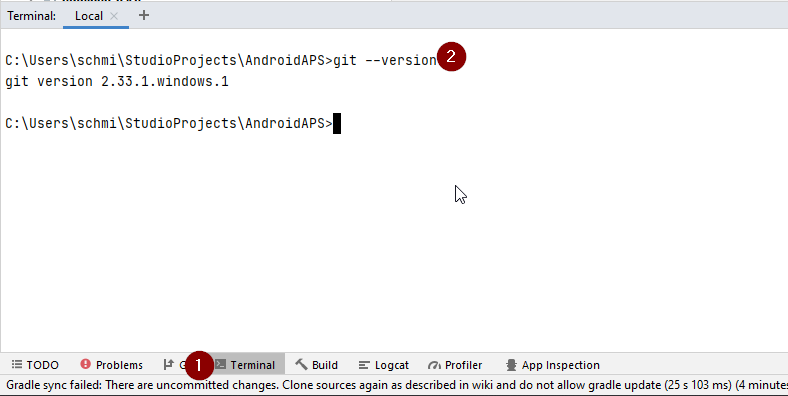
Note: There is a space and two hyphens between Git and version!
You must receive a message saying what Git version is installed, as you can see in the screenshot above. Dans ce cas, allez à l”étape 2.
Dans le cas où vous recevez un message disant
Git: command not found
votre installation Git n’est pas correcte.
if on Windows and the Git was just installed, you should restart your computer to make Git globally available after the installation
If Git is installed, you have restarted (if on windows), and Git still couldn’t found:
Cherchez dans votre ordinateur un fichier « git.exe ».
Note for yourself, which directory it is saved in.
Allez dans les variables d’environnement de Windows, sélectionnez la variable « PATH » et cliquez sur Modifier. Add the directory where you have found your Git installation.
Sauver et fermer.
Redémarrer Android Studio.
Étape 2 : Vérifier les modifications non commitées.
In Android Studio, open the “Commit” tab (1) on the left-hand side.
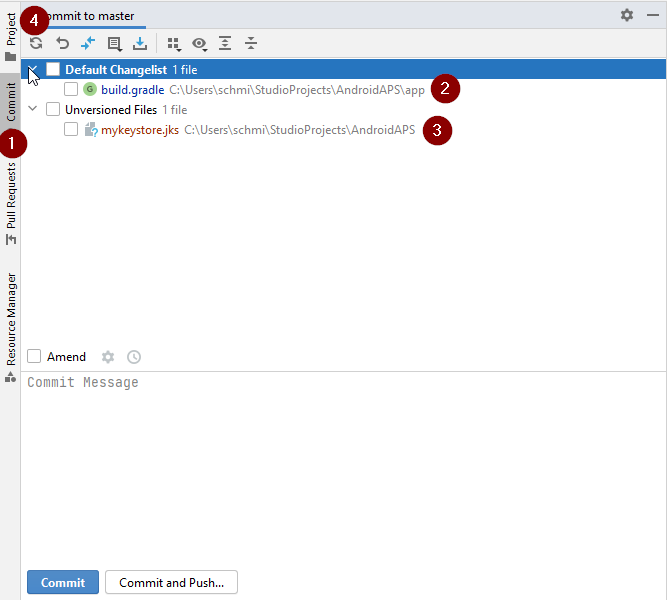
Vous pouvez voir « Default changeset » (2) ou « Unversioned files » (3):
For « Default changeset », you probably updated “Gradle” or changed some of the file contents by mistake.
Faites un clic droit sur « Default Changeset » et sélectionnez « Rollback »
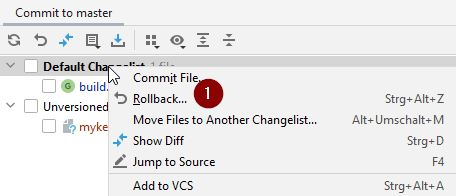
Les fichiers sont récupérés à nouveau depuis le serveur Git. S’il n’y a pas d’autres changements dans l’onglet commit, allez à l”étape 3.
If you can see « Unversioned Files », you might have stored files in your source code directory by mistake. Maybe they are important files: like your keystore file, that should be moved elsewhere. If you don’t know what those files are and you have not created them yourself, you can delete them.
Use your regular file explorer on your computer to move or cut and paste that file to a safe place.
Go back to Android Studio and click the Refresh button (4) within the Commit tab to make sure the file is not stored in the AAPS directory anymore.
If there are no other changes in the Commit tab, go to Step 3.
Étape 3 : Resynchroniser Gradle (encore)
Suivez les instructions de Resynchronisation Gradle.
Git Pull Failed - Please tell me who you are
If you see this message, Git needs you to identify yourself.

Open the terminal and type the following two commands, one after the other.
git config --global user.name "Your name here"
git config --global user.email your.email@here.com
Your name needs to be written between quotation marks.

Incompatible Gradle JVM

Your build is currently configured to use incompatible Java 21.0.3 and Gradle 8.2.
Cannot sync the project.

We recommend upgrading to Gradle version 8.9.

The minimum compatible Gradle version is 8.5.

The maximum compatible Gradle JVM version is 19.
Or:
Cause: error: invalid source release: 21
If you experience the above error message, you need to download a correct JVM version before you can try rebuild again:
Check in the requirement table which JVM version you need for the AAPS version you are building, and make a note of it.
Open the Gradle view by clicking on the elephant (1) on the right side of Android Studio and open the settings (2) and select Gradle Settings (3):

In Gradle JDK field, check if the appropriate version is selected (1) If not, click on the field, and see if it is already available in the list. The example below shows JVM 21 is labeled as “jbr-21”. If you find it, just select it, and you are done. If not available, then select “Download JDK”.

In Version (1), select the JDK required for your AAPS version (the one you made a note of when you checked the requirement table). In Vendor (2) select any Vendor. Location (3): do not change.

Close the Settings dialog with OK.
You now need to restart the Gradle Sync. Suivez les instructions de Resynchronisation Gradle.
Incompatible version of Android Gradle plugin
If you experience the following error message
The project is using an incompatible version (AGP x.x.x) of the Android Gradle plugin. Latest supported version is AGP x.x.x

You are using an outdated version of Android Studio. In the menu, go to Help > Check for updates and install any updates of Android Studio and its plugins that are found.
Could not resolve/No cached version
Si vous rencontrez ce message d’erreur:

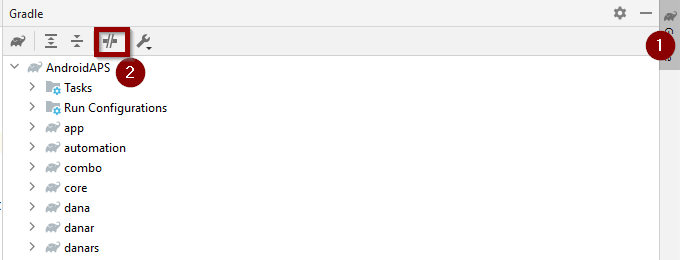
Sur la droite, ouvrez l’onglet Gradle (1).
Assurez-vous que le bouton affiché (2) n’est PAS sélectionné.
Now you need to trigger a Gradle Resync
Unable to start daemon process
Si vous voyez un message d’erreur ci-dessous, vous utilisez probablement un système Windows 10 32 bits. This is not supported by Android Studio 3.5.1 and above and unfortunately there is nothing that the AAPS developers can do about this!
There is information on the internet about how to determine whether you have a 32-bit or 64-bit OS - i.e. this one.

Resynchronisation Gradle
Si vous pouvez toujours voir le message que la synchronisation de gradle a échoué, sélectionnez maintenant le lien « Try again ».
If you don’t see the message anymore, you can still trigger this manually:
Ouvrez l’onglet Gradle (1) sur le côté droit de Android Studio.
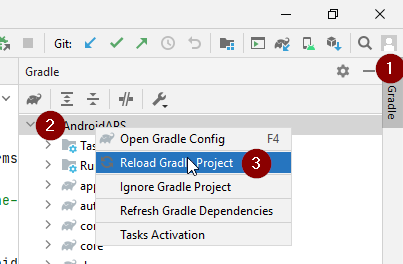
Right-click on AAPS (2)
Cliquez sur « Reload Gradle Project » (3)
Générer l’APK signé avec succès mais avec 0 variantes de compilation
When you generate the signed apk, you might get the notification that generation was successfully but are told that this is with “0 build variants” were generated:
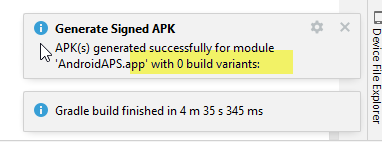
C’est un faux avertissement. Check the directory for your selected « Destination folder » for generation (step Generate Signed APK) and you will find the generated apk there!
L’application a été créée avec les avertissements du compilateur/kotlin
Si votre compilation est terminée avec succès mais que vous obtenez des avertissements du compilateur ou de kotlin (indiqués par un point d’exclamation jaune ou bleu), alors vous pouvez ignorer ces avertissements.

Your apk was built successfully and can be transferred to your phone!
No CGM data is received by AAPS
If you are using patched Dexcom G6 app: this app is outdated. Use the BYODA app instead.
If you are using xDrip+: identify receiver as described on xDrip+ settings page.
Apk not installed
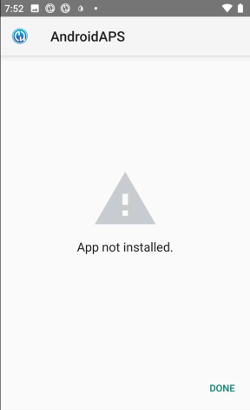
Assurez-vous d’avoir transféré le fichier “app-full-release.apk” sur votre téléphone.
Si vous avez le message « App non installé » sur votre téléphone, suivez ces étapes :
Export settings (in AAPS version already installed on your phone)
Uninstall AAPS on your phone.
Activer le mode avion & désactiver bluetooth.
Installer la nouvelle version (« app-full-release.apk »)
Activer le bluetooth et désactiver le mode avion
Apk installed but old version
If you built the app successfully, transferred it to your phone and installed it successfully but the version number stays the same then you might have missed to update your local copy
Rien ci-dessus n’a marché
If none of the above tips helped you might consider building the apk from scratch:
Export settings (in AAPS version already installed on your phone)
Have your key password and key store password ready.
Ou vous pouvez recréer un nouveau fichier de clés.
Build the apk from scratch as described here.
When you have built the apk successfully delete the existing apk on your phone, transfer the new apk to your phone and install.
Import settings again to restore your objectives and settings.
Vous devez vérifier vos options d’optimisation de la batterie et désactivez-les à nouveau.
Pire scénario
If the above does not solve your build issue you may wish to try to uninstall Android Studio completely and rebuild from scratch. Some users find that this can resolve their build problem. When deleting Android Studio, do not delete Android user settings and Make sure to uninstall all files associated with Android Studio. If you do not completely remove Android Studio with all hidden files, uninstalling may cause new problems instead of solving your existing one(s). Les manuels pour une désinstallation complète peuvent être trouvés en ligne, par ex.
Installez Android Studio à partir de zéro comme c’est décrit ici.