Creating and restoring back-ups
Es ist wichtig, Backups der unten aufgeführten Dinge zu behalten. Es hat sich bewährt ein Backup lokal auf der Festplatte als auch in der Cloud (z.B. Google Drive, Dropbox, etc…) zu speichern. Unten sind die Dinge aufgelistet, von denen Du Backups erstellen solltest.
Creating back-ups
Keystore file from the computer you used to build the APK
Mit dem Keystore bist Du in der Lage ein Update der APK über eine bestehende AAPS-Version zu installieren. Der Keystore reduziert die Komplexität bei einem zukünftigen APK-Update ganz erheblich. Das gilt insbesondere, wenn Du die App auf einem neuen Computer erzeugen musst. See the Updating AAPS section for details on using the keystore when building a new APK.
When to back-up: the keystore should be backed up after you first build the AAPS apk.
So sicherst Du: Finde den Keystore-Pfad heraus. If you don’t remember it you can find it in Android Studio by selecting Build > APK > Next. Der Pfad wird Dir in “Key store path” angezeigt. Using your file explorer, navigate to this path and make a copy of your keystore file (ending in file extension .jks). Speichere sie an einem sicheren Ort in Deinem Cloud-Speicher, für den möglichen Fall, dass Du auf Deinem Computer nicht zugreifen kannst. Wichtig ist auch, dass Du Dein Keystore-Passwort, den Key-Alias und das Key-Passwort kennst (oder notierst).
Copies of the most recent APK
If your main AAPS phone is lost or damaged, having a copy of the APK available will allow you to quickly resume using AAPS with a new phone (note: you also need your preferences backed up as noted below).
When to back-up: you should maintain a back-up of the most recent APK that you installed on your main AAPS phone. You may want to also maintain one earlier version in case you need to roll back to that for any reason.
So sicherst Du: Eine Kopie wird auf dem Computer gespeichert, der zum Erstellen des APK mit Android Studio verwendet wurde. Wenn Du eine Cloud nutzt, speichere zusätzlich eine Kopie der APK in Deinem Cloud-Speicher von dem Du die Datei später auf Dein Smartphone laden kannst. Merke oder notiere Dir die jeweiligen Speicherorte, damit Du die Kopien im Fall der Fälle auch wiederfindest. Zur Speicherung der Backups sind dedizierte Verzeichnisse auf Deinem Computer und auch in Deinem Cloud-Speicher eine Überlegung wert.
AAPS preferences
Preferences are what tailors the stock AAPS application to how you have it setup. Preferences include details on your config builder settings, status of objectives, third-party communication settings (Nightscout, Tidepool…), automations and profiles. With a copy of the APK (see above) and Preferences you can be up and running on a new phone quickly.
Wann ich ein Backup machen soll:
as Preferences store your progress towards completing the objectives, you should back up your Preferences each time you complete an objective so that you do not lose your progress. Without a copy of your Preferences you will have to complete all objectives again in the event you need to replace your phone.
any time you plan to make significant changes to your configuration (change SMB settings, change insulin types, change pump, make changes to automations) you should back up your Preferences before and after making the changes. This way you have your most recent settings as well as a copy of what they were before the changes in case you need to revert back to them.
Tubeless pumps (Omnipod and Medtrum) users only : the Preferences file contains connection details on your current pod and can be used to restore connection to that pod with a new phone. If you do not have a copy of your preferences exported after you started your current pod you will need to start a new pod in the event you need to replace your current phone.
How to back-up:
If this your first time importing or exporting Preferences you will need to set a master password in Preferences > General > Protection. Lege ein Passwort fest und notiere es an einem sicheren Ort. You will be unable to access your Preferences back-ups without this password.
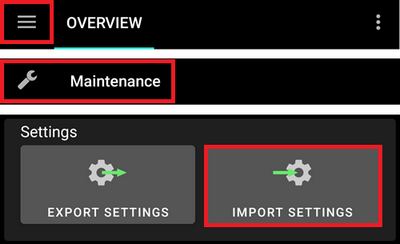
From the AAPS home screen, select the three line (hamburger) menu in the top left > Maintenance > Export settings > type in Master password set above > Ok

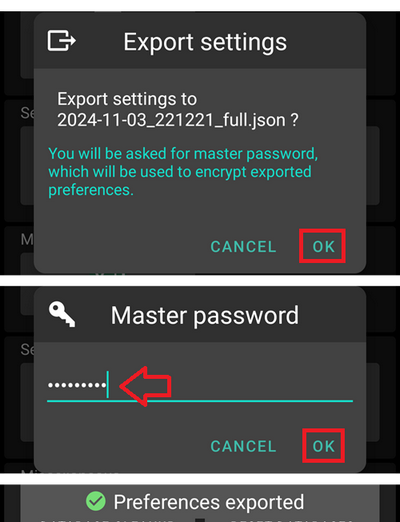
Using the file explorer on your phone (commonly called “Files” or “My Files”) navigate to Internal Storage > AAPS > preferences. Hier findest Du Kopien aller exportierten Einstellungs-Dateien. The file name should be
YYYY-MM-DD_Time_appname.json. Lade diese Datei in den Cloud-Speicher Deiner Wahl hoch. Lade dann auch eine Kopie aus der Cloud auf Deinen lokalen Computer herunter.
Wiederherstellen Deines Backups auf einem neuen Smartphone oder AAPS-Neuinstallation
Use these instructions if you have a back-up of your APK and Preferences that you want to load on to a new phone or if you needed to delete and reinstall the APK on your existing phone for any reason.
If you are updating AAPS using an APK built with the same keystore you should not need to follow this process. Es wird trotzdem empfohlen, ein Backup vor dem Update zu erstellen.
If you are updating AAPS after you lost or replaced your original keystore (i.e. using a new build computer without transferring the keystore), ensure that you back up all settings per the above and then uninstall the existing version of AAPS on your phone.
If needed, set up your CGM/BG source receiver prior to the steps listed below
Tubeless pumps (Omnipod and Medtrum) users
Importing a Preferences file will deactivate your current pod if those Preferences were exported during a different active pod session.
Using the back-up copy of your APK from above, follow the instructions for a new installation
Launch AAPS and allow any requested permissions
Exit the Setup Wizard. We will be importing all the necessary settings from the back-up copy of Preferences
From the AAPS home screen select Request and allow on all permissions listed in red on the top
From the AAPS home screen, set the master password in Preferences > General > Protection to the same password as you used with your back-ups.
From the AAPS home screen, select the three line (hamburger) menu in the top left > Maintenance > Export settings > type in Master password set above > Ok. Damit wird der Ordner ‚preferences‘ - sofern noch nicht vorhanden - auf Deinem Smartphone erstellt.
Download the back-up of your Preferences file from your cloud platform.
Use your file explorer (commonly called “Files” or “My Files”) to move the file from your downloads to
/internal storage/AAPS/preferencesFrom the AAPS home screen, select the three line (hamburger) menu in the top left > Maintenance > Import settings > select the preferences file you want to back-up from > Ok > type in Master password set above > Ok. Da alle vorhandenen .json Dateien im „preferences“-Verzeichnis angezeigt werden, ist Vorsicht bei Auswahl der richtigen Datei erforderlich.
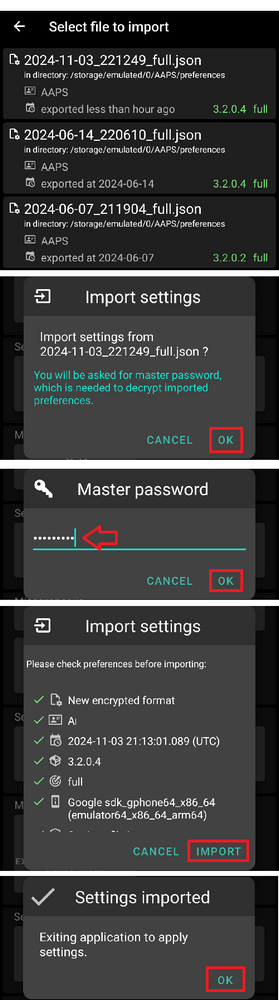
AAPS will automatically restart and should then have all of your preferences imported.
Tubeless pumps (Omnipod and Medtrum) users only - if your Preferences were not backed up from the same pod you are currently using, you will need to start a new pod to begin insulin delivery.
Troubleshooting: if you are unable to get an active profile set from the AAPS home screen, select the three line (hamburger) menu in the top left > config builder > Pump > switch to Virtual Pump > then switch back to your pump type
Hinweis für Dana RS Nutzer
As pump connection settings are also imported AAPS on your new phone will already „know“ the pump and therefore not start a bluetooth scan.
Bitte stelle die Bluetooth-Verbindung zwischen Smartphone und Pumpe manuell her.