Einstellungen
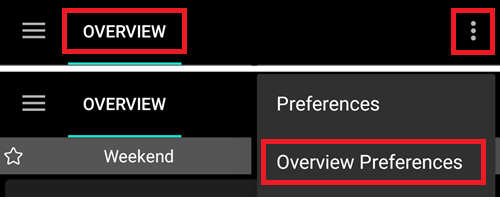
Open preferences by clicking the three-dot menu on the top right side of the home screen.
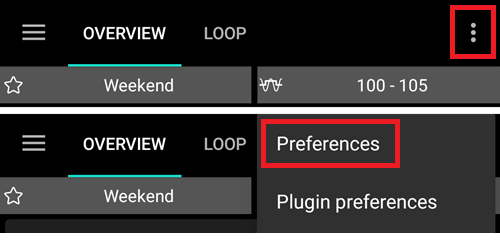
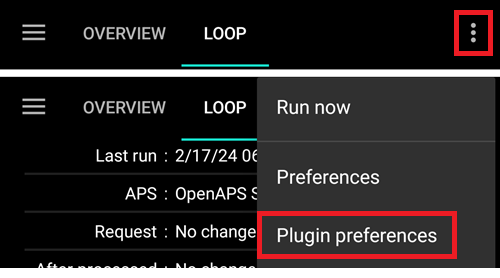
You can jump directly to preferences for a certain tab (i.e. pump tab) by opening this tab and clicking Plugin preferences.
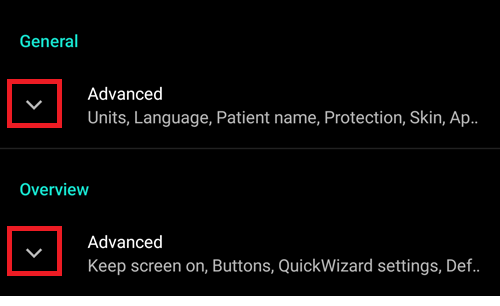
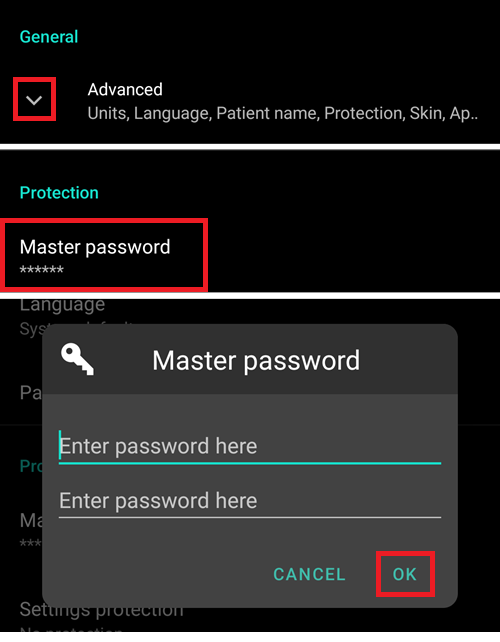
Sub-menus can be opened by clicking the triangle below the sub-menu title.
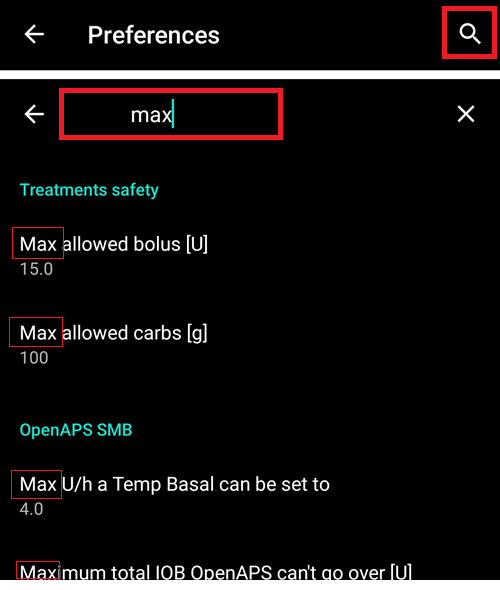
With the filter on top of the preferences screen you can quickly access certain preferences. Just start typing part of the text you are looking for.
General
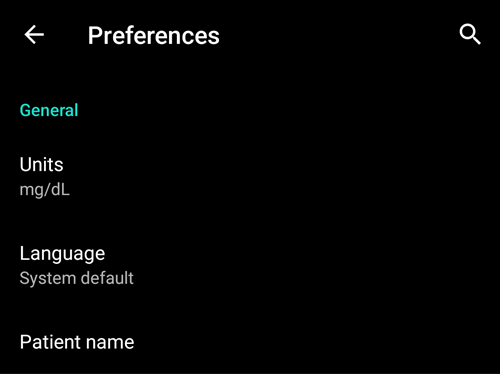
Units
Set units to mmol/l or mg/dl depending on your preferences.
Language
New option to use phone’s default language (recommended).
In case you want AAPS in a different language than your standard phone language, you can choose from a broad variety.
If you use different languages, you might sometimes see a language mix. This is due to an android issue where overriding the default android language sometimes doesn’t work.
Patient name
Can be used if you have to differentiate between multiple setups (i.e. two T1D kids in your family).
Schutz

Master-Passwort
Mandatory to be able to export settings as they are encrypted from version 2.7.
Biometric protection may not work on OnePlus phones. This is a known issue of OnePlus on some phones.
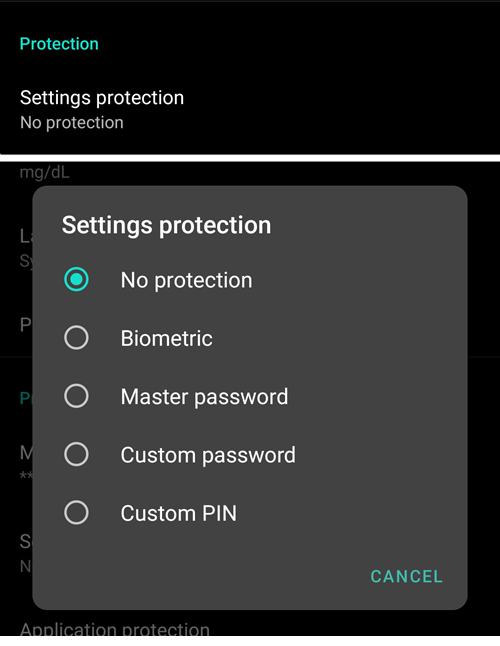
Schutz der Einstellungen
Protect your settings with a password or phone’s biometric authentication (i.e. child is using AAPS). If you enable this feature, you will be prompted for authentication each time you want to access any Preferences related view.
Custom password should be used if you want to use master password just for securing exported settings, and use a different one for editing the preferences.
If you are using a custom password click on line „Settings password“ to set password as described above.
Schutz der App
If the app is protected, you must enter the password or use the phone’s biometric authentication to open AAPS.
AAPS will shut down immediately if a wrong password is entered - but will still run in background if it was previously opened successfully.
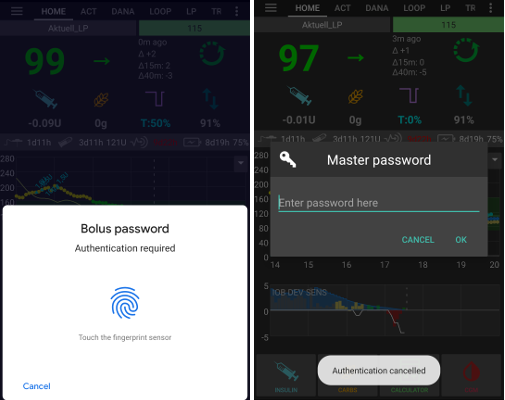
Bolus-Schutz
Bolus protection might be useful if AAPS is used by a small child and you bolus via SMS.
Im Beispiel unten siehst du die Aufforderung zur biometrischen Freigabe. If biometric authentication does not work, click in the space above the white prompt and enter thr master password.
Password and PIN retention
Define how long (in seconds), the preferences or bolus functionalities remain unlocked after you successfully enter the password.
Erscheinungsbild
Du kannst zwischen vier Darstellungsarten wählen:
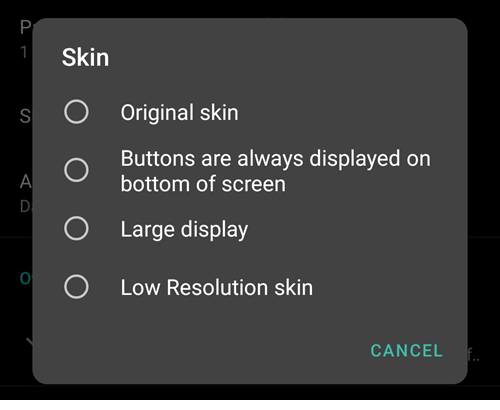
‚Low resolution skin‘ comes with shorter labels and age/level removed to have more available space on a very low resolution screen.
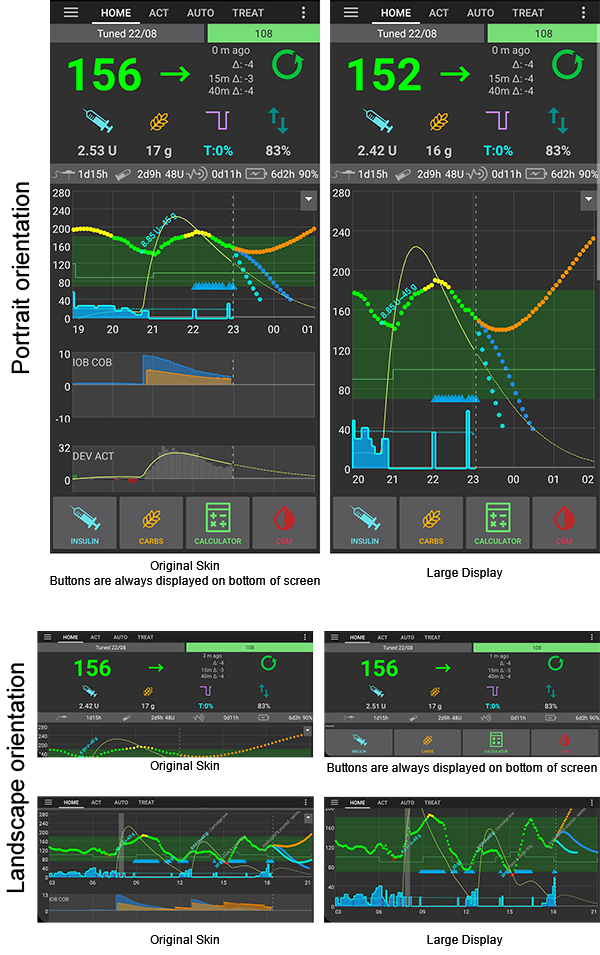
Difference between the other skins depends on the phone’s display orientation:
Hochformat
Ursprüngliches Erscheinungsbild und Schaltflächen werden immer am unteren Rand des Bildschirms angezeigt sind identisch.
Large Display has an increased height for all graphs compared to other skins
Querformat
Bei Verwendung von Ursprüngliches Erscheinungsbild und Großer Bildschirm, musst Du nach unten scrollen, um Schaltflächen am unteren Rand des Bildschirms zu sehen
Large Display has an increased height for all graphs compared to other skins
Übersicht
In the Overview section, you can define the preferences for the home screen.
Bildschirm aktiv lassen
Option ‚Keep screen on‘ will force Android to keep the screen on at all times. This is useful for presentations etc. But it consumes a lot of battery power. Therefore, it is recommended to connect the smartphone to a charger cable.
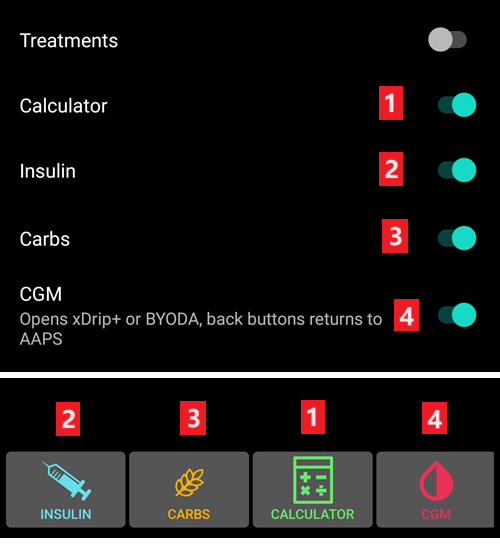
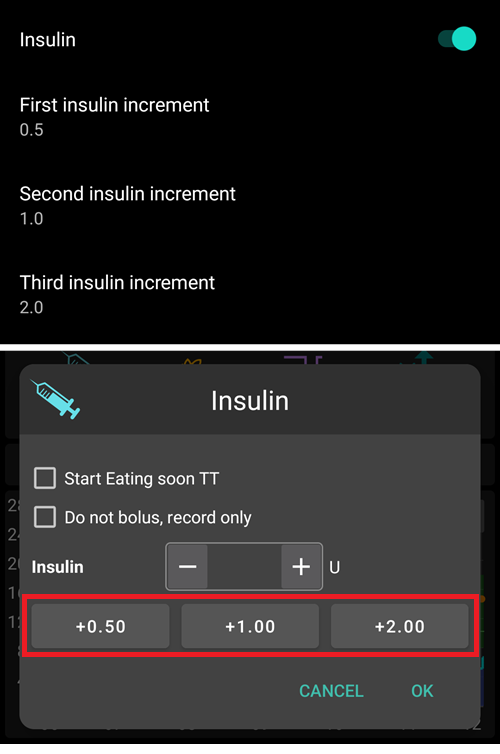
Schaltflächen
Define which buttons are visible on the bottom of your home screen.
The Increment options allow you to define the amount for the three buttons in the carb and insulin dialogues, for easy entry.

Quick Wizard
Create customized buttons for certain standard meals or snacks which will be displayed on the home screen. Useful for standard meals frequently eaten.
For each button, you define the carbs and calculation method for the bolus. Then, you define during which time period the button will be visible on your home screen - just one button per period. The button will not be visible if outside the specified time range or if you have enough IOB to cover the carbs defined in the QuickWizard button. If different times are specified for the different meals you will always have the appropriate standard meal button on the home screen, depending on the time of day.
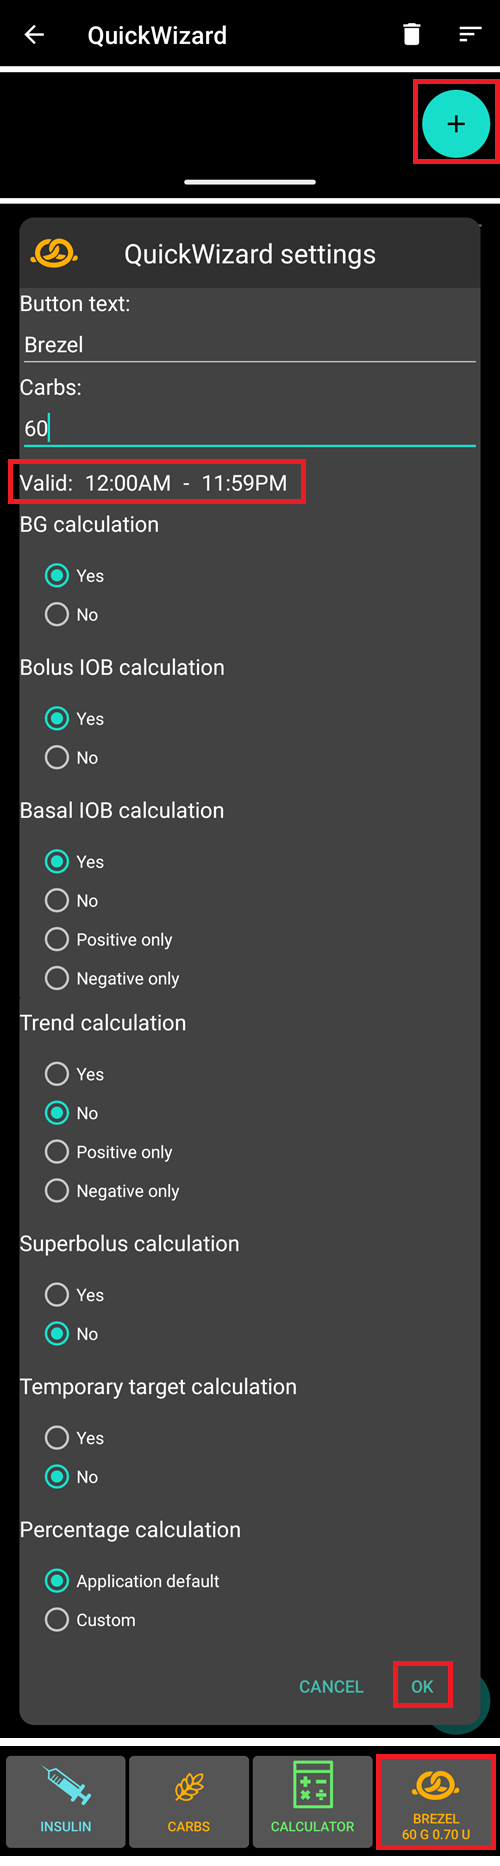
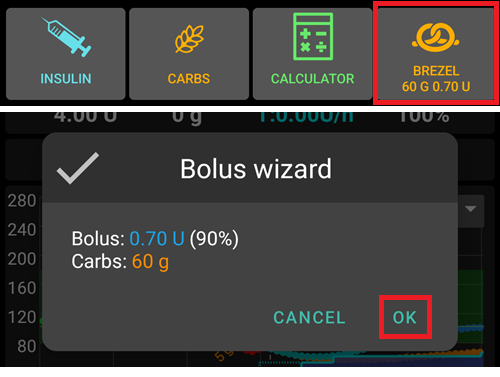
If you click the quick wizard button AAPS will calculate and propose a bolus for those carbs based on your current ratios (considering blood glucose value or insulin on board if set up).
Der Vorschlag muss bestätigt werden, bevor Insulin abgegeben wird.
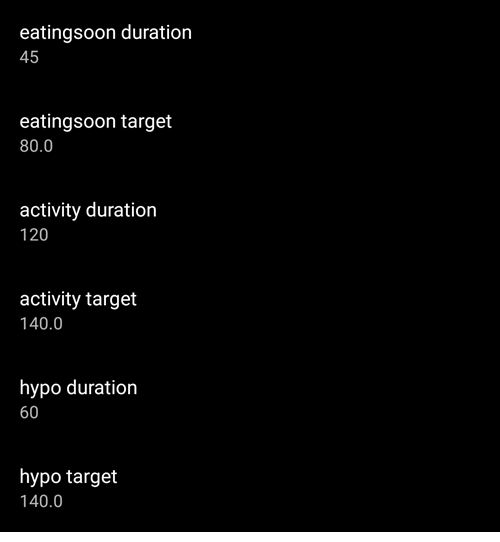
Vordefinierte temporäre Ziele
Temporary targets (TT) allow you to change your blood glucose target for a certain time period. When setting a default TT, you can easily change your target for activity, eating soon etc.
Here you can change the target and the duration for each predefined TT. Preset values are:
Eating soon: target 72 mg/dL / 4.0 mmol/l, duration 45 min
Activity: target 140 mg/dL / 7.8 mmol/l, duration 90 min
Hypo: target 125 mg/dL / 6.9 mmol/l, duration 45 min
Learn how to activate Temp Targets here.
Füll-/Vorfüll-Standardmengen
If you want to fill the tube or prime cannula through AAPS you can do this through the Actions tab.
Voreinstellungen für Füllmengen können in diesem Dialog definiert werden. Choose the default amounts of the three buttons in fill/prime dialogue, depending on the length of your catheter.
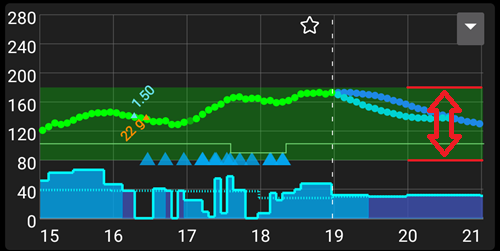
Zielbereich für die Grafikanzeige
Choose the high and low marks for the BG-graph on AAPS overview and smartwatch. It is only the visualization, not the target range for your BG. Example: 70 - 180 mg/dl or 3.9 - 10 mmol/l
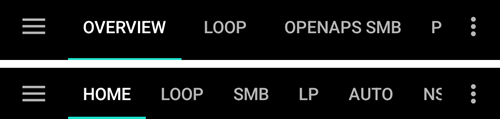
Kurze Tab-Überschriften
Useful to see more tab titles on screen.
Zum Beispiel wird die ‚OpenAPS AMA‘ -Registerkarte zu ‚OAPS‘, ‚Objectives (Ziele)‘ wird zu ‚ZIEL‘ usw.
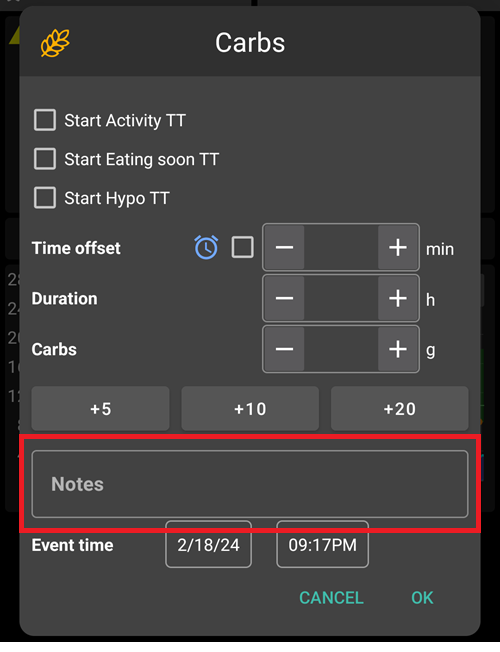
Möglichkeit zur Erfassung von Notizen in Behandlungsdialogen
Gibt dir die Möglichkeit, kurze Textnotizen zu Deinen Behandlungen hinzuzufügen (z.B. im Bolus-Rechner, den Buttons für Insulin und Kohlenhydrate etc.)
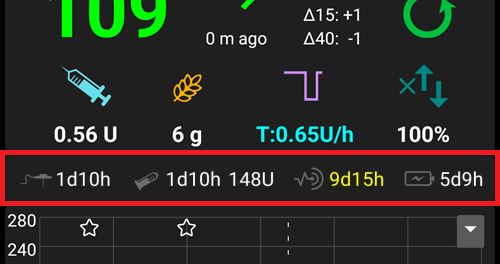
Statusanzeige
Status lights give a visual warning for:
Sensoralter
Sensor battery level for certain smart readers (see screenshots page for details).
Insulinalter (Tage Reservoirverwendung)
Reservoirstand (Einheiten)
Kanülenalter
Alter der Pumpenbatterie
Stand (%) der Pumpenbatterie
If the warning threshold is exceeded, values will be shown in yellow. If the critical threshold is exceeded, values will be shown in red.
The last option allows you to import those settings from Nightscout if defined there. See Nightscout documentation for more information.
Deliver this part of bolus wizard result
Set the default percentage of the bolus calculated when using the bolus wizard.
Default is 100%: no correction. Even when setting a different value here, you can still change each time you use the bolus wizard. If this setting is 75 % and you had to bolus 10U, the bolus wizard will propose a meal bolus of only 7.5 units.
When using SMB, many people do not meal-bolus 100% of needed insulin, but only a part of it (e.g. 75 %) and let the SMB with UAM (Unattended Meal Detection) do the rest. Using a value lower than 100% here can be useful:
for people with slow digestion: sending all the bolus upfront can cause hypo because the insulin action is faster than the digestion.
to leave more room to AAPS to deal by itself with BG rise. In both cases, AAPS will compensate for the missing part of the bolus with SMBs, if/when deemed adequate.
Enabled bolus advisor
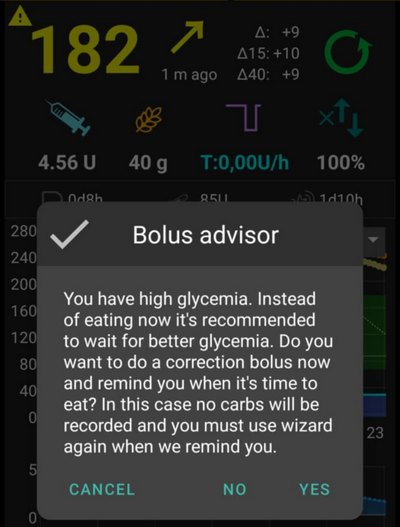
When enabled, when you use the bolus wizard as you are in hyperglycemia, you will get a warning, prompting you if you wish to pe-bolus and eat later, when your BG gets back in range.
Enabled bolus reminder
Erweiterte Einstellungen (Übersicht)

Superbolus
Option zur Aktivierung des Superbolus im Bolus-Rechner.
Superbolus ist ein Konzept, um in den nächsten zwei Stunden etwas Insulin aus der Basalrate „vorzuziehen“, um Spitzen zu verhindern. It is different from super micro bolus!
Use with caution and do not enable it until you learn what it really does. Basically, the basal for the next two hours is added to the bolus and a two hour zero-temp activated. AAPS looping functions will be disabled - so use with care! If you use SMB AAPS looping functions will be disabled according to your settings in „Max minutes of basal to limit SMB to“, if you do not use SMB looping functions will be disabled for two hours. Details on super bolus can be found here.
Sicherheitseinstellungen der Behandlungen
Patiententyp
Sicherheitsgrenzwerte werden auf der Grundlage des Alters festgelegt, das Du in dieser Einstellung auswählst.
Wenn du an diese festen Grenzen (z.B. Maximal-Bolus) kommst, ist es an der Zeit, einen Schritt weiter zu gehen.
It’s a bad idea to select higher than real age because it can lead to overdosing by entering the wrong value in the insulin dialog (by skipping the decimal dot, for example).
If you want to know the actual numbers for these hard-coded safety limits, scroll to the algorithm feature you are using on this page.
Max allowed bolus
Defines the maximum amount of bolus insulin, in insulin units, that AAPS is allowed to deliver at once.
Diese Einstellung ist eine Sicherheitsgrenze, um die Abgabe eines massiven Bolus aufgrund einer versehentlichen Eingabe oder eines Benutzerfehlers zu verhinden.
Es wird empfohlen, das auf eine vernünftige Menge zu setzen, die ungefähr der maximalen Abgabemenge von Bolus Insulin entspricht, das Du für eine Mahlzeitenkorrektur brauchst.
Diese Einschränkung gilt auch für die Ergebnisse des Bolus-Rechners.
Max allowed carbs
Defines the maximum amount of carbs, in grams, that AAPS bolus calculator is allowed to dose for.
Diese Einstellung ist eine Sicherheitsgrenze, um die Abgabe eines massiven Bolus aufgrund einer versehentlichen Eingabe oder eines Benutzerfehlers zu verhinden.
Es wird empfohlen, das auf eine vernünftige Menge zu setzen, die ungefähr der maximalen Menge an Kohlenhydraten entspricht, die du vermutlich jemals für eine Mahlzeit brauchen wirst.
Loop
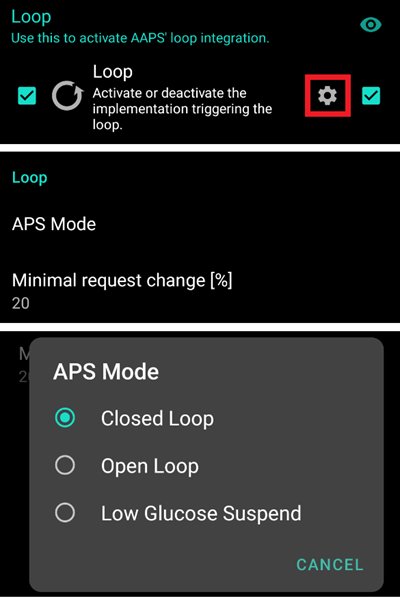
APS-Modus
Switch between Open Loop, Closed Loop and Low Glucose Suspend (LGS).
Open Loop
AAPS continuously evaluates all available data (IOB, COB, BG…) and makes treatment suggestions (temporary basal rates) on how to adjust your therapy if necessary.
The suggestions will not be executed automatically (as in closed loop). The suggestions have to be enacted by the user manually into the pump (if using virtual pump) or by using a button if AAPS is connected to a real pump.
This option is for getting to know how AAPS works or if you are using an unsupported pump. You will be in Open Loop, no matter what choice you make here, until the end of Objective 5.
Closed Loop
AAPS continuously evaluates all available data (IOB, COB, BG…) and automatically adjusts the treatment if necessary (i.e. without further intervention by you) to reach the set target range or value (bolus delivery, temporary basal rate, insulin switch-off to avoid hypo etc.).
The Closed Loop works within numerous safety limits, which can be set individually.
Closed Loop is only possible if you are in Objective 6 or higher and use a supported pump.
Low Glucose Suspend (LGS)
In this mode, maxIOB is set to zero.
This means that if blood glucose is dropping, AAPS can reduce the basal for you. But if blood glucose is rising, no automatic correction will be made. Your basal rates will remain the same as defined in your current Profile. Only if basal IOB is negative (from a previous Low Glucose Suspend) additional insulin will be given to lower BG.
Minimal request change
When using Open loop, you will receive notifications every time AAPS recommends adjusting the basal rate. To reduce the number of notifications you can either use a wider bg target range or increase the percentage of the minimal request rate. Diese definiert, wie hoch die relative Änderung sein muss, damit eine Benachrichtigung erscheint.
Advanced Meal Assist (AMA) oder Super Micro Bolus (SMB)
Depending on your settings in config builder you can choose between three algorithms:
Advanced meal assist (OpenAPS AMA) - state of the algorithm in 2017
Super Micro Bolus (OpenAPS SMB) - most recent algorithm recommended for beginners
Dynamic ISF - released in 2024, available starting at Objective 11
OpenAPS AMA
All the settings for OpenAPS AMA are described in the dedicated section in Key AAPS Features > Advanced Meal Assist (AMA).
OpenAPS SMB
All the settings for OpenAPS SMB are described in the dedicated section in Key AAPS Features > Super Micro Bolus (SMB).
Dynamic ISF
All the settings for Dynamic ISF are described in the dedicated section in Dynamic ISF.
Resorptions-Einstellungen
min_5m_carbimpact
The algorithm uses BGI (blood glucose impact) to determine when carbs are absorbed.
At times when carb absorption can’t be dynamically worked out based on your blood’s reactions, AAPS inserts a default decay to your carbs. Basically, it is a failsafe. This value is only used during gaps in CGM readings or when physical activity “uses up” all the blood glucose rise that would otherwise cause AAPS to decay COB.
Einfach gesagt: Der Algorithmus „weiß“, wie sich Deine Glukosewerte unter Berücksichtigung der aktuellen Insulindosis etc. entwickeln sollten. Wenn eine positive Abweichung vom erwarteten Verhalten registriert wird, werden einige Kohlenhydrate absorbiert/aufgenommen. Große Abweichung = viele Kohlenhydrate etc.
Das min_5m_carbimpact definiert die Standard-Kohlenhydrat-Resorptionswirkung pro 5 Minuten. Für weitere Details siehe OpenAPS Docs.
Der Standardwert für AMA ist 5, für SMB ist es 8.
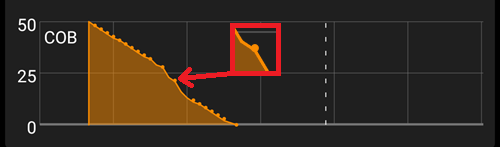
Im COB-Diagramm auf dem Startbildschirm werden Zeiten, in denen min_5m_impact verwendet wird, mit einem orangenen Punkt auf der Diagrammlinie markiert.
Meal max absorption time
Wenn du oft Mahlzeiten mit viel Fett oder Eiweiß zu dir nimmst, wirst du die Resorptionszeit für das Essen erhöhen müssen.
Erweiterte Einstellungen - Autosens-Faktoren
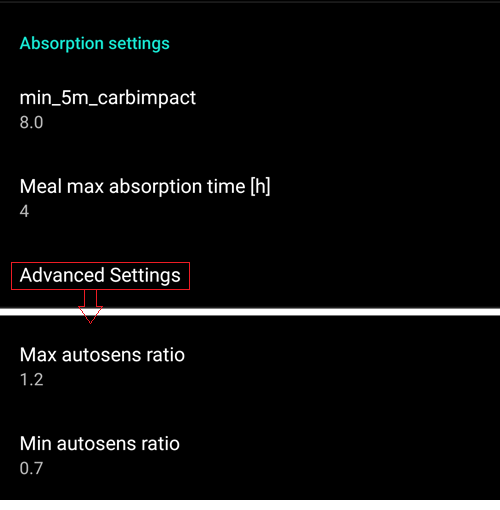
Define min. and max. autosens ratio.
Die Standardwerte (max. 1.2 und min. 0.7) sollten nicht verändert werden.
Pump
BT Watchdog
Activate BT watchdog if necessary (e.g. for Dana pumps). It switches off bluetooth for one second if no connection to the pump is possible. This may help on some phones where the bluetooth stack freezes.
Pumpen-Einstellungen
The options here will vary depending on which pump driver you have selected in Config Builder. Pair and set your pump up according to the pump related instructions.
Tidepool
More information on the dedicated Tidepool page.
Nightscout-Client
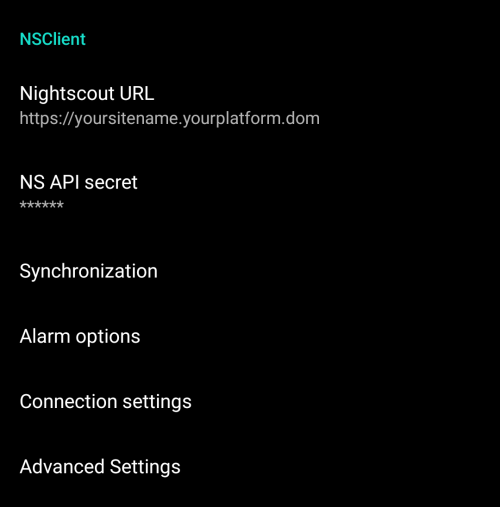
Ursprüngliches Kommunikations-Protokoll, dass mit älteren Nightscout-Versionen genutzt werden kann.
Lege Deine Nightscout URL (z.B. https://deineseite.deinprovider.com) fest.
Stelle sicher, dass die URL NICHT mit /api/v1/ endet.
Das API Secret (ein 12-Zeichen langes Passwort, das in den Nightscout Variablen eingetragen wurde).
This enables data to be read and written between both the Nightscout website and AAPS.
Überprüfe die Eingaben auf Tippfehler, wenn du bei Ziel 1 hängen bleibst.
NSClientV3
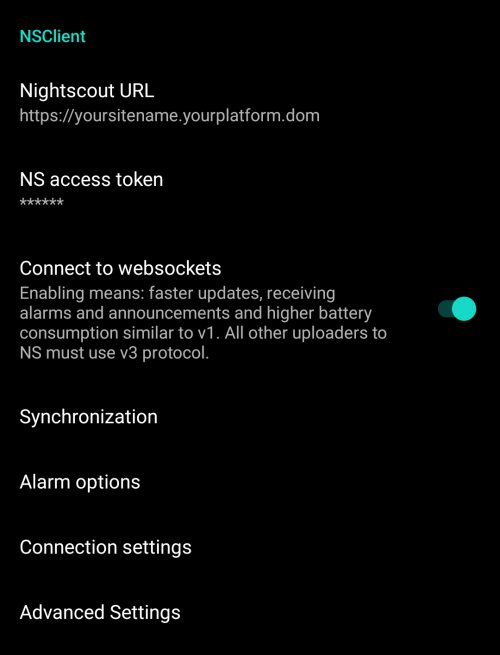
New protocol introduced with AAPS 3.2. Safer and more efficient.
V3 data uploaders
Bei der Verwendung von NSClientV3 müssen alle Uploader die API V3 verwenden. Since most are not compatible yet, this means you must let AAPS upload all data (BG, treatments, …) to Nightscout and disable all other uploaders if they’re not V3 compliant.
Lege Deine Nightscout URL (z.B. https://deineseite.deinprovider.com) fest.
Stelle sicher, dass die URL NICHT mit /api/v1/ endet.
In Nightscout, create an Admin token (requires Nightscout 15 to use the V3 API) and enter it in the NS access token (not your API Secret!).
This enables data to be read and written between both the Nightscout website and AAPS.
Überprüfe die Eingaben auf Tippfehler, wenn du bei Ziel 1 hängen bleibst.
Lasse „Mit Websockets verbinden“ aktiviert (empfohlen).
Synchronisierung
Synchronization choices will depend on the way you will want to use AAPS.
You can select which data you want to upload and download to or from Nightscout.
Alarm-Optionen
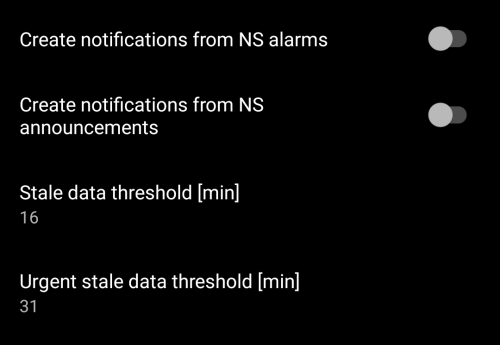
In den Alarm-Optionen legst Du fest, welche Standard-Nightscout-Alarme in AAPS genutzt werden sollen. AAPS will alarm when a Nightscout alarm triggers.
Damit die Alarme ausgelöst werden können, musst Du in den Nightscout-Variablen Werte für Urgent High, High, Low und Urgent Low Alarme setzen.
Diese funktionieren nur, wenn Du eine Online-Verbindung zu Nightscout hast und sind vor allem für Eltern und Betreuende gedacht.
If you have the CGM source on your phone (i.e. xDrip+ or BYODA) then use those alarms instead of Nightscout Alarms.
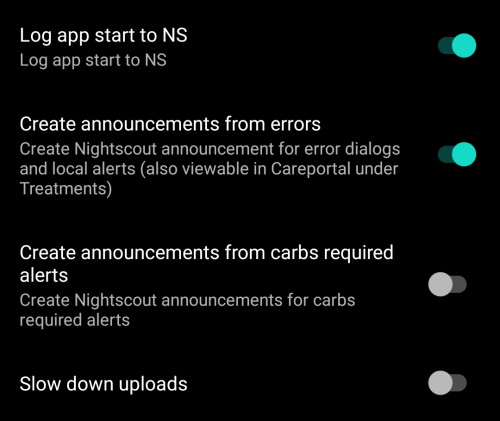
Create notifications from Nightscout announcements will echo Nightscout announcements in the AAPS notifications bar.
Du kannst die Schwellenwerte für veraltete Daten und stark veraltete Alarme ändern, wenn nach einer bestimmten Zeit keine Daten von Nightscout empfangen werden.
Verbindungseinstellungen
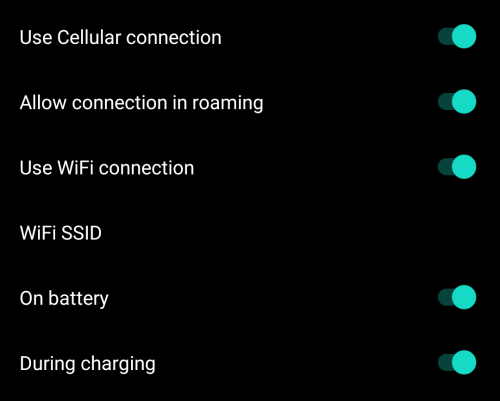
Verbindungseinstellungen legen fest auf welchem Weg (z.B. WLAN oder Mobilfunknetz) eine Nightscout-Verbindung aufgebaut werden darf.
Beschränken den Nightscout-Upload auf WLAN-Verbindungen oder sogar auf bestimmte WLAN-SSIDs.
If you want to use only a specific Wi-Fi network you can enter its Wi-Fi SSID.
Mehrere SSIDs können durch Semikolon (Strichpunkt) getrennt werden.
Gib zum Löschen aller SSIDs ein Leerzeichen in das Feld ein.
Erweiterte Einstellungen (Nightscout-Client)
Die Optionen in den erweiterten Einstellungen sind selbsterklärend.
SMS Kommunikator
More information on the dedicated SMS Commands page.
Automatisierung
Wähle aus, welcher Standortdienst verwendet werden soll:
Use passive location: AAPS only takes locations if other apps are requesting it
Netzwerkstandort: Standort Ihres Wi-Fi
GPS-Standort (Achtung! Kann zu übermäßigen Akkuverbrauch führen!)
Lokale Alarme

Einstellungen sollten selbsterklärend sein.
Datenübermittlung
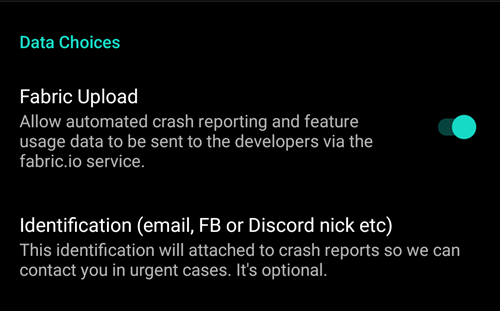
You can help develop AAPS further by sending crash reports to the developers.
Wartungseinstellungen

Standardempfänger der Protokolldateien ist logs@aaps.app.
Open Humans
Du kannst die Community unterstützen, indem Du Deine Daten für Forschungsprojekte zur Verfügung stellst. Details are described on the Open Humans page.
In Preferences, you can define when data shall be uploaded
only if connected to Wi-Fi
nur während des Ladens