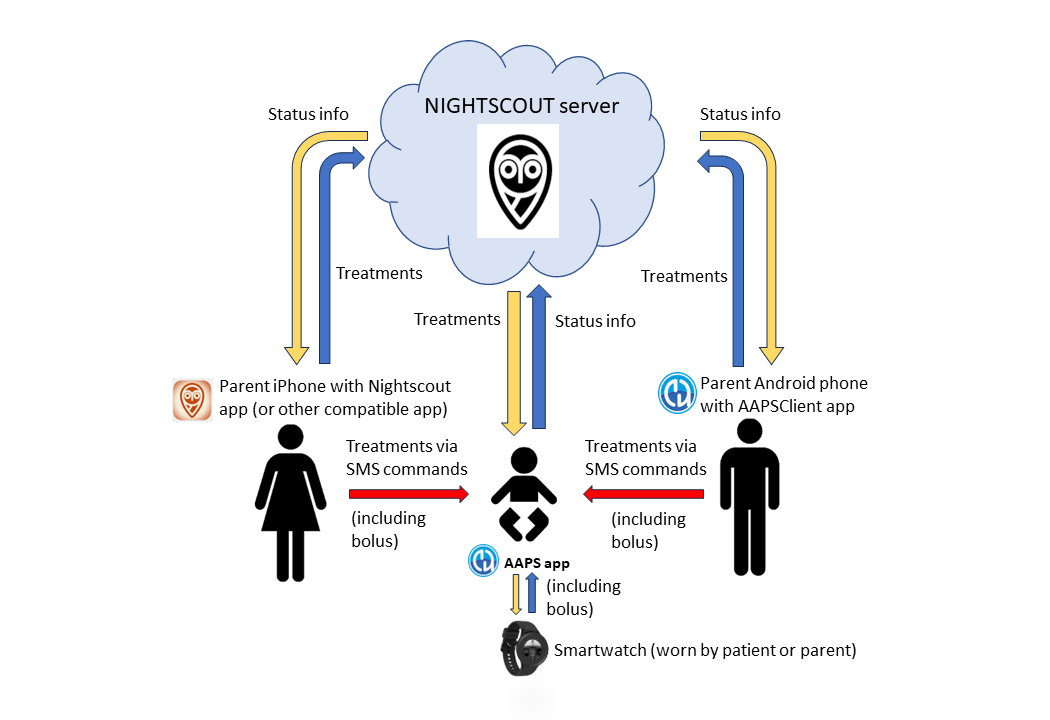
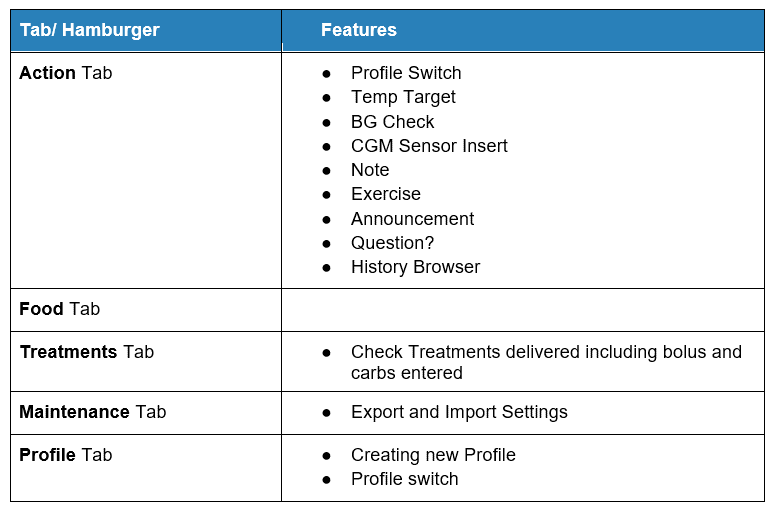
Дистанционное управление AAPS
Существует 4 наиболее эффективных инструмента для удаленного управления AAPS:
SMS команды (телефон фолловера может быть как Android, так и iOS), 2) Клиент AAPS (телефон фолловера только Android), 3) Nightscout (Android, iOS или любой компьютер/устройство с доступом к браузеру)
Умные часы (Android)
Первые три варианта вполне подходят родителям или опекунам, однако умные часы весьма удобны не только им, но и взрослым с диабетом.
Некоторые соображения по поводу настройки удаленного управления AAPS для детей
Подумайте о том, каким образом вы обеспечите нахождение телефона ребенка в зоне доступа его помпы и НМГ. Это еще то испытание с маленькими детьми, которые пока не несут ответственность за свой телефон. Убедитесь, что выбрали для AAPS телефон с хорошим качеством и дальностью связи Bluetooth и подобрали удобный для ребенка способ ношения помпы и телефона (_например, _ можно использовать поясные сумочки).
Найдите время, чтобы спокойно настроить и отладить все удаленные команды, находясь рядом с ребенком, прежде чем начать удаленно подавать команды и следить за сахарами. Многие родители для этого выбирают школьные каникулы или выходные.
Убедитесь, что учителя или другие ответственные взрослые, в курсе терапии вашего ребенка и выясните, как удаленное управление может повлиять на имеющуюся терапию.
Многие родители находят полезным иметь отдельное устройство для мониторинга состояния ребенка другими, например недорогой телефон-«фолловер» для учителя.
Примеры организации устройств в школе для детей разных возрастов можно найти в разделен “файлы” на странице AAPS в Facebook.
Какие ваши действия на случай, когда удаленное управление не работает (например, возникли проблемы с интернетом или потерялся сигнал bluetooth)? Всегда учитывайте, что может произойти с AAPS, если вы внезапно потеряете возможность отправить новую команду. AAPS перезапишет значения базы, ФЧИ и УК, указанные в помпе, значениями из текущего профиля. Если вы устанавливаете более агрессивный профиль - всегда делайте его временным (т.е. указывайте длительность действия профиля) на случай, если удаленное управление станет недоступным. Помпа вернется к стандартному профилю по истечении указанного времени.
1) SMS Commands
Существует возможность удаленно управлять AAPS с помощью текстового (SMS) сообщения на основе SMS-команд. Команды SMS можно отправлять на AAPS с любого типа телефона (iPhone|Android).
SMS-команды очень полезны:
Для обычного дистанционного управления
Для дистанционного введения инсулина
На территориях с плохо работающим интернетом, где могут проходить текстовые сообщения, а прием данных/интернет ограничен. Полезно при путешествиях в отдаленные районы ( в походах, на лыжных базах и т.п.).
Если другие методы дистанционного управления (Nightscout/AAPSClient) временно не работают
Безопасность SMS-команд
При включении SMS коммуникатора в AAPS, учитывайте, что телефон, который настроен для подачи удаленных команд, может быть украден и/или использован кем-то еще. Всегда блокируйте телефон PIN-кодом. Рекомендуются надежные пароли и/или биометрические замки, отличные от мастер-пароля (пароль, который требуется для изменения настроек AAPS). Для корректной работы SMS команд в настройках должен быть активирован второй номер телефона, даже если у вас только один основной опекун/фоллоуэр. Второй номер может понадобиться чтобы временно отключить SMS-коммуникатор (командой «SMS stop»), если главный телефон попал в чужие руки. Версии AAPS 2.7 и новее также используют приложение Authenticator).
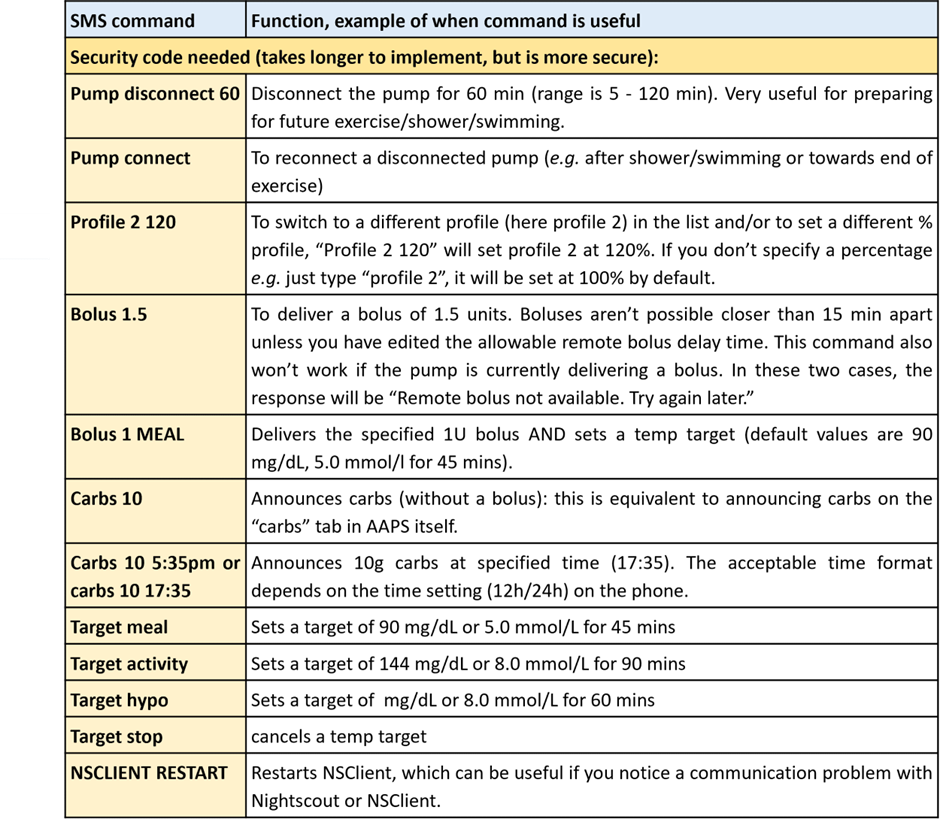
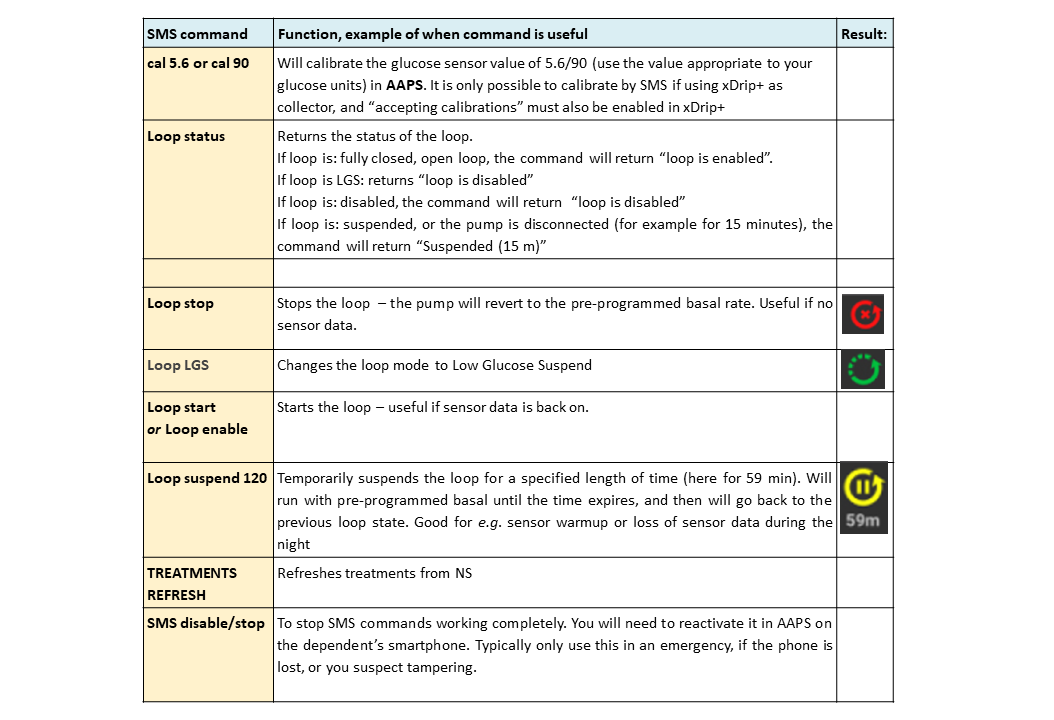
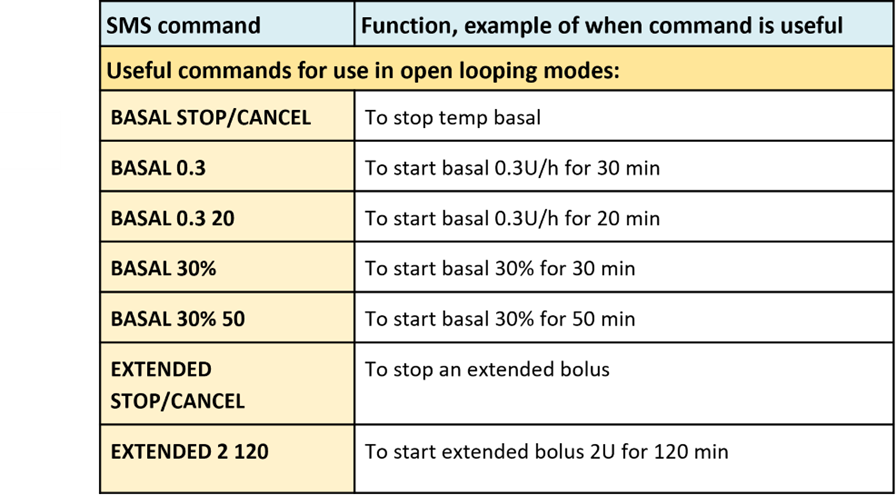
Различные типы SMS команд
В нижеприведенной таблице команд SMS представлены все возможные SMS-команды. Для облегчения понимания приводятся Примерные значения. Команды имеют такой же диапазон возможных значений (цели, процентный профиль и т. д.), который разрешен в самом приложении AAPS. Команды в таблицах перечислены в том порядке, в котором обычно используются; первые две таблицы содержат большую часть команд SMS для AAPS.
Таблицы SMS команд
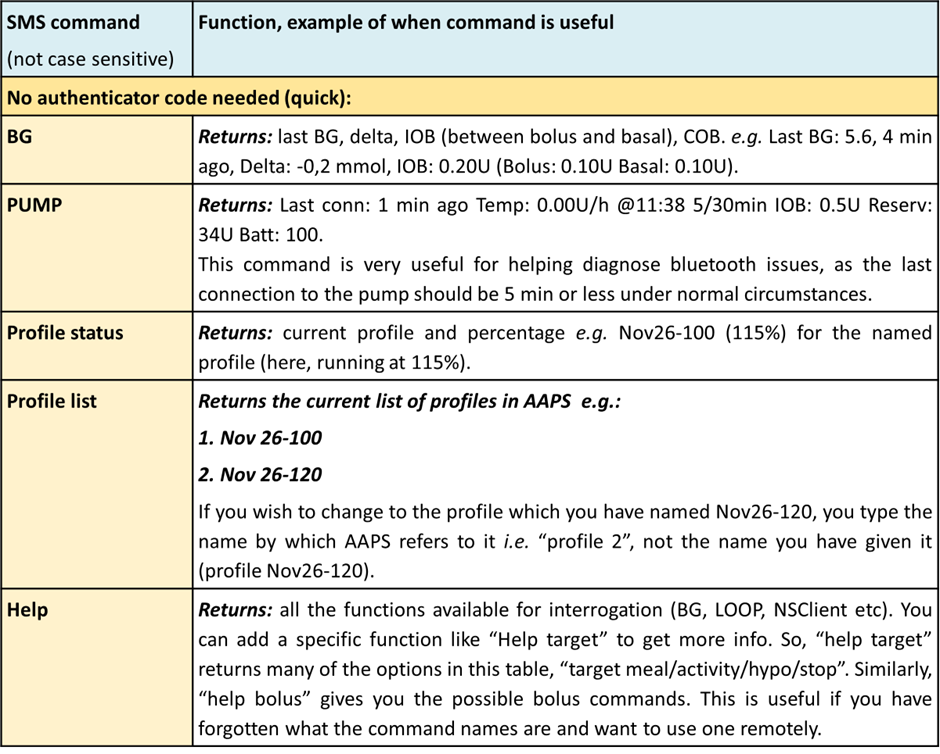
Нужна ли аутентификация?
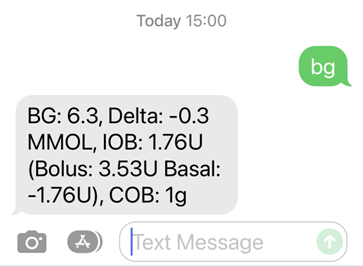
Из приведенной таблицы видно, что некоторые команды SMS дают немедленный ответ, а другие требуют аутентификации по коду безопасности из дополнительного приложения и PIN-коду (см. подробнее ниже). Простой запрос, например «bg» (запрашивает обновление ГК) быстро вводится, не требует аутентификации и возвращает информацию о статусе AAPS - см. ниже:
Команды, которым требуется больше безопасности, требуют ввести код, например:

Как настроить SMS-команды
Общий процесс выглядит так:
1) Скачиваем аутентификатор (на телефон родителя/опекуна)
2) Проверяем настройки телефона (телефон с AAPS)
3) Синхронизируем дату и время (телефон родителя и телефон AAPS)
4) Настройки AAPS (телефон APPS)
5) Проверяем работу команд SMS (телефон родителя и AAPS)
Приступим!
Скачиваем аутентификатор: На смартфоне родителя скачиваем (из App store или Google play) и установливаем один из аутентификаторов на выбор из списка ниже:
Аутентификатор Google - Android / iOS
Эти приложения содержат ограниченный по времени одноразовый 6-значный пароль. Можно использовать любое приложение Authenticator, которое поддерживает маркеры TOTP RFC 6238. Microsoft Authenticator не работает.
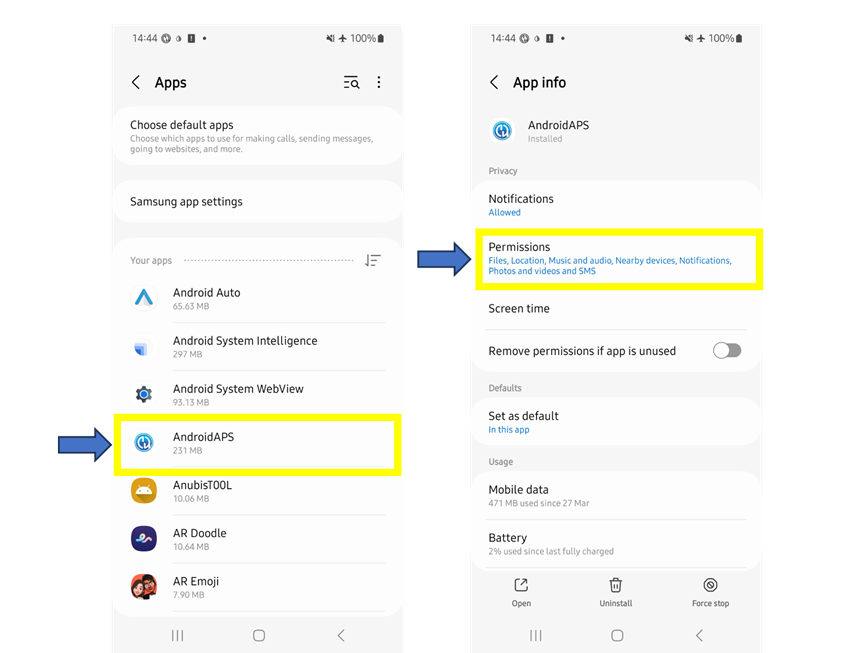
Проверьте настройки телефона: В настройках телефона AAPS перейдите к приложениям > AAPS > Разрешения > SMS > Разрешить SMS
Синхронизация дат и времени: В телефоне с AAPS и телефоне опекуна, проверьте синхронизацию даты и времени. Как именно вы это делаете, зависит от конкретных моделей телефонов, возможно придется попробовать различные настройки.
Пример (для смартфона Samsung S23): Настройки – общее управление дата и время - автоматическая дата и время
Некоторые опции могут быть недоступны (затенены) из-за настроек семейной учетной записи ребенка. Эта настройка даты и времени называется «автоматически» на iPhone опекуна/родителя. Если вы не уверены, синхронизированы ли телефоны, не волнуйтесь, это можно настроить в дальнейшем.
Настройки AAPS:
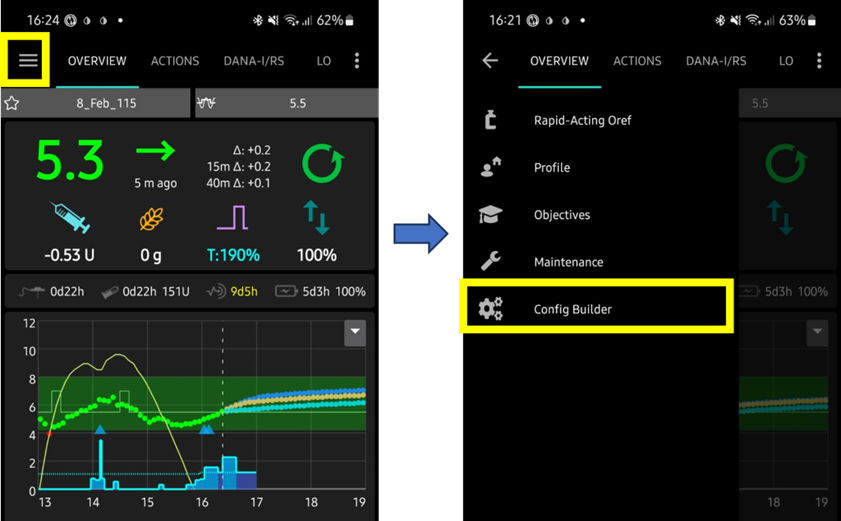
i) После проверки настроек телефона, в самом приложении AAPS, через левое верхнее меню перейдите в Конфигуратор:
ii) Включите «SMS-коммуникатор», установив флажок, затем нажмите «шестеренку» и получите доступ к экрану настройки SMS-коммуникатора:
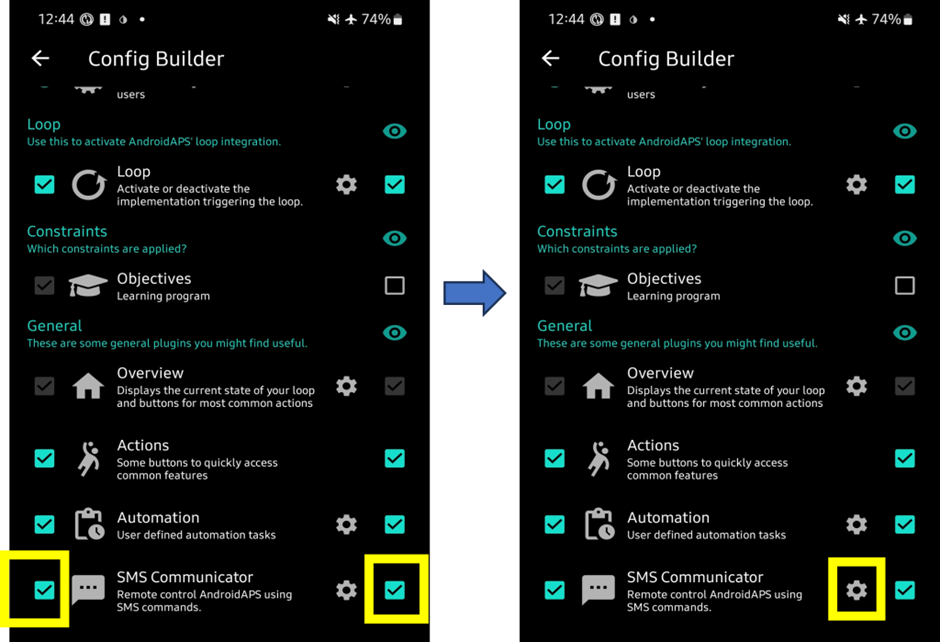
Примечание. В качестве альтернативного пути к Конфигуратору можно также использовать новую вкладку «SMS-коммуникатор» в верхней части окна AAPS, затем щелкните правой кнопкой мыши по контекстному меню справа для этой страницы, чтобы перейти к настройкам SMS коммуникатора.
iii) На экране настроек включите «разрешить удаленные команды с помощью SMS»:
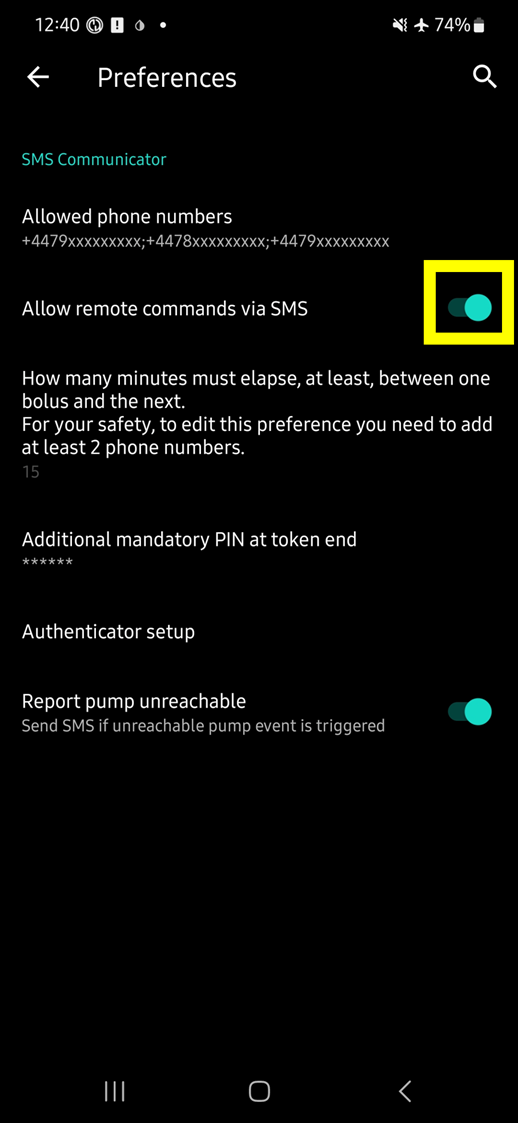
iv) Введите номер телефона опекуна/родителя. Включите код страны и исключите первый «0» номера телефона, как показано на примерах:
Номер телефона великобритании: +447976304596
Номер телефона сша: +11234567890
Номер телефона франции: +33612344567
и т. д.
Обратите внимание, что «+» перед номером может быть обязательным или не потребуется в зависимости от вашего местоположения. Для определения этого отправьте тестовое сообщение, которое будет отображать полученный формат на вкладке SMS Communicator.
Если у вас более одного номера телефона, разделите их точкой с запятой БЕЗ пробела между цифрами (это критично!). Выберите «OK»:

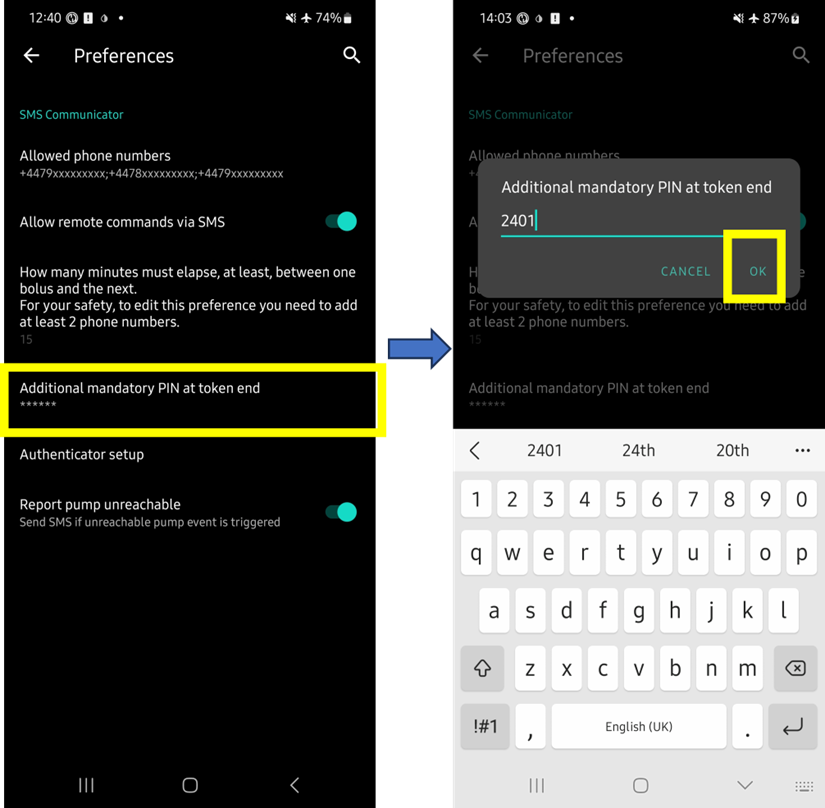
v) Выберите PIN-код, который вы (и другие опекуны) будут использовать в конце кода аутентификатора при отправке SMS-команды.
Требования к PIN-коду:
•от 3 до 6 цифр
•не одинаковые цифры (напр. 1111 или 1224)
•не последовательные цифры (напр. 1234)
vi) На экране настроек выберите «Настройка Аутентификации»
● Следуйте пошаговым инструкциям на экране.
● Откройте установленное приложение-аутентификатор на телефоне опекуна создайте новое соединение и
● Телефоном опекуна сканируйте QR-код от AAPS, при подсказке.
● Проверьте одноразовый код доступа от аутентификатора на телефоне опекуна, за которым следует ваш PIN:
Пример:
Маркер из приложения идентификации-457051
Ваш обязательный PIN-код 2401
Код для проверки: 4570512401
Если запись правильна, красный текст «WRONG PIN» автоматически изменится на «OK». Процесс завершен, нет кнопки «OK», которую нужно нажать после ввода кода:

Теперь все готово для работы с помощью SMS-команд.
Первые шаги работы с помощью SMS команд
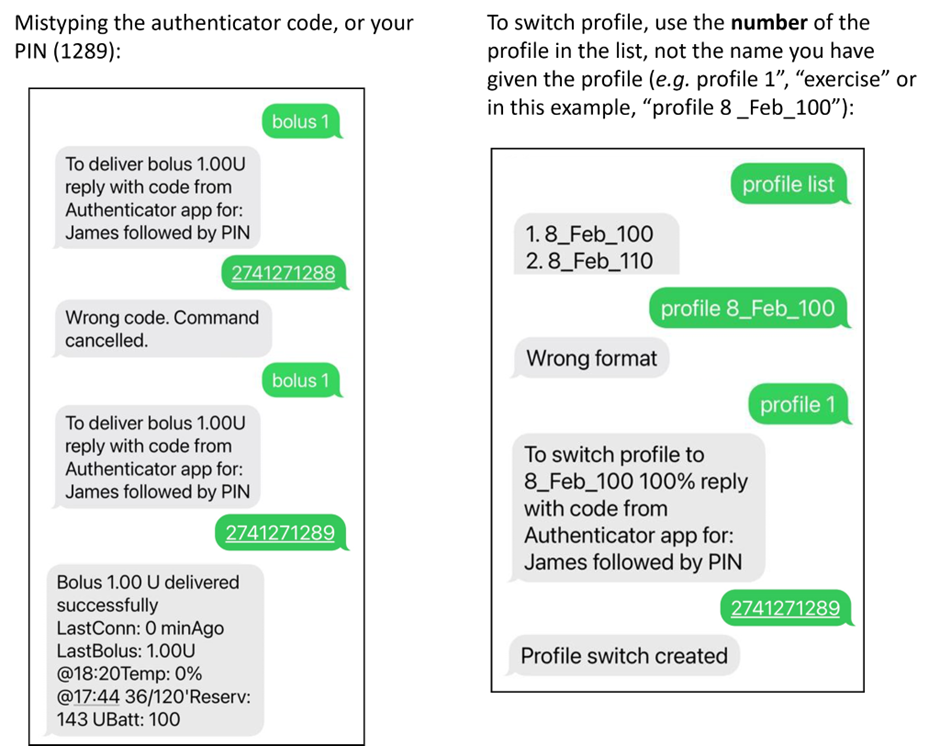
Чтобы проверить правильность настройки, отправьте «bg» в качестве SMS-сообщения с телефона опекуна на телефон AAPS. Вы должны получить ответ, похожий на этот:

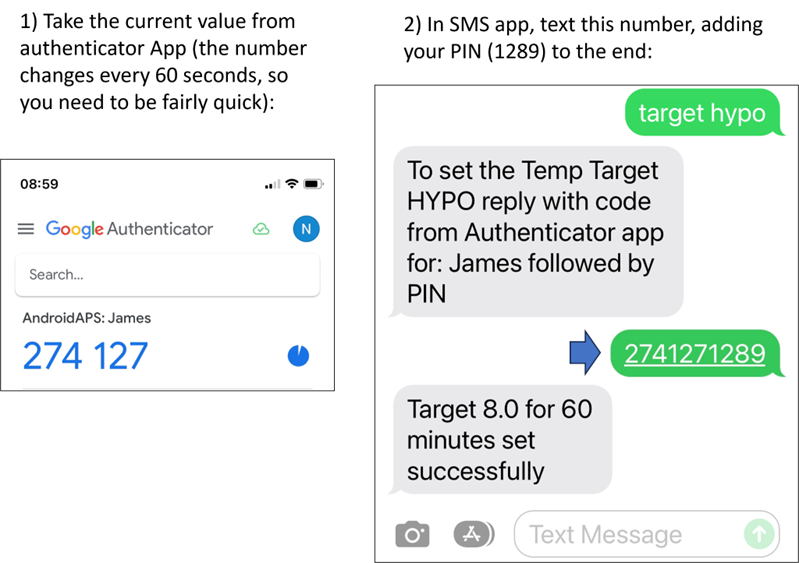
Теперь попробуйте команду SMS, которая требует аутентификатора. Для этого с телефона опекуна отправьте смс с нужной командой на телефон с AAPS (напр. «target hypo» (цель гипо)). Телефон опекуна получит смс с предложением ввести пароль аутентификации с шестизначными цифрами из приложения-аутентификатора, с последующим секретным PIN-кодом известным только родителям/опекунам (строка из десяти цифр в общей сложности, при условии, что ваш PIN-код состоит из 4х цифр).
Ниже показан пример с командой SMS «target hypo», чтобы установить временную цель гипо:
● В этом примере ваш PIN-код 1289
Маркер из приложения идентификации-274127
● При появлении запроса отправьте текст 2741271289
Команды отправляются на английском языке. Ответ на локальном языке. Когда будете отправлть команду в первый раз, держите оба телефона при себе, чтобы убедиться, что все работает:
Телефон опекуна получит SMS от AAPS в подтверждение успешного выполнения команды от SMS. Существует несколько возможных причин, по которым команда не проходит:
● Настройка SMS-команд не завершена/не корректна
● Отправлена команда в некорректном формате (например, “disconnect pump 45” вместо “pump disconnect 45”)
● Использован неправильный или просроченный код аутентификации (обычно лучше подождать несколько секунд чтобы получить свежий код, если истекает срок действующего)
● Код подтверждения+PIN-код в порядке, но возникла задержка в отправке/прибытии SMS, что заставило AAPS вычислить истекший код аутентификации
● Телефон AAPS вне диапазона/контакта с помпой
● Система уже занята вводом болюса
Если ваша команда успешна, вы получите ответ-подтверждение. Если возникла проблема, вы получите сообщение об ошибке.
Распространенные ошибки приведены в примерах ниже:
Дополнительные примечания о безопасности в SMS-командах
Минимальная задержка между командами на болюс по умолчанию составляет 15 минут. Из соображений безопасности следует добавить хотя бы два авторизованных номера телефона для уменьшения этого значения. Если вы дистанционно пытаетесь повторно ввестиь болюс в течение 15 минут после предыдущего, вы получите ответ “Дистанционный болюс невозможен. Повторите позже”
Если вы хотите прекратить возможность отправлять SMS команды с телефона опекуна, используйте экстренную кнопку “RESET AUTHENTICATORS” в AAPS (см. настройки выше, ссылка) или отправьте SMS-команду “SMS stop”. Сбросив аутентификаторы, вы делаете ВСЕ телефоны опекунов недействительными. Вам придется их снова настроить.
Передача SMS-команд о болюсах на еду
Дистанционное введение болюсов может быть сделано только с помощью SMS команд, оно не может осуществляться через NightScout или AAPSClient. Однако углеводы могут быть внесены любым из трех методов. В одном SMS-сообщении невозможно отправить углеводы и инсулин. Эти команды должны отправляться отдельно следующим образом:
Отправьте команду на болюс (например»bolus2»,которая инициирует введение 2 единиц) при помощи SMS, что эквивалентно нажатию на иконку «шприца» в AAPS. 2) Отправьте SMS об углеводах (напр. “carbs 20” внесет 20 г углеводов). Это эквивалентно использованию иконки “углеводы” в AAPS.
To avoid hypos, it is a good idea to start conservatively, by bolusing less insulin than would be needed according to your carb ratio, because you are not taking into account the current glucose level or glucose trend.
Порядок отправки этих команд важен.. Если любым методом внести запись о значительном количестве углеводов при активированнной функции SMB, AAPS может моментально отреагировать, введя часть болюса. Поэтому если после этого отправить команду на болюс, может возникнуть задержка с выполнением и появится сообщение «вводится болюс», после которого придется проверять количество инсулина, введенного в виде микроболюса. Или, если вы не обнаружили SMB, а ваш собственный болюс также введен успешно, может оказаться, что на еду отправлено слишком много инсулина. Поэтому, если дистанционно отправлять команду на болюсы, следует всегда вводить болюс перед внесением записи об углеводах. Если предпочитаете, можно использовать сочетание Nightscout или AAPSClient с командами SMS. Запись об углеводах вносится в Nightscout без проверки подлинности (см. раздел инструкций ниже), и поэтому происходит быстрее чем SMS-команды.
Ответы на часто задаваемые вопросы по SMS-командам и устранение неполадок
В: Что не может быть выполнено при помощи команд SMS?
**Невозможно переключиться на временный профиль (т. е. нельзя например установить профиль «нагрузка» на 60 мин.), но можно просто переключить профиль на неопределенное время. Временные профили можно устанавливать через Nightscout или AAPSClient.
Нельзя отменить автоматизацию или задать определенные пользователем цели, но есть другие решения: представьте себе обычную цель профиля 5.5. В AAPS установлена автоматизация всегда устанавливать высокую цель 7.0 между 14.30 и 15.00 из-за урока физкультуры в школе, а условием срабатывания автоматизации является «отсутствие врем. целей». На этой неделе незадолго до занятий вам сообщили о замене урока физкультуры на ланч с пиццей, но ваш ребенок уже в школе с телефоном AAPS. Если высокая временная цель 7.0 запускается автоматизацией, а вы ее отменили (на телефоне AAPS или удаленно), то условия для автоматизации все равно соблюдены, и AAPS просто установит высокую цель еще раз, минутой позже.
Если у вас есть доступ к телефону AAPS, вы можете отключить/изменить автоматизацию, или, если вы не хотите этого делать, вы можете просто установить новую временную цель 5.6 на 60 минут на вкладке Действия или нажав на кнопку Цель. Это помешало бы автоматизации устанавить высокую цель 7.0.
Если же у вас нет доступа телефону с AAPS SMS команда может приблизительно исправить ситуацию: например, с помощью команды «target meal (ожидаемый прием пищи) установить цель 5.0 на 45 минут (другие цели по умолчанию 8.0 для нагрузки или гипо, см. таблицу). However, with SMS commands you cannot specify a specific value target value (of 5.6 for 60 minutes, for example), you would need to use AAPSClient or Nightscout to do this.
В: Что произойдет, если я передумаю отдавать команду, которую только что отправил?
AAPS выполняет только самую свежую команду. Поэтому, если вы отправили «bolus 1.5», а затем, не аутентифицируясь, новую команду «bolus 1», то она проигнорирует предыдущую команду 1.5. AAPS will always send the caregiver’s phone a response to confirm what the SMS command is before you are prompted to enter the authentication code, as well as a response following the action.
Q: Why didn’t I get a response to an SMS command?
It could be for one of these reasons:
Сообщение не попало на телефон (проблемы с сетью). 2) AAPS все еще обрабатывает запрос (напр. болюс, который отнимает некоторое время в зависимости от скорости обмена). 3) Телефон AAPS не имеет хорошего соединения Bluetooth с помпой при получении команды, и ему не удается выполнить команду (обычно это вызывает оповещение на телефоне AAPS).
Q: How can I stop a command once it has been authenticated?
You can’t. However, you can cancel a bolus sent by SMS on the AAPS phone itself, by simply cancelling it on the bolusing popup, if you are quick. Many SMS commands (apart from bolusing and carb announcements) can be easily reversed, or actions taken to mitigate unintended effects if a mistake is made.
По поводу ошибок в болюсах и записях об углеводах, также можно принять меры. Например, внесена запись о 20 г углеводов, но ваш ребенок съел только 10 г, и нет возможности удалить ее непосредственно в телефоне AAPS, вы можете установить высокую временную цель или понизить % профиля, чтобы снизить агрессивность AAPS.
В. Почему я получаю несколько SMS одного сообщения?
Если же вы неоднократно получаете одно и то же сообщение (напр. переключатель профиля) возможно случайно возникло закольцовывание с другими приложениями. Например, с xDrip+. Если это так, убедитесь, что xDrip+ (или любое другое приложение) не загружает данные терапии в NS.
В. Я только что настроил команды SMS, и теперь получаю слишком много текстовых сообщений. Можно уменьшить их частоту или остановить?
Использование SMS команд может генерировать много автоматических сообщений на телефон опекуна. Также могут приходить сообщения типа “basal profile in pump updated” (базальный профиль на помпе обновлен), если в AAPS настроена автоматизация. Полезно иметь тарифный план с неограниченным количеством SMS на телефоне AAPS (и на телефонах опекунов), а также отключить уведомления, оповещения или вибрации на SMS. Невозможно пользоваться SMS-командами и не получать эти сообщения. В связи с этим, альтернативный способ общения с ребенком (если он достаточно взрослый) может оказаться более предпочтительным. Альтернативные приложения для коммуникаций с опекунами AAPS включают Whatsapp, Lime, Telegram, и Facebook Messenger.
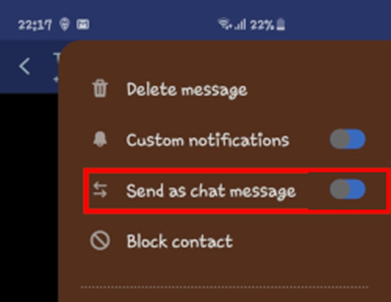
В. Почему команды SMS не работают на моем телефоне Samsung?
Были сообщения об остановке работы SMS команд после обновления на телефоне Galaxy S10. Решается путем отключения опции «отправлять SMS как сообщения чата».
В. Как исправить проблемы с приложением Android Messages?
Если у вас возникают проблемы с отправкой или получением SMS-команд в приложении Android Messages, отключите сквозное шифрование как на телефоне опекуна, так и на детском телефоне:
● Откройте конкретный SMS-диалог в приложении Messages
● Выберите параметры в правом верхнем углу
● выберите «Подробности”
● Активируйте опцию «Отправлять только SMS и MMS”
2) AAPSClient
Обратите внимание, что NSClient теперь заменен на AAPSClient для AAPS версии 3. и выше, подробности см. в примечаниях к версиям.
For versions of AAPS which are older than AAPS 3.2, if you have a caregiver/parent Android phone you can directly download and install the AAPSClient apk. AAPSClient похож внешне на сам AAPS, но позволяет опекунам отправлять команды в AAPS дистанционно:
There are 2 versions of the apk that can be downloaded from here, AAPSClient & AAPSClient2 which have a subtle but important difference as explained below.
AAPSClient can be installed on a single phone or multiple follower phones (i.e. parent 1’s follower phone and parent 2’s follower phone) in order for both caregivers to be granted access and remote control a patient’s AAPS phone.
Если опекуну требуется вторая копия AAPSClient для дистанционного контроля дополнительным пациентом с учетной записью Nightscout, они должны установить AAPSClient2 в дополнение к AAPSClient. AAPSClient 2 позволяет одному опекуну установить apk AAPSClient два раза на одном и том же телефоне, чтобы получить одновременный доступ и дистанционное управление для двух различных пациентов.
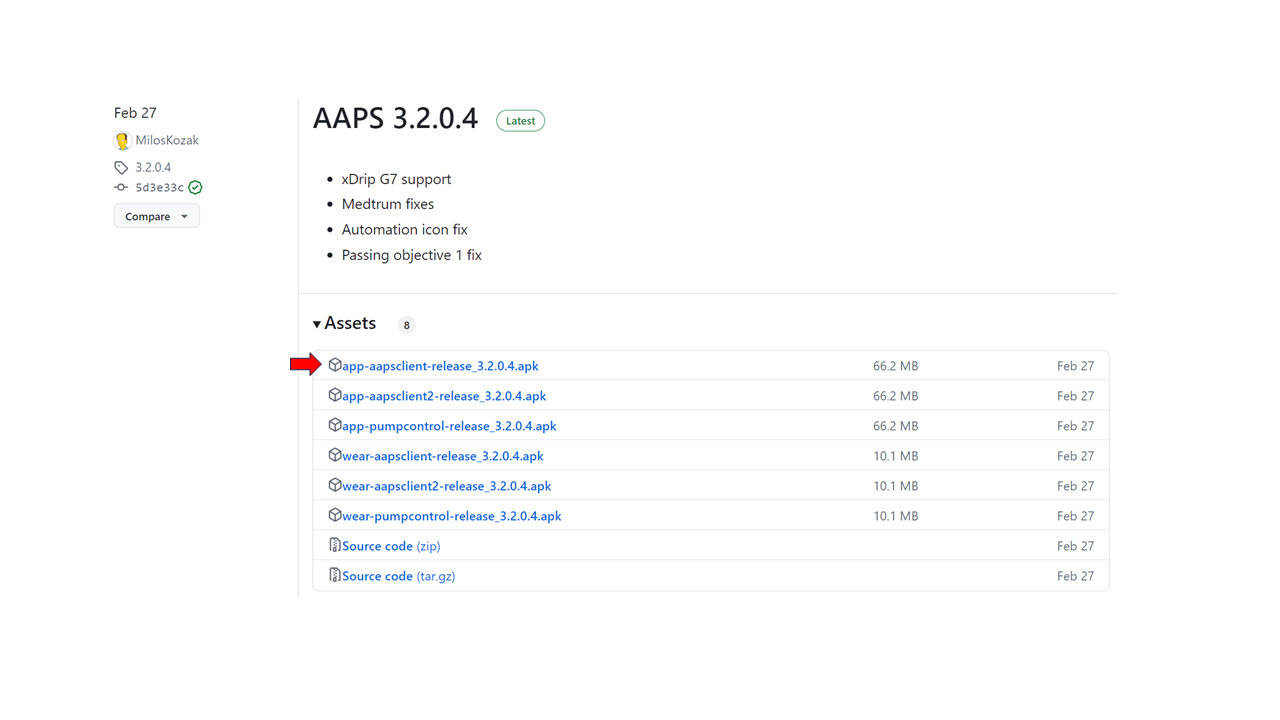
To download AAPSClient, navigate to here and click on the asset “app-AAPSClient-release_x.x.x.x” (it may be a newer version to that shown in the screenshot below):
Затем перейдите в загрузки на своем компьютере. В Windows, -downloads_ покажется лента справа:
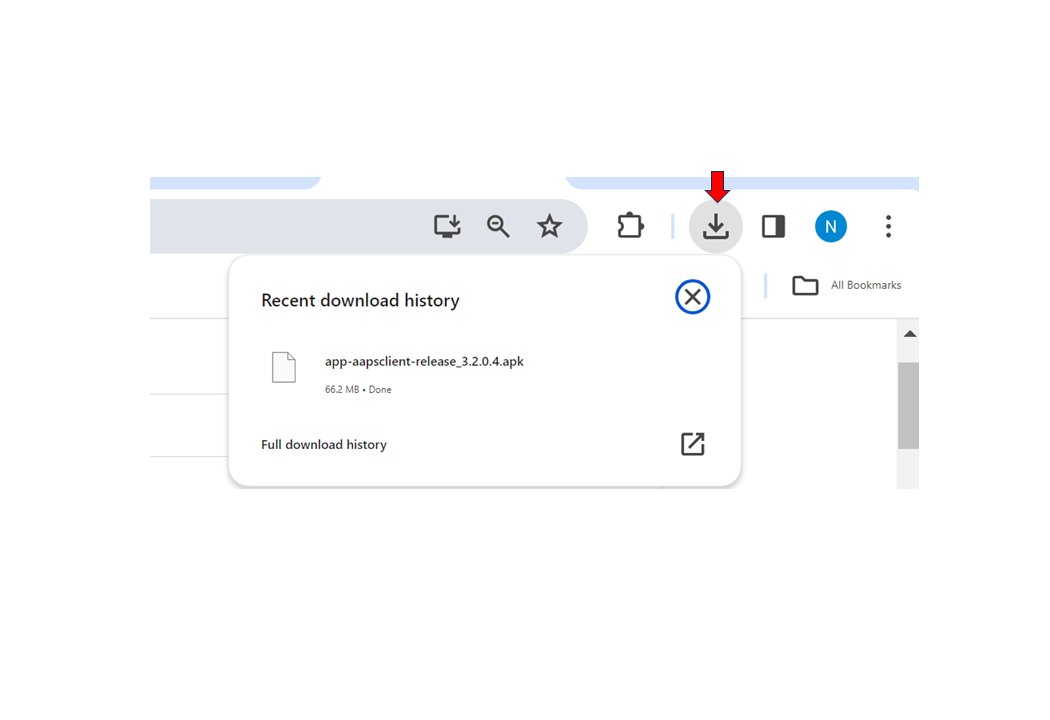
После загрузки нажмите показать в папке для поиска файла.
The AAPSClient apk can now be either:
Перенесено при помощи кабеля USB на телефон опекуна; или перетащено в папку Google диска, а затем добавлено на телефон опекуна после нажатия на app-AAPSClient-release-3. apk.
Возможности AAPSClient включают:
AAPSClient позволяет родителю/опекуну выполнять действия, которые выполняются непосредственно в приложении AAPS (за исключением болюсов) дистанционно по мобильной или интернет-сети. Основными преимуществами AAPSClient являются скорость и легкость, с которой опекуны/родители могут использовать его для дистанционного управления APPS. AAPSClient способен действовать быстрее SMS команд, особенно тех, которые требуют подтверждения подлинности. Команды, введенные в AAPSClient загружаются в Nightscout.
Дистанционное управление через приложение AAPSClient рекомендуется только в том случае, если хорошо работает синхронизация (т. е. вы не видите нежелательных изменений данных, таких как спонтанная модификация TT, TBR и т. д.), подробнее см. примечания к выпуску версии 2.8.1.1.
AAPSClient with smartwatch options
Смарт-часы - полезный инструмент в управлении AAPS у детей. Возможны несколько различных конфигураций. Если AAPSClient установлен на родительский телефон,, приложение AAPSClient WearOS может быть установлено на смарт-часах, сопряженных с родительским телефоном. На них будет отображаться текущая ГК, статус замкнутого цикла, возможность вписать углеводы, временные цели и изменения профиля. Возможности ввести болюс с приложения на WearOS не будет. Подробнее о смарт-часах читайте здесь.
3) Nightscout
Кроме того, что Nightscout является сервером в «Облаке», также есть специальное приложение Nightscout, которое можно загрузить непосредственно из App Store на iPhone. Для телефонов на Android нет специального приложения Nightscout и лучше использовать AAPSClient, или, если вам нужно только наблюдать и не отправлять терапию, то можете скачать и установить приложение Nightwatch из Playstore.
После установки приложения Nightscout на iPhone, откройте приложение и следуйте инструкциям настройки, введя адрес Nightscout (см. ниже, слева). Форма может быть разной, в зависимости от провайдера хостинга. (например http://адресвашегосайта.herokuapp.com). Затем введите Nightscout API secret (см. ниже, справа). Если API-пароль не запрошен, то нужно ввести его, нажав на замок в верхней части приложения:
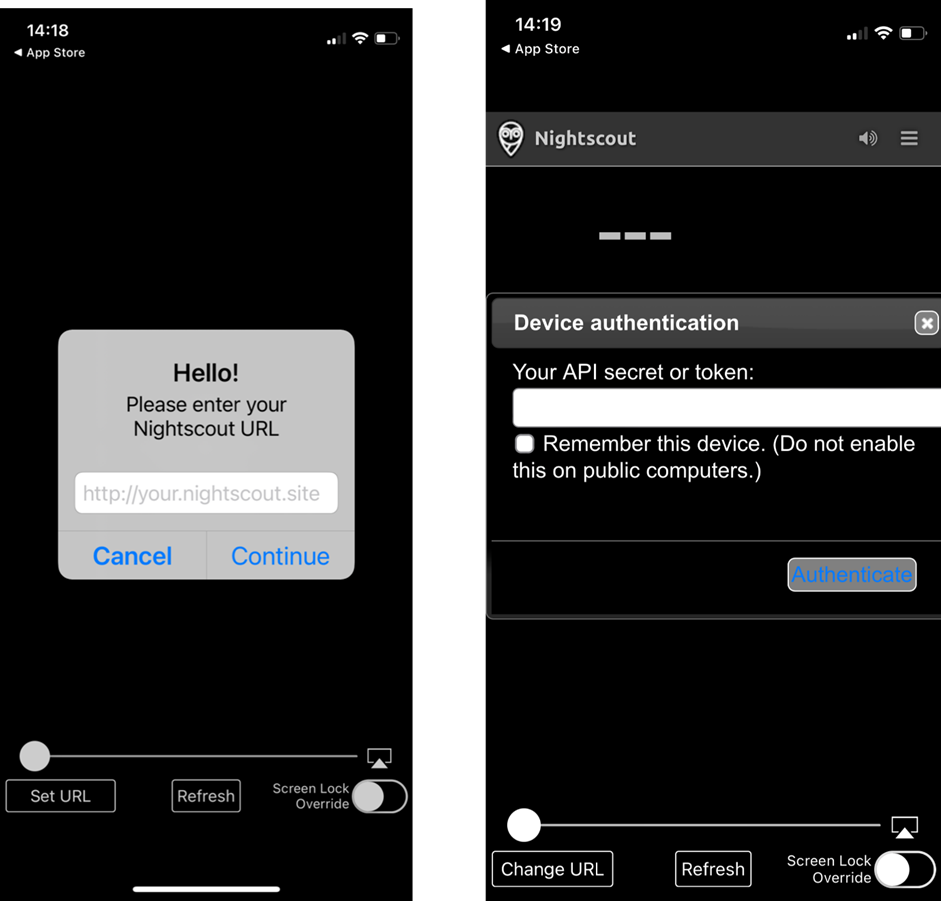
Дополнительная информация об установке доступна непосредственно на ресурсе Nightscout
Когда вы впервые входите в систему, перед вами будет очень простой дисплей (ниже, слева). Настройте параметры отображения, выбрав выпадающее меню в правом верхнем углу и прокручивая его вниз:
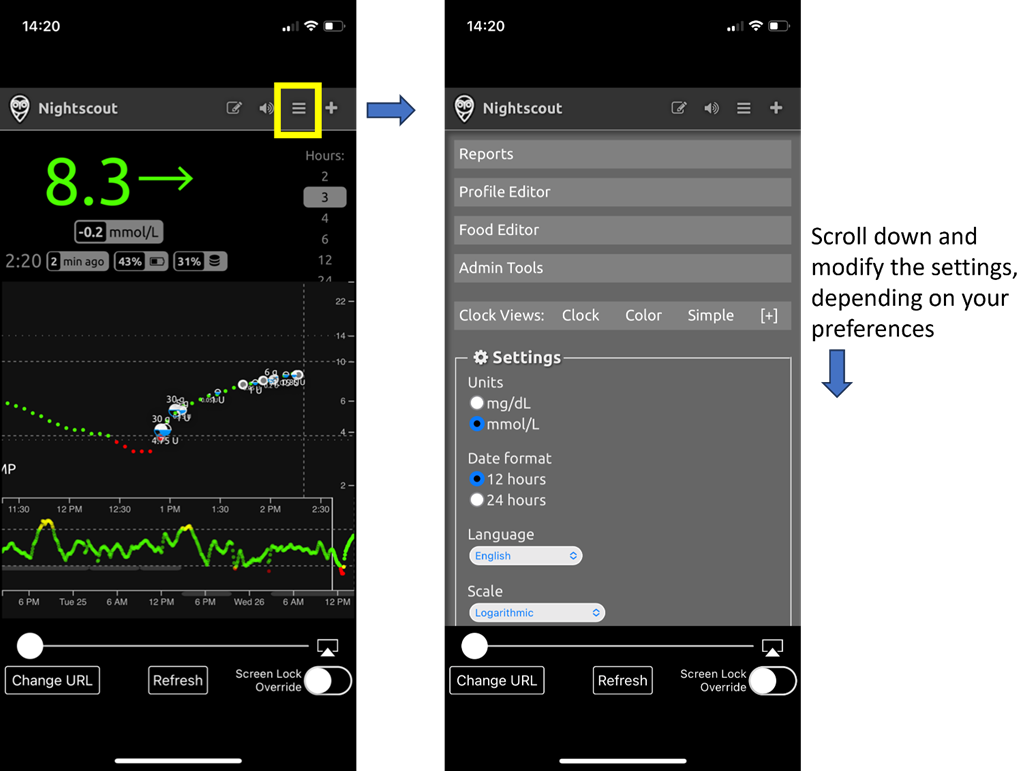
Прокрутите вниз до «Настройки». «Масштаб» можно заменить на «линейный» т. к. по умолчанию он логарифмический, и в строке «отображать базал» выберите «по умолчанию», чтобы появился график базала. Продолжайте прокручивать вниз до «показать расширения (плагины)». Убедитесь, что «портал терапии» отмечен галочкой, а также можете выбрать другие показатели (наиболее полезные: активный инсулин IOB, помпа, катетер, отсчет возраста инсулина, базальный профиль и OpenAPS).
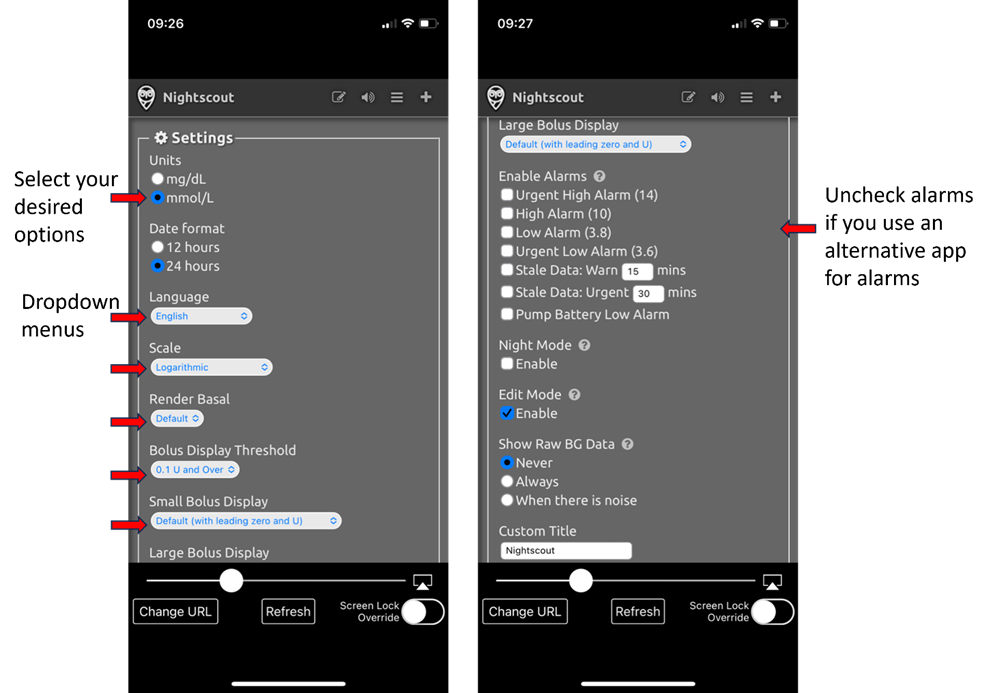
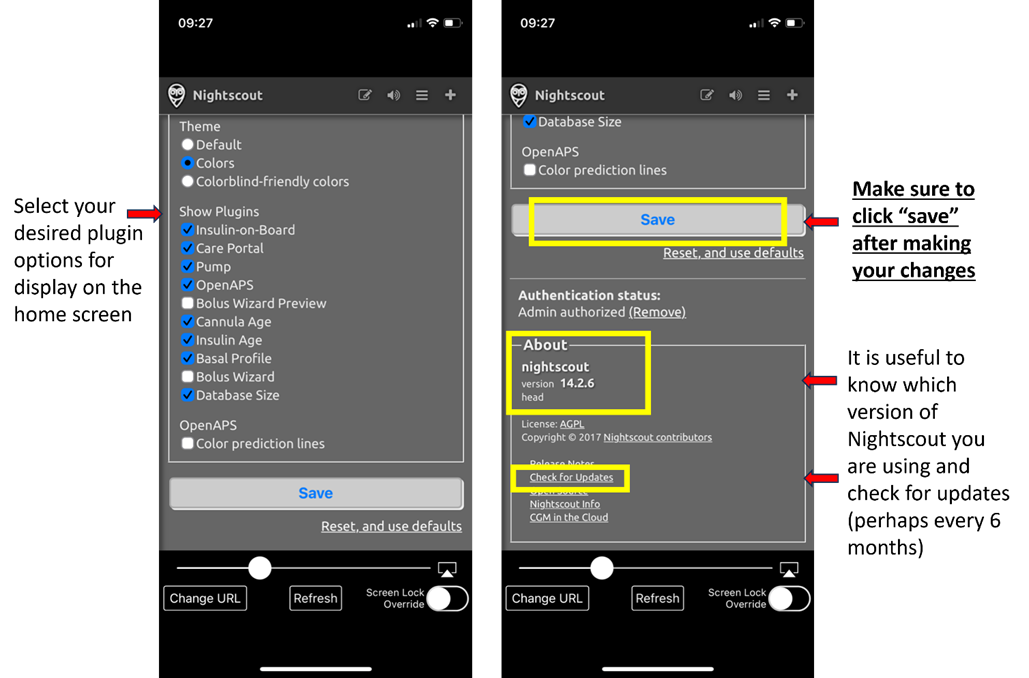
Не забудьте, это важно, чтобы эти изменения вступили в силу, нажать кнопку «сохранить» в нижней части.
После нажатия «сохранить» приложение вернется на главный экран Nightscout и будет выглядеть примерно так:
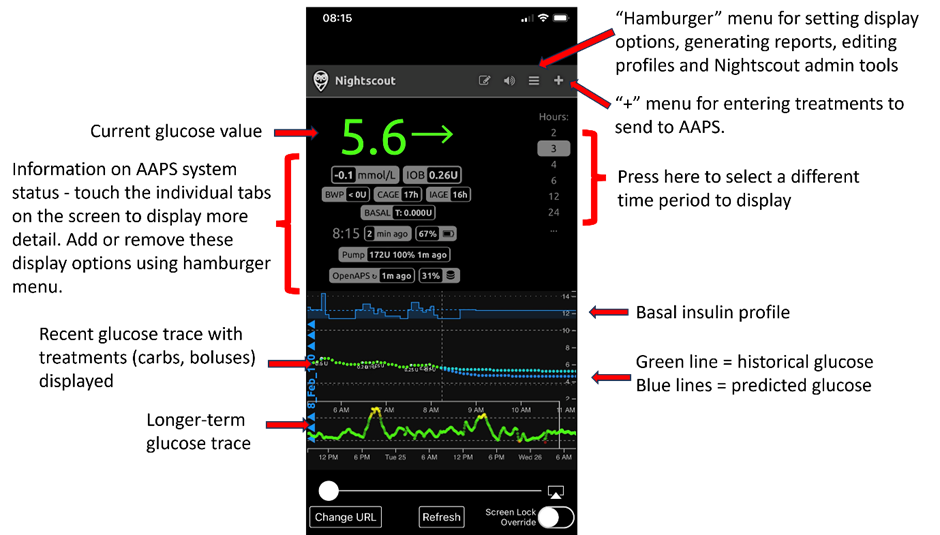
В верхнем левом меню приложения Nightscout вы найдете дополнительную информацию:

На серых вкладках огромное количество информации о состоянии системы AAPS (и еще больше информации если щелкуть по вкладкам):
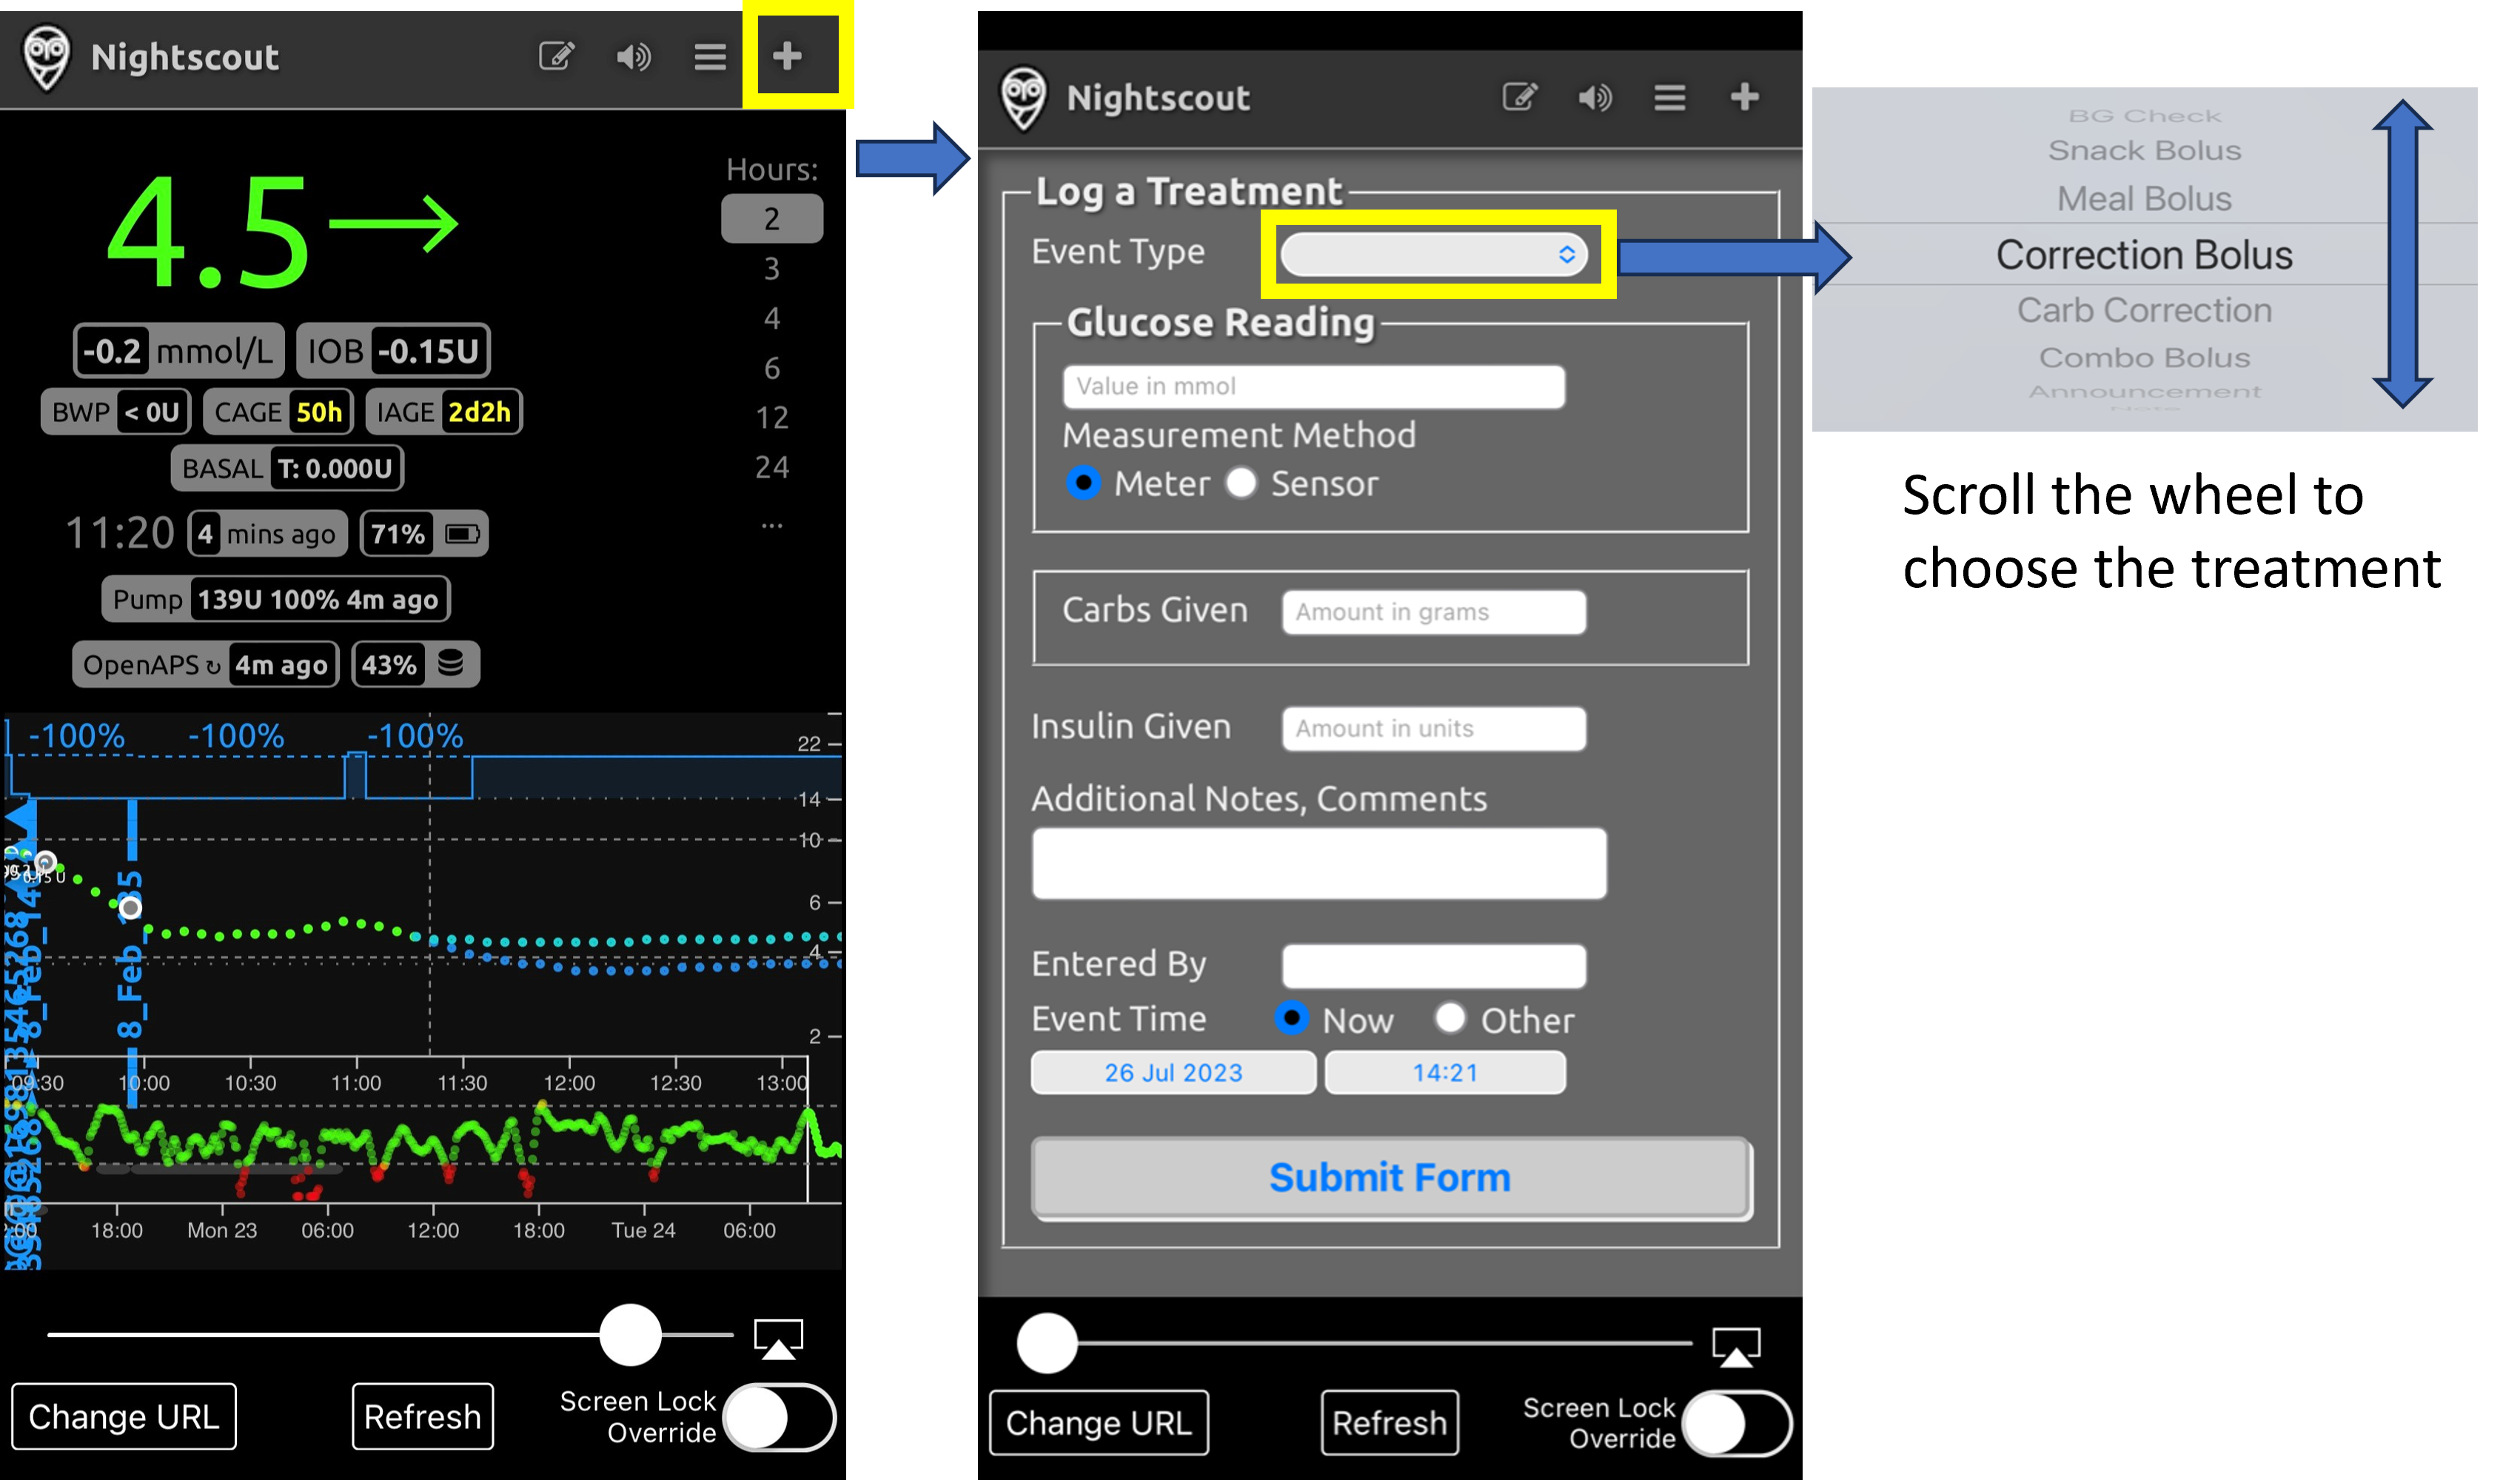
Отправка событий терапии через приложение Nightscout в AAPS
Чтобы настроить отправку событий терапии с приложения Nightscout на главный телефон AAPS, перейдите на вкладку AAPSClient в приложении AAPS. Откройте меню с правой стороны, найдите настройки синхронизации AAPSClient – и выберите соответствующие параметры. Настройте его на получение различных команд (временных целей и т. д.) а также на синхронизацию профилей. Если ничего не синхронизируется, вернитесь на вкладку AAPSClient, выберите «полная синхронизация» и подождите несколько минут.
Nightscout на iPhone имеет те же функции, что и Nightscout на ПК. Он позволяет отправлять множество команд AAPS, за исключением болюсов.
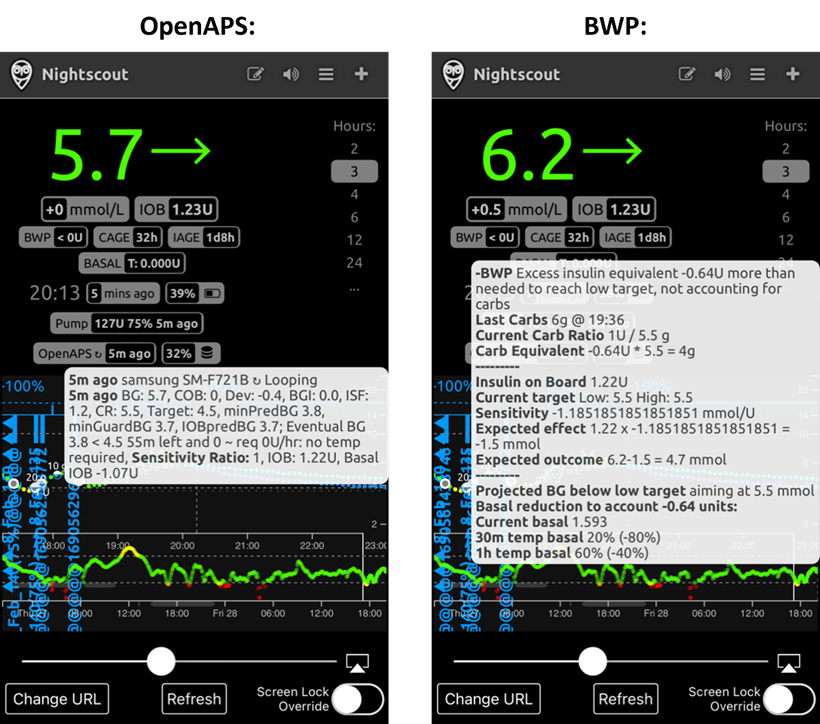
Отмена отрицательного инсулина во избежание повторных гипо
Хотя у нас нет возможности вводить болюсы, мы можем «внести» инсулин через Nightscout как «болюс на коррекцию», который реально не вводится. В этом случае AAPS будет учитывать этот инсулин,, заставляя алгоритм AAPS действовать менее агрессивно, что полезно при отмене отрицательного активного инсулина. Это также предотвратит гипогликемию при агрессивно настроенном профиле. Вы можете проверить это самостоятельно в присутствии телефона AAPS если настройки Nightscout отличаются.
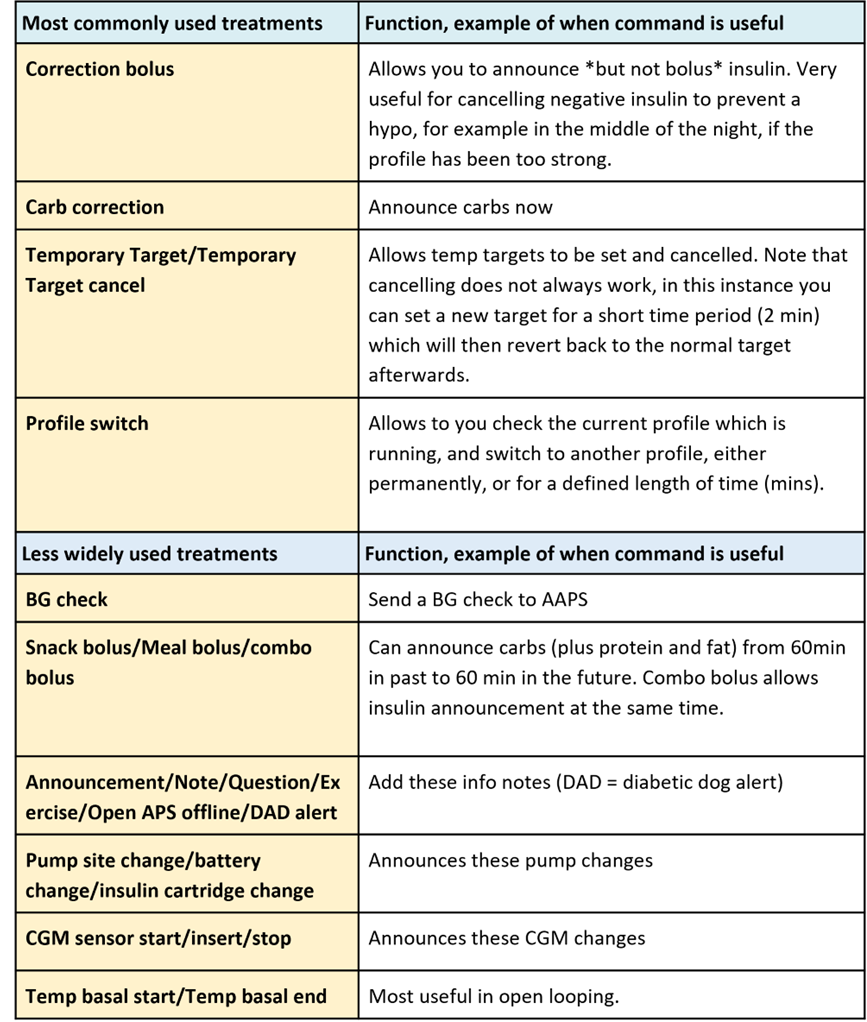
Некоторые полезные команды Nightscout приведены в таблице ниже.
Таблица команд Nightscout
Подробнее возможностях Nightscout здесь
Как извлечь максимум пользы из приложения Nightscout
1). Если вы «застряли» на странице и хотите видеть главное окно снова, просто нажмите «обновить» (внизу по центру) и вернетесь на домашнюю страницу Nightscout с графиком ГК.
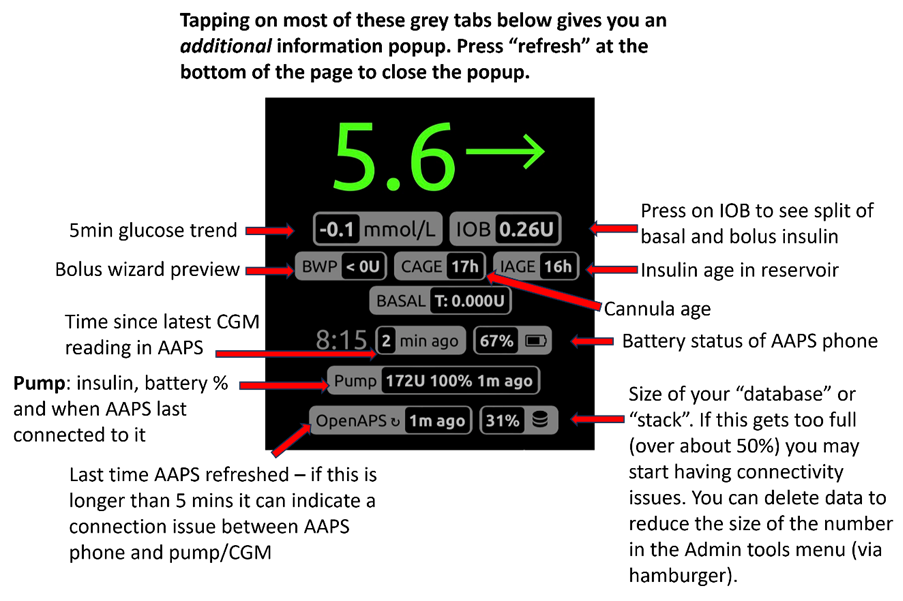
Чтобы увидеть параметры текущего профиля на телефоне, нажмите на различные иконки на экране над графиком. Больше информации (текущий углеводный коэффициент, чувствительность, часовой пояс и т. д.) можно увидеть нажав «basal»; а нажав на «OpenAPS» получим данные о профиле, текущей цели и т. д. Можно также отслеживать % батареи телефона и % батареи помпы. Калькулятор болюса дает информацию о прогнозе алгоритма с учетом активного инсулина IOB и активных углеводов COB.
Другие иконки в меню: что означает карандаш (редактирование)?
Карандаш редактирования поможет (технически) переместить или удалить болюс или коррекцию с графика за последние 48 часов.
Подробнее здесь
Хотя это может пригодиться для удаления внесенных (но не получивших болюса) углеводов, на практике эта функция плохо работает с AAPS и мы рекомендуем вносить такие изменения непосредственно через приложение AAPS.
Смарт-часы
Смарт-часы все чаще используются с AAPS и для взрослых с диабетом и опекунов/родителей детей с диабетом.
Преимущества смарт-часов в связке с AAPS
Смарт-часы - в зависимости от модели - могут найти различное применение с AAPS. С их помощью можно полностью или частично контролировать работу AAPS, а также проверять уровни гликемии, количество активного инсулина и другие параметры.
Интеграция смартфонов с AAPS может быть полезна во многих ситуациях, включая вождение автомобиля, мотоцикла, велосипеда, во время занятий спортом и т. п. Многие считают, что взгляд, брошенный на часы (на переговорах, банкетах, приемах и т. п.) вызывает меньше негативных реакций, чем общение со смартфоном. С точки зрения безопасности, смарт-часы также удобнее в пути, и позволяют пользователю не держать телефон с AAPS на виду (а, например, в сумке), и управлять системой дистанционно.
Конкретные преимущества AAPS для родителей/опекунов
Для ребенка - если телефон AAPS находится поблизости - опекун может использовать смарт-часы для мониторинга или внесения модификаций не прибегая к помощи телефона AAPS. Это может пригодиться, например, если телефон AAPS скрыт в поясе для помпы.
Смарт-часы могут быть дополнением к или альтернативой возможностям телефона контролировать дистанционно или только отслеживать.
Кроме этого, в отличие от телефонов родителей/опекунов (которые зависят от мобильной сети или wi-fi связи), смарт-часы с их bluetooth-технологией пригодятся в таких местах, как пещеры, на катере, при восхождении на гору. Если оба устройства ( телефонAAPS и смарт-часы) находятся в одной и той же сети Wi-Fi, они также могут использовать wifi.
Различные типы взаимодействия смарт-часов и AAPS
Многие возможноси смарт-часов для пользователей AAPS подробно описаны на Nightscout на ваших часах, так что рекомендуется сначала ознакомиться с этим источником.
В настоящее время существует пять основных способов использования смарт-часов в связке с AAPS. Эти данные приводятся ниже в таблице:
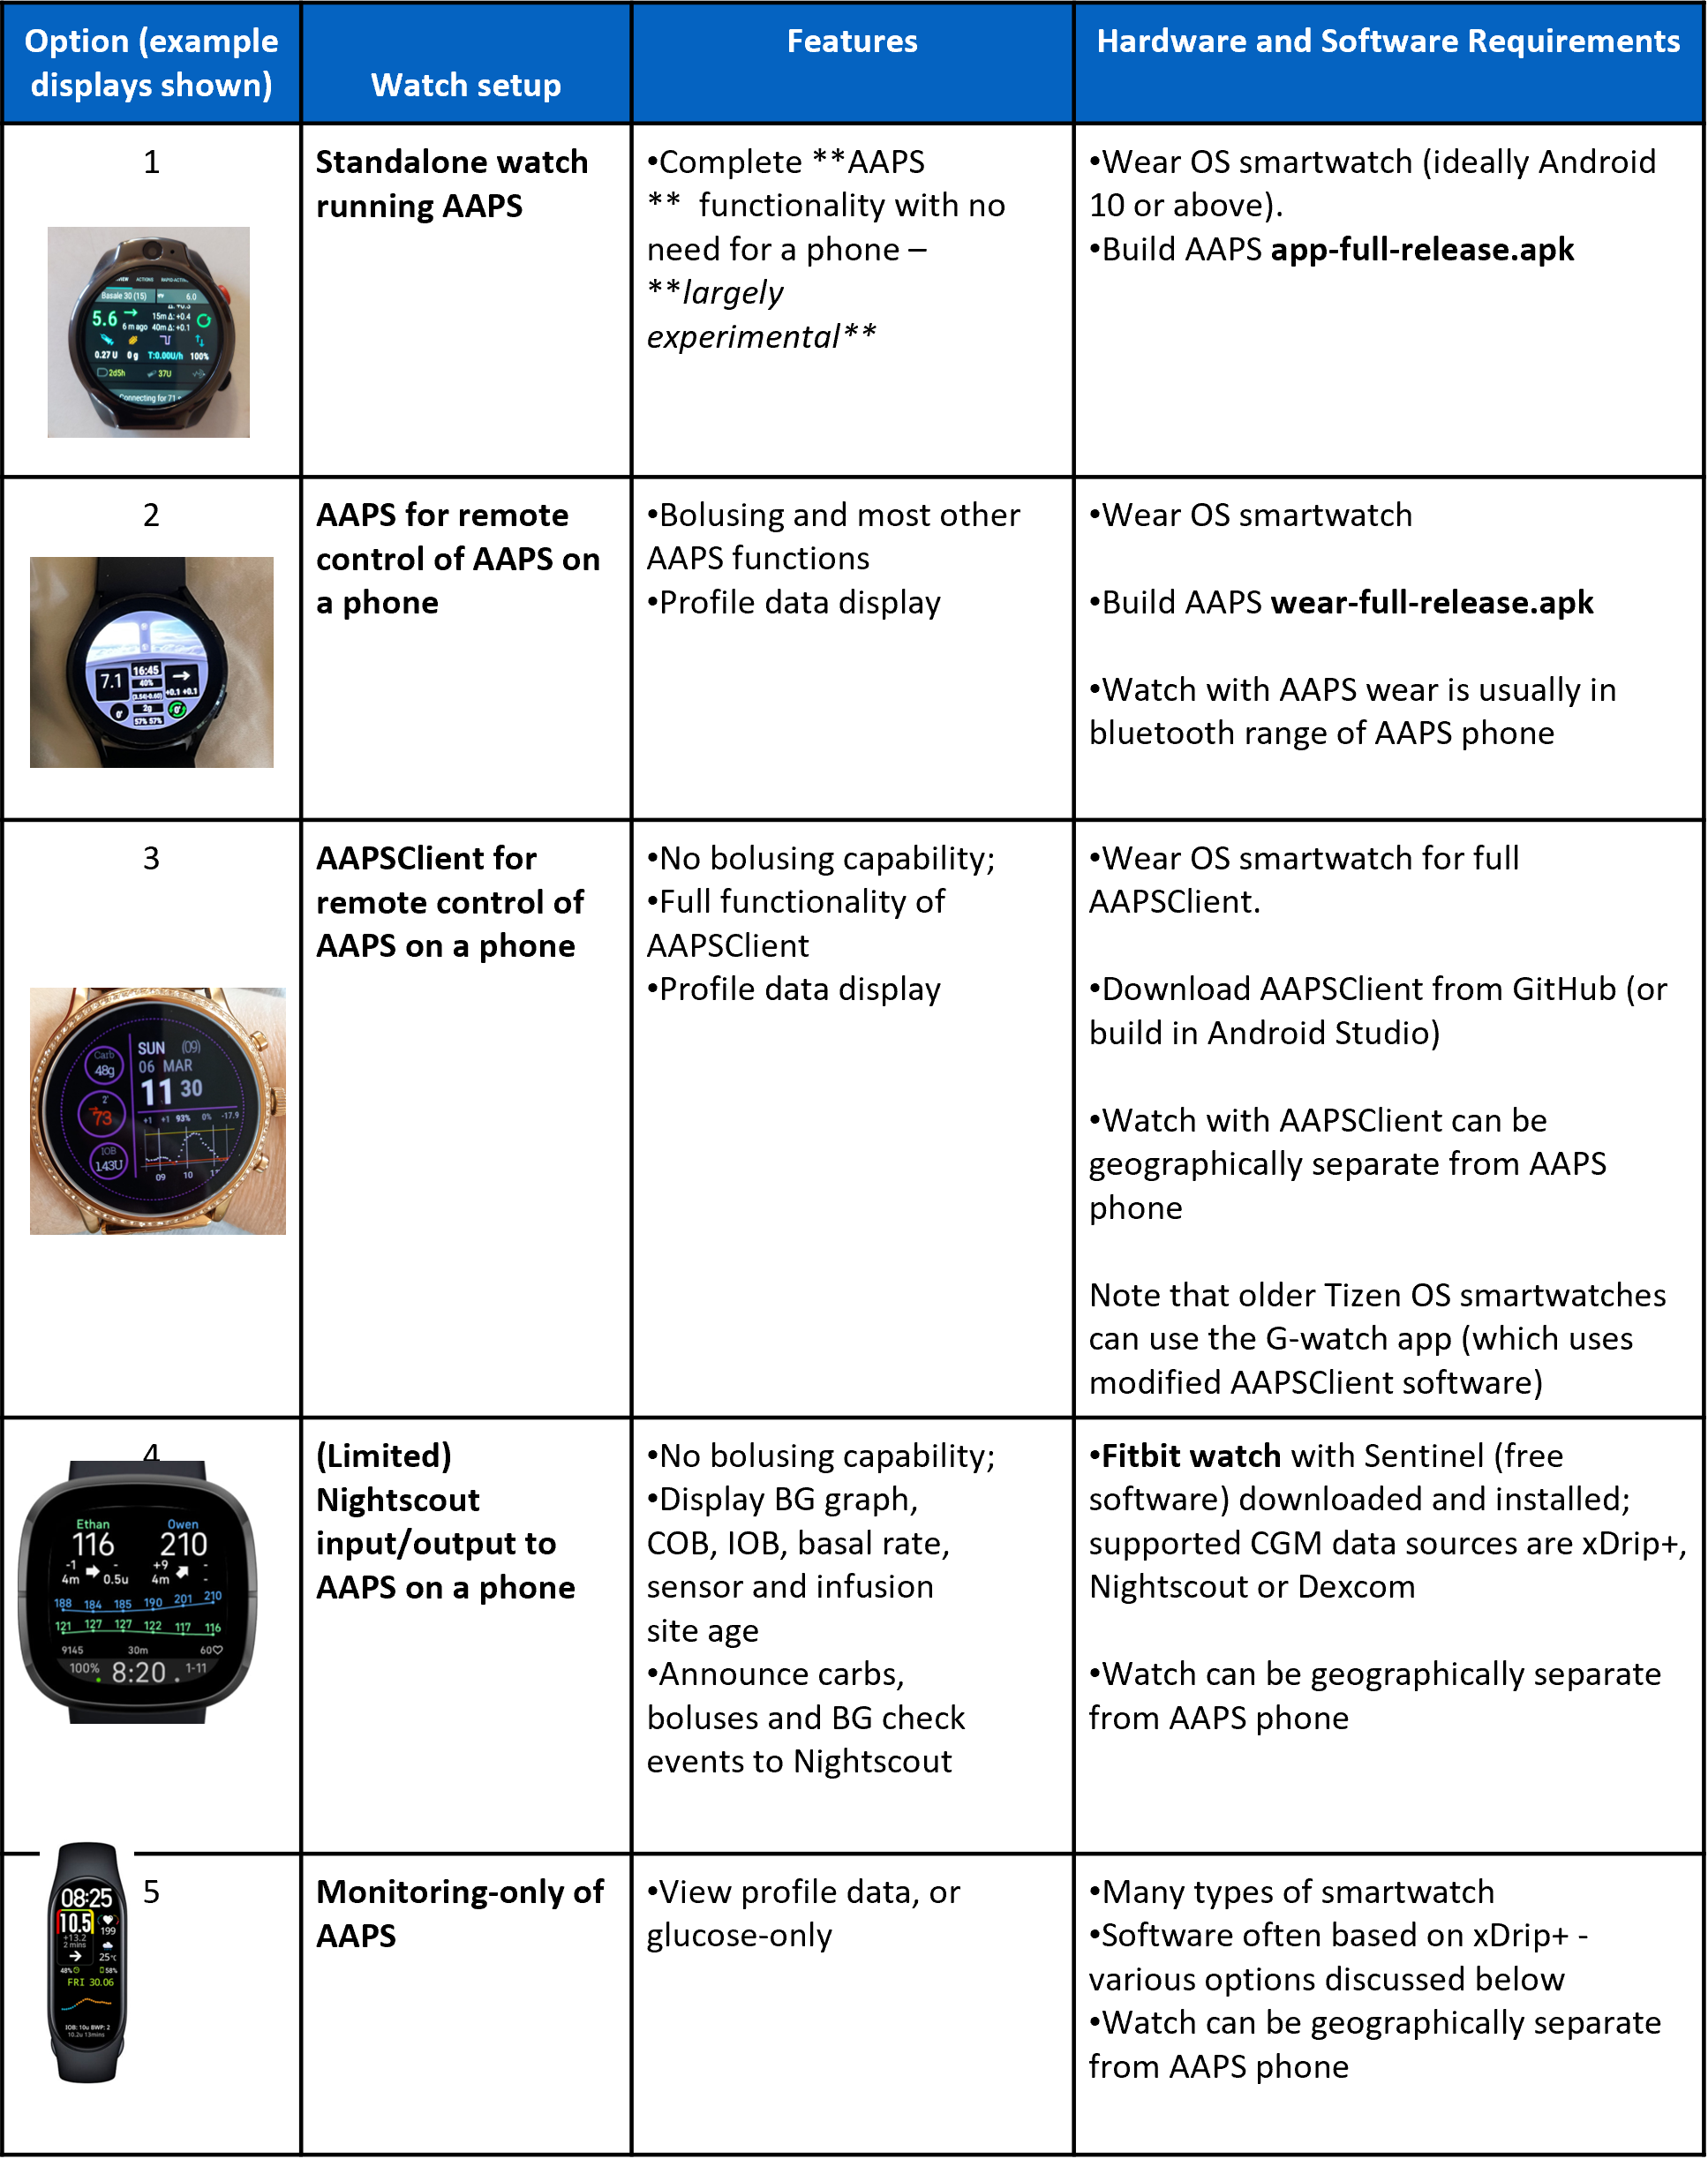
Обратите внимание, что таблица была подготовлена в 2023 году, она не является исчерпывающей, дополнительные варианты добавляются постоянно.
Перед тем как купить смарт-часы…
Модель, которую вы покупаете, зависит от желаемых функций. There are currently two historical spreadsheets recording compatible smartphones and smartphones and watches but these will no longer continue to be updated since it is easier to ask via the Discord and Facebook groups, due to the huge range of options.
Популярные марки смарт-часов – Samsung Galaxy, Garmin, Fossil, Mi band и Fitbit. Различные варианты, описанные в таблице выше, подробнее описаны далее, чтобы помочь принять решение, какие смарт-часы подойдут именно в вашем случае.
Если вы интегрируете смарт-часы с телефоном AAPS чтобы удаленно взаимодействовать с AAPS, нужно учитывать, совместимы ли оба устройства друг с другом, особенно если у вас устаревший или необычный телефон.
В общем, если вы хотите только следить за гликемией и не взаимодействовать с AAPS, то имеется большой выбор доступных и простых смарт-часов.
The best way to choose a smartwatch is to search for «watch» posts on either Discord or Facebook AAPS groups. Have a read of others experiences, and post any specific questions, if your query isn’t answered by older posts.
Для вариантов 1-3 со смарт-часами: Что такое Wear OS?
Первые три варианта требуют наличия операционной системы Wear OS. на смарт-часах.
Wear OS - это операционная система некоторых современных смарт-часов Android. В 2018, Google сделал ребрендинг Android Wear 1.x на Wear OS начиная с версии 2.x. Поэтому, если устройство маркируется «Android Wear», а не Wear OS — то мы имеем дело с более старой версией. Если в описании смарт-часов указывается только совместимость с Android и iOS - это не означает, что они работают под управлением Wear OS. Это может быть какая-то другая специальная операционная система, не совместимая с AAPS. Для поддержки установки и использования любой версии AAPS или AAPSClient, смарт-часы должен работать на Wear OS, а в идеале на Android 10 или новее. В качестве ориентира, по состоянию на октябрь 2023 года новейший выпуск Wear OS – версия 4.0 (на основе Android 13).
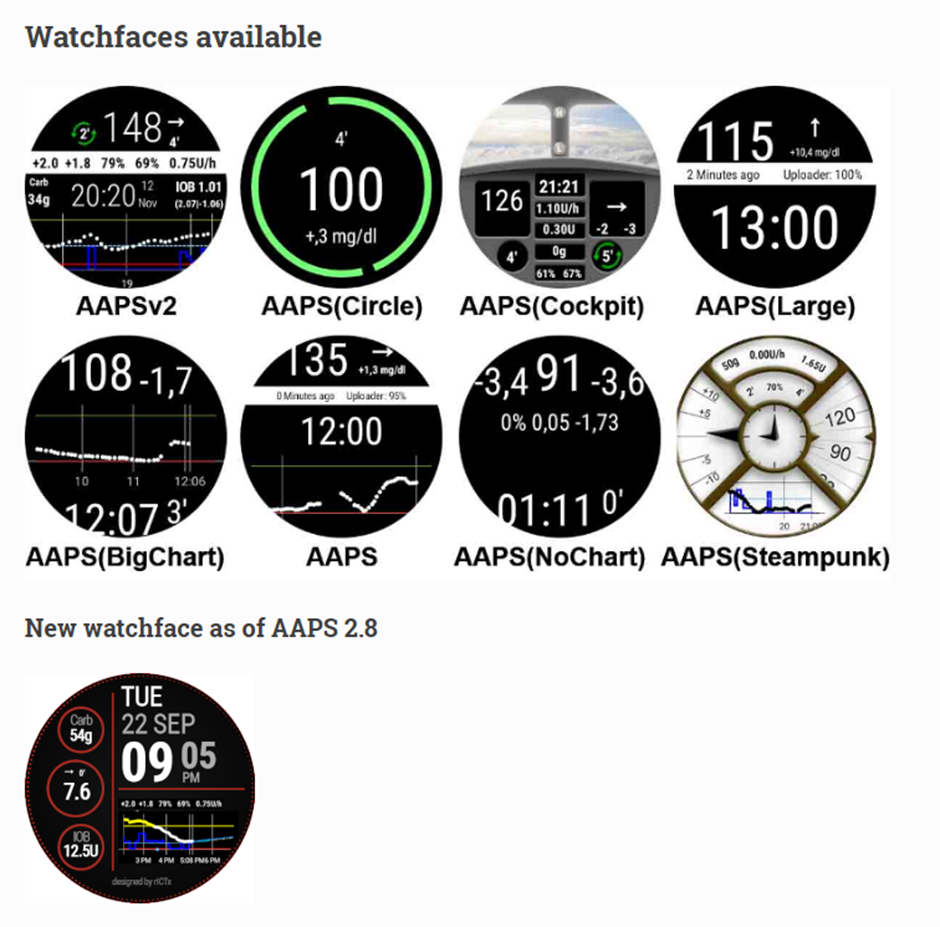
Если вы устанавливаете AAPSwear.apk на часы с Wear OS, для этого существует ряд циферблатов AAPS. Кроме того, вы можете использовать стандартный циферблат с информацией AAPS которая отображается на маленьких плитках, известных как «усложнения». Усложнение - это любая функция, которая отображается на циферблате помимо времени. Такие функции как усложнения, требуют Wear OS версии 2.0 или новее.
Как выглядят смарт-часы с дистанционным управлением AAPS?
After installing AAPS onto your watch, you will automatically be able to select your preferred watchface from these AAPS-dedicated watchfaces. On most watches, you simply long-press on the homescreen until the screen shrinks and swipe right to select an alernative screen:
How would I operate a Wear OS watch from day-to-day?
Further details about the watchfaces, and day-to-day use, including how to make (and share) your own customised watchface, can be found in the section Operation of Wear AAPS on a Smartwatch.
Вариант 1) Автономные часы с AAPS
Похоже на привлекательный вариант? Однако в настоящее время лишь несколько энтузиастов экспериментируют с AAPS на отдельных часах. Есть не так много смарт-часов с удобным интерфейсом, которые также способны работать с AAPS и приложением мониторинга. Популярные модели включают LEMFO LEM 14, 15 и 16. На них потребуется установить «полноценное» приложение AAPS (которое обычно устанавливается на телефон), а не приложение AAPS «wear».
Пока нет четкой спецификации, которая поможет узнать, будут ли часы самостоятельно работать с AAPS, но ориентиром будут следующие параметры:
Android 10 или новее. 2) Возможность выключать «квадратный» режим для увеличения и упрощения чтения текста. 3) Очень хороший срок службы батареи. 4) Хороший диапазон Bluetooth.
Большинство разочарований от автономных часов с AAPS происходит от взаимодействия с крошечным экраном, и то, что текущий полный интерфейс AAPS не был разработан для часов. Из-за величины экрана возможно понадобится стилус для редактирования настроек AAPS на часах, а некоторые кнопки AAPS могут не отображаться на экране просмотра.
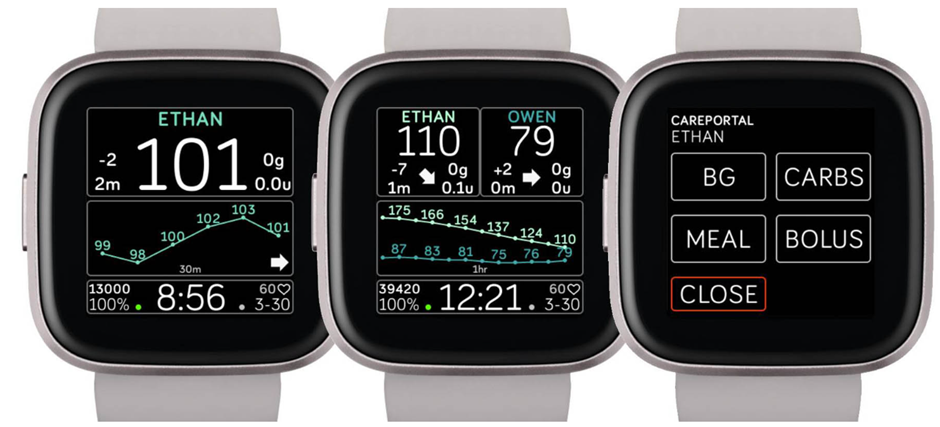
Дополнительные проблемы заключаются в том, что трудно получить хороший срок службы батареи, а часы с хорошей батареей часто громоздкие и толстые. Пользователи сообщают о борьбе с настройками энергосбережения, трудностях с запуском сенсоров, плохом диапазоне Bluetooth (для поддержания связи с сенсором и помпой) и сомнительной влагоустойчивости. Примеры на фотографиях ниже (фото: Janvier Doyon).
Если вы хотите автономно пользоваться смарт-часами, прочтите сообщения и комментарии в группе AAPS на Facebook (ищите по «standalone» (автономные) и «Lemfo») и на Discord для дополнительной информации.
Вариант 2) AAPS на смарт-часах, для дистанционного управления AAPS на телефоне
Аналогично использованию телефона фоллоуэра либо с AAPSClient, Nightscout или SMS (ссылка на разделы) смарт-часы можно использовать для удаленного управления AAPS и предоставления полных данных профиля. Ключевое различие с телефоном фоллоуэра заключается в том, что смарт-часы связываются с AAPS через Bluetooth и не требуют кода аутентификатора. Пользователи сообщают, что если смарт-часы и телефон, связанные по Bluetooth, находятся в одной сети Wi-Fi, часы также могут взаимодействовать с смартфоном по wifi, давая более широкий диапазон возможностей.
Таким образом, смарт-часы дистанционного управления полезны когда:
a) команды AAPSClient/Nightscout/SMS не работают; или
b) The user wishes to avoid the need for authenticator code (as required for the follower phone with inputting data, selecting TT or entering carbs).
На смарт-часах требуется программное обеспечение Android wear (идеально версии 10 или выше), чтобы управлять AAPS. Проверьте технические характеристики и сравните с таблицей совместимых смарт-часов. Воспользуйтесь поиском или задайте вопрос в группе AAPS на Facebook или в Discord если есть сомнения.
Specific How-to guides for setting up AAPS on the popular [Samsung Galaxy Watch 4 (40mm) is given below. Часы Garmin также популярны. If you have experience of setting up a different smartwatch which you think would be useful to others, please add it into these pages edit the documentation to share your findings with the wider AAPS community.
Приложение AAPS Wear apk
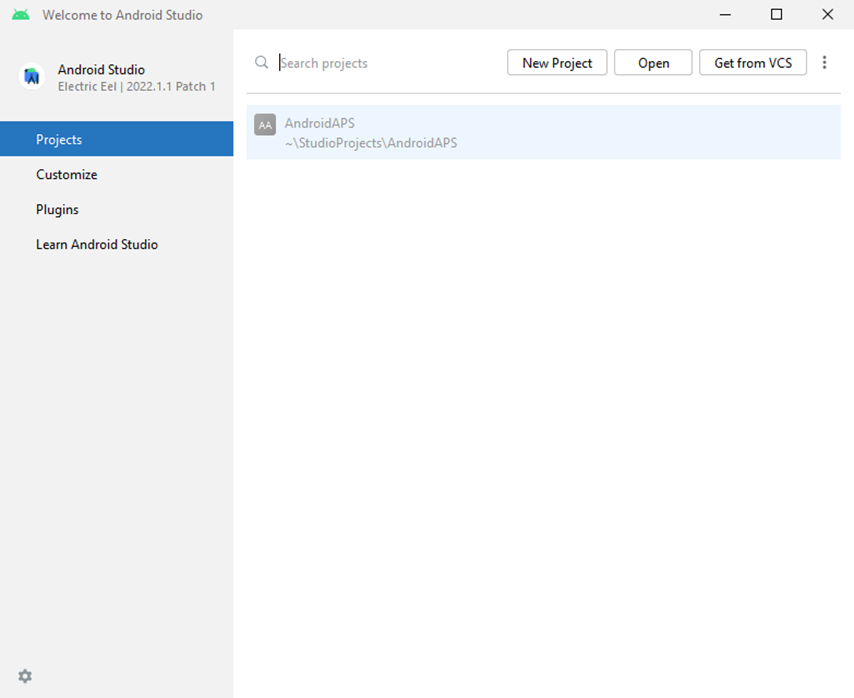
Приложение ОС Wear OS AAPS («Apk Wear OS»), необходимое для смарт-часов теперь отделено от «полной» сборки AAPS для телефонов Android. Поэтому следует создать второй установочный файл, или apk, для установки AAPSwear на часы (который параллельно загружается с телефона). Настоятельно рекомендуется, чтобы файл AAPS Wear apk был собран сразу же после сборки полноценного AAPS apk для телефона. Это не только не займет много времени, но и позволит избежать возможных проблем совместимости при попытке установить связь с телефоном. AAPS Wear apk на часах вряд ли будет совместимо с телефономAAPS, если было создано в другой версии Android studio, или если с момента первоначальной сборки AAPS истекли месяцы.
Если вы уже используете AAPS на телефоне, и не собирали сразу оба приложения тогда лучше сделать новую сборку обоих apk файлов одновременно. Если у вас уже установлена Android studio, то переустановите ее и соберите AAPS для двух устройств одновременно используя один файл хранилища ключей.
Как удалить Android Studio
Убедитесь, что файл хранилища ключей безопасно хранится за пределами папок Android Studio.
Существует несколько шагов, необходимых для полного удаления Android Studio с компьютера. Вот хорошее руководство для Windows. На последнем этапе этих инструкций также необходимо вручную удалить папку «StudioProjects».
Теперь переустановите свежую версию Android Studio.
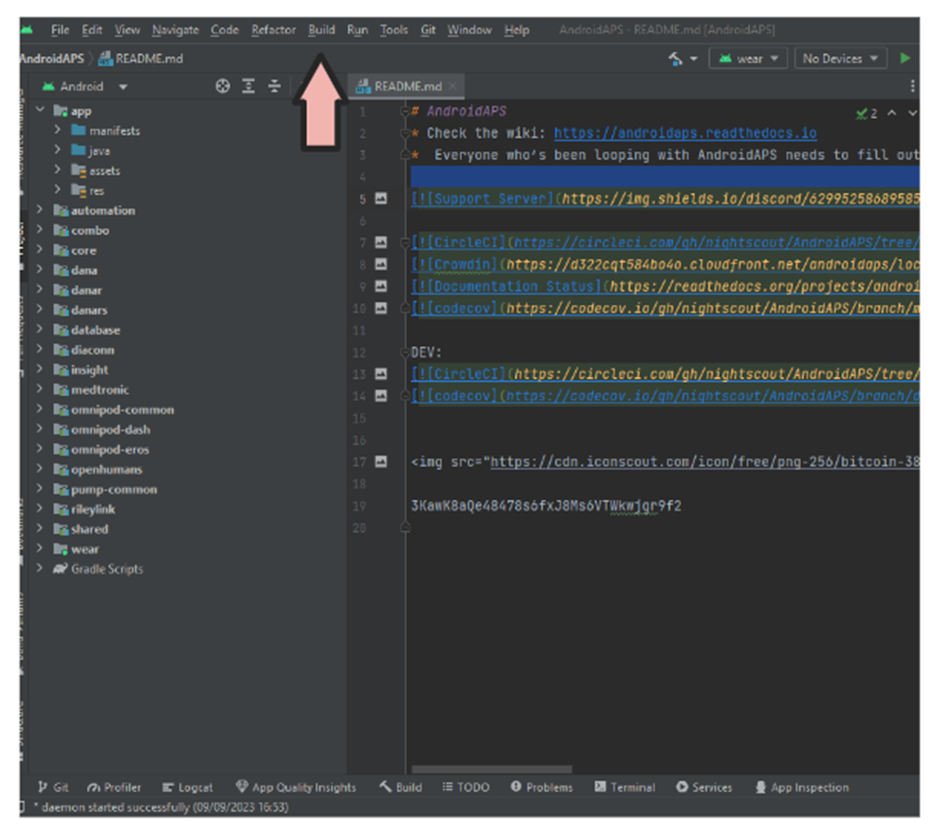
Создание приложения AAPS Wear apk
Процесс сборки Wear apk очень похож на процесс «полного» apk, разница в том, что в Android Studio необходимо выбрать “AndroidAPS. wear» а в выпадающем меню вариант сборки выберите “fullRelease”. Это создаст файл AAPS Wear apk. Вместо этого можно собрать “pumpcontrolRelease” из выпадающего меню, которое позволит дистанционно управлять помпой, но вне цикла.
Это руководство предполагает, что вы переустановили версию Android studio( Giraffe 2022.3.1)).
Чтобы вернуться сюда:

продолжайте следовать инструкциям.
Следуйте подсказкам через различные экраны, пока вам не будет предложена опция с выпадающим меню, предлагающим сборку полного AAPS apk. На данном этапе выберите «Wear» из выпадающего списка вместо «AndroidAPS.apk», потому что вы собираете apk для смарт-часов.
Следующий шаг перейдите в «Собрать» наверху в ленте
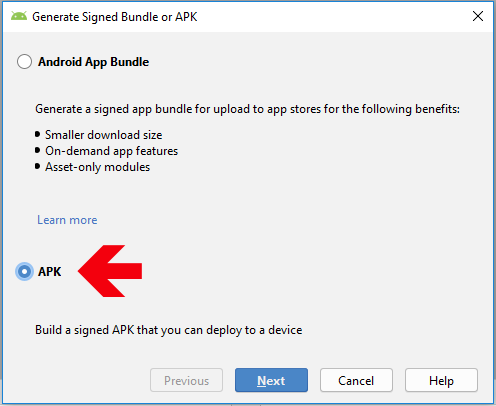
Перейти к сборке > Сгенерировать подписанный комплект / APK
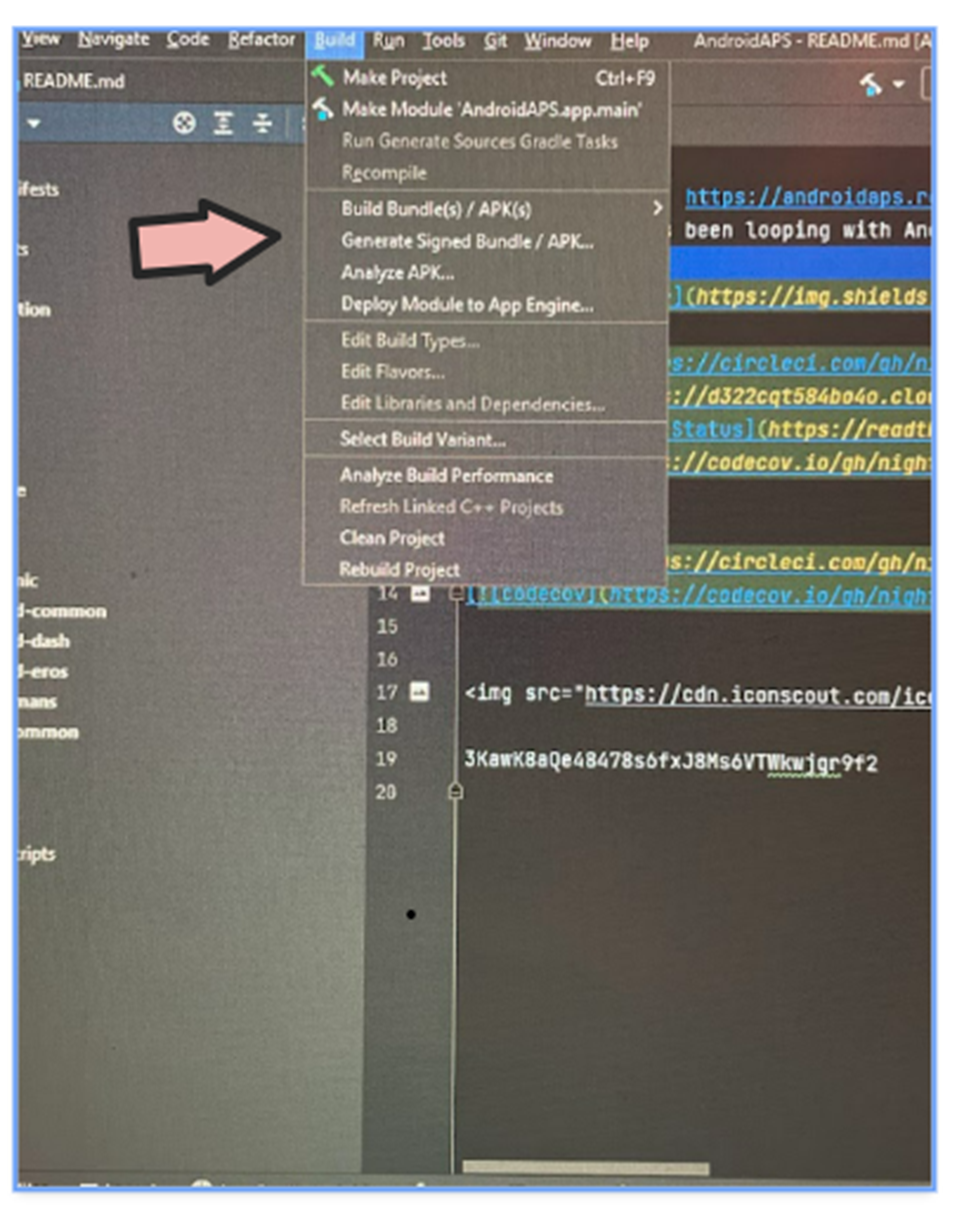
Выберите > APK:
Выберите в модуле: AndroidAPSwear
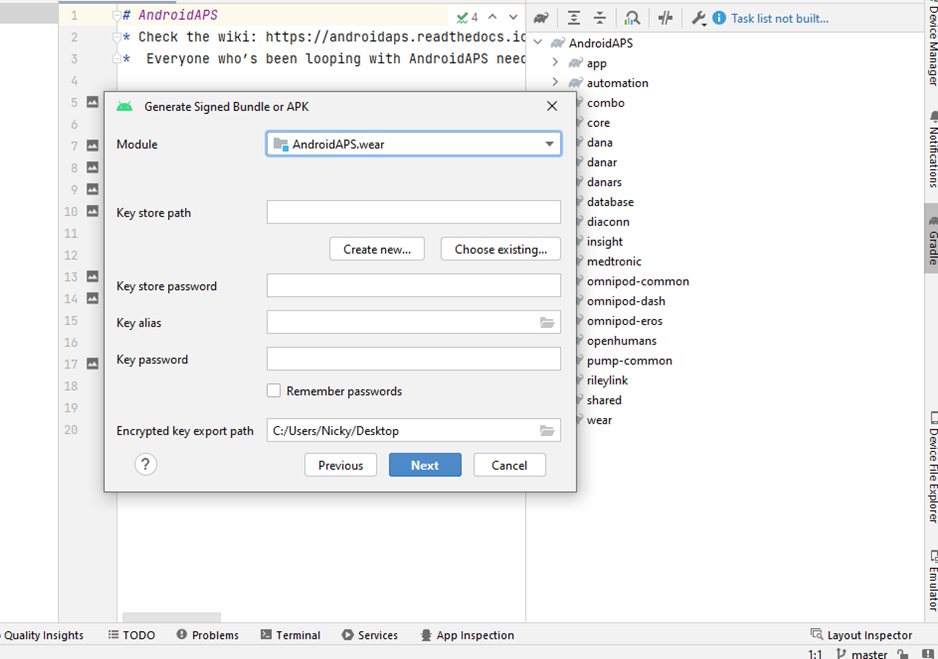
Введите файл keystore в расположении по умолчанию. Путь к хранилищу ключей будет зависеть от того, где расположено хранилище. В нашем варианте путь к хранилищу ключей: C:\Program Files\Android\Android Studio\jbr\bin
Следующий экран должен показать:
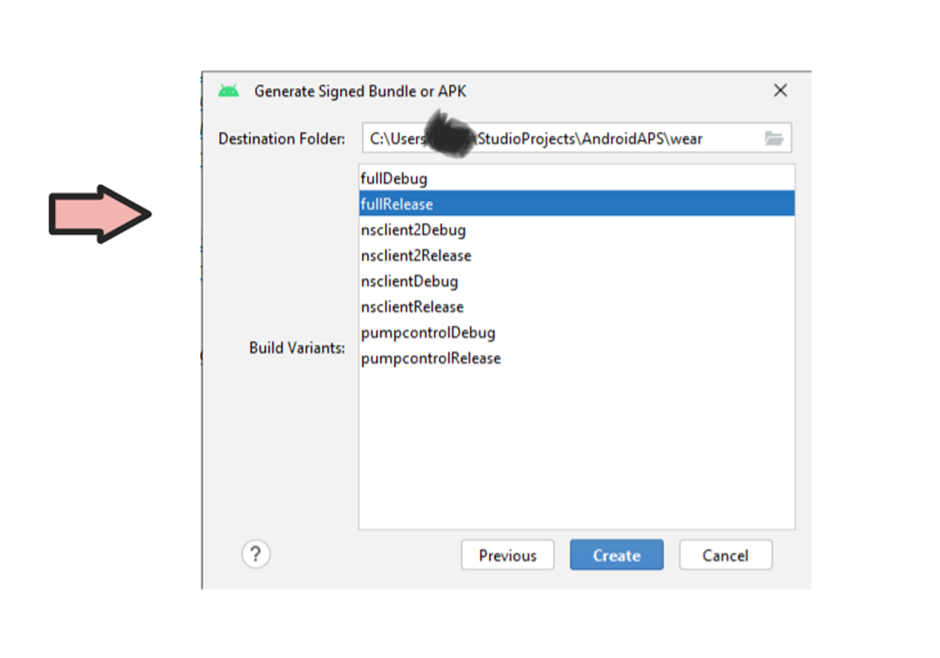
И выберите «fullRelease».
Наберитесь терпения - AAPS Wear apk должен быть собран примерно через 10-20 минут, в зависимости от скорости подключения к Интернету.
Устранение неполадок
В процессе сборки полного приложения AAPS 3.2 (и в принципе любого подписанного приложения) Android Studio генерирует файл с расширением .json. Это приводит к ошибкам с незапрошенными изменениями, когда создается следующее подписанное приложение, например AAPSwear. Самый быстрый способ решения это переход к папке, в которой было построено полное приложение AAPS, путь к папке, вероятно, выглядит как-то так:
C:\Users\Your Name\StudioProjects\AndroidAPS\app\aapsclient\release.
Удалите или переместите ненужный файл .json из этой папки. Затем попробуйте снова создать приложение AAPS. Если это не помогает, то детальная инструкция по устранению неполадок поможет определить конкретный файл, вызывающий проблему; им также может оказаться файл хранилища ключей.
Как настроить смарт-часы Samsung Galaxy 4 с AAPS
Этот раздел предполагает, что вы новичок в смарт-часах; он сориентирует в популярных часах, Galaxy Watch 4, и даст пошаговое руководство по настройке AAPS на часах.
В этом руководстве предполагается, что на часах Samsung Galaxy, с которыми вы сейчас разбираетесь, работает Wear OS версии 3 или ниже.. Если же вы настраиваете часы под управлением Wear OS 4/OneUI 5 или более поздней, то нужно использовать новый процесс сопряжения через ADB, это объясняется в программном обеспечении Samsung на телефоне и будет своевременно здесь обновляться. Вот основные параметры настройки для Galaxy Watch 5 и Galaxy Watch 6
Базовое знакомство с часами
После базовой настройки часов в соответствии с видео выше, перейдите в playstore на телефоне и загрузите следующие приложения: «Galaxy Wearable» «Samsung» и «Easy Fire tools» или «Wear Installer 2».
Существует множество сторонних видео на YouTube, которые помогут ознакомиться с этими смарт-часами, например:
https://www.youtube.com/watch?v=tSVkqWNmO2c
В приложении «Galaxy Wearable» также имеется встроенное руководство. В телефоне откройте приложение galaxy wearable, выполните поиск часов, попытайтесь связать часы с телефоном. В зависимости от вашей версии, в ходе этого может появиться запрос на установку еще одного приложения «galaxy watch 4 plugin» из playstore (потребуется некоторое время для загрузки). Установите его на телефон, а затем попытайтесь снова связать часы и телефон в приложении. Пройдите через ряд меню и отметьте предпочтения.
Настройка учетной записи Samsung
Вы должны убедиться, что учетная запись электронной почты для настройки учетной записи Samsung имеет дату рождения пользователя старше 13+, ибо в противном случае получить разрешения Samsung не получится. Если вы настроили вашему ребенку до 13 лет детскую учетную запись Gmail и используете этот адрес электронной почты, вы не можете просто изменить его на аккаунт для взрослых. Один из вариантов заключается в том, чтобы изменить текущую дату рождения и сделать текущий возраст 12 лет и 363 дня. На следующий день аккаунт будет преобразован в учётную запись для взрослых, и вы сможете выполнить настройку учетной записи Samsung.
Перенос приложения AAPS Wear на телефон AAPS
Загрузка Aapswear.apk из Android Studio на телефон может быть выполнена:
a) при помощи USB-кабеля, разместив файл AAPSwear. apk на телефон, а затем выполнив «параллельную загрузку» на часы. Перенесите файл Wear.apk в телефон через USB в папку загрузок; или
b) вырежьте и вставьте файл Wear.apk из Android Studio на Gdrive.
Можно использовать либо Wear Installer 2, либо Easy Fire tools для «побочной» (параллельной) загрузки AAPSwear на часы. Здесь мы рекомендуем Wear Installer 2, потому что инструкции и процесс в видео понятны и хорошо описаны.
Использование Wear Installer 2 для параллельной загрузки AAPS на часы

Установщик Wear Installer 2, разработанный Malcolm Bryantзагружается из Google Play и может применяться для «побочной» загрузки приложения AAPS wear на часы. В состав приложения входит понятное видео «как выполнить параллельную загрузку»
В нем есть вся необходимая информация (лучше всего открыть видео на отдельном устройстве, чтобы посмотреть при настройке телефона).
Как сказано в видео, после завершения установки выключите отладку ADB на часах, чтобы не перегружать аккумулятор смарт-часов.
В качестве альтернативы можно:
(предостережение) Пользуйтесь Easy Fire tools для параллельной загрузки AAPSwear на смарт-часы :class: выпадающее
Загрузите Easy Fire Tools с playstore на телефон
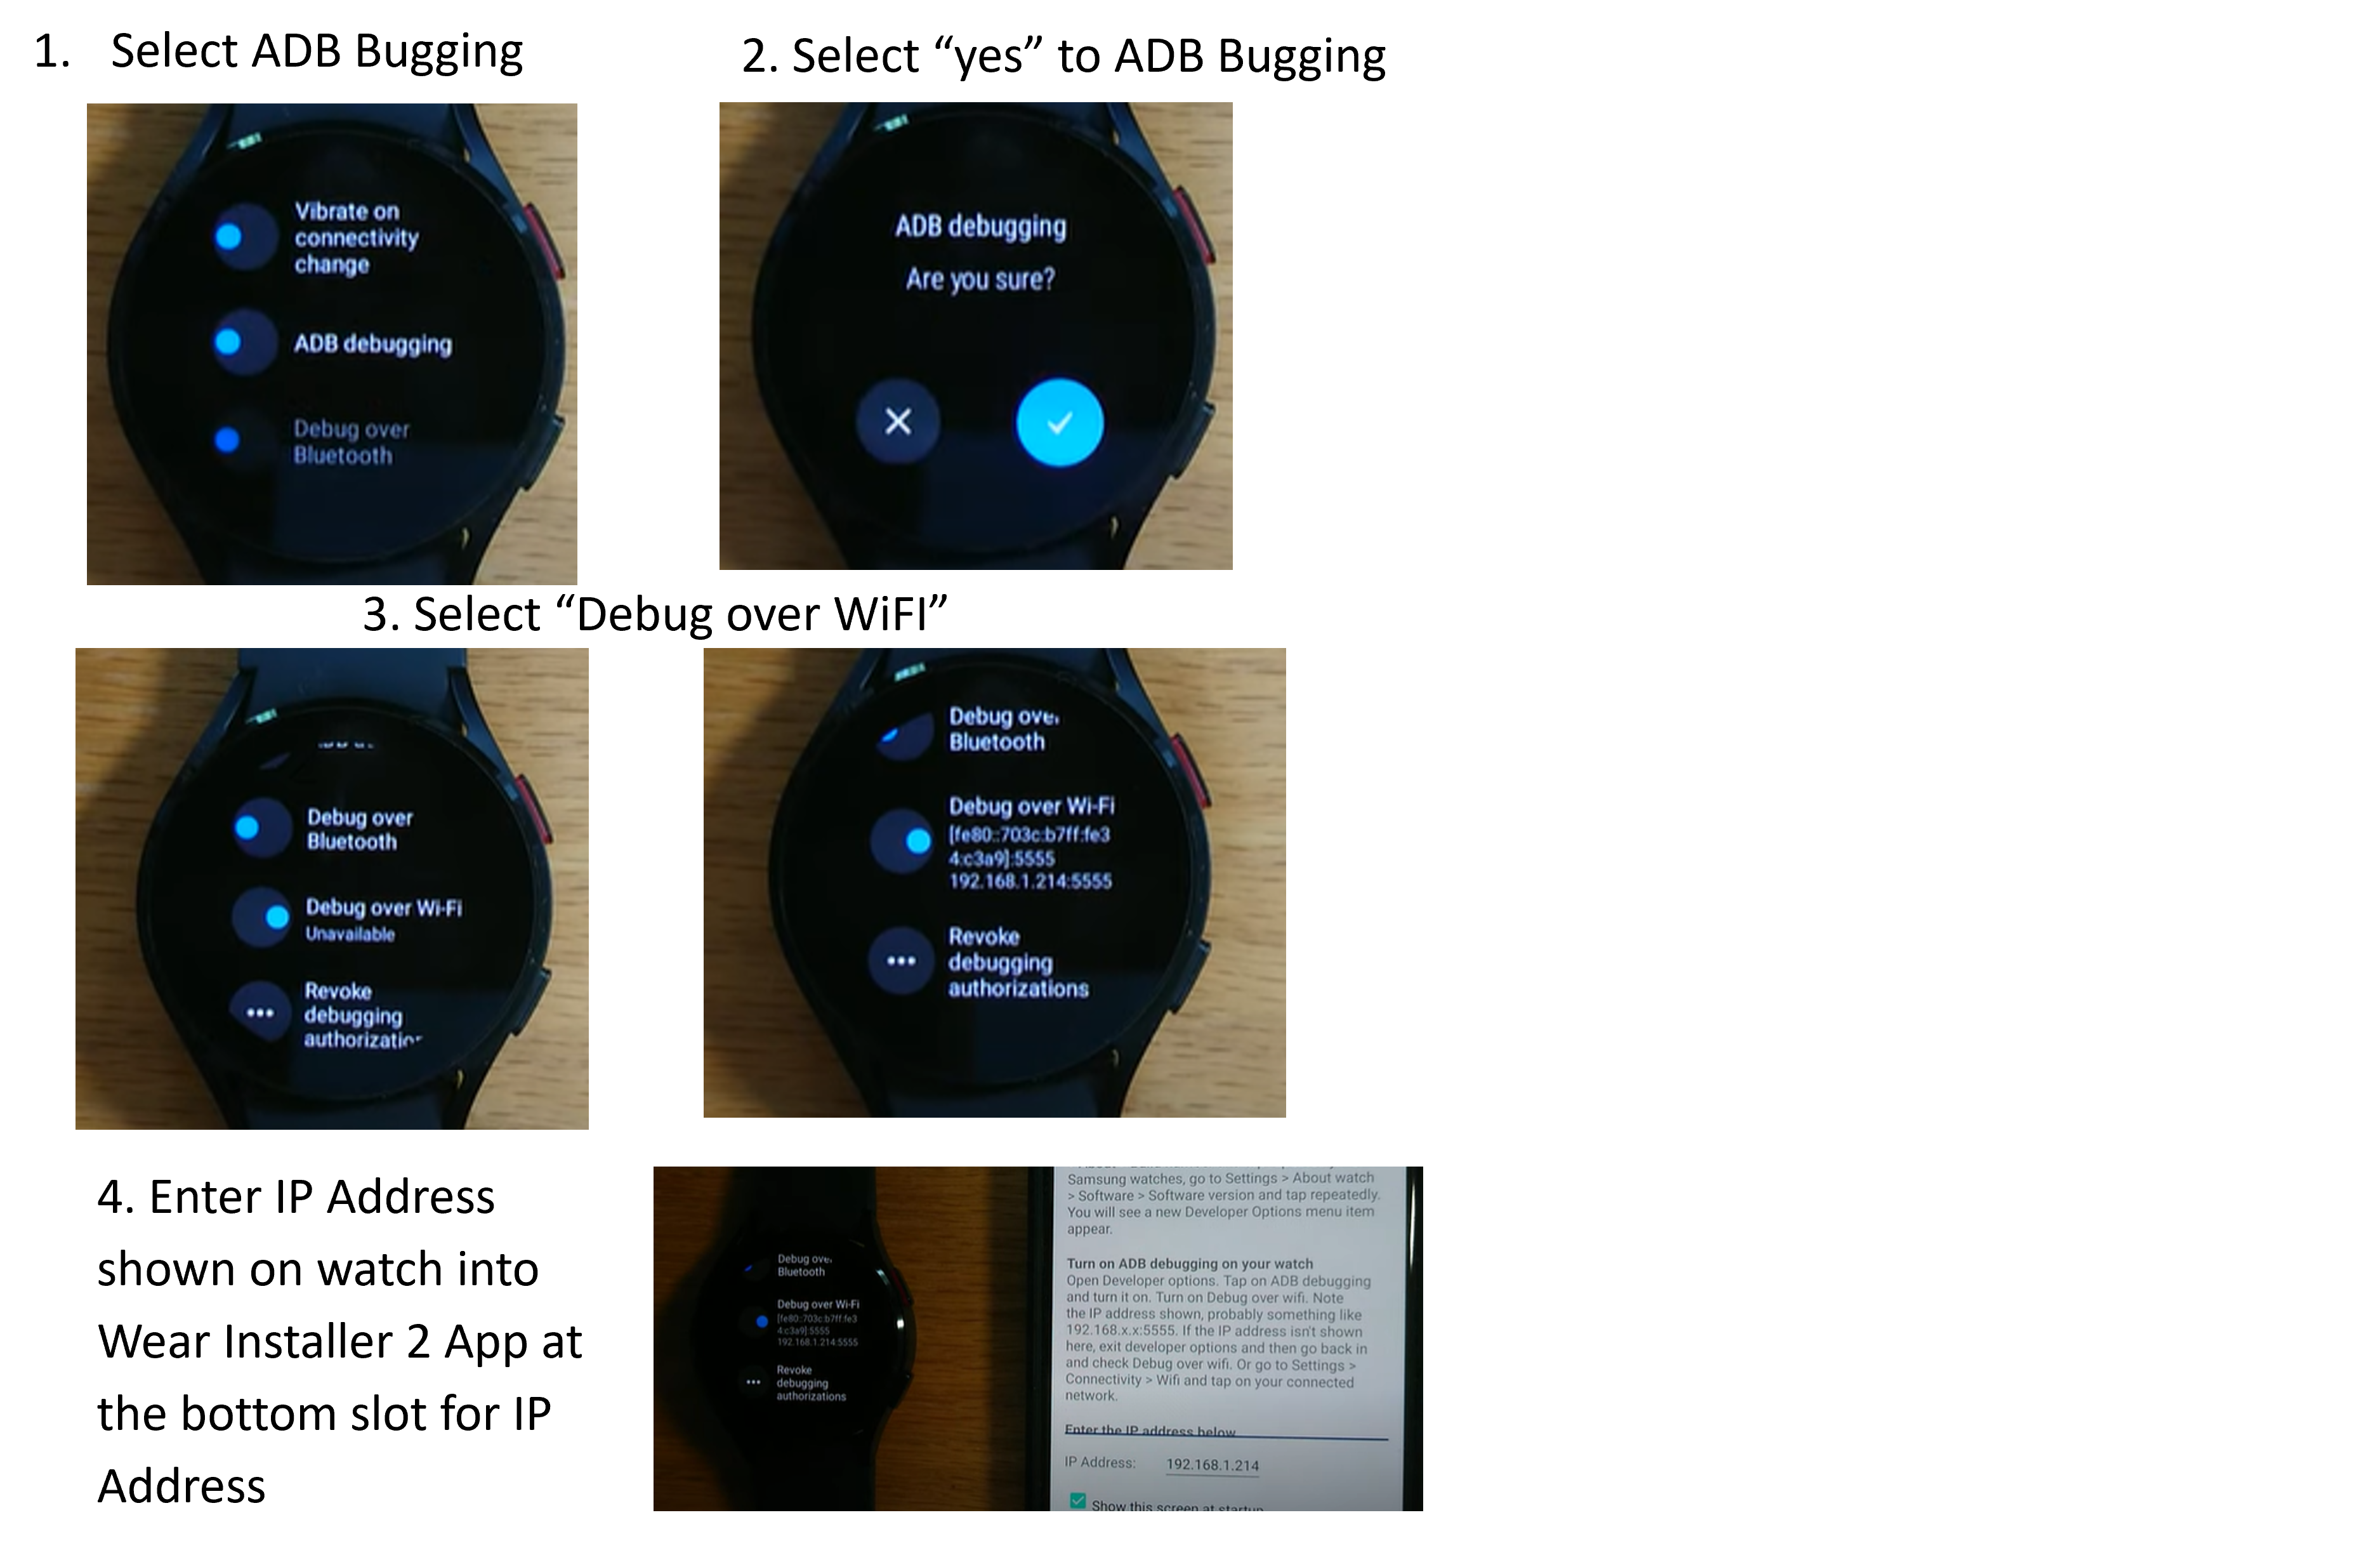
Сделайте себя разработчиком часов (после настройки и подключения к телефону):
Перейдите в настройки >о часах (нижняя опция) >- информация о программном обеспечении > версия ПО.
Быстро нажимайте на «номер сборки» (7 раз), пока не появится уведомление о том, что часы находятся в «режиме разработчика». Вернитесь в верхнюю часть меню настроек, прокрутите вниз и посмотрите «настройки разработчика» ниже «о часах».
В «опциях разработчика» включите «Отладку ADB и «беспроводную отладку». Эта последняя опция показывает IP адрес часов, последние две цифры которого меняются каждый раз, когда часы сопрягаются с новым телефоном. Будет что-то вроде 167.177.0.20. 5555 (игнорируйте последние 4 цифры). Обратите внимание, что последние две цифры (здесь «20») этого адреса будут меняться каждый раз, когда вы меняете телефон для AAPS.
ЩАГ 3) Введите IP адрес например 167.177.0. 0 в Easy Fire tools на телефоне (перейдите в левое выпадающее меню, настройки и введите IP адрес). Затем нажмите на значок розетки в правом верхнем углу.
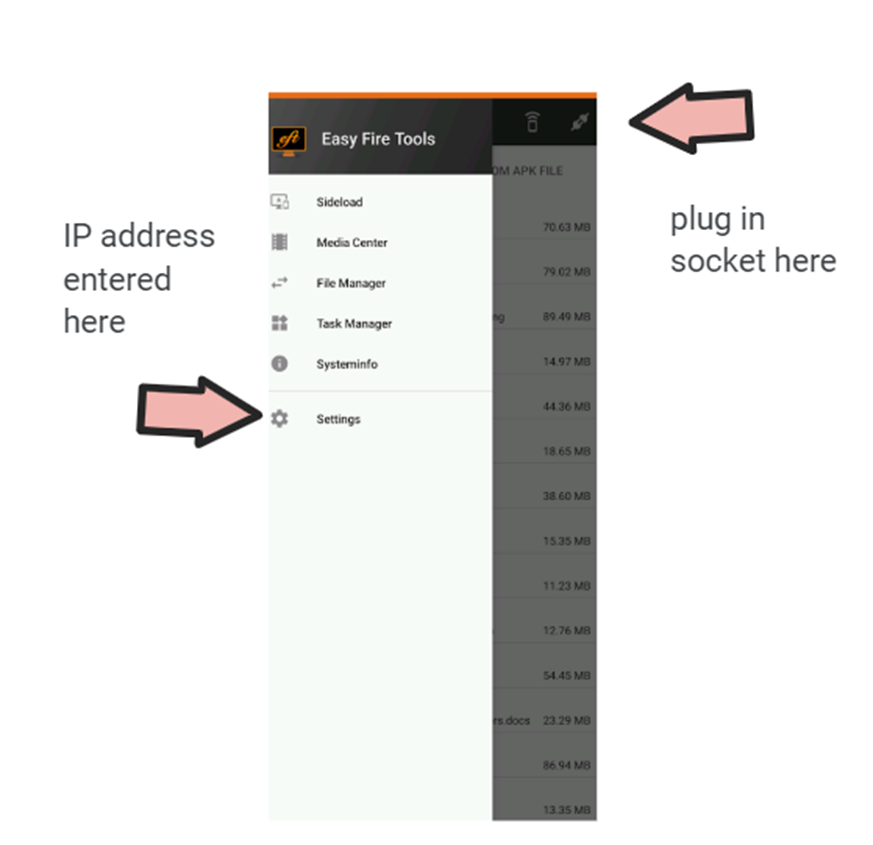
ШАГ 4) Следуйте инструкциям здесь для параллельной загрузки (т.е. передачи) Wear.apk на смарт-часы с помощью инструментов Easy Fire
Нажмите на сокет «plug-in» в приложении, чтобы загрузить Wear OS.apk на смартфон:

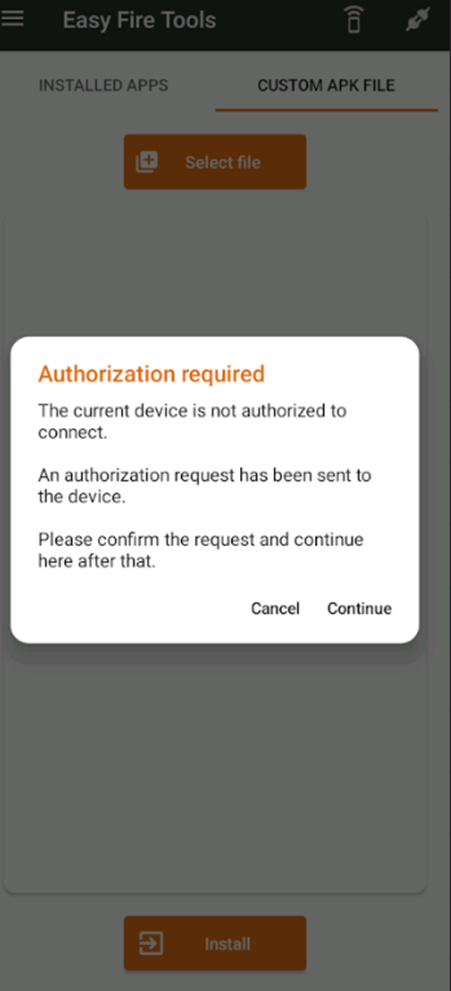
Следующий шаг > принять запрос на авторизацию на часах
Настройка связи между часами и телефоном AAPS
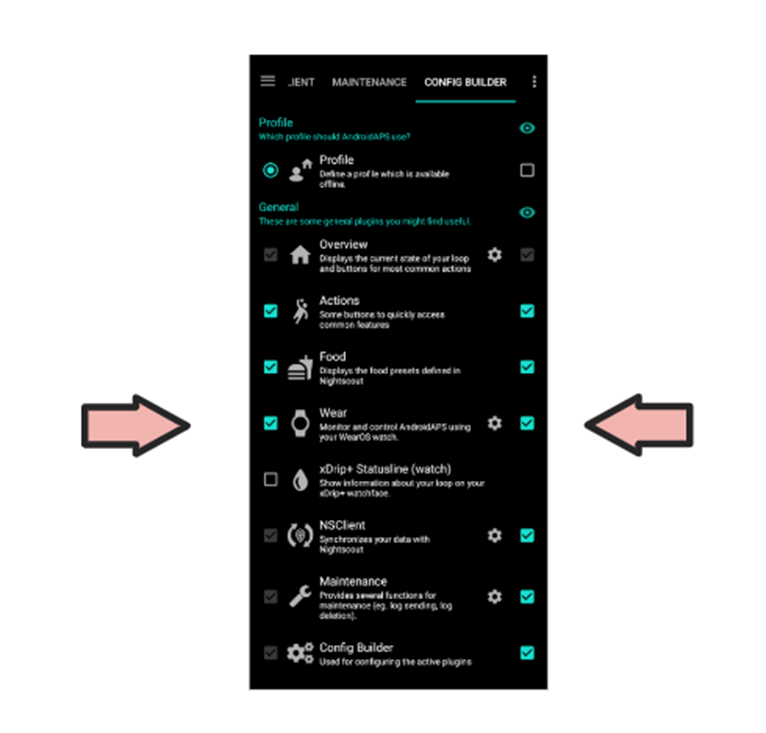
Последним шагом является настройка AAPS на телефоне для работы с AAPS Wear на часах. Для этого включите плагин Wear в Конфигураторе настроек:
● Перейдите в приложение AAPS на телефоне
● Выберите > Конфигуратор в левой вкладке
● Выберите «Wear» в разделе Синхронизация Конфигуратора
Чтобы изменить внешний вид циферблата AAPS выполните долгое нажатие на главный экран часов и перейдите к кастомизации. Затем проведите вправо, пока не дойдете до всех циферблатов AAPS.
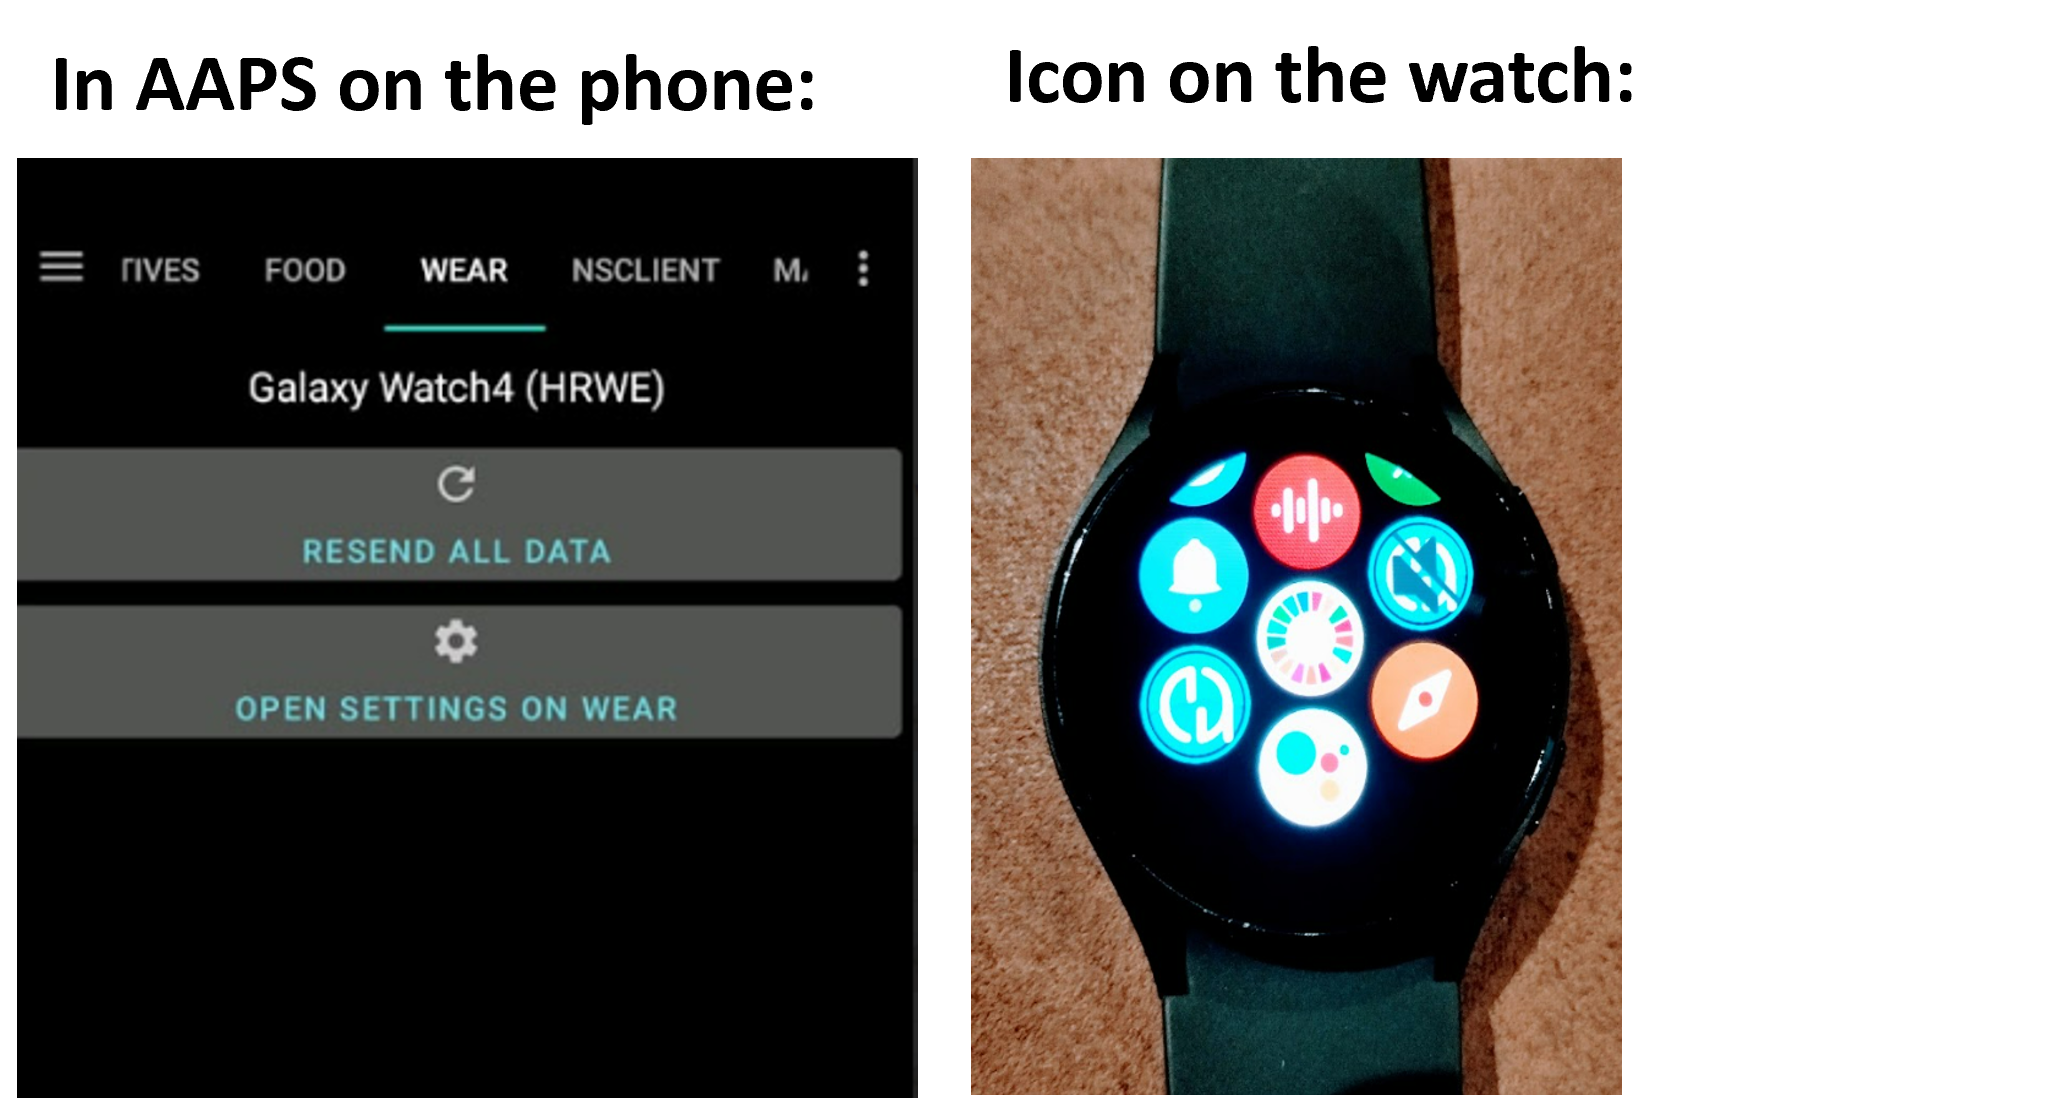
Если приложение AAPS Wear.apk успешно загружено в смарт-часы, оно будет выглядеть так:
Устранение неполадок связки AAPSчасы-AAPS телефон
Если инструменты EasyFire не сработали, или если «авторизация не выполнена» > проверьте правильность ввода IP-адреса.
Проверьте, что часы подключены к Интернету (а не просто подключены к телефону через Bluetooth).
Убедитесь, что телефон и смарт-часы AAPS сопряжены и связаны в приложении Samsung.
Жесткий перезапуск телефона и смарт-часов (включение и выключение телефона и часов) может устранить проблему подключения
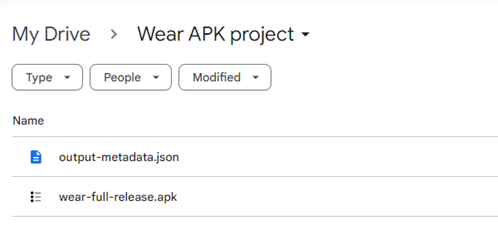
Если вам удалось загрузить Wear. телефон, но данных ГК не поступают, проверьте, что вы загрузили корректную версию apk AAPS на часы. Если ваша версия AAPS wear.apk указана как любая из следующих версий: a) «wear-AAPSClient-release»; b) «wear-full-release». aab’; или c) в заголовке присутствует слово «debug», то выбрана неправильная версия apk OS Wear во время сборки.
Убедитесь, что ваш роутер не изолирует устройства друг от друга.
Общее устранение неполадок можно найти здесь
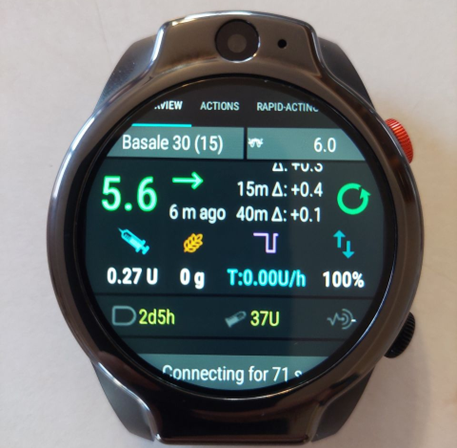
Контроль AAPS с помощью часов Wear
Once you have setup AAPS on your watch, extensive details about the smartwatch faces and their functions can be found in Operation of Wear AAPS on a Smartwatch.
As a brief overview, the following functions can be triggered from the smartwatch:
● set a temporary target
● use the bolus calculator (calculation variables can be defined in settings on the phone)
● administer eCarbs
● administer a bolus (insulin + carbs)
● watch settings
● status
● check pump status
● check loop status
● check and change profile, CPP (Circadian Percentage Profile = time shift + percentage)
● show TDD (Total daily dose = bolus + basal per day)
Communication from caregivers to the watch using other apps (like Whatsapp)
It is possible to add additional apps to the watch, like Whatsapp, for messaging (for example) between caregivers and kids. It is important only to have ONE Google account associated with the phone, or the watch will not bring this data across. You need to be 13 or older to have a Samsung account, and this needs to be set up in the same email address which is used on the Android phone.
A video explaining getting Whatsapp setup for messaging on the Galaxy 4 watch (you can’t get full functionality of Whatsapp) is shown here
Making adjustments in both the Galaxy wearable app on the AAPS phone and the watch makes it possible for Whatsapp messages to announce with a slight vibration, and also for the Whatsapp message to display over the existing watchface.
Устранение неполадок со смарт-часами Sony
Несмотря на то, что производство Sony SW3 было прекращено несколько лет назад,, смотрите: Решение проблем Sony Smartwatch SW 3
Вариант 3) AAPS на смарт-часах, для дистанционного управления AAPS на телефоне
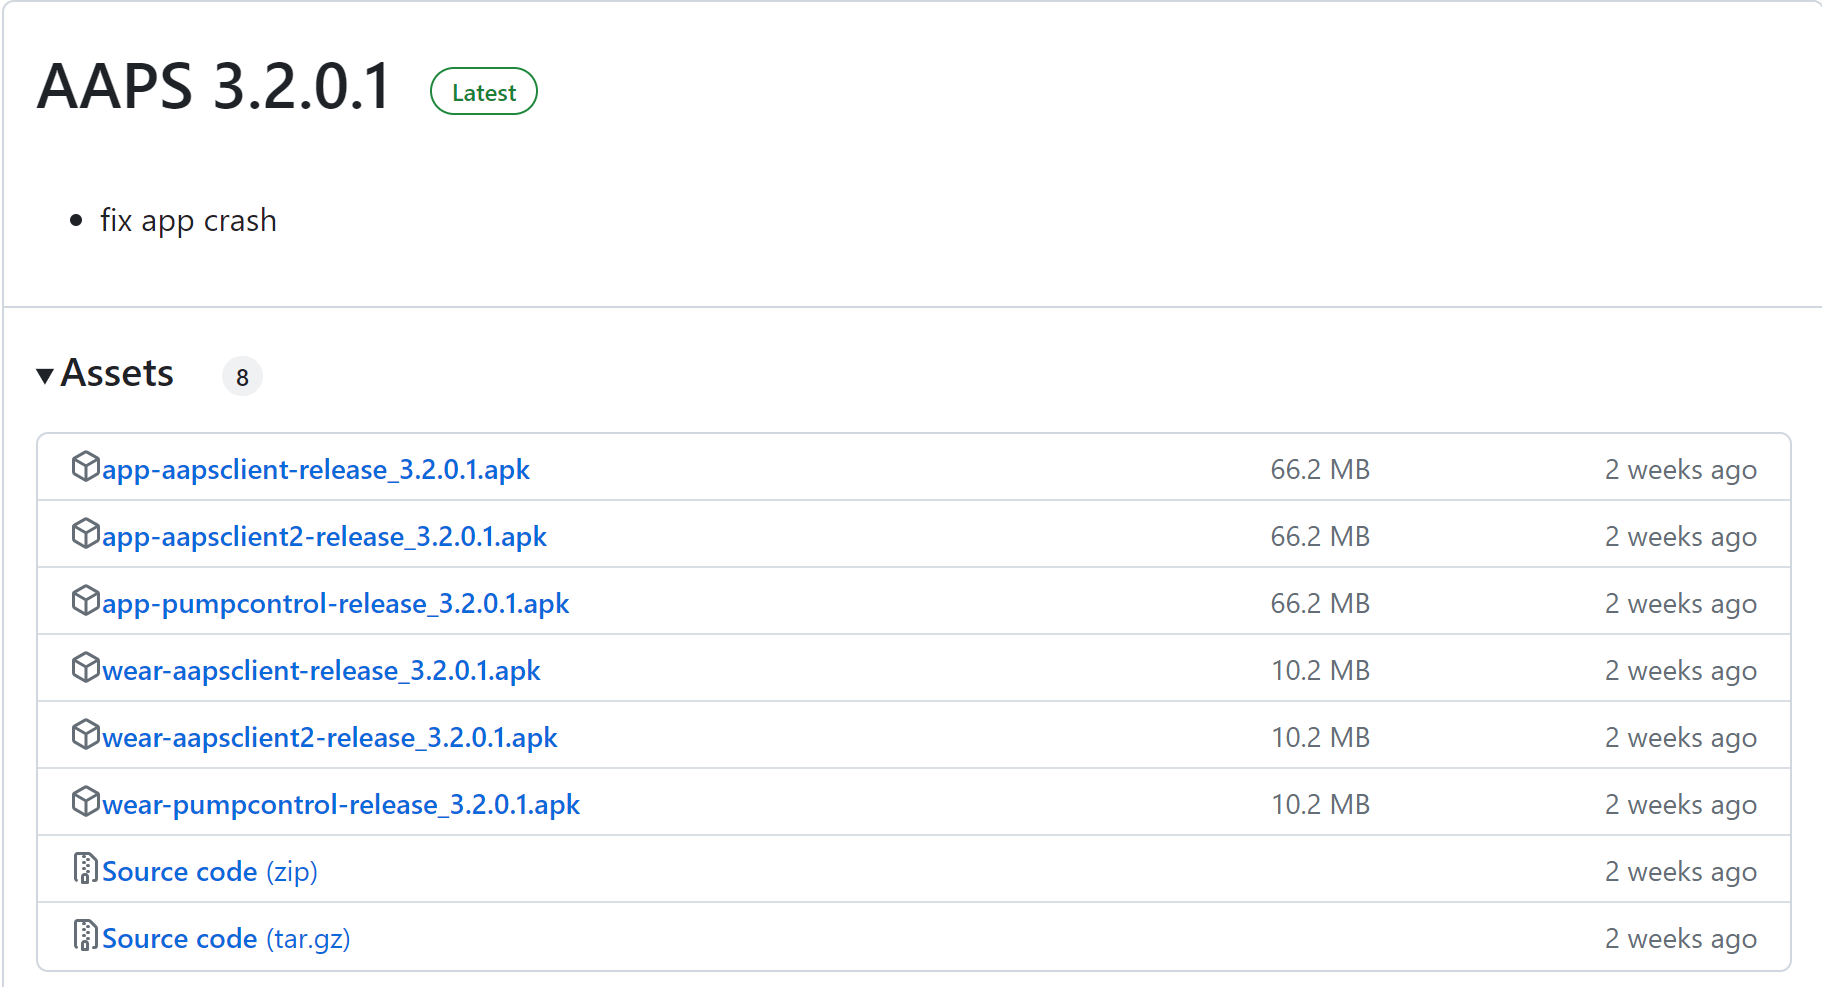
Программное обеспечение для часов, AAPSClient Wear apk, можно загрузить непосредственно с Github.
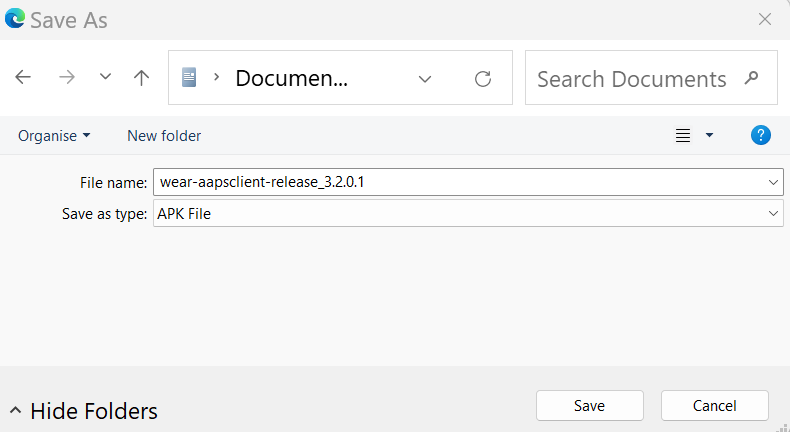
Чтобы скачать приложение, нажмите на требуемое приложение (на этом снимке экрана, либо wear-aapsclient-release_3.2.0. либо wear-aapsclient2-release_3.2.0. будут работать, есть две версии (копия для второго опекуна):
Затем «сохранить как» и сохранить файл в удобном месте на компьютере:
AAPSClient может быть перенесено на телефон и параллельно загружено на часы так же, как и приложение AAPS Wear, как подробно описано в Передача Wear на телефон
Вариант 4) Nightscout с ограничениями (и другими опциями) на часах - часы Fitbit
«Sentinel»(дозор)-циферблат, разработанный Ryan Chen для членов семьи и бесплатно выложенный для смарт-часов Fitbit: Sense1/2, Versa 2/3/4. fitBit Luxe не совместим с FitBit Luxe, так как это только фитнес-трек. Sentinel можно загрузить с мобильных приложений для FitBit.
Он позволяет контролировать гликемию 1,2 или 3 человек, используя либо Dexcom Share, либо Nightscout или сочетание двух источников данных.
Также можно использовать xDrip+ или SpikeApp, в локальном режиме веб-сервера. Пользователи могут установить свои сигналы оповещений и отправлять события, используя функциональность портала терапии Nightscout непосредственно с часов для отслеживания инсулина на борту (IOB), активные углеводы(COB), вводить информацию о питании (количество углеводов и болюсов) и проверить ГК.
Все они появятся в графике Nightscout и в обновленных значениях полей активного инсулина IOB и углеводов COB. Поддержку пользователей можно найти в группе Facebook, Sentinel.
Есть дополнительные опции для часов FitBit, которые, как представляется, предназначены только для мониторинга. Сюда входит Glance. Эти дополнительные опции описаны на веб-страницах Nightscout
Вариант 5) Мониторинг AAPS (полные данные профиля или только гликемия), когда AAPS работает на телефоне.
Эти варианты описаны в разделе только слежение документации.
В общем, существует широкий ассортимент доступных смартфонов, которые могут обеспечить только отображение ГК. Если вы пользуетесь сайтом Nightscout, то хороший обзор всех параметров дан на страницах Nightscout.