Wie man die Dokumentation bearbeitet
An dieser Stelle wird nur die Bearbeitung der englischen Dokumentation erläutert. Alle neuen Informationen müssen zuerst in Englisch eingegeben werden. Falls du diese in eine andere Sprache übersetzen willst (Danke dafür!), nutze bitte crowdin.
Hinweise zum Formatieren von Texten (Überschriften, fett…) und zum Setzen von Links findest Du weiter unten auf dieser Seite im Bereich „Code-Syntax“.
Allgemein
For any questions, feedback or new ideas you can contact the documentation team via discord.
At some point it will be suggested that you make a pull request (PR), which is how your changes in the documentation are actually put onto the AAPS webpages, which are stored in GitHub. It’s actually not too hard to do a PR and it is a great way to contribute. You are reading this documentation right now because people like you made PRs. Don’t worry about making a mistake or somehow editing the wrong documents. Your changes are reviewed before they are merged into the „formal“ AAPS documentation repository. You can’t mess up the originals through any accidents in the process. The general process is:
Mache Änderungen und Verbesserungen am Code oder der Dokumentation, indem du das bestehende Dokument veränderst.
Vergewissere dich, dass die Änderungen gut aussehen.
Füge Notizen hinzu, damit andere die Änderungen verstehen können.
Erstelle einen Pull-Request, durch den die Administratoren aufgefordert werden deine Änderungen zu verwenden.
Sie werden sich das anschauen und entweder (1) deine Änderungen übernehmen (2) deine Änderungen kommentieren oder (3) ein neues Dokument mit deinen Änderungen erstellen.
(Randbemerkung: Wenn Du ein visueller Lerner bist, gibt es hier ein YouTube Video, das den PR-Prozess darstellt.)
In unserem Beispiel nehmen wir nun eine Änderung an der AndroidAPS-Dokumentation vor. This can be done on any Windows PC, Mac, etc. (any computer with Internet access).
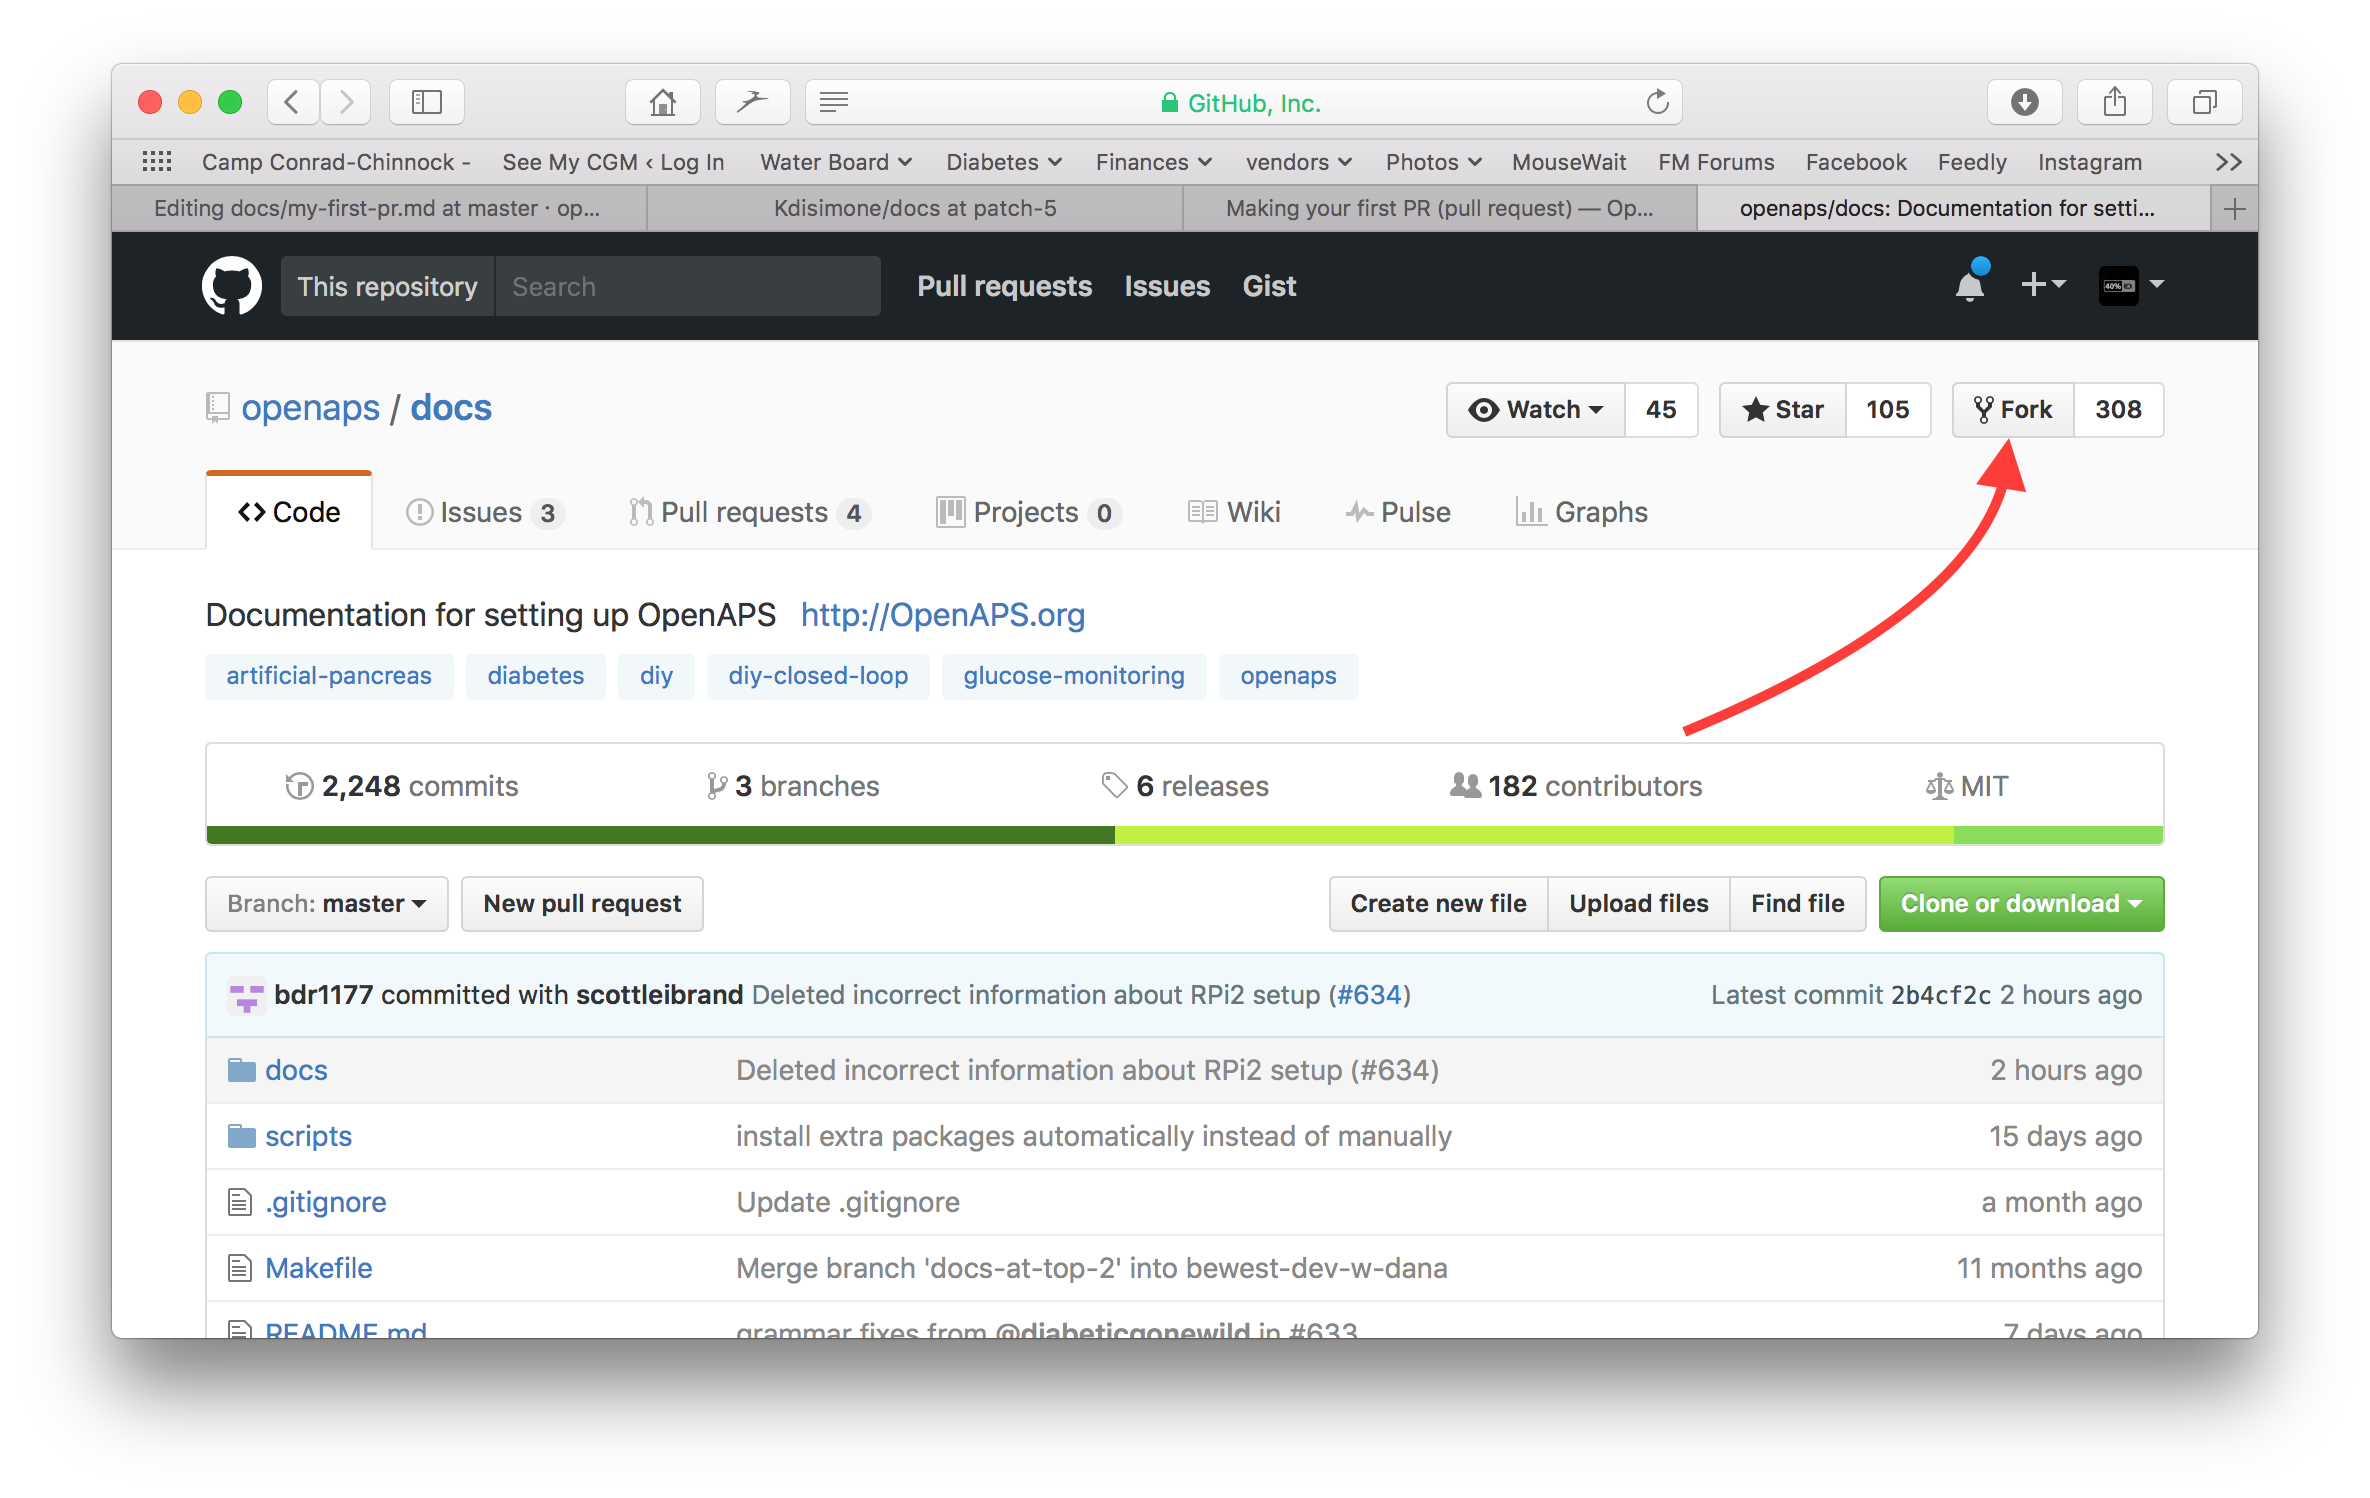
Gehe zu https://github.com/openaps/AndroidAPSdocs und klicke auf „Fork“ oben rechts, um deine eigene Kopie des Repositories (=Quell-Code) zu machen.
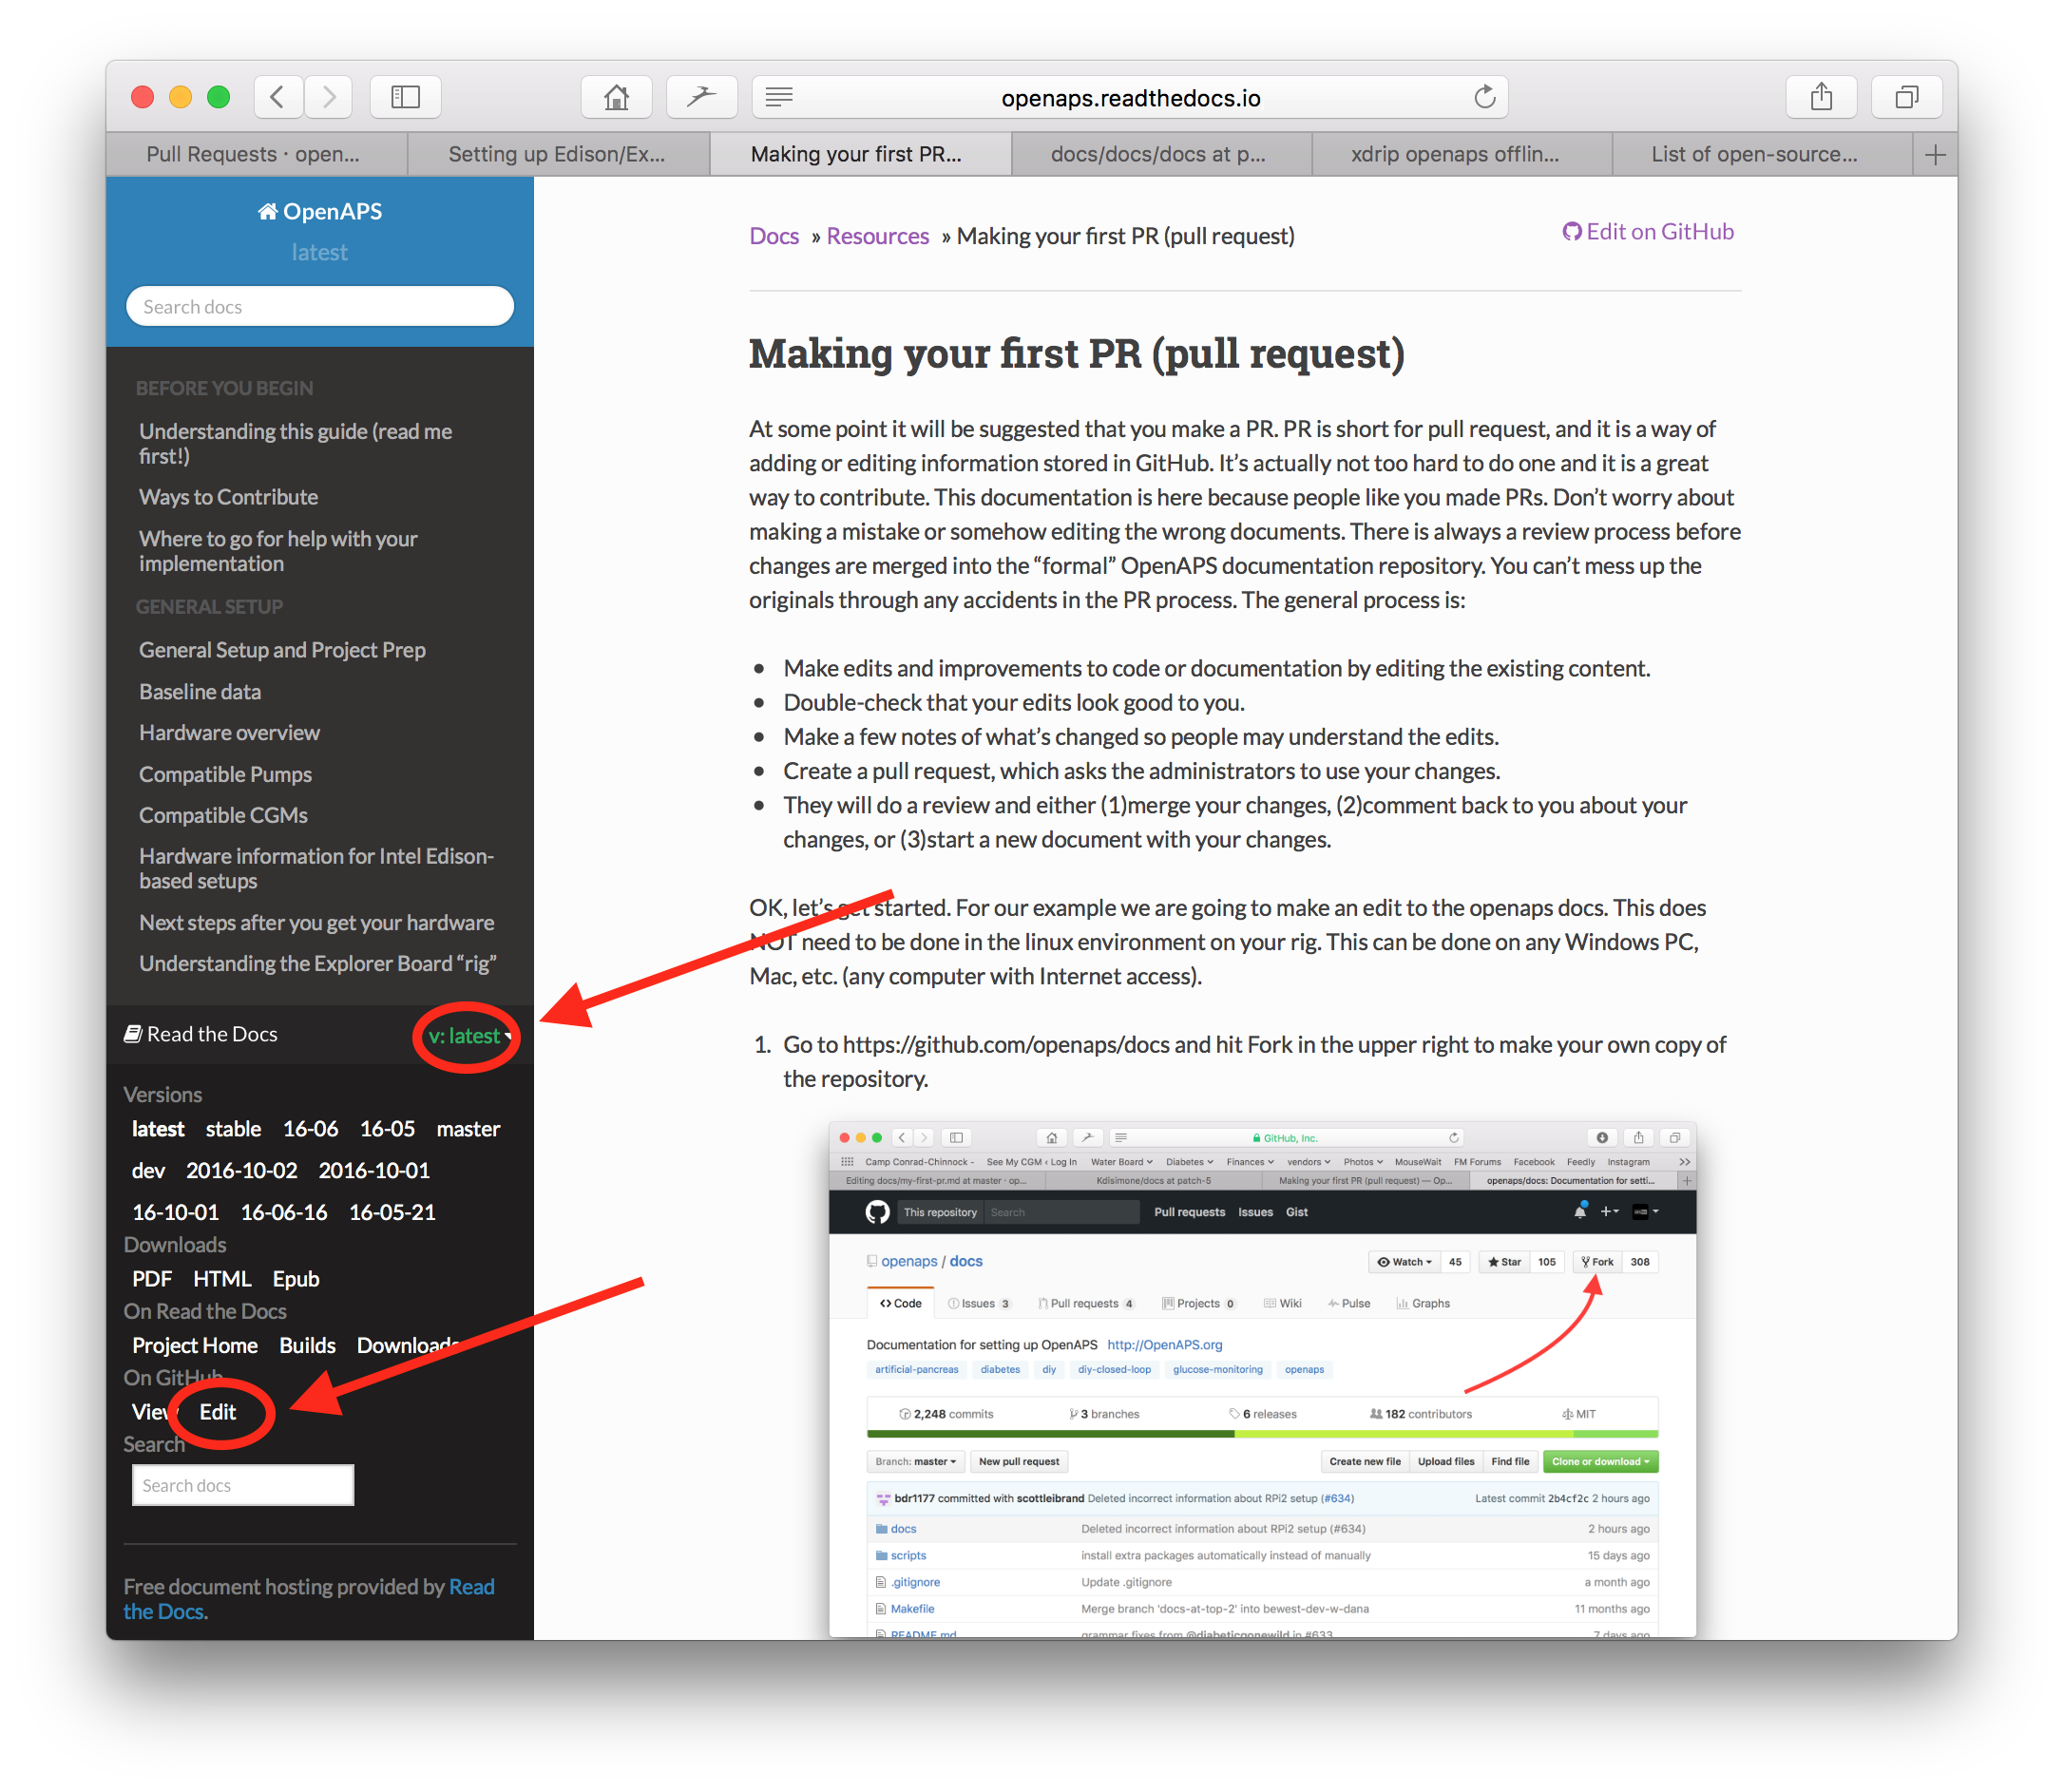
Wechsle zu einer beliebigen Seite und navigiere zu der Seite, die du bearbeiten möchtest. Klicke auf die Black-Box unten links in der Seite mit dem grünen Wort „v: newest“ oder ähnliches. Es öffnet sich ein Pop-Up-Fenster. Klicke in diesem auf „edit“, um in GitHub zu bearbeiten.
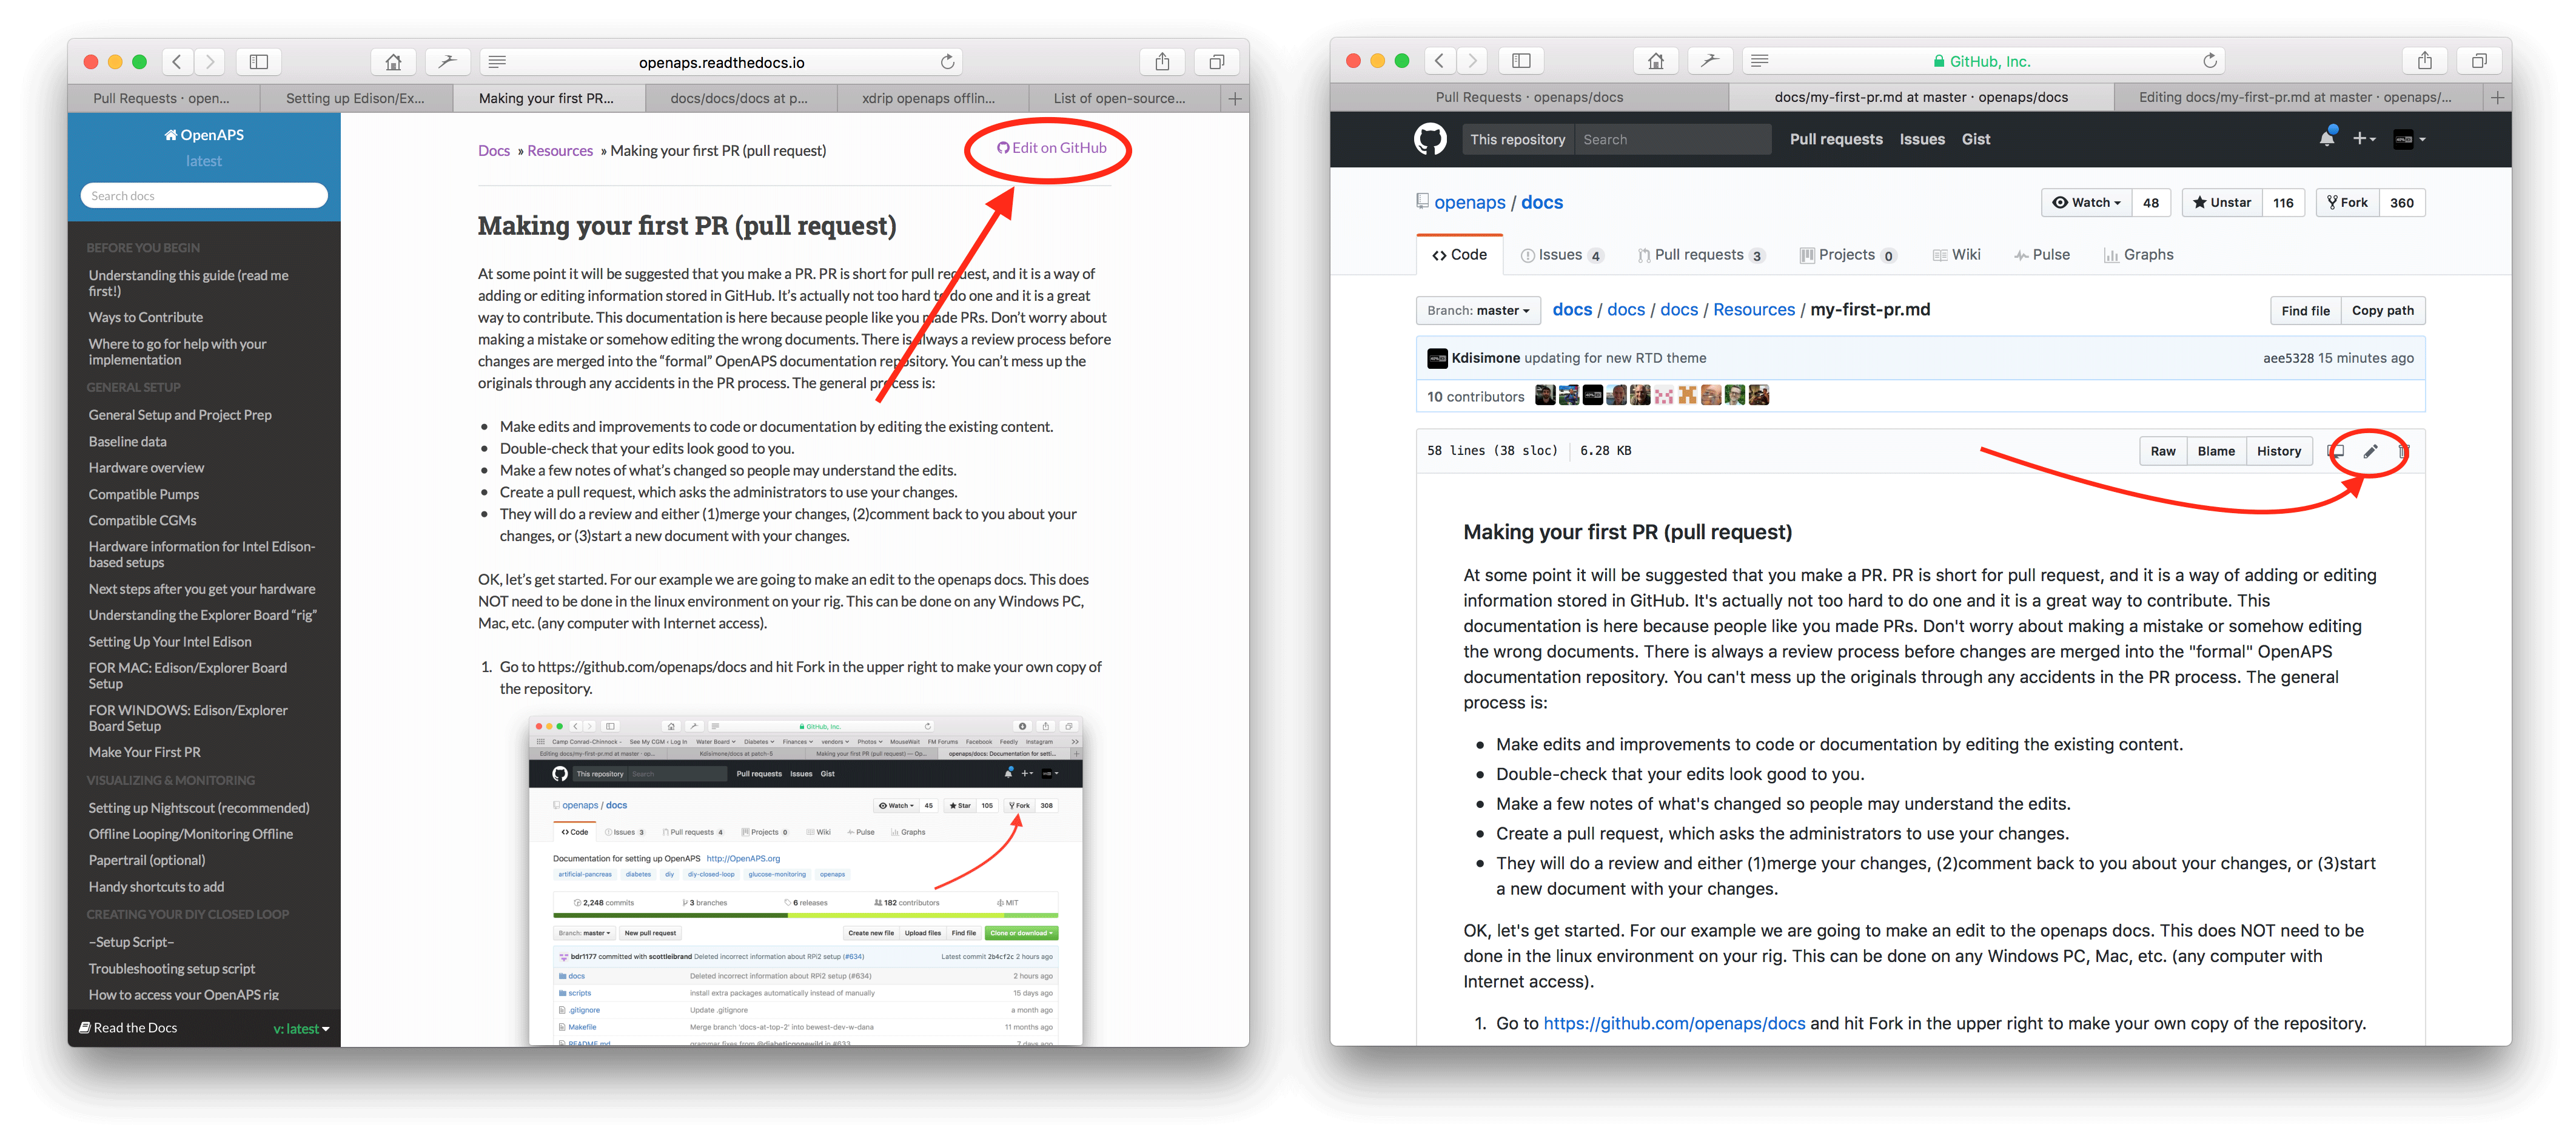
Or you can click on the „Edit in GitHub“ link in the upper right corner, and then click the pencil icon that appears in the top bar of the page contents to be edited. You will need to be already logged into your Github account to do this (if you don’t have one, they are straightforward to set up).
Beide Optionen in Schritt 2 führen dazu, dass ein neuer Branch in DEINEM kopierten Repository erstellt wird, wo die Änderungen gespeichert werden sollen. Editiere die Datei.
We are using markdown for the docs pages. The file have got the suffix „.md“.The Markdown specification is not fixed and we use at the moment the myst_parser for our markdown files. Take care to use the correct syntax as described below.
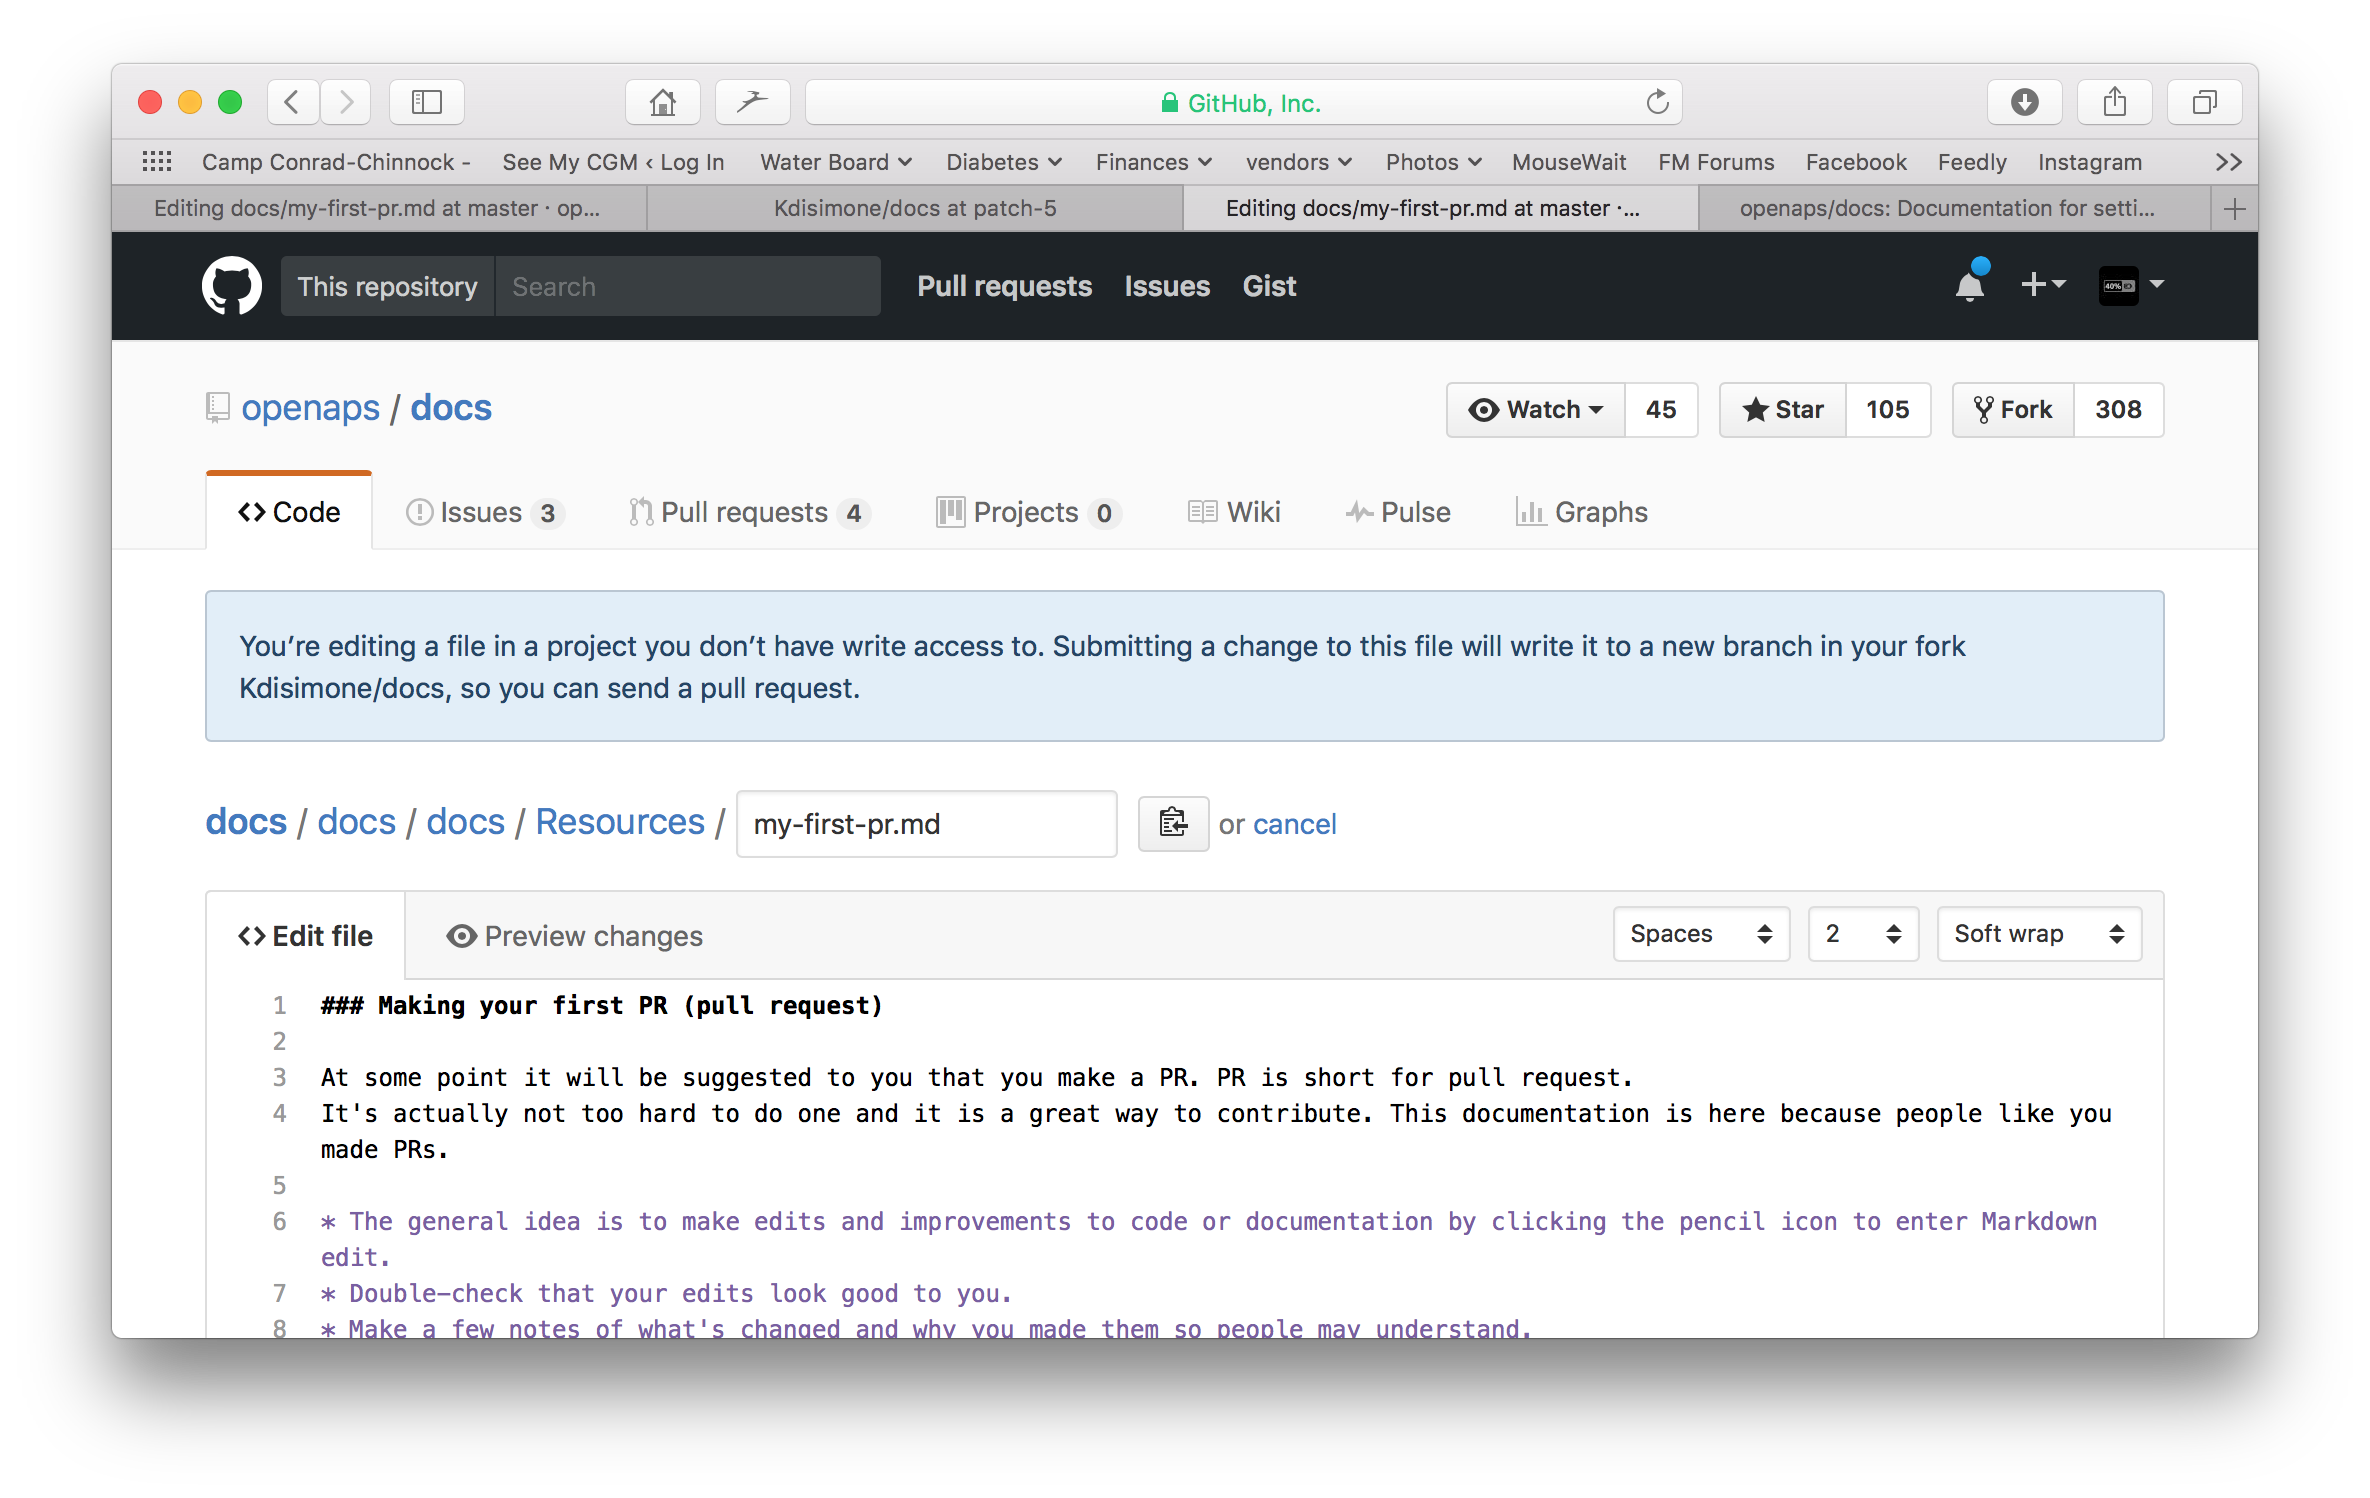
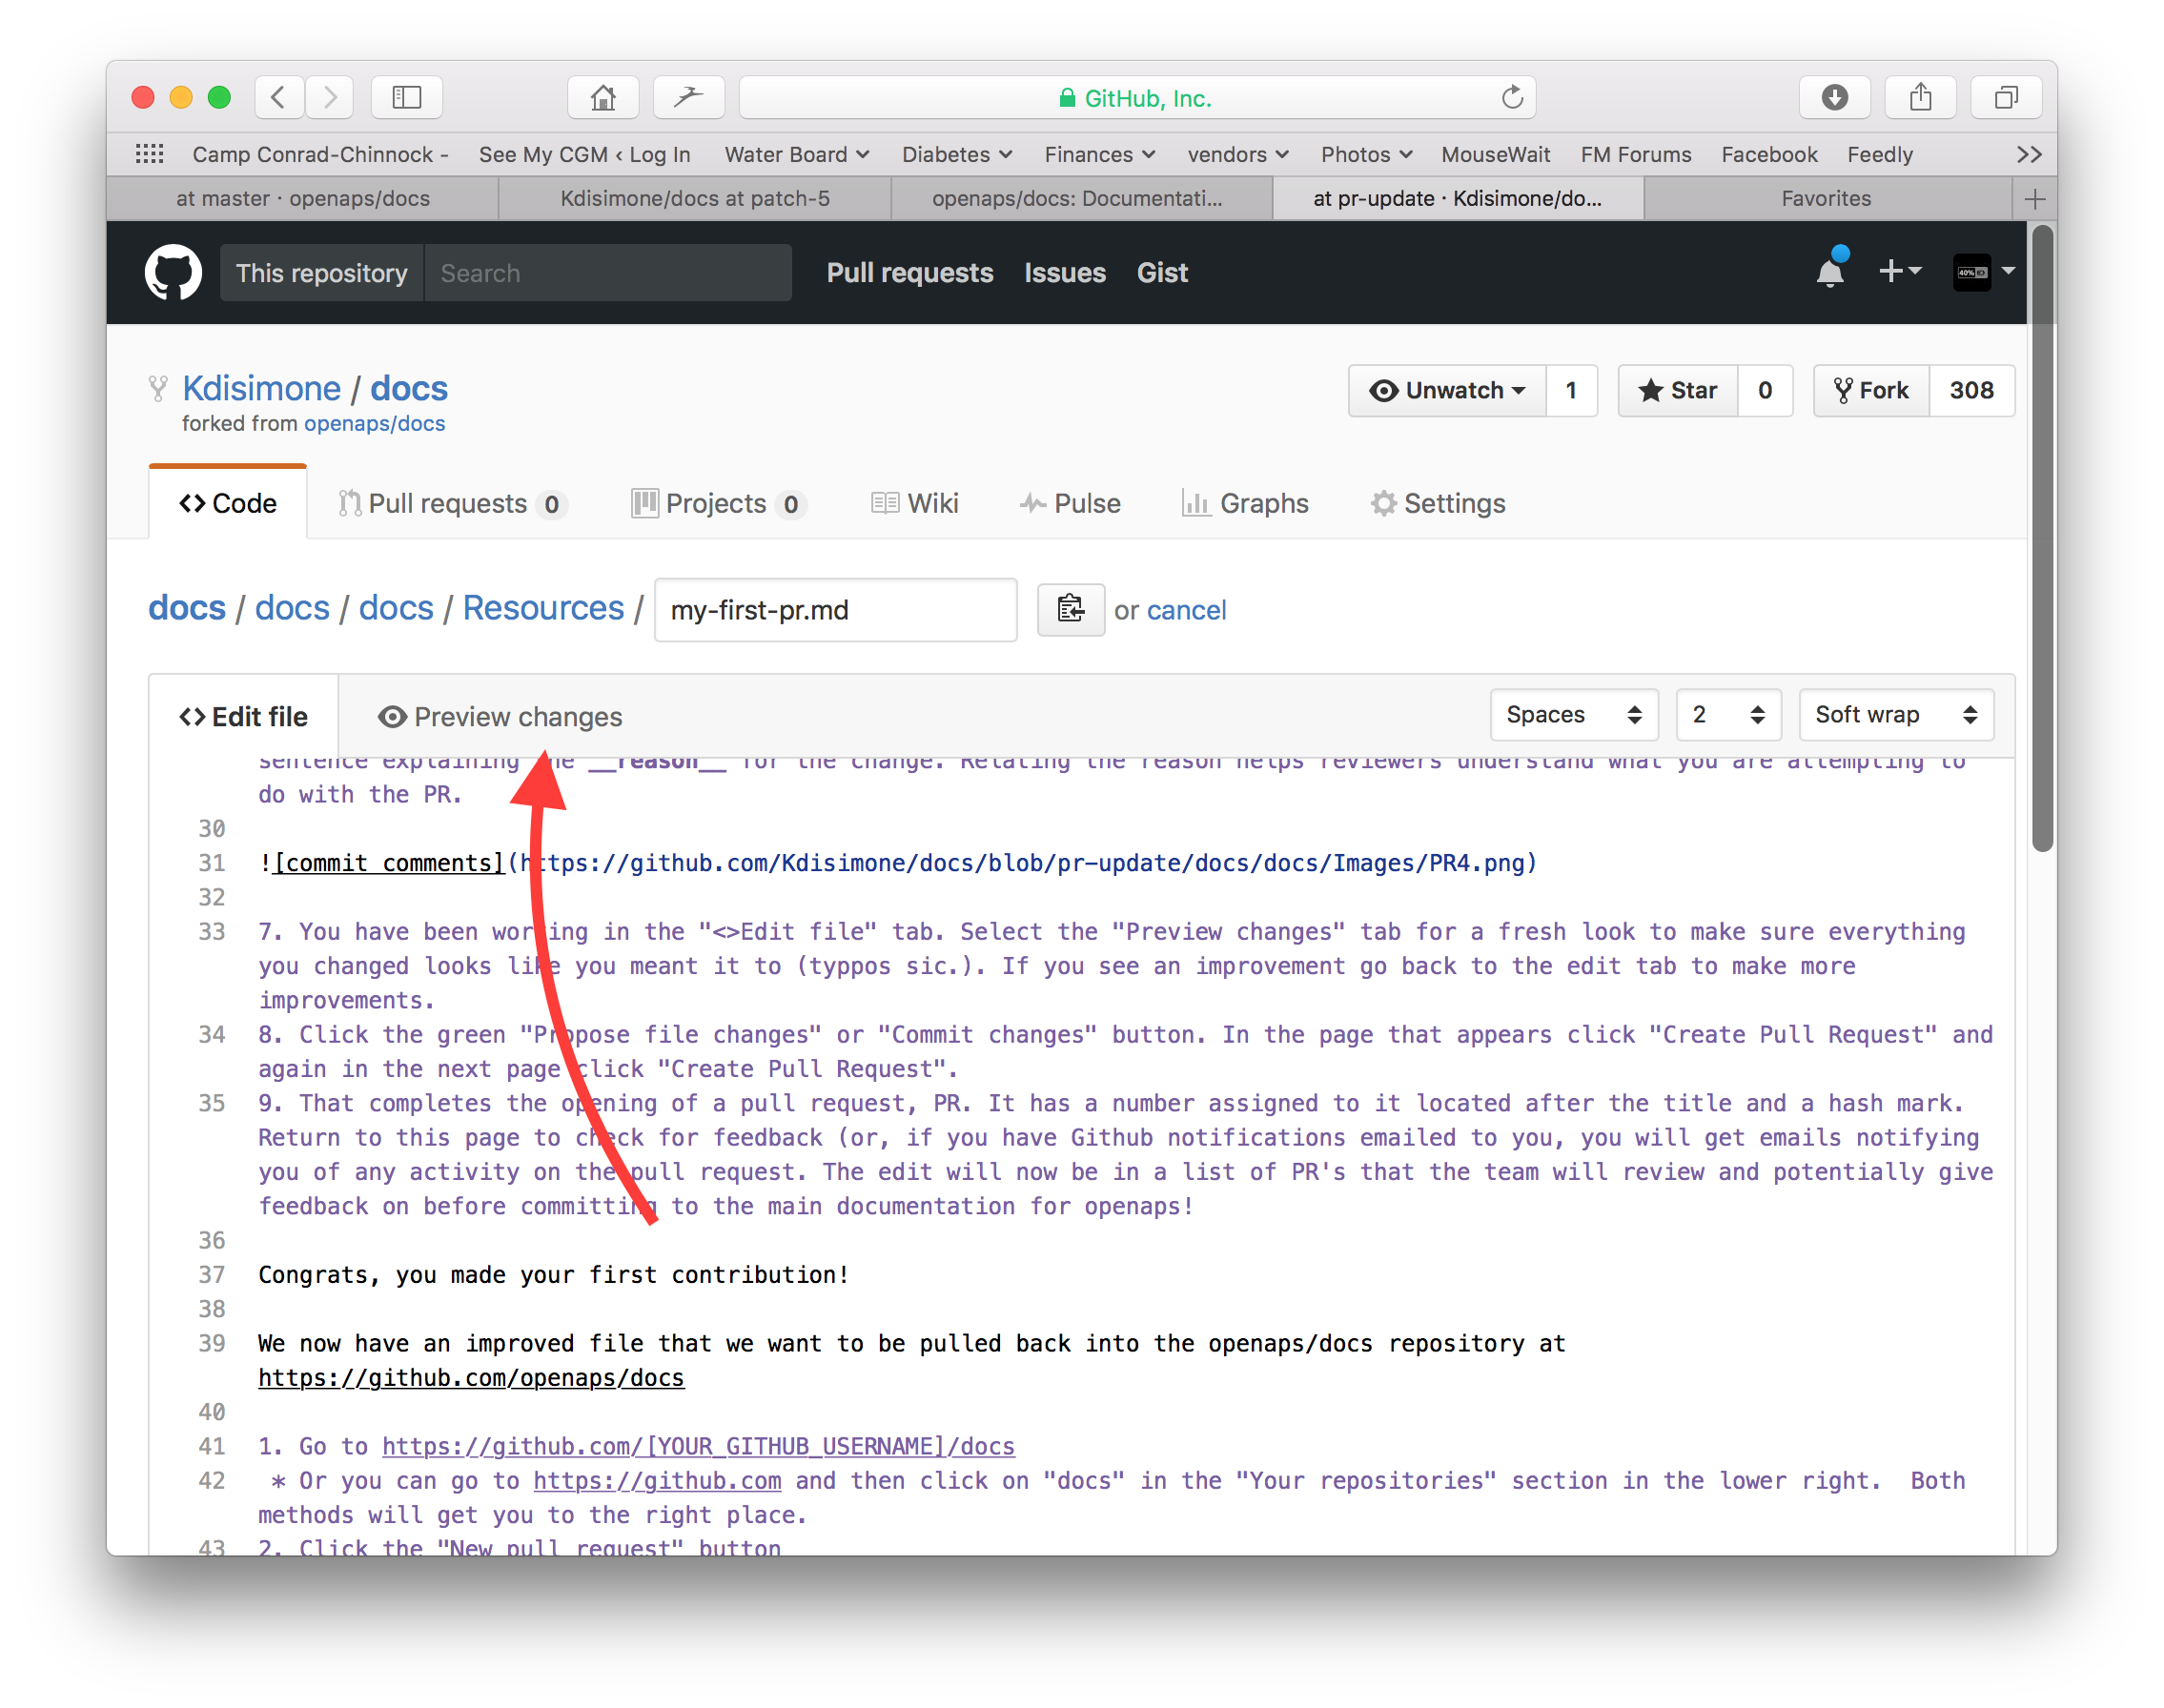
Du arbeitest im „<>Edit file“ Reiter. Wechsle zum „Preview changes“ Reiter, um auf die Vorschau einen Blick zu werfen, damit alles was du geändert hast so aussieht wie du es wolltest (Rechtschreibfehler prüfen). Wenn du etwas entdeckst, das ausgebessert werden muss, wechsle wieder zum edit Reiter, um die Ausbesserungen vorzunehmen.
Wenn du mit deinen Änderungen fertig bist, scrolle zum Seitenende. In der Box am Seitenende solltest du deine Kommentare im Textfeld namens „Add an optional extended description…“ einfügen. Der Standardtitel beinhaltet den Dateinamen. Versuche einen Satz dazu zu schreiben, warum du etwas geändert hast. Die Angabe des Grundes hilft den Admins zu verstehen, was du mit deinem PR bezweckst.
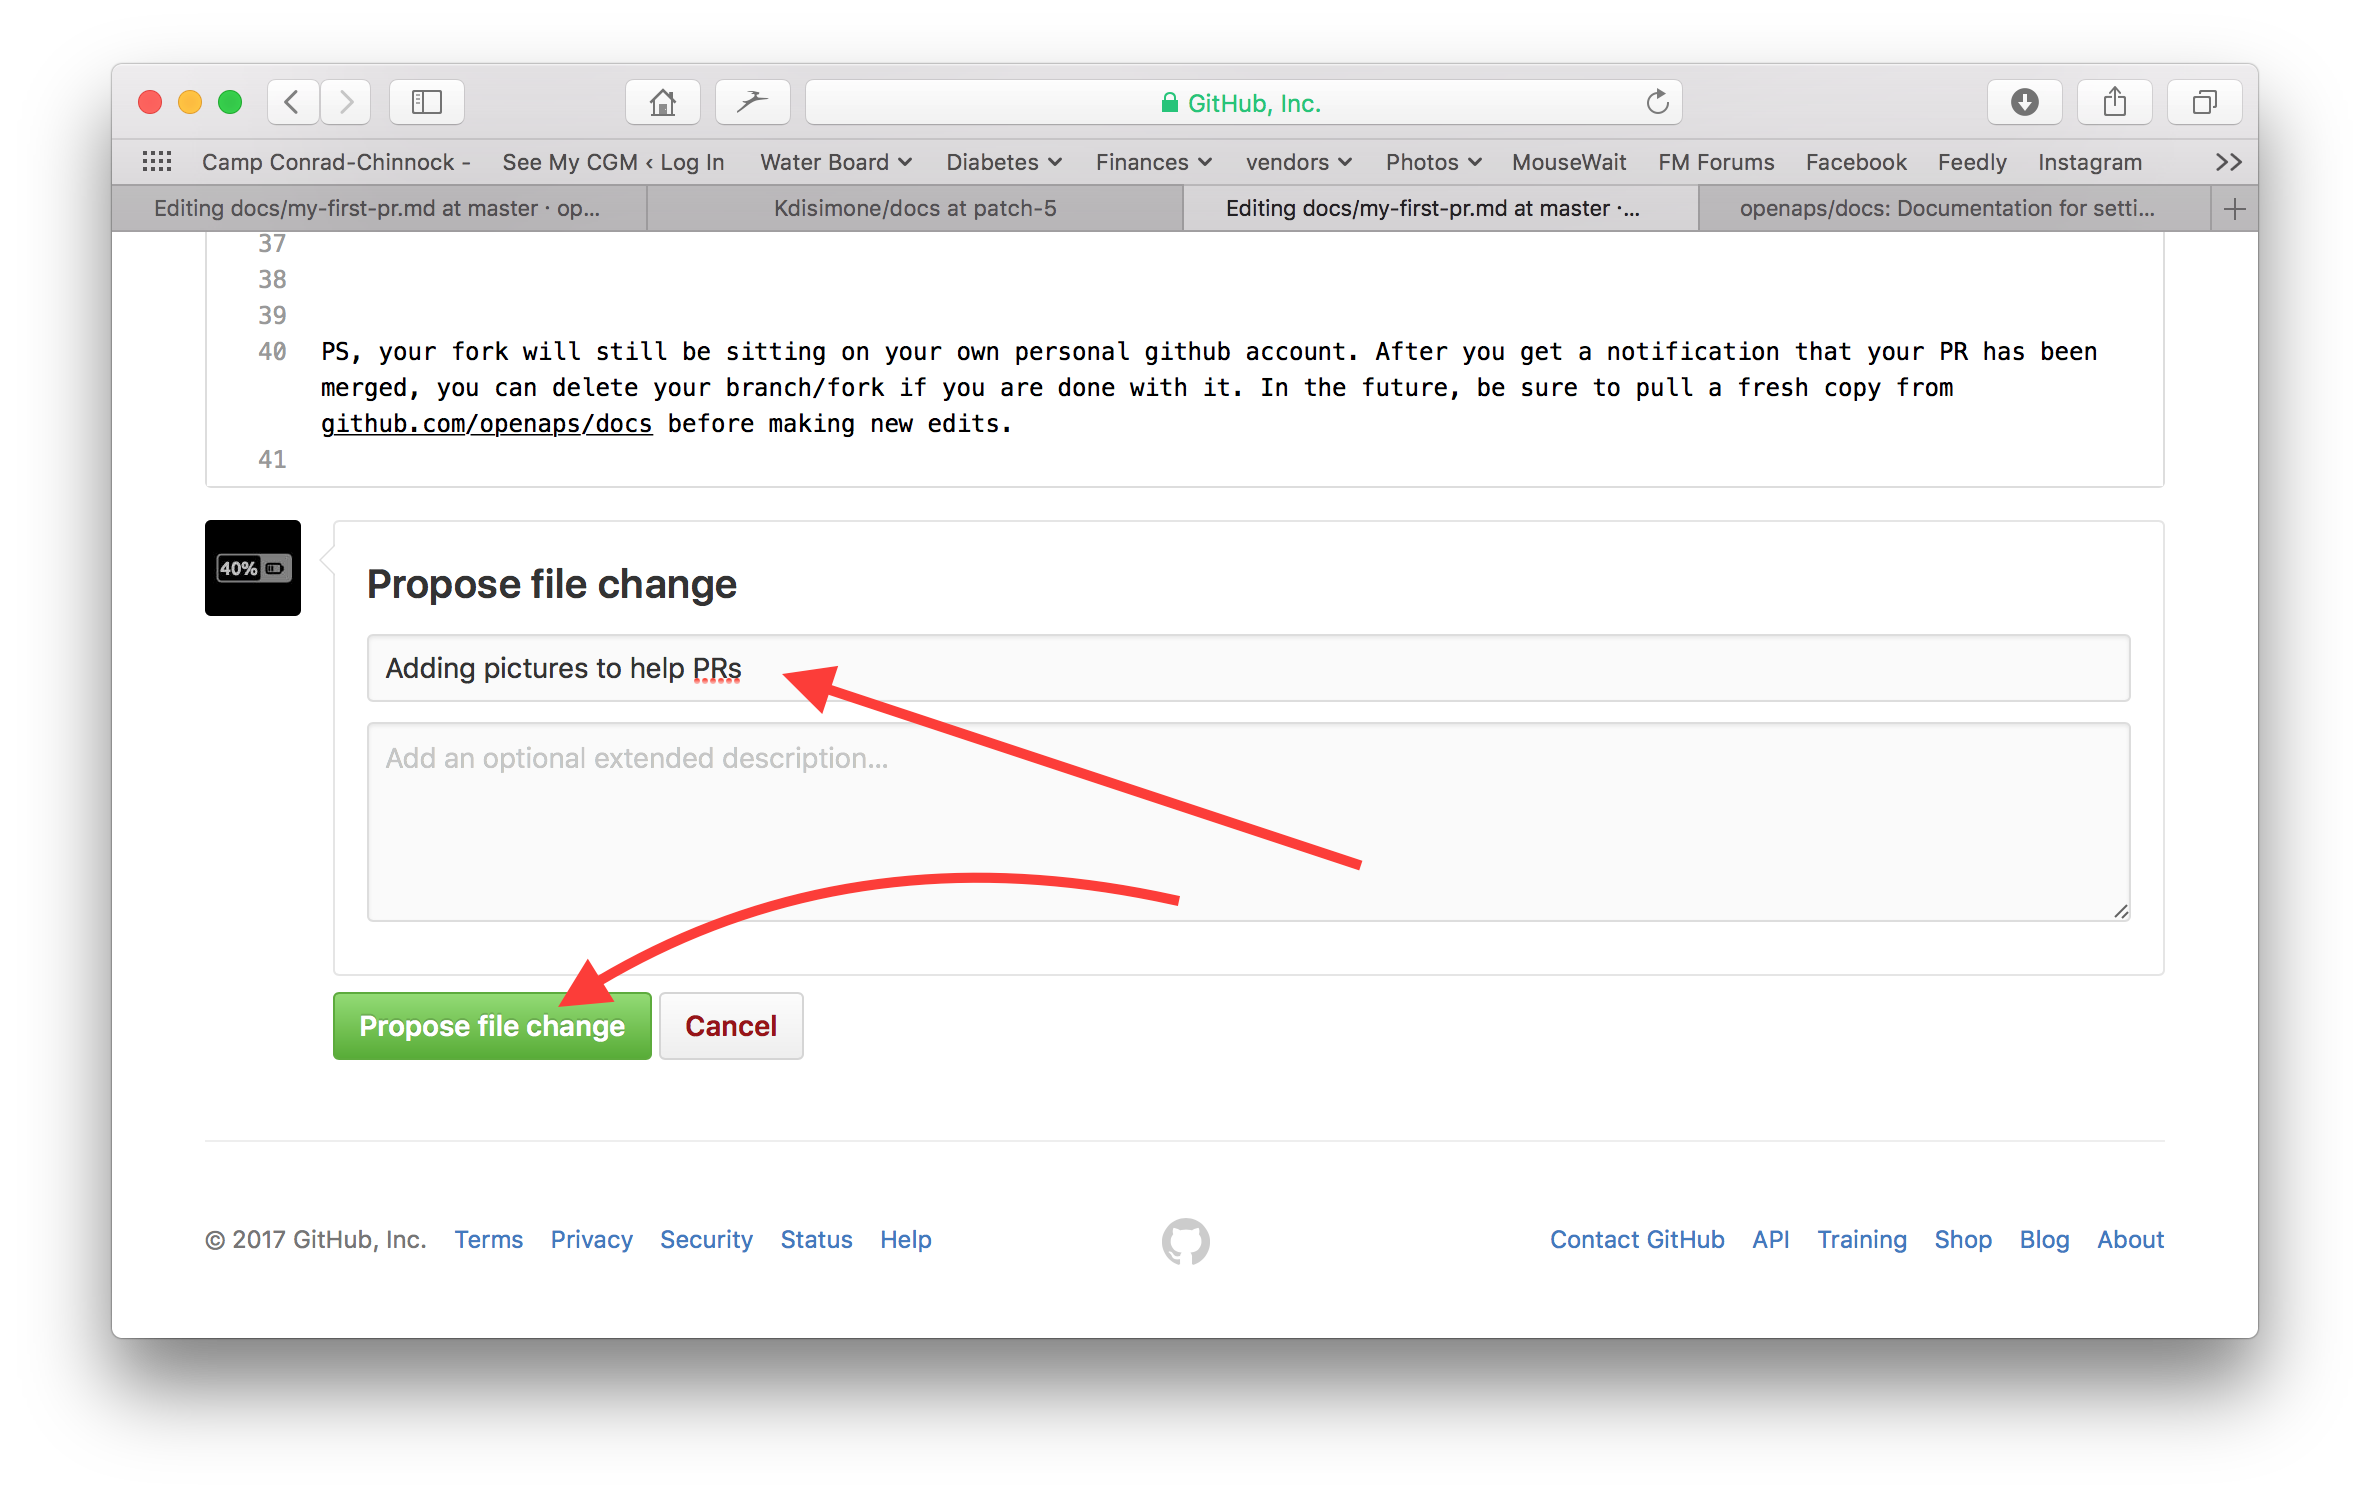
Klicke auf den grünen „Propose file changes“ (Änderungen vorschlagen) oder „Commit changes“ (Änderungen integrieren) Button. Auf der Seite, die dann erscheint, klicke auf „Create Pull Request“ und auf der dann erscheinenden Seite klicke auf „Create Pull Request“.
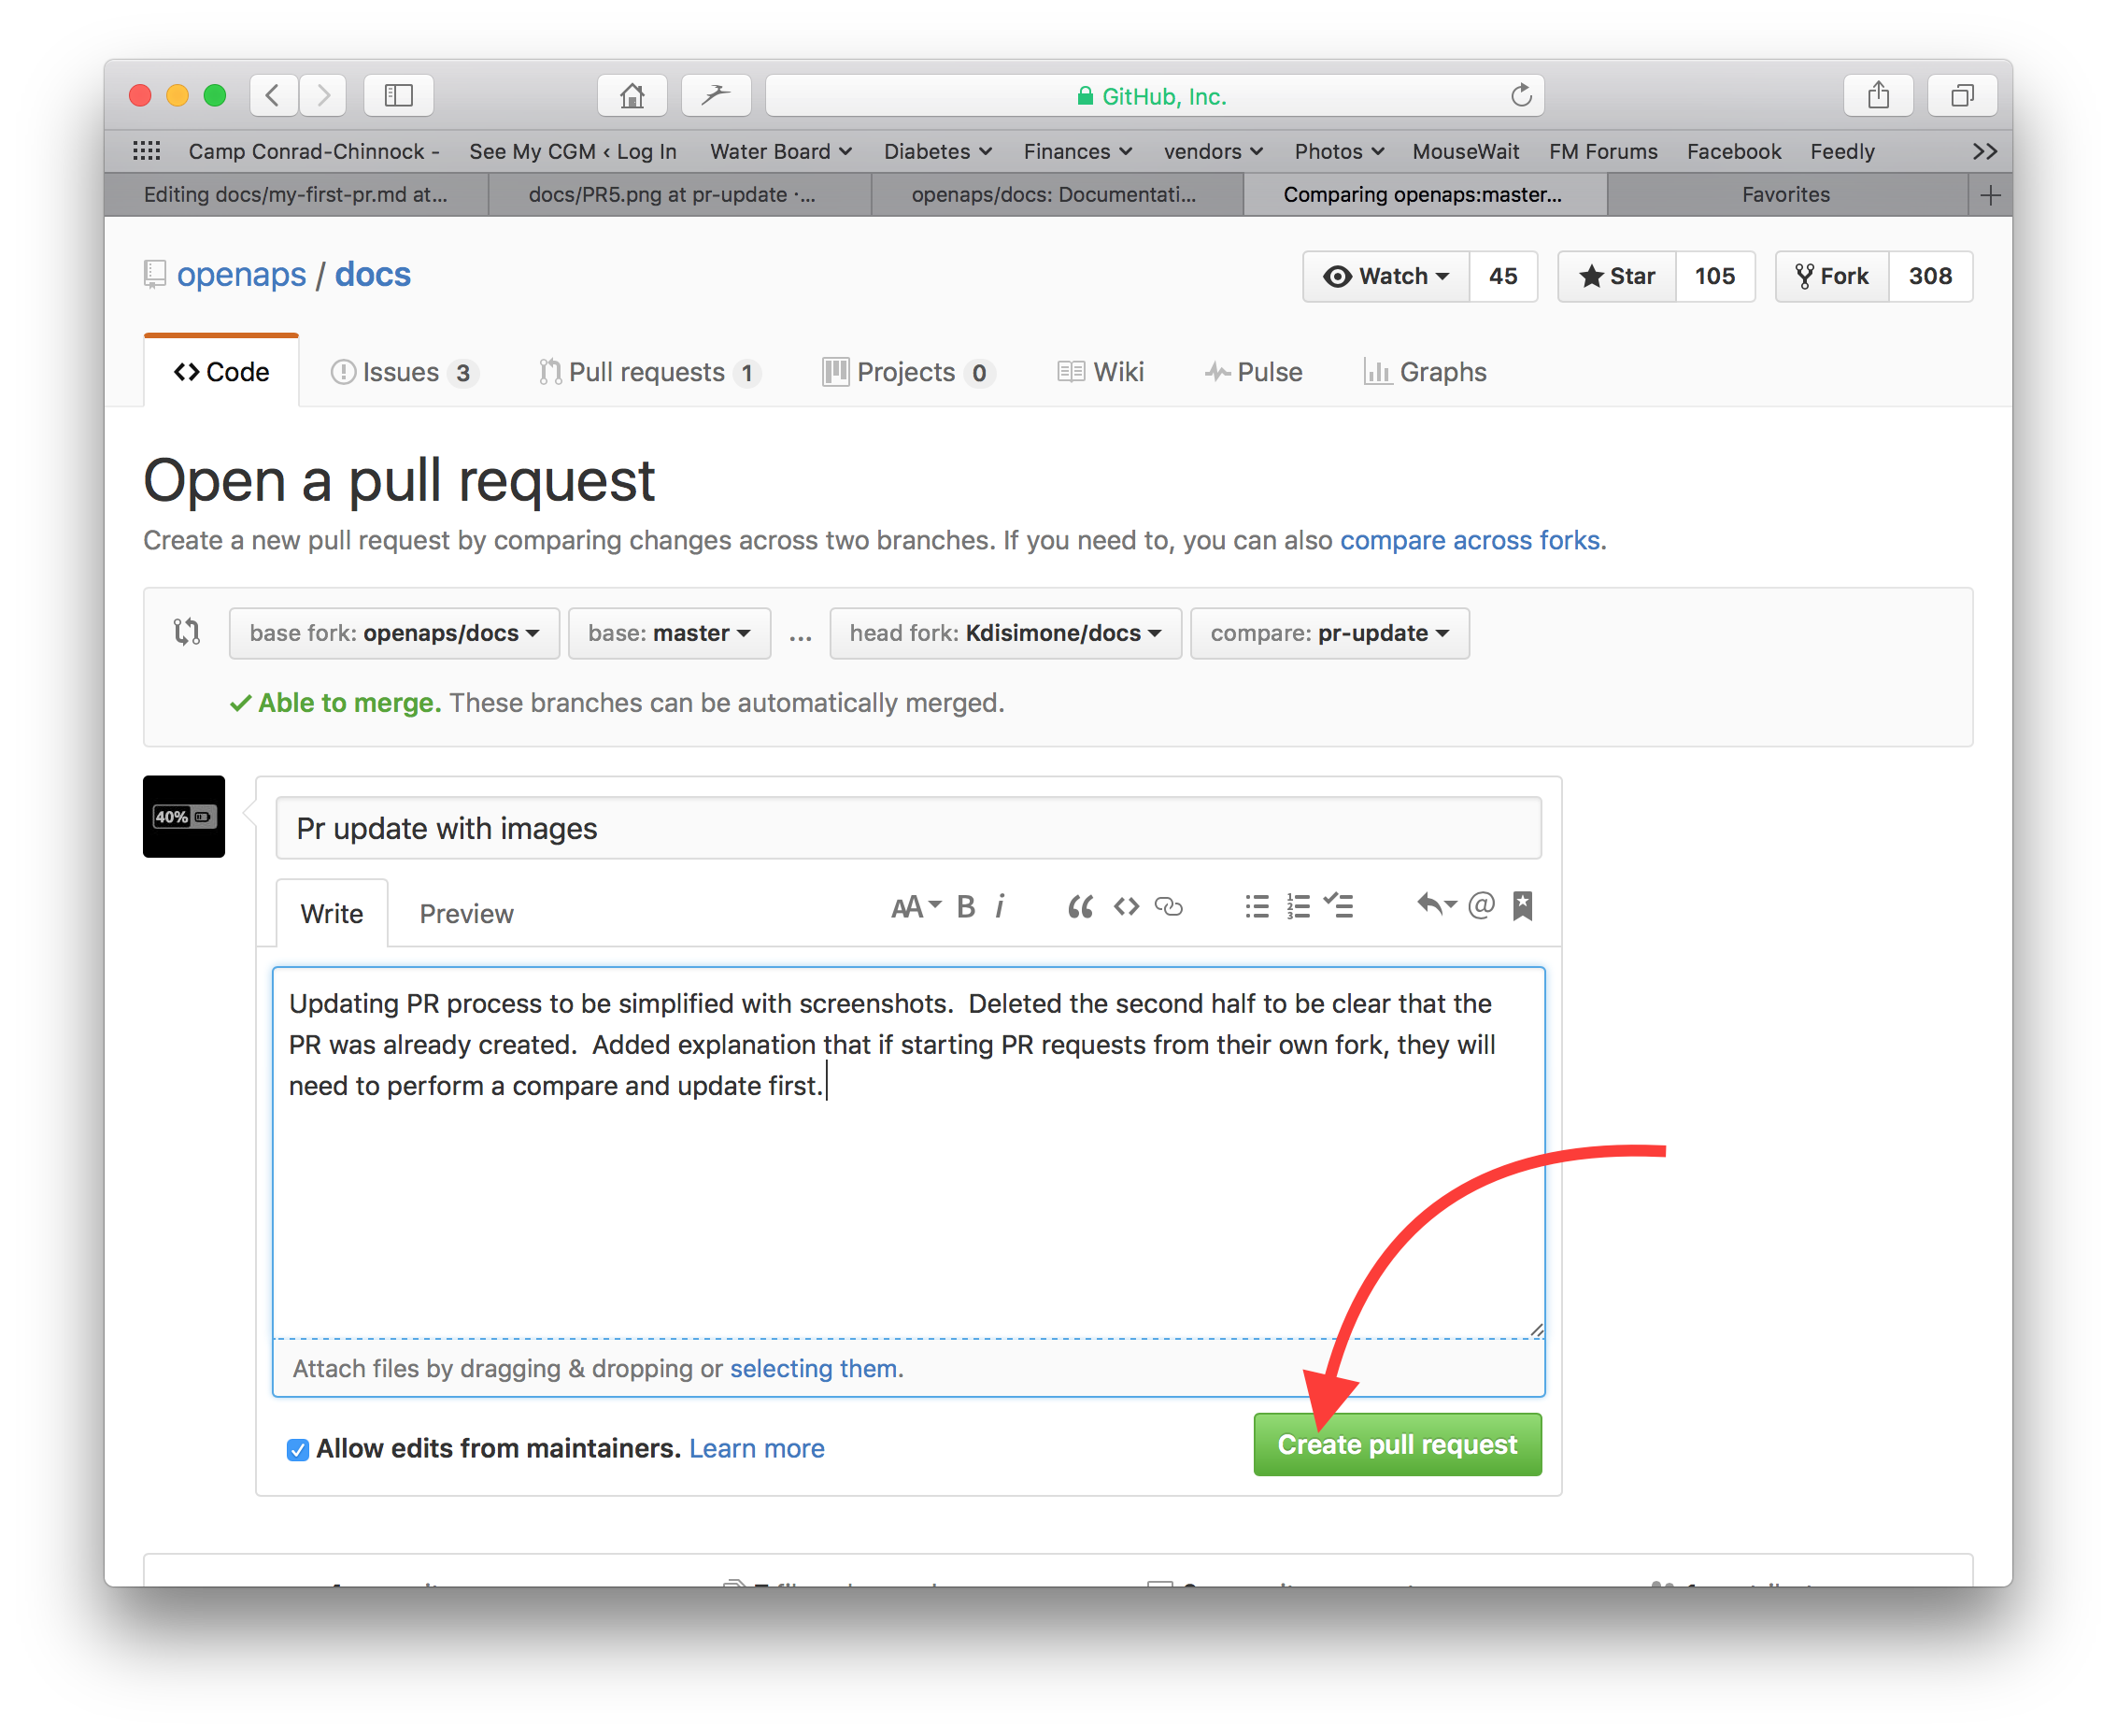
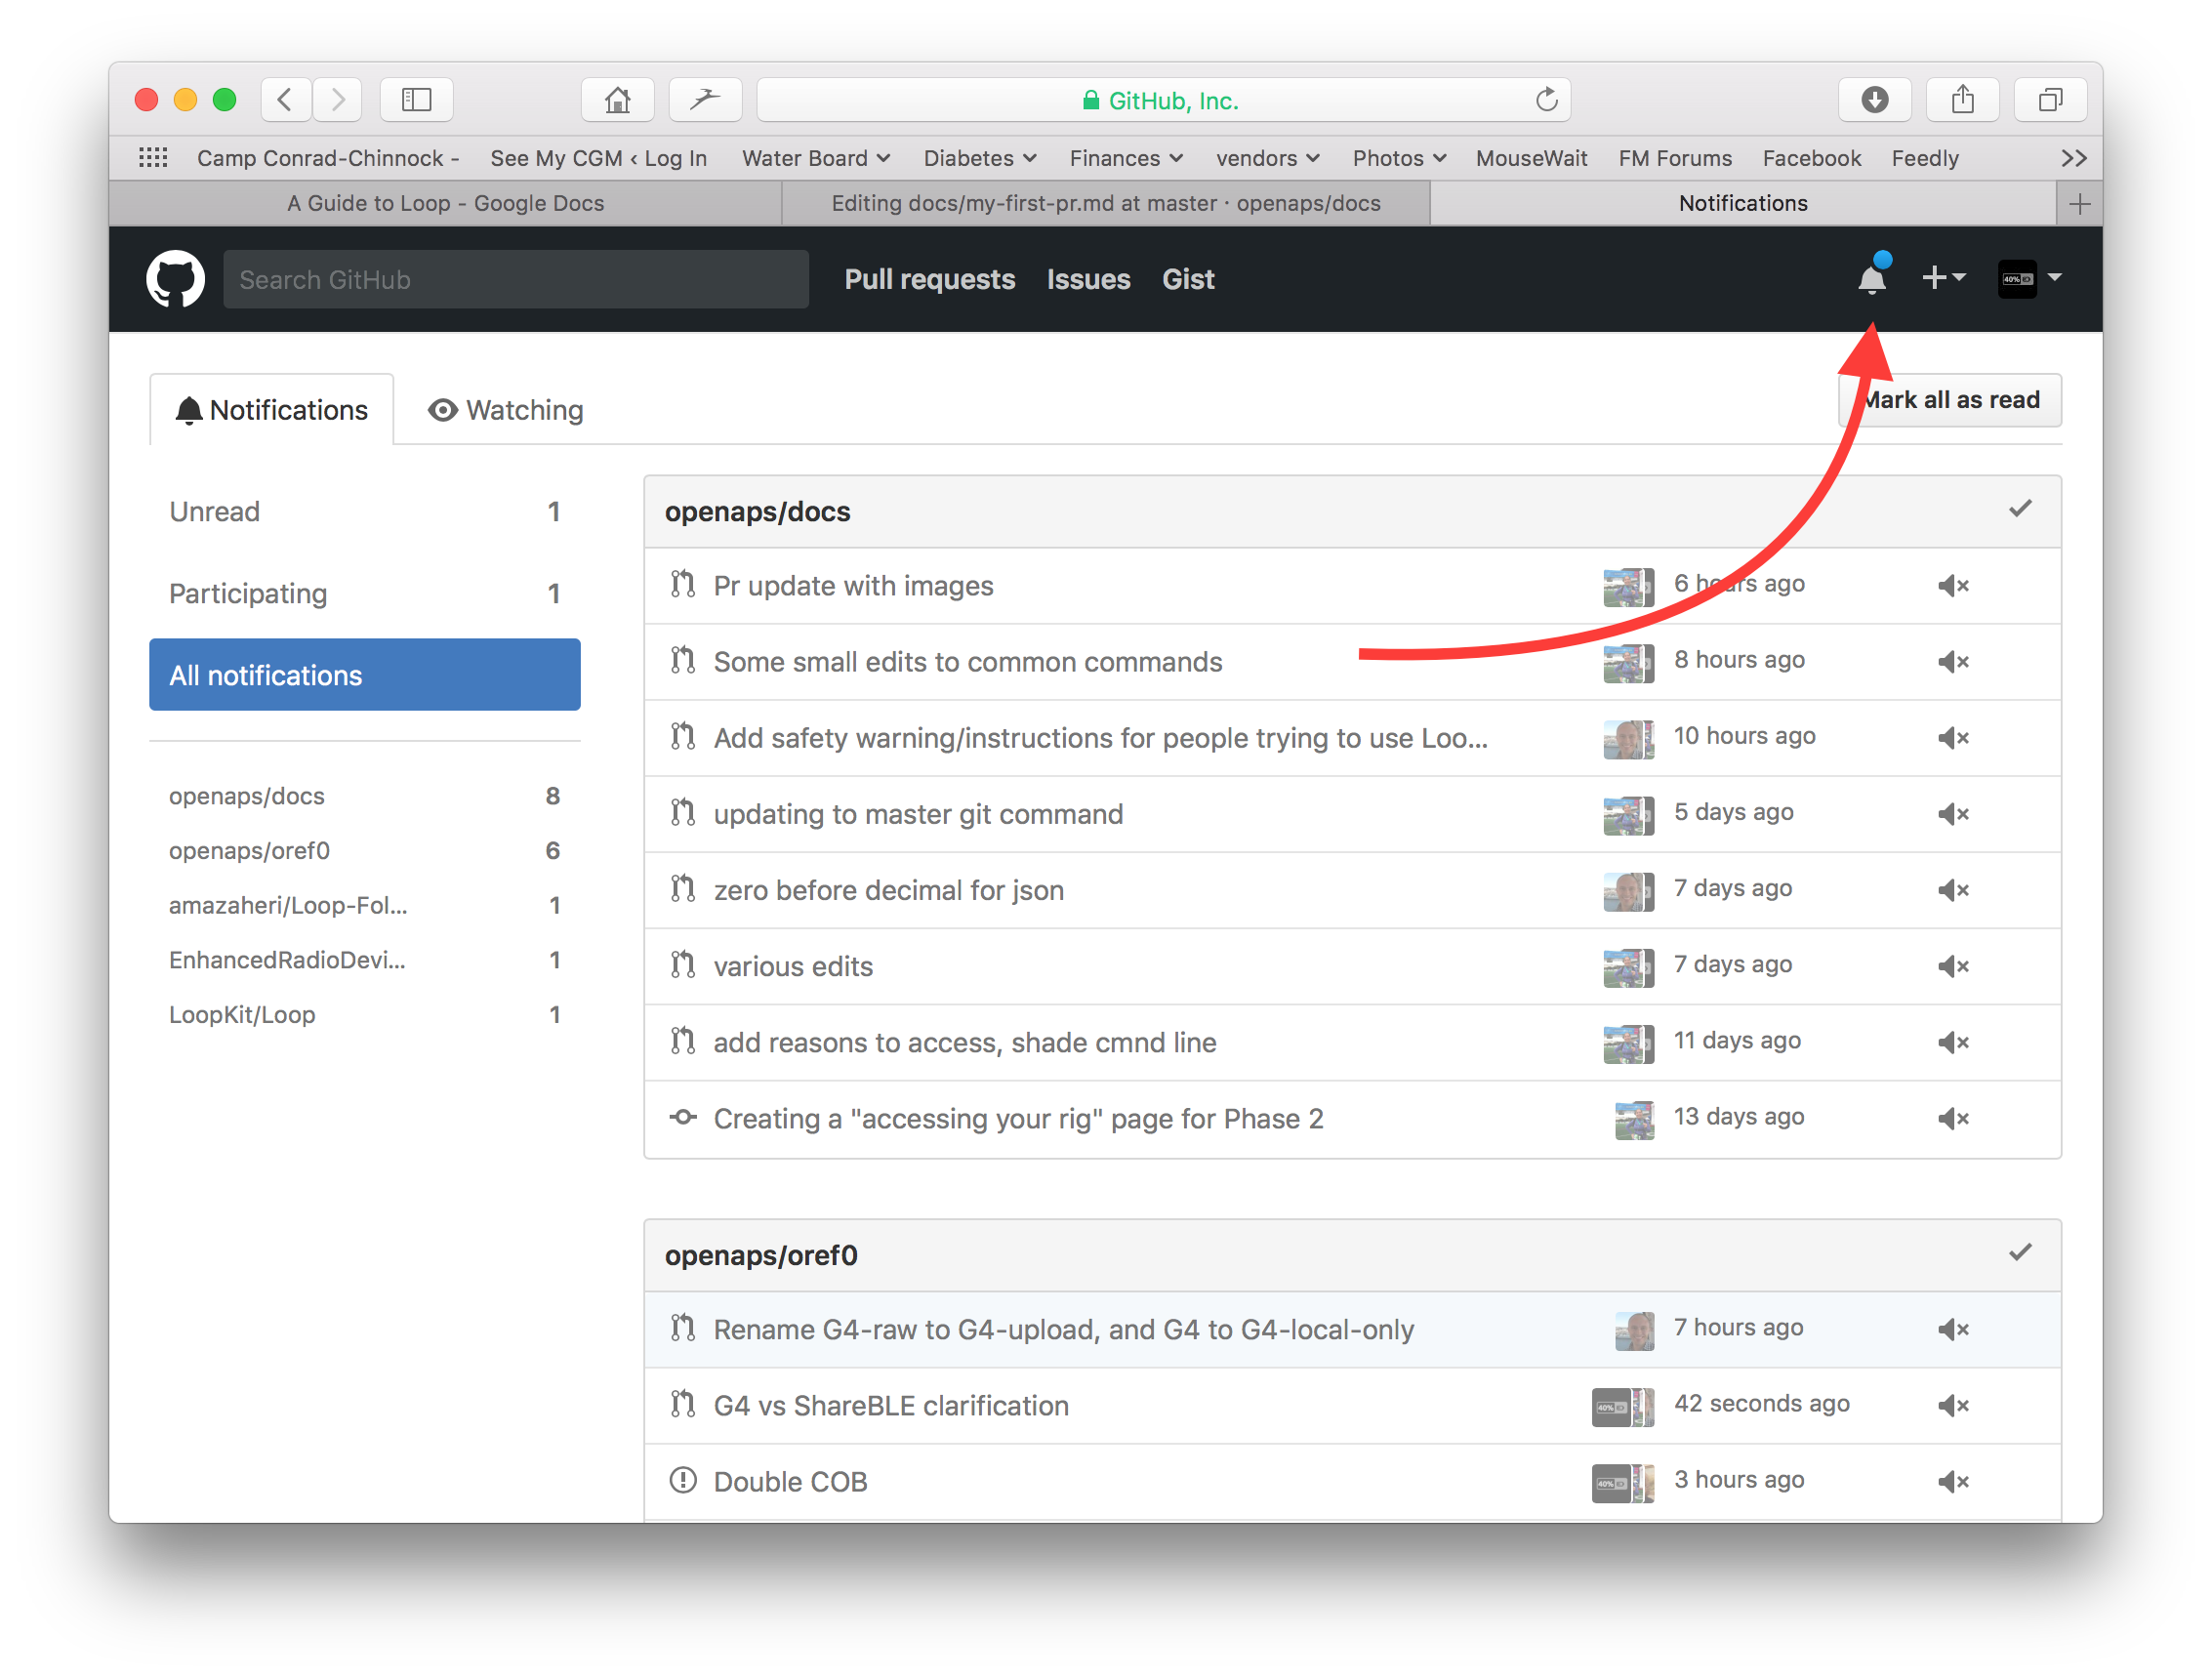
Das war der letzte Schritt zur Erstellung eines pull requests, PR. GitHub ordnet dem PR eine Nummer, die du nach dem Titel findest, zu und einen Hashtag. Rufe diese Seite wieder auf, um Feedback zu erhalten (oder du erhältst automatisch E-Mail Benachrichtigungen über Aktivitäten bei deinem PR, wenn du Github entsprechend konfiguriert hast). The edit will now be in a list of PR’s that the team will review and potentially give feedback on before committing to the main documentation for AAPS! Wenn du den Fortschritt des PR überprüfen willst, kannst du auf das Logo mit der Glocke in der oberen rechten Ecke deines GitHub-Kontos klicken, wo du dann alle deine PRs siehst.
PS: Your fork and branch will still be sitting on your own personal GitHub account. After you get a notification that your PR has been merged, you can delete your branch if you are done with it (Step 8’s notification area will provide a link to delete the branch once it has been closed or merged). For future edits, if you follow this procedure the edits will always start with an updated version of the AndroidAPSdocs repositories. If you choose to use another method to start a PR request (e.g., editing starting from your forked repo’s master branch as the starting point), you will need to ensure your repo is up-to-date by performing a „compare“ first and merging in any updates that have happened since you last updated your fork. Since people tend to forget to update their repos, we recommend using the PR process outlined above until you get familiar with performing „compares“.
Code-Syntax
We are using markdown for the documentation pages. The files have got the suffix „.md“.
Markdown is a very simple text formating language which separates text content from text formating.
The writer only e.g. marks a headline as level 1 headline and the markdown processor generates the necessary HTML code during processing to render the heading in HTML.
The idea behind this is that
the writer should think about the text and not the formatting first,
the markdown text is open for exchange between different markdown tools instead of e.g. proprietary tools like Microsoft Windows and
you can generate several output formats from one markdown file.
Markdown is not a 100% fixed standard and we try to stay as near as possible to the standard, to
stay flexible to change markdown tools as needed or forced in the further innovation of markdown tools and markdown SaaS services and
enable us to use translation services to translate the English language in a target language like French or German. They can work on markdown but not complex formatting codes, because they can’t separate content from layout, which might be fatal.
Headlines
Headline 1:
# headlineHeadline 2:
## headlineHeadline 3:
### headlineHeadline 4:
#### headline
We try to avoid further levels of headlines.
Text format
bold:
**text**italic:
*text*
ordered list
1. erste
2. zweite
3. third :::

4. erste

5. zweite
6. third

### unordered list
one element
another element
and another element :::
one element
another element
and another element
multi level list
You can insert lists in lists by indenting the next level with 4 more spaces to the right than the one before.
1. erste
2. zweite
3. third
1. one element
2. another element
3. and another element
4. vier
5. fünf
6. six :::
7. erste
8. zweite
9. third
1. one element
2. another element
3. and another element
10. vier
11. fünf
12. six
### Images
To include images you use this markdown syntax.
- images: ``
The type of image should be PNG or JPEG.
Images names should confirm to one of following naming rules. In the example I use png as suffix. In case you use JPEG please use jpeg as a suffix instead.
- `filename-image-xx.png` where xx is a unique double digit number for the images in this file.
- `filename-image-xx.png` where xx is a meaning full name for the author of the md file.
Images are located in the images folder for the english language and propagated to the other languages automatically by Crowdin. You have nothing to do for this!
We are not translating images at the moment.
(make-a-PR-image-size)= Use a reasonable size for the images which must be readable on PC, tablet and mobiles.
- Screenshots from web pages images should be up to **1050 pixels wide**.
- Diagrams of process flows should be up to **1050 pixels wide**.
- Screenshots from the app should be up to **500 pixels wide**.
### Links
#### External links
External links are links to external web sites.
- external link: `[alt text](www.url.tld)`
#### Internal links to the start of a md file
Internal links to pages are links to the start of a md file which is hosted on our own server.
- internal link to .md page: `[alt text](../folder/file.md)`
#### Internal links to named inline refernces
Internal links to named inline refernces are links to any point in a md file which is hosted on our own server and where a reference was set to link to.
Add a named reference at the location in the target md file you want to jump to.
`(name-of-my-md-file-this-is-my-fancy-named-reference)=`
The named reference must be unique in the whole AndroidAPSDocs md files and not only the own md file it resides in!
Therefore it is a good practice to start with the filename and then the reference name you select.
Use only lowercase letters and hyphenate words.
Then link this refernce in the text you are writing with the following kind of link.
- Internal links to named inline refernces: `[alt text](name-of-my-md-file-this-is-my-fancy-named-reference)`
### Notes, Warnings, Collapsing Notes
You can add notes and warning boxes to documentation.
Furthermore you can add collapsing notes for detailed information which would users who are not interested in the details quench to read the text at all. Please use these carefully as the documentation should be as easy to read as possible.
#### Notes
:::: :::{admonition} Note :class: note
This is a note. ::: ::::
:::{admonition} Note :class: note
This is a note. :::
#### Warnungen
:::: :::{admonition} Warning :class: warning
This is a warning. ::: ::::
:::{admonition} Warning :class: warning
This is a warning. :::
#### Collapsing Notes
:::: :::{admonition} further detailed readings for interested readers :class: dropdown
This admonition has been collapsed, meaning you can add longer form content here, without it taking up too much space on the page. ::: ::::
:::{admonition} further detailed readings for interested readers :class: dropdown
This admonition has been collapsed, meaning you can add longer form content here, without it taking up too much space on the page. :::
## Style Guide
### Contents
1. English language writing tips
2. AAPS-specific writing notes
3. Useful references
###  1\. English language writing tips
#### Use language that is appropriate for the reader
Use plain English wherever possible. This helps non-native readers and also aids translation of AAPS documents into other languages. Write in a conversational way with the user, imagine you are sitting across the desk from the person you are writing for. Remember - most AAPS users do not have programming backgrounds. Diabetes itself also has a lot of jargon and abbreviations. Bear in mind that some people may be recently diagnosed, may not be as experienced as you with diabetes, or may have been given different diabetes training. If you use shorthand or an abbreviation, write it out in full the first time you use it, giving the abbreviation directly after it in brackets, like “super micro bolus (SMB)”. Also, link to the glossary. Technical terms which might not be familiar to the reader can be also be added in brackets.
Instead of: *“What causes high postprandial BG peaks in closed loop?"*
Use: *“What causes a high BG peak **after lunch** (postprandial) in closed loop?"*
##### Use plain words that everyone can understand
Find an A-Z of alternative words to make your writing easier to understand here:
<https://www.plainenglish.co.uk/the-a-z-of-alternative-words.html>
#### Privacy/licensing concerns:
Particularly if you record video or screenshots, make sure not to disclose your private details (API key, passwords). Make sure Youtube content is not openly listed, and needs a link from the documentation to view. Avoid drawing attention to infringed copyrighted materials (BYODA etc).
#### Keep sentences short, get to the point
- Clear writing should have an average sentence length of 15 to 20 words.
- This does not mean making every sentence the same length. Be punchy. Vary your writing by mixing short sentences (like the last one) with longer ones (like this one).
- Stick to one main idea in a sentence, plus perhaps one other related point.
- You may still find yourself writing the odd long sentence, especially when trying to explain a complicated point. But most long sentences can be broken up in some way.
- Remove weak words: “you can”, “there is/are/were”, “in order to”.
- Place keywords near the beginning of titles, sentences and paragraphs.
- Be visual! Wherever possible provide a brief diagram, screenshot or video.
#### Don't be afraid to give instructions
Commands are the fastest way to give instructions, but writers sometimes fear giving commands, writing “you should do this” instead of just “do this”. Perhaps people worry that commands sound too harsh. You can often solve this by putting the word 'please' in front. However, if something must be done, it is best not to say ‘please’ as it gives the reader the option to refuse.
Instead of: *“You should just think of it as a complete statement."*
Use: *“Think of it as a complete statement.”*
#### Mostly use active verbs, rather than passive verbs
Example of an **active verb**:
- *“The pump (subject) delivers (verb) the insulin (object).”*
“delivers” is an active verb here. The sentence says what is doing the delivering before it says what is being delivered.
Example of a **passive verb**:
- *“The insulin (subject) is delivered (verb) by the pump (object)”*
*“delivered”* a passive verb here. The subject and object are switched around, compared to the active verb sentence. We have had to make the sentence longer by introducing “is” and “by the”. Also consider starting with the active verb.
Instead of: *“You can connect your pump with the phone through the AAPS pump menu, and there are a number of pumps available for you to connect with.”*
Use: *“Connect your desired pump to the phone through the AAPS pump menu.”*
Passive verbs can cause problems:
- They can be confusing.
- They often make writing more long-winded.
- They make writing less lively.
##### Good uses of passives
There are times when it might be appropriate to use a passive.
- To make something less hostile - 'this bill has not been paid' (passive) is softer than 'you have not paid this bill' (active).
- To avoid taking the blame - 'a mistake was made' (passive) rather than 'You made a mistake' (active).
- When you don't know who or what the doer is - 'the England team has been picked'.
- If it simply sounds better.
#### Avoid nominalisations
A nominalisation is the name of something that isn't a physical object, such as a process, technique or emotion. Nominalisations are formed from verbs.
For example:
| Verb | Nominalisation |
| --------- | -------------- |
| complete | completion |
| introduce | introduction |
| provide | provision |
| fail | failure |
They are often used **instead** of the verbs they come from, but they can sound as if nothing is actually happening. Too many of them can make writing very dull and heavy-going.
Instead of: *“The implementation of the method has been done by a team.”*
Use: *“A team has implemented the method.”*
#### Use lists where appropriate
Lists are excellent for splitting information up. There are two main types of list:
- A continuous sentence with several listed points picked out at the beginning, middle or end.
- Separate bullet points with an introductory statement.
In the bulleted list above, each point is a complete sentence so they each start with a capital letter and end with a full stop. Use bullet points rather than numbers or letters, as they draw your attention to each point without giving you extra information to take in.
#### Mythbusting
- You can start a sentence with **and, but, because, so or however**.
- You can split infinitives. So you can say **“to boldly go”**.
- You can end a sentence with a preposition. In fact, it is something **we should stand up for**.
- And **you** can use the same **word** twice in a sentence if **you** can't find a better **word**.
#### Optimising writing style by purpose
To keep the documentation clear and short, we write different sections of the documentation in different styles.
An “explanation” style is used for the introduction, background and knowledge development sections.
A “How-to-guide” style (with minimal explanation) is used for building, configuring AAPS, and some of the troubleshooting sections.
A tutorial helps the pupil acquire basic competence. The user will **learn by doing**.

#####  Tutorials (e.g. teaching a kid to beat egg whites)
- narrator directly talks to the reader: In this tutorial **you** will (we) could be used to convey “we are in this together” frame-of-thought in some rare cases
- Future Tense -> to show the final target
- Imperative Tense -> to do the tasks -> Concrete steps - avoid abstract concepts
- Past Tense -> to show accomplished tasks -> Quick and immediate visible results
- Minimum Explanations -> strict necessary to complete the task - **what and why**
- Ignore options/alternatives/…. No ambiguity
- Step Transitions: finish a step with a sentence leading to the next step as a logical progression flow. Example: *You have now installed the Let’s Encrypt client, but before obtaining certificates, you need to make sure that all required ports are open. To do this, you will update your firewall settings in the next step.*
- **Tutorial** Title (Level 1 heading)
- Introduction (no heading)
- Prerequisites (Level 2 heading)
- Steps:
- Step 1 — Doing the First Thing (Level 2 heading)
- Step 2 — Doing the Next Thing (Level 2 heading)
- Step n — Doing the Last Thing (Level 2 heading)
- Conclusion (Level 2 heading)

#####  How-To Guides (e.g. a recipe)
A how-to guide’s purpose is to help the already-competent user perform a particular task correctly.
- HOW-to
- narrator directly talks to the reader: In this tutorial **you** will
- Future Tense -> to show the final target
- Conditional Imperative Tense -> to get X do y -> Concrete steps - avoid abstract concepts
- Minimum Explanations -> strict necessary to complete the task -> **what and why**
- Ignore options/alternatives/…. No ambiguity, but you can link to the reference entry or explanation entry
- **How-to**: Title (Level 1 heading)
- Introduction paragraph
- Optional Prerequisites (paragraph or Level 2 heading if more than 1)
- Steps:
- Step 1 — Doing the First Thing (Level 2 heading)
- Step 2 — Doing the Next Thing (Level 2 heading)
- Step n — Doing the Last Thing (Level 2 heading)
- Conclusion paragraph

#####  Explanation (e.g. Science behind why egg whites stiffen when you beat them)
An explanation clarifies, deepens and broadens the reader’s understanding of a subject.
- WHY
- Start with **About**
- Provide context, link ALL relevant references
- Discuss options/alternatives
- Don’t instruct or provide reference (link to them)
- State the unknown/moving targets etc…
- **About** Title (Level 1 heading)
- Introduction (no heading)
- Optional Prerequisites (Level 2 heading)
- Subtopic 1 (level 2 heading)
- Conclusion (Level 2 heading)

### 2\. AAPS-specific writing/updating notes
#### Author & Editor
For writing/updating the AAPS documentation, consider the process as consisting of two stages. These can be carried out by the same person at different points, or more than one person.
An **author (e.g. you!)** writes/edits a section of the documentation in a concise conversational tone, then passes it to the editor.
The **editor (e.g. a fellow AAPS user, or the person who receives the pull request)** reviews adherence to the style guide, edits the section for clarity and accessibility, removing as many words as possible (especially for tutorial/how-to sections). Reading the text out loud may help.
#### General AAPS points
- For glucose values, state both mg/dl and mmol/l in each occurrence (also consider this for screenshots, if possible).
- For consistency, use “AAPS” rather than “Android APS”.
- Clearly state the version of Android Studio/AAPS you are writing for, or that the screenshots are taken from.
### 3\. Useful References
<https://dev.readthedocs.io/en/latest/style-guide.html>
[Diátaxis (diataxis.fr)](https://diataxis.fr/)
[Technical Writer Style Guide Examples | Technical Writer HQ](https://technicalwriterhq.com/writing/technical-writing/technical-writer-style-guide/)
[DigitalOcean's Technical Writing Guidelines | DigitalOcean](https://www.digitalocean.com/community/tutorials/digitalocean-s-technical-writing-guidelines)
[Top 10 tips for Microsoft style and voice - Microsoft Style Guide | Microsoft Learn](https://learn.microsoft.com/en-us/style-guide/top-10-tips-style-voice?source=recommendations)
<https://www.plainenglish.co.uk/how-to-write-in-plain-english.html>
<https://developers.google.com/style>
<https://www.mongodb.com/docs/meta/style-guide/screenshots/screenshot-guidelines/>