Operation of AAPS via your Wear OS smartwatch
AAPS Watchfaces
Warning
The classic AAPS watchfaces run on Wear OS 5 and older only, and Wear OS 5 already limits them. On Wear OS 6 and newer the watch app installs one watchface in Google’s Watch Face Format instead: your custom watchface as a picture, or the Complications watchface. See Wear OS watch face changes for what breaks on each Wear OS version, and the watchface AAPS installs for Wear OS 6.
On Wear OS 5 and older, several classic watchfaces are built into the AAPS watch app. They show the glucose value with delta, IOB, the active basal rate and a graph of the readings. Two taps work on them:
Double-tap the glucose value to open the AAPS main menu
Double-tap the graph to change its time range
On every Wear OS version, the complications and the tiles described on this page work with any watchface that has room for them.
Configuration
Enable Wear in Configuration > Communication.
To bolus or take other actions from the watch, turn on Wear control. The bolus wizard options for the watch are set in the same place: see Settings > Wear. While Wear control is off, the phone refuses every treatment or mode change sent from the watch, and the watch shows “Wear control is turned off in the Wear settings on the phone.”
With Open plugin on the Wear card you open the Wear screen:

The top line shows the name of the connected watch, or (No Watch Connected). From this screen you can
Resend all data. Might be helpful if watch was not connected for some time, and you want to push the information to the watch.
Open settings on your watch directly from your phone.
Choose which watchface AAPS installs on the watch (Watchface installed on watch: your custom watchface, or the complications watchface). This card is only shown while a Wear OS 6 or newer watch is connected. See the watchface AAPS installs.
Manage the Custom Watchface (the card is shown while a watch is connected): Load Watchface sends a custom watchface to the watch, Infos Watchface lists the details of the loaded watchface and the fields it contains, More watchfaces opens the exchange site in your browser, and Export template saves a template you can edit. A preview of the loaded watchface is shown below the buttons. See Changing to an AAPS Watchface.
Ensure notifications from AAPS are not blocked on the watch. Confirmation of an action (e.g. bolus, tempt target) comes via a notification which you will need to swipe and tick.
Accessing main menu of AAPS

To open the main menu of AAPS, use one of these:
open AAPS from the watch’s app list
tap an AAPS complication that opens the menu, see Complication related settings
tap the BG Graph tile with its Tap action set to Main Menu, see Tile settings
on a classic AAPS watchface, double-tap the glucose value
Loop Status screen
The Loop Status screen gives a summary of what the loop is doing, without taking out your phone. Open it from the AAPS main menu (Loop status, or Status → Loop), or by tapping the Blood Glucose complication. The Status menu also has a Pump page and a TDD page with the total daily doses.


The screen is a list of cards. Scroll down to see them all:
Running mode — the current mode (closed loop, open loop, LGS, suspended, disconnected…) and, for a temporary mode, how long it still runs.
Loop result — when the loop last ran, and the temporary basal or SMB it requested.
Scene — only while a scene is active: its name, the time left (or Until ended for a scene without end time) and the Follow-up scene that starts when it ends.
Targets — your target, and the temporary target if one is running.
Profile — the name of the active profile, with its Percentage and Timeshift when they are not the default values. A temporary profile switch is highlighted and shows how long it still runs and the profile it Returns to when it ends.
Sensitivity — the same lines as the sensitivity chip on the phone’s main screen: the autosens value and the profile, variable and effective ISF.
A small scene icon next to a running mode, a temporary target or a profile switch means it was set by the active scene. The same icon is shown in the Running mode picker.

The bolus calculator on the watch
Open Calculator from the AAPS main menu, from the Actions tile or from a complication set to open the wizard. It walks through a few pages, swipe from right to left to go on:
Carbs |
Request |
Result |
Calculation |
Confirm |
|---|---|---|---|---|
|
|
|
|
|
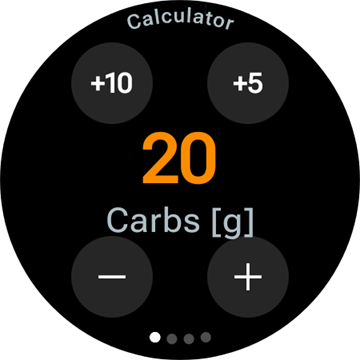


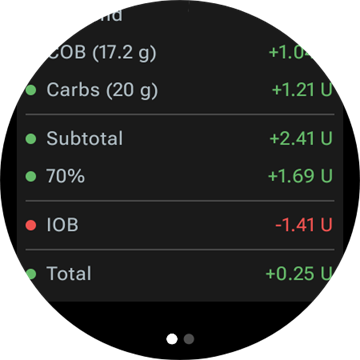

Carbs: enter the carbs with the +10, +5, − and + buttons.
Request: the last page before the phone takes over. It shows what you entered: the carbs, and the meal type, carb time and percentage when you use them, see Optional pages. Tap the check mark to send it to the phone, which runs the calculation.
Result: the bolus AAPS proposes, with the carbs under it: the carbs now and the eCarbs later, the carb time and the bell of the eat reminder. Adjust the dose with − and +, see below. Scroll down for the Calculation card: tap it to see every line of the calculation, the same as on the phone.
Confirm: swipe to the second page and tap the check mark. The phone delivers the bolus and records the carbs.
Optional pages
Three watch settings each add a page after Carbs. They are off by default. Open the AAPS main menu, then Settings > Interface, and turn on the ones you want; when more than one is on, the pages come in the order Meal type, Carb time, Percentage. The dots at the bottom of the calculator show how many pages it has.
Settings |
Meal type |
Carb time |
Percentage |
|---|---|---|---|
|
|
|
|


Calculator Meal Type: Bread, Cake or Pizza, which splits the carbs of a slow meal into carbs now and eCarbs later, see Choosing the meal type.
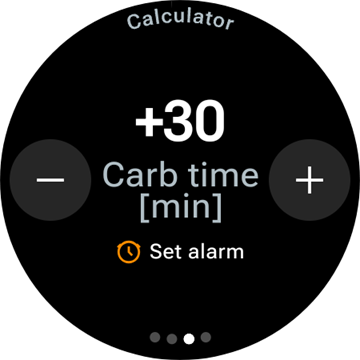
Calculator Carb Time: the minutes until you eat, with a Set alarm bell for the eat reminder, see Carb time and the eat reminder.
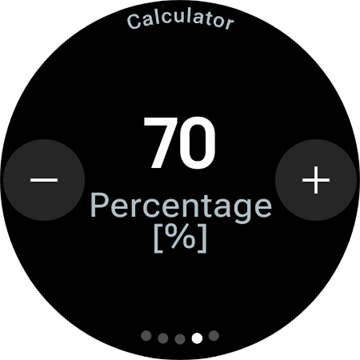
Calculator Percentage: a percentage of the calculated bolus, for example 70 % when you want a smaller dose. It starts at the Bolus percentage of the phone’s Bolus wizard settings, 100 % unless you changed it. See also the note under Adjusting the bolus on the result page.
Adjusting the bolus on the result page
The result page shows the bolus AAPS proposes, together with a − and a + button. Use them to adjust the dose before you confirm it, without going back to the phone.
Proposed |
More |
Less |
|---|---|---|
|
|
|
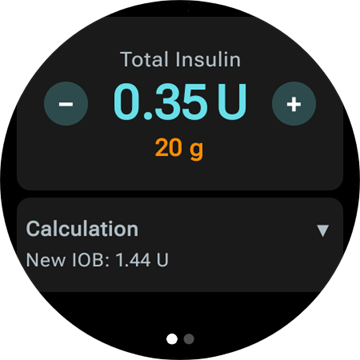
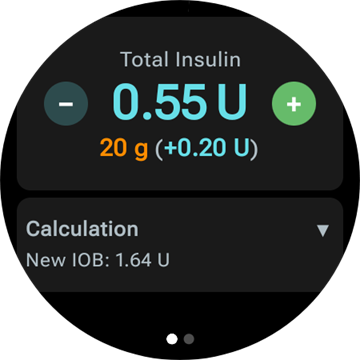
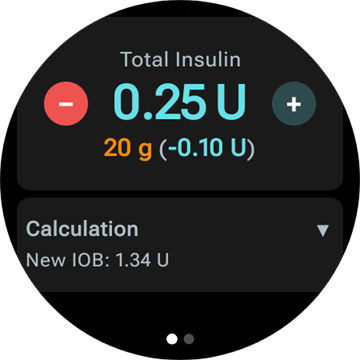
Each press changes the bolus by one step of your pump, so the amounts offered always match what your pump can actually deliver.
Press and hold a button to keep changing the value. The longer you hold, the faster it goes.
You cannot go below 0 U, nor above your max bolus setting.
The running total is shown on the result page, so you always see the amount you are about to confirm. The change is shown after the carbs, for example (+0.20 U), and the button you used turns green for more or red for less.
If AAPS had to limit the dose, for example because the calculated bolus is above your max bolus setting, a warning line in amber below the total says so (for example “Bolus constraint applied”). The same applies to a limited carbs amount.
This is not the same as Calculator Percentage
The Calculator Percentage setting lets you enter a percentage of the calculated bolus before the result page appears. The − and + buttons adjust the final amount on the result page. You can use both.
Choosing the meal type
The watch calculator can split the carbs of a slow meal into carbs now and eCarbs later, like the carbs type of the phone wizard. Turn on Calculator Meal Type in the watch’s Settings > Interface. The setting is off by default, and then the Meal type page is skipped.
After you enter the carbs, a Meal type page shows three icons: Bread, Cake and Pizza. Tap an icon: its name and the carbs it gives show below the icons, for example 65 g for bread, or 52+22 g for pizza (52 g now and 22 g of eCarbs later). Bread is the default and keeps all the carbs now.
The request and confirm pages show the carbs in the same way (52+22 g). The result page also shows when the eCarbs start and how long they last.
The bolus is calculated only for the carbs eaten now. The split uses the same numbers as the phone wizard.
Carb time and the eat reminder
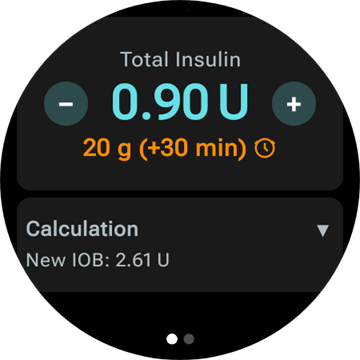
With Calculator Carb Time turned on in the watch’s Settings > Interface, a Carb time page follows the carbs: the minutes until you eat, like the carb time of the phone wizard. Now is the default. − and + move it in steps of 5 minutes, up to an hour before or after now. A time in the past is for carbs you have eaten already.
With a time in the future, a Set alarm bell appears under the value. It is on by default, tap it to turn it off. The request and result pages show the carb time, for example +30 min, and the bell. The phone records the carbs at that time, moves the eCarbs of the meal type with it, and starts its time to eat reminder.
Result |
BG graph |
Running |
Time to eat |
|---|---|---|---|
|
|
|
|

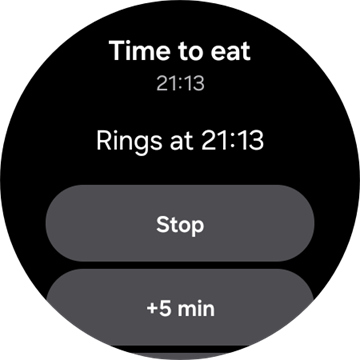
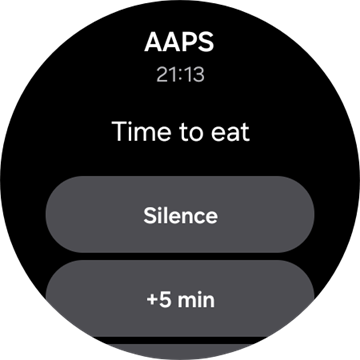
The reminder also lives on the watch, so it rings when the phone is out of reach too:
The BG Graph screen, the BG Graph tile and the graph of the Complications watchface draw a dashed orange line where the reminder rings, with the minutes left next to it.
While it runs, a silent Time to eat notification with Stop and +5 min sits in the notification stream. It comes back when you swipe it away, until the reminder is over.
When the time has come, the watch vibrates, and again every half minute for five minutes until you answer. The notification offers Silence and +5 min, and swiping it away silences it too.
Stop, Silence and +5 min do the same on the watch, on the phone and on an AAPSClient, and all of them show the same reminder.
Complications
Complication is a term from traditional watchmaking, where it describes addition to the main watchface - as another small window or sub-dial (with date, day of the week, moon phase, etc.). Wear OS 2.0 brings that metaphor to allow custom data providers, like weather, notifications, fitness counters and more - to be added to any watchfaces that support complications.
AAPS Wear OS app supports complications since build 2.6, and allow any third party watchface that supports complications to be configured to display AAPS related data (BG with the trend, IOB, COB, etc.).
Complications also serve as shortcut to AAPS functions. By tapping them you can open AAPS related menus and dialogs (depending on complication type and configuration).

Complication Types
AAPS Wear OS app provides only raw data, according to predefined formats. It is up to third-party watchface to decide where and how to render complications, including its layout, border, color, and font. From many Wear OS complication types available, AAPS uses:
SHORT TEXT- Contains two lines of text, 7 characters each, sometimes referred to as value and label. Usually rendered inside a circle or small pill - one below another, or side by side. It is a very space-limited complication. AAPS tries to remove unnecessary characters to fit-in: by rounding values, removing leading and trailing zeroes from values, etc.LONG TEXT- Contains two lines of text, about 20 characters each. Usually rendered inside a rectangle or long pill - one below another. It is used for more details and textual status.RANGED VALUE- Used for values from predefined range, like a percentage. It contains icon, label and is usually rendered as circle progress dial.LARGE IMAGE- Custom background image that can be used (when supported by watchface) as background.SMALL IMAGE/MONOCHROMATIC IMAGE- A small icon. In aSMALL IMAGEslot AAPS draws it in its own colour; in aMONOCHROMATIC IMAGEslot the watchface tints it.
Complication Setup
To add complication to watchface, configure it by long press and clicking the gear icon below. Depending on how specific watchface configures them - either click on placeholders or enter the watchface setup menu for complications. AAPS complications are grouped under the AAPS menu entry.
When configuring complications on watchface, Wear OS will present and filter the list of complications that can be fit into selected complication place on watchface. If specific complications cannot be found on the list, it is probably due to its type that cannot be used for the given place.
Complications provided by AAPS
AAPS provides the complications below. “Opens” is what a tap does with Complication Tap Action left at Default, see Complication related settings.
Glucose
Blood Glucose (
SHORT TEXT, opens Loop Status): the glucose value with the trend arrow on the first line, the age of the reading and the delta on the second.Blood Glucose (large) (
SHORT TEXT, opens BG Graph): the glucose value alone on the first line, so the watchface can draw it big. The age and the trend arrow are on the second line.BG Graph (
SMALL IMAGE/LARGE IMAGE, opens BG Graph): the BG graph as a picture, for watchfaces with an image slot. This is the graph on the Complications watchface.Full Status (
LONG TEXT, opens Menu): most of the data in one line: the glucose value with the trend arrow, the delta and the age of the reading, then carbs on board, insulin on board and the basal rate.Full Status (flipped) (
LONG TEXT, opens Menu): the same, with the two lines swapped, for watchfaces that show only one of the two lines of aLONG TEXTslot.
Insulin and carbs
IoB Icon (
SHORT TEXT, opens Bolus): insulin on board with a syringe icon.IoB Detailed (
SHORT TEXT, opens Bolus): total insulin on board on the first line, the bolus and basal parts on the second.CoB Icon (
SHORT TEXT, opens Wizard): carbs on board with a carbs icon.CoB Detailed (
SHORT TEXT, opens Wizard): the carbs on board now on the first line, the carbs still to come (eCarbs) on the second.CoB & IoB (
SHORT TEXT, opens Wizard): insulin on board on the first line, carbs on board on the second.
Basal and target
Basal rate (
SHORT TEXT, opens Menu): the current basal rate.BR & IoB (
SHORT TEXT, opens Menu): insulin on board on the first line, the basal rate on the second.BR & Target (
SHORT TEXT, opens Temp Target): the target on the first line, with the time left when a temporary target runs, and the basal rate on the second.Target (
SHORT TEXT, opens Temp Target): the target on the first line and, while a temporary target runs, its time left on the second.BR, CoB & IoB (
SHORT TEXT, opens Menu): the basal rate on the first line, carbs on board and insulin on board on the second.
Loop and phone
Running mode (
SMALL IMAGE/ICON, opens Running mode picker): the current loop mode as an icon: closed loop, open loop, low glucose suspend, suspended, disconnected or disabled. A tap opens a picker with the mode changes allowed right now, for example Suspend loop, Disconnect pump, Resume loop or Reconnect pump. The same picker is in the AAPS main menu under Running mode.Uploader/Phone Battery (
RANGED VALUE/SHORT TEXT/ICON, opens Status): the battery of the AAPS phone, as a gauge with a battery icon, as a number, or as the icon alone. It updates together with the other AAPS data, usually every 5 minutes with a new reading.
The Running mode picker, as opened from the complication, the main menu or the Running mode tile:

Complication related settings
In the AAPS main menu on the watch, open Settings > Complication:

Complication Tap Action (default
Default): what a tap on an AAPS complication opens, for all complications at once:Default: what the complication itself opens, see the list above
Menu: the AAPS main menu
Calculator: the bolus calculator
Treatment: the treatment dialog, insulin and carbs
eCarbs: the eCarbs dialog
Status: the status menu
Running mode: the running mode picker. Needs Wear control turned on in the phone’s Wear settings, otherwise the main menu opens instead.
None: a tap does nothing
BG graph time range (default
3 hours): how many hours the BG Graph complication shows, 1, 3 or 6. The BG Graph tile has its own setting.Unicode in Complications (default
On): the complications use Unicode symbols likeΔfor the delta,⁞as separator and⎍for the basal rate. How they look depends on the font of the watchface. Turn thisOffwhen a watchface draws them as boxes or blanks.
Wear OS Tiles
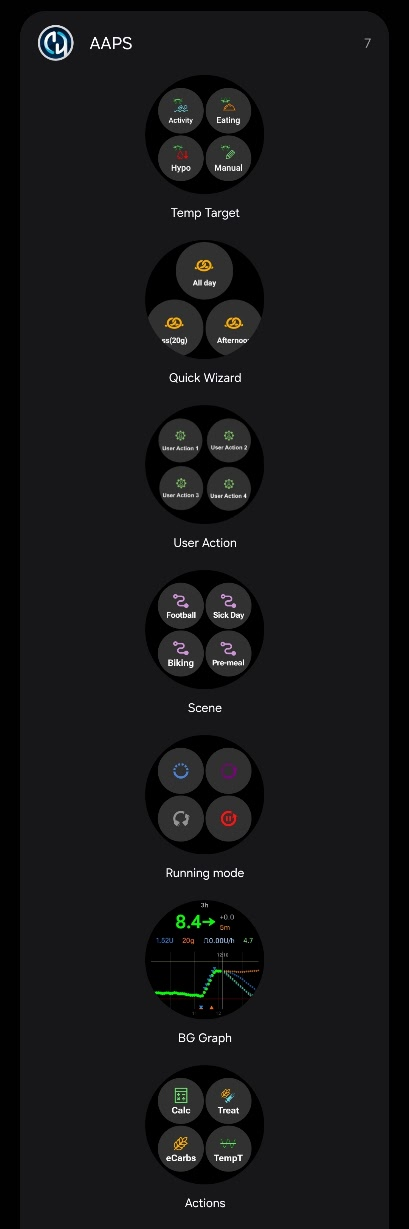
Tiles are the pages you reach by swiping from the watchface. AAPS brings seven of them, each a set of up to four buttons. A tap on a button opens the matching dialog on the watch, or asks you to confirm, and the phone then does the work. A tile is a shortcut, not a status display: it does not hold the state of the phone app.
Before using the tiles, turn on Wear control in Settings > Wear.
Adding a tile
There are two ways, depending on your watch and phone:
On the watch: swipe from the watchface past the last tile to Add tile and pick an AAPS tile. On most watches a long-press on a tile also opens the add and remove view.
On the phone, in the companion app for your watch (Galaxy Wearable for Samsung, Wear OS for other brands): open Tiles, tap Add and pick the AAPS tiles you want. The order of the tiles can be changed by dragging.
Tile settings
The Actions, Temp Target, BG Graph and Scene tiles have settings on the watch. Open the AAPS main menu, then Settings > Tiles, and pick the tile. A long-press on the tile also opens its settings, except on Pixel watches. The other three tiles are filled from the phone and have nothing to set on the watch.
Main menu |
Settings |
Tiles |
|---|---|---|
|
|
|


The settings of a tile are a list of its four places. Tap a place to pick what it shows, or None to leave it empty.
Long-press on the tile |
Settings of the Temp Target tile |
|---|---|
|
|


Every tile has four places. A tile with more entries than that shows the first four.
Actions tile

Shortcuts to the dialogs of the AAPS watch app. Pick up to four of these in the tile settings:
Calc: the bolus calculator, with a carbs input, an optional percentage [1] and an optional meal type [2]
Treat: insulin and carbs in one go
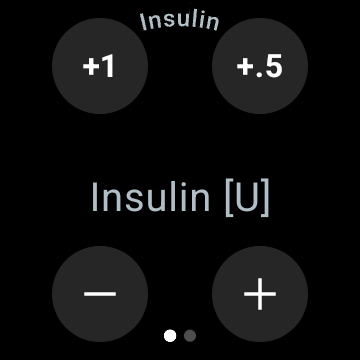
Insulin: a bolus, entered in units
Carbs: carbs, also extended carbs. A negative amount is accepted, down to your current COB, to correct carbs you entered earlier. Carb removals are shown on the watch’s BG graph.
eCarbs: extended carbs
TempT: a temporary target with a custom target and duration
Profile switch: a profile switch with percentage, time shift and duration

The dialogs the buttons open. Swipe from right to left to reach the next page of a dialog, and tap the check mark on the last page to send the request to the phone:
Treat |
Insulin |
Carbs |
eCarbs |
TempT |
Profile switch |
|---|---|---|---|---|---|
|
|
|
|
|
|

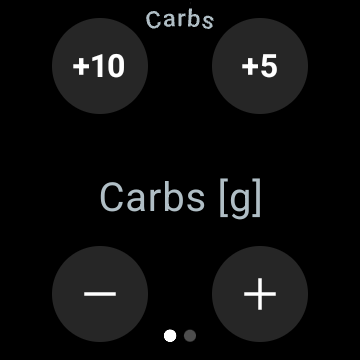


[1] In the watch’s Settings > Interface, turn on Calculator Percentage to show the percentage input in the bolus calculator. The default percentage comes from the phone’s “Bolus percentage”. The other calculator settings are those of the phone under Settings > Bolus wizard settings.
[2] In the watch’s Settings > Interface, turn on Calculator Meal Type to show the Meal type page, where you pick Bread, Cake or Pizza to split the carbs of a slow meal into carbs now and eCarbs later. See Choosing the meal type.
Temp Target tile

Temporary targets from the phone’s presets. Set the duration and the target of each preset on the phone under Settings > Default temp targets. Pick up to four of these in the tile settings:
Activity: for sport
Eating: eating soon, a lower target so there is more insulin on board at the meal
Hypo: a higher target during a hypo treatment
Manual: a custom target and duration
Cancel: stops the running temporary target. The button is shown only while a temporary target is running.
Quick Wizard tile

The QuickWizard entries of the phone that have Show on Watch turned on, within their valid hours. A carbs entry shows its carbs in g, an insulin entry its fixed dose in U. A tap runs the entry after a confirmation on the watch. There is nothing to set on the watch: edit the entries on the phone, and turn on Show on Watch under Device Selection for each entry you want on the tile. Outside the valid hours of all your entries, the tile shows No config available.

Scene tile

The Scenes of the phone. Each of the four places is set to Automatic, None or one scene in the tile settings. An Automatic place takes the next scene from the phone’s list that no other place has claimed. A place set to a scene that no longer exists on the phone shows Unavailable.

Running mode tile

The running modes you can switch to from the current one, with the same icons as on the phone: closed loop, low glucose suspend, open loop, disable loop, suspend loop and disconnect pump, or resume and reconnect while one of those runs. Suspend loop and Disconnect pump ask for a duration first. The phone decides which modes are offered, the watch shows the first four and leaves out Disable loop when Suspend loop is on the list.
User Action tile
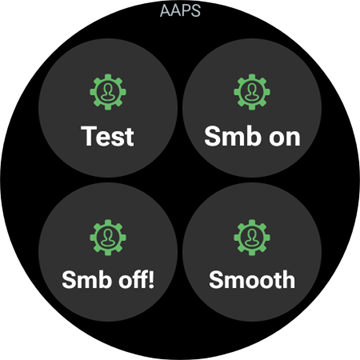
One button for each automation on the phone whose trigger is User action. A tap asks you to confirm, then the phone runs the automation’s actions. The buttons are named after the automations, so give them short names. There is nothing to set on the watch.
BG Graph tile

The glucose value with arrow, delta and age, below it IOB, COB, basal rate and target, and the BG graph with predictions, boluses, carbs and SMBs. Two settings on the watch: Time range (1, 3 or 6 hours) and Tap action, which opens the full BG Graph, the Main Menu or the Loop Status screen.


Always on
This section and the next apply to the classic AAPS watchfaces on Wear OS 5 and older. On Wear OS 6 the Complications watchface has an always-on display of its own, see the watchface AAPS installs.
Long battery life for Android Wear OS smartwatches is a challenge. Some smartwatches get as much as 30 hours before recharging. The display should be switched off for optimal power saving when not in use. Most watches support the “Always on” display.
Since AAPS version 3, we can use a “Simplify UI” during always-on-mode. This UI only contains the blood glucose, direction, and time. This UI is power-optimized with less frequent updates, showing less information and lighting up fewer pixels to save power on OLED displays.
The simplified UI mode is available for the Digital Style and Custom watchfaces. The simplified UI is optional and is configured through the watch face settings (long press the watch face and click “edit” or the gear icon). Select the configuration “Simplify UI” and set it to “Always On Mode” or “Always On and Charging”.
Night-time mode
While charging, it would be helpful if the display could stay “always-on” and show your blood glucose during the night. However, the standard watch-faces are too bright and have too much information, and the details are hard to read with sleepy eyes. Therefore, we added an option for the watch-face to simplify the UI only during charging when set in the configuration.
The simplified UI mode is available for the Digital Style and Custom watchfaces. The simplified UI is optional and is configured through the watch face settings (long press the watch face and click “edit” or the gear icon). Select the configuration “Simplify UI” and set it to “During Charging” or “Always On and Charging”.
The Android developer options enable your watch to stay awake during charging. To make the developer options available, see the official documentation. Set the “Stay awake when charging” to “on” in the developer options.
Note: not all displays can handle always-on very well. It can cause screen burn-in, especially on the older OLED displays. The watches will generally dim the display to prevent burn-in; please check your owner’s manual, the manufacturing, or the internet for advice.


Phone alarms on the watch

The watch shows the alarms of the phone, so you see why the phone makes a sound and can answer from the wrist. The watch vibrates, and again every half minute for five minutes until you answer. A notification shows the title and the text of the alarm, with the same answers as the time to eat reminder:
Silence, or a swipe: the alarm stops, and the alarm screen on the phone closes.
Mute 5 min: the alarm stops and rings again after five minutes, on the phone and on the watch.
Two kinds of alarm reach the watch:
The alarm screen of the phone (pump errors, automation alarms, BG alarms): Silence and Mute 5 min.
Urgent notifications with a sound, like Pump unreachable or a Nightscout alarm: Silence only. The phone has only Dismiss for those, and they come back by themselves while their cause lasts.
The time to eat reminder is not sent this way: the watch rings that one by itself.
Snooze Alert shortcut
The watch shows the alarm itself; the shortcut is a second way to silence it, with one press. It is possible to create a shortcut to snooze the alerts/alarm of AAPS. Muting the sound via your watch is convenient and faster without reaching for your phone. Note: you still have to check your alarm message on your phone and handle it accordingly, but you can check that later. When your watch has two buttons, you can assign a key to the AAPS Snooze Alert program.
To link the button on the Samsung Watch 4 go to Settings > Advanced Features > Customize Buttons > Double press > AAPS Snooze Alert
On a watchface with complications, an App shortcut complication set to AAPS Snooze Alert does the same with a tap. The alternative setup of the Complications watchface uses its top-right slot for it.
Snooze xDrip
When you use xDrip and have xDrip installed on the watch, the ‘AAPS Snooze Alert’ shortcut will also Snooze any xDrip alarm.
Performance and battery life tips
Wear OS watches are very power-constrained devices. The size of the watch case limits the capacity of the included battery. Even with recent advancements both on hardware and software side, Wear OS watches still require daily charging.
If an experienced battery span is shorter than a day (from dawn to dusk), here are some tips to troubleshoot the issues.
Main battery-demanding areas are:
Active display with a backlight on (for LED) or in full intensity mode (for OLED)
Rendering on screen
Radio communication over Bluetooth
Since we cannot compromise on communication (we need up-to-date data) and want to have the most recent data rendered, most of the optimizations can be done in display time area:
Stock watchfaces are usually better optimized than custom one, downloaded from the store.
It is better to use watchfaces that limit the amount of rendered data in inactive / dimmed mode.
Be aware when mixing other Complications, like third party weather widgets, or other - utilizing data from external sources.
Start with simpler watchfaces. Add one complication at the time and observe how they affect battery life.
Use a dark theme on the watchface. On OLED displays fewer lit pixels mean less power and less burn-in.
Check what performs better on your watch: AAPS stock watchfaces or other watchfaces with AAPS Complications.
Observe over a few days, with different activity profiles. Most watches activate the display on glancing, movement and other usage-related triggers.
Check your global system settings that affect performance: notifications, backlight/active display timeout, when GPS is activated.
Check list of tested phones and watches and ask community for other users experiences and reported battery lifetime.
We cannot guarantee that data displayed on watchface or complication is up-to-date. In the end, it is up to Wear OS to decide when to update a watchface or a complication. Even when the AAPS app requests update, the System may decide to postpone or ignore updates to conserve battery. When in doubt and low on battery on watch - always double-check with main AAPS app on phone.
Troubleshooting the wear app
If the watch shows no data or old data, first check the connection between the watch and the phone, see Troubleshooting the AAPS watch - AAPS phone communication. For a watch on Wear OS 5, see also the general troubleshooting recommendations for Wear OS 5. A complication that does not update has the same causes as a tile or watchface that does not update, so check those first.
Additional AAPS custom watchfaces are also available
Here you can download Zip-Files with custom watchfaces made by other users.
Build your own watchface
If you want to build your own watchface, follow the guide here.
Once you have built a custom watchface, you can share your own AAPS custom watchface with others, the zip-file can be uploaded in the folder “ExchangeSiteCustomWatchfaces” via a Pull Request into GitHub. During merge of the pull request, the documentation team will extract the CustomWatchface.png file and prefix it with the filename of the Zip-file.
Make your own version of the Complications watchface
The Complications watchface that AAPS installs on Wear OS 6 (see the watchface AAPS installs) is made with Samsung’s Watch Face Studio. Its project file is free to download, so you can change it to your taste, or use it on a watch with Wear OS 5 or older where AAPS does not install it:
Complications watchface (AAPS V4), zip
The zip holds four files:
AAPS V4_0_2.wfs: the project. Open it in Watch Face Studio, change what you like, and install it on the watch from there.com.watchfacestudio.aapsv4.apk: the watchface as it is, ready to install with adb:adb install com.watchfacestudio.aapsv4.apkwith the watch connected over ADB debugging.README.txt: the two recommended complication setups, the same as on the Wear OS page.AAPS V4.png: a preview.
This is not a custom watchface
The zip is not a custom watchface for Load Watchface in the Wear plugin, and the phone cannot install it. It must be unzipped and installed on the watch with Watch Face Studio or adb, as above.