Settings
In AAPS v4 the preferences are found on the Settings screen. There are three routes to reach them — see Making changes to your AAPS’ configuration for details:
Tap the Settings (gear) icon in the top-right corner of the main screen: all settings, grouped into expandable sections.
In Configuration, tap “Settings” underneath an active plugin: only that plugin’s settings.
Use the search bar on top of the main screen: just start typing part of the text you are looking for. This finds individual settings (even those not visible in the Settings screen), dialogs and documentation.

Sections are opened and closed by tapping them. The sections you see depend on the plugins you have enabled and on Simple mode.

General

Units
Set units to mmol/L or mg/dL depending on your preferences.
Language
By default AAPS follows the language of the phone (recommended).
If you want AAPS in another language than the phone, choose it here. On Android 13 and newer, AAPS registers it as its own app language in Android, so all its screens, the main screen, the widgets and the way numbers are written follow it.
When you change the language, the texts of AAPS switch to the new language straight away. If some texts still show the old language, restart AAPS.
On Android 12 this setting is not shown: AAPS always uses the language of the phone.
Setting hidden in simple mode.
Simple mode
The simple mode is activated by default when you first install AAPS. In simple mode, a significant amount of settings is hidden and preferences are replaced by predefined values. You should switch off Simple mode once you become familiar with AAPS user interface and settings.
Insulin concentration support
Enables support for different insulin concentrations (U50, U200, …). Only enable this if you really use a concentration other than U100, and read the warnings carefully.
Setting hidden in simple mode.
Keep screen on
Forces Android to keep the screen on at all times. This is useful for presentations etc. But it consumes a lot of battery power. Therefore, it is recommended to connect the smartphone to a charger cable.
Instance name
The name of the person using this phone. It tells this AAPS instance apart in reports and synchronization, for example if two children with type 1 diabetes in your family use AAPS.
Used in the names of exported settings files.
Displayed in the Dual Watchface.
Skin
The skin selection from AAPS 3.x (Original, Low resolution, Large display…) no longer exists in AAPS 4. The new interface adapts to your screen automatically, and the color scheme can be changed in Appearance.
Appearance

Range for visualization
Choose the high and low marks for the BG-graph on AAPS main screen and smartwatch. It is only the visualization, not the target range for your BG. Example: 70 - 180 mg/dL or 3.9 - 10 mmol/L
Show notes in dialogs
Gives you the option to add short text notes to your treatments (bolus wizard, carbs, insulin…)
Setting hidden in simple mode.
App Color Scheme
Choose between the light theme, the dark theme, or following the phone’s system setting.
Protection

Master password
Mandatory to be able to export settings as they are encrypted from version 2.7.
Biometric protection may not work on OnePlus phones. This is a known issue of OnePlus on some phones.

Settings protection
Protect your settings with a password or phone’s biometric authentication (i.e. child is using AAPS). If you enable this feature, you will be prompted for authentication each time you want to access any Settings related view.
The management screens (Profile, Insulin settings, Temp Target, QuickWizard) then open read-only. You can still activate or use an entry, but adding, editing, cloning and deleting are hidden until you unlock your settings. See Settings protection now also locks the management screens.
Custom password should be used if you want to use master password just for securing exported settings, and use a different one for editing the settings.
If you are using a custom password click on line “Settings password” to set password as described above.
Application protection
If the app is protected, you must enter the password or use the phone’s biometric authentication to open AAPS, and again when you come back to it after the protection timeout.
AAPS will shut down immediately if a wrong password is entered - but will still run in background if it was previously opened successfully.
Bolus protection
Bolus protection might be useful if AAPS is used by a small child and you bolus via SMS.
Bolus protection can only be selected once Settings protection (Level 2) is set.
In the example below, bolus protection uses the Master password: AAPS asks for it before opening a treatment dialog such as Insulin. With Biometric, if biometric authentication does not work, you can enter the master password instead.
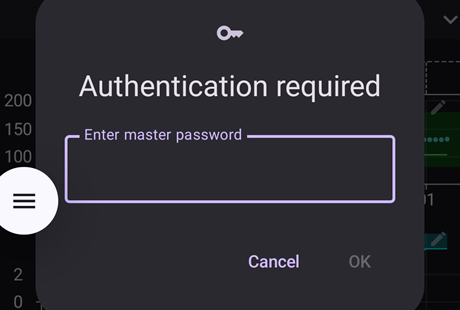
Password and PIN retention
Protection timeout defines how long (in seconds) the settings or bolus functionalities remain unlocked after you successfully enter the password.
Treatment safety

Patient age
Safety limits are set based on the age you select in this setting.
If you start hitting these hard limits (like max bolus) it’s time to move one step up.
It’s a bad idea to select higher than real age because it can lead to overdosing by entering the wrong value in the insulin dialog (by skipping the decimal separator, for example).
If you want to know the actual numbers for these hard-coded safety limits, scroll to the algorithm feature you are using on this page.
Maximum bolus
Defines the maximum amount of bolus insulin, in insulin units, that AAPS is allowed to deliver at once.
This setting exists as a safety limit to prevent the delivery of a massive bolus due to accidental input or user error.
It is recommended to set this to a sensible amount that corresponds roughly to the maximum amount of bolus insulin that you are ever likely to need for a meal or correction dose.
This restriction is also applied to the results of the bolus calculator.
Maximum carbs allowed
Defines the maximum amount of carbs, in grams, that AAPS bolus calculator is allowed to dose for.
This setting exists as a safety limit to prevent the delivery of a massive bolus due to accidental input or user error.
It is recommended to set this to a sensible amount that corresponds roughly to the maximum amount of carbs that you are ever likely to need for a meal.
BG source
The settings of your selected BG source appear as their own section. For example with xDrip+ BG:

Upload BG data to NS: let AAPS upload the received BG values to Nightscout. Only enable this if the CGM app itself is not already uploading them.
Log sensor change: create a sensor change therapy event automatically when the sensor is inserted.
The main screen
In AAPS 3.x these settings were grouped in an “Overview” section. In AAPS 4 they are configured directly from the main screen elements they belong to.
QuickLaunch buttons
Define which action buttons are visible on the main screen: tap the small gear at the bottom center of the main screen (“Configure QuickLaunch”) and Add the actions you want quick access to (treatments, CGM actions, careportal entries…).

Quick Wizard
Create customized buttons for certain standard meals or snacks which will be displayed on the main screen. Useful for standard meals frequently eaten.
For each button, you define the carbs and calculation method for the bolus. Then, you define during which time period the button will be visible on your main screen - just one button per period. The button will not be visible if outside the specified time range or if you have enough IOB to cover the carbs defined in the QuickWizard button. If different times are specified for the different meals you will always have the appropriate standard meal button on the main screen, depending on the time of day.
To manage your Quick Wizard presets, type “QuickWizard” in the main screen search bar and open QuickWizard - Manage quick wizard presets.
If you click the quick wizard button AAPS will calculate and propose a bolus for those carbs based on your current ratios (considering blood glucose value or insulin on board if set up).
The proposal has to be confirmed before insulin is delivered.
Default temp targets
Temporary targets (TT) allow you to change your blood glucose target for a certain time period. When setting a default TT, you can easily change your target for activity, eating soon etc.
Tap the target range on the main screen to open the Temp Target screen. Swipe through the preset cards (Eating Soon, Activity, Hypo) and change the target and the duration of each preset under Preset Settings. Preset values are:
Eating soon: target 90 mg/dL / 5.0 mmol/L, duration 45 min
Activity: target 140 mg/dL / 7.8 mmol/L, duration 90 min
Hypo: target 160 mg/dL / 8.9 mmol/L, duration 60 min

Learn how to activate Temp Targets here.
Fill/Prime standard insulin amounts
If you want to fill the tube or prime the cannula through AAPS you can do this with the Prime/Fill buttons in the expanded status panel of the main screen.
The default amounts of the three fill buttons can be defined in the Prime/Fill settings, depending on the length of your catheter. Type “prime” in the main screen search bar to open them.

Status lights
Status lights give a visual warning for:
Sensor age
Insulin age (days reservoir is used)
Reservoir level (units)
Cannula age
Pump battery age
Pump battery level (%)
If the warning threshold is exceeded, values will be shown in yellow. If the critical threshold is exceeded, values will be shown in red.
To change the thresholds, expand the status panel on the main screen (chevron on the right of the status row) and tap the small Settings icon next to “Status”:

Tap an item (Cannula, Insulin, Sensor or Pump battery) to open its warning and critical thresholds:

The last option allows you to import those settings from Nightscout if defined there. See Nightscout documentation for more information.
Bolus wizard settings
Type “bolus” in the main screen search bar to open the Bolus wizard settings:

Bolus percentage sets the default percentage of the bolus calculated when using the bolus wizard.
Default is 100%: no correction. Even when setting a different value here, you can still change each time you use the bolus wizard. If this setting is 75 % and you had to bolus 10U, the bolus wizard will propose a meal bolus of only 7.5 units.
When using SMB, many people do not meal-bolus 100% of needed insulin, but only a part of it (e.g. 75 %) and let the SMB with UAM (Unattended Meal Detection) do the rest. Using a value lower than 100% here can be useful:
for people with slow digestion: sending all the bolus upfront can cause hypo because the insulin action is faster than the digestion.
to leave more room to AAPS to deal by itself with BG rise. In both cases, AAPS will compensate for the missing part of the bolus with SMBs, if/when deemed adequate.
Use bolus advisor
When enabled, if you use the bolus wizard while you are in hyperglycemia, you will get a warning, prompting you if you wish to pre-bolus and eat later, when your BG gets back in range.
Superbolus
The Superbolus option of AAPS 3.x is not available as a setting in AAPS 4.
Loop
See AAPS screens > The main screen > Loop status to change loop mode now.
Open mode minimum change
When using Open loop, you will receive notifications every time AAPS recommends adjusting the basal rate. To reduce the number of notifications you can either use a wider bg target range or increase the percentage of the “Open mode minimum change” setting. This defines the relative change required to trigger a notification.

Advanced Meal Assist (AMA) or Super Micro Bolus (SMB)
Depending on your settings in Configuration > APS you can choose between two algorithms:
Advanced meal assist (OpenAPS AMA) - state of the algorithm in 2017
Super Micro Bolus (OpenAPS SMB) - most recent algorithm recommended for beginners
As of AAPS version 3.3, the Dynamic ISF feature has been moved into OpenAPS SMB.
OpenAPS AMA
All the settings for OpenAPS AMA are described in the dedicated section in Key AAPS Features > Advanced Meal Assist (AMA).
OpenAPS SMB
All the settings for OpenAPS SMB are described in the dedicated section in Key AAPS Features > Super Micro Bolus (SMB).
The list of settings you see depends on your progress in the Objectives and on Simple mode. On a new installation only Use dynamic sensitivity is shown. Once the objectives are completed, the section looks like this:


Advanced Settings at the bottom of the section holds values that you normally do not have to change:


Absorption settings

SMB min 5m carbs impact (min_5m_carbimpact)
Setting hidden in simple mode.
The algorithm uses BGI (blood glucose impact) to determine when carbs are absorbed.
At times when carb absorption can’t be dynamically worked out based on your blood’s reactions, AAPS inserts a default decay to your carbs. Basically, it is a failsafe. This value is only used during gaps in CGM readings or when physical activity “uses up” all the blood glucose rise that would otherwise cause AAPS to decay COB.
To put it simply: The algorithm “knows” how your BGs should behave when affected by the current dose of insulin etc. Whenever there is a positive deviation from the expected behavior, some carbs are absorbed/decayed. Big change=many carbs etc.
The min_5m_carbimpact does define the default carb absorption impact per 5 minutes. For the full parameter reference see OpenAPS’s preferences and safety settings documentation.
Standard value for AMA is 3, for SMB it’s 8.
The COB graph on the main screen indicates when min_5m_carbimpact is being used by putting orange dots along the top of the COB curve.
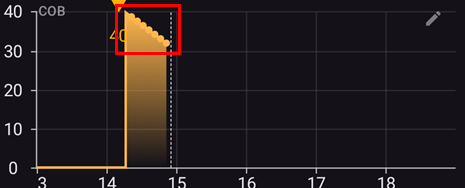
Absorption cutoff
Time at which any meal is considered absorbed; remaining carbs will be cut off. If you often eat high fat or protein meals you will need to increase your meal absorption time.
Advanced settings - autosens ratio

Define min. and max. autosens ratio.
Normally standard values (max. 1.2 and min. 0.7) should not be changed.
Pump

BT Watchdog
Activate BT watchdog if necessary (e.g. for Dana pumps). It switches off Bluetooth for one second if no connection to the pump is possible. This may help on some phones where the Bluetooth stack freezes.
Pump settings
The options here will vary depending on which pump driver you have selected in Configuration > Pump. Pair and set up your pump according to the pump-related instructions.
For example with the Virtual Pump, the section is called Virtual pump settings. You choose the Pump type the virtual pump imitates, and whether its status is uploaded to Nightscout:

Tidepool
More information on the dedicated Tidepool page.
NSClientV3

The NSClient plugin (shown as NSClientV3 in the configuration menu) synchronizes your data with Nightscout. It uses the Nightscout API v3.
Data uploaders
When using NSClientV3, all uploaders must use the Nightscout API v3. If another uploader (for example your CGM app) is not API v3 compliant, let AAPS upload all data (BG, treatments, …) to Nightscout and disable that uploader.
Set your Nightscout URL (i.e. https://yoursitename.yourplatform.dom).
Make sure that the URL is WITHOUT /api/v1/ at the end.
In Nightscout, create an Admin token (requires Nightscout 15 to use the V3 API) and enter it in the Nightscout access token (not your API Secret!). On AAPSClient you can scan the main phone’s QR code instead, which sets up a token of the client’s own. A client paired with the PIN gets its own token from the main phone after pairing. See The client’s own Nightscout token.
This enables data to be read and written between both the Nightscout website and AAPS.
Double check for typos here if you are stuck in Objective 1.
Leave “Use websockets” enabled (recommended).
Synchronization

Synchronization choices will depend on the way you will want to use AAPS.
You can select which data you want to upload and download to or from Nightscout.
While client control is on (always in Simple Mode), these settings are hidden: AAPS is then in hardened mode, takes no changes made directly in Nightscout and uploads all its data.
Alarm options
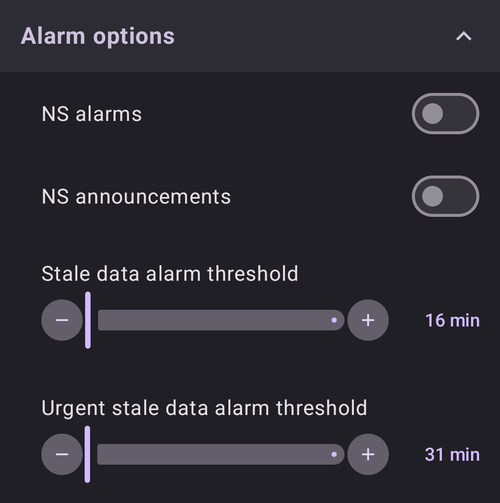
Alarm options allows you to select which Nightscout alarms to use through the app. AAPS will alarm when a Nightscout alarm triggers.
For the alarms to sound you need to set the Urgent High, High, Low and Urgent Low alarm values in your Nightscout variables.
They will only work while you have a connection to Nightscout and are intended for parent/caregivers.
If you have the CGM source on your phone (i.e. xDrip or BYODA) then use those alarms instead of Nightscout Alarms.
NS announcements will echo Nightscout announcements in the AAPS notifications.
You can change stale data and urgent stale data alarms threshold when no data is received from Nightscout after a certain time.
Remote control
The switch “Allow client control” is no longer in these settings: it is at the top of Manage → Authorized clients, where the paired clients are managed. See the dedicated Client / Master control page, including hardened mode, which this switch turns on.
Connection settings

Connection settings define when Nightscout connection will be enabled.
Restrict Nightscout upload to Wi-Fi only or even to certain Wi-Fi SSIDs.
If you want to use only a specific Wi-Fi network you can enter its Wi-Fi SSID.
Multiple SSIDs can be separated by semicolon.
To delete all SSIDs enter a blank space in the field.
Advanced settings (NSClientV3)

Options in advanced settings are self-explanatory.
SMS Communicator
More information on the dedicated SMS Commands page.
Wear
This section is shown when the Wear plugin is enabled in Configuration > Communication. More information on the dedicated Wear OS smartwatch and Operation of AAPS via your Wear OS smartwatch pages.

Wear control: allow treatments and other actions to be sent from the watch. Without it, the watch only displays data: the phone refuses any command from the watch, and tapping a complication that would open a control screen opens the AAPS menu on the watch instead.
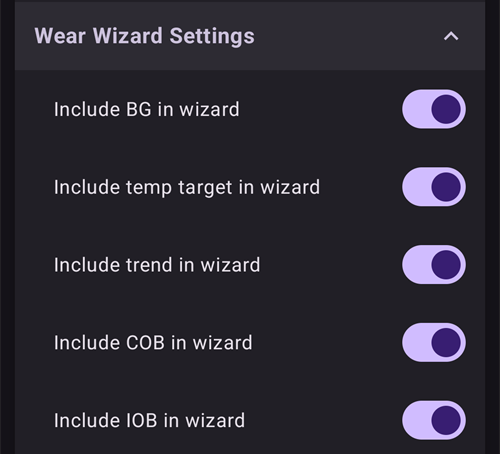
Wear Wizard Settings defines which calculations are included in the result of the bolus wizard on the watch. On the watch you only enter the carbs; these switches replace the choices you would make in the bolus wizard on the phone:
Include BG in wizard: add a correction for the difference between your current glucose and your target.
Include temp target in wizard: use the running temp target instead of the profile target for this correction.
Include trend in wizard: take the current glucose trend into account.
Include COB in wizard: add insulin for the carbs that are still on board.
Include IOB in wizard: subtract the insulin that is still on board.
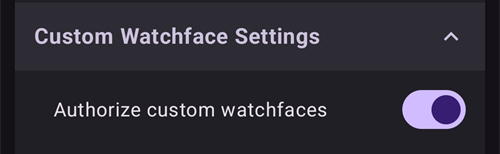
Custom Watchface Settings contains Authorize custom watchfaces. A custom watchface file can include values for some watch settings. When this switch is on, loading such a watchface is allowed to change those settings on the watch; when it is off, the watchface is loaded but the settings stay as they are:
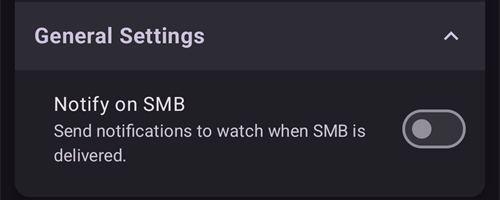
General Settings contains Notify on SMB, to get a notification on the watch each time an SMB is delivered:
Autotune
This section is shown when the Autotune plugin is enabled in Configuration > General. The settings are described on the dedicated Autotune page.

Automation

Select which location service shall be used:
Use passive location: AAPS only takes locations if other apps are requesting it
Use network location: Location of your Wi-Fi
Use GPS location (Attention! May cause excessive battery drain!)
Local alerts

Settings should be self-explanatory.
Override Do Not Disturb mode (on by default): the AAPS alarms ring even when the phone is silent or in Do Not Disturb. Turn it off if AAPS should respect those modes: the alarms do not ring then, and in Do Not Disturb they only vibrate, on the phone and on the watch. Loop suggestions that arrive during Do Not Disturb are shown without a sound.
When an alarm rings, the alarm screen offers Silence alarm (the screen stays open, so you can read the message) and Silence and close. Swiping the alarm notification away in the notification tray mutes the alarm. When you open AAPS later, an alarm you did not answer is shown again.
Maintenance settings

Email recipient: Standard recipient of logs is mailto:logs@aaps.app.
Number of logs to send: how many of the most recent log files are attached when you send logs.
Data Choices

You can help develop AAPS further by sending crash reports to the developers.
Unattended Settings Export
By enabling this feature, you allow AAPS to execute settings exports without user intervention. For this the master password
is securely stored on your phone (only) at the next manual export. The stored password will be used for up to 4 weeks.
After 4 weeks you will be notified the password is about to expire. During a grace period of 1 week, the password can then be refreshed by
manually exporting settings from the maintenance menu.
After the grace period of 1 week has passed the stored password expires and any automated settings export will abort while notifying the user, asking to reenter the password. (Automated settings exports) will be logged to the AAPS ‘Careportal’ and ‘User entry’ lists under Treatments.
After enabling this option, make sure to perform a manual settings export, where you will be requested for your password, so that AAPS can store it.
Log files
AAPS will save logs for troubleshooting.
Do not disable this feature: it will help understanding the reasons if something goes wrong.
If you need to send the logs to the developers, make sure you accurately describe the issue in the email. It is preferable to send logs only after being requested to do so, following an issue report in GitHub.
You can find AAPS logs in your phone memory -> Android -> data -> info.nightscout.androidaps -> files.
Log handling (log settings, sending and deleting logs) and file management are found on the Maintenance screen, opened from the menu (☰) in the top-left corner of the main screen:

Setting the local AAPS directory
The Maintenance screen also includes the AAPS directory. This setting allows the user to choose a directory on their phone where AAPS will store preferences, logs, and other files. Once a directory is chosen, its path (for example Documents/AAPS) is shown below AAPS directory, so you can always see where your files are saved.
It is strongly recommended to use a directory directly in the main entry of your phone memory. Default is AAPS.

If you select a subdirectory of AAPS, you will see an error message. Tap “OK” and retry, selecting the correct directory (one above). Do not select “DISMISS” unless you clearly know what you are doing.

Android can silently take the directory permission away, for example after you reinstall AAPS or clear its storage. When that happens, AAPS shows a persistent Access to the AAPS directory was lost notification and local settings export stops working until you come back here and select the directory again. Do this promptly, otherwise your backups on the phone are no longer refreshed.
Setting a cloud directory
You can export your settings, logs and CSV data to a cloud service.
Open the menu (☰), select Maintenance and tap Cloud Directory (under File management).

In Select Storage Type, select Google Drive.

A Google sign-in page opens. Choose the Google account that will hold your backups (you can use a dedicated Google account).

Check that the account is the right one and tap Continue to give AAPS access. If you set up the cloud directory before, the page says that AAPS already has some access.

Back in AAPS, the message Cloud storage authentication successful appears at the bottom of the main screen:

In the Maintenance menu, Cloud Directory now has a green dot, and the Cloud buttons next to Send logs, Export settings, Import settings and Export User Entries to Excel (csv) are available.

To stop exporting to the cloud, tap the ✕ (Clear Settings) icon at the end of the Cloud Directory row in the Maintenance menu (it is shown once a cloud service is set up) and confirm Clear Cloud Settings. This switches back to local storage and clears the authorization.
Open Humans
You can help the community by donating your data to research projects! Details are described on the Open Humans page.
In Settings → Open Humans, you can define when data shall be uploaded
only if connected to Wi-Fi
only if charging