Fehlerbehebung für Android Studio
Verlorener Keystore
If you use the same keystore when updating AAPS you do not have to uninstall the previous version on your smartphone. Daher wird empfohlen, den Keystore an einem sicheren Platz zu speichern.
Wenn Du versuchst das apk zu installieren und es mit einem anderen keystore signiert wurde als zuvor, bekommst Du einen Fehler, dass die Installation fehlgeschlagen ist!
Falls Du deinen alten keystore oder das dazugehörige Passwort nicht mehr wiederfindest, kannst Du wie folgt vorgehen:
Einstellungen exportieren auf deinem Smartphone.
Kopiere die Datei mit den Einstellungen von deinem Smartphone auf ein externes Gerät (d.h. dein Computer, externe Festplatte) oder lade sie in deinen Cloudspeicher hoch.
Erstelle ein signiertes Apk für die neue Version, wie es im Update Guide beschrieben ist und übertrage es auf dein Smartphone.
Deinstallieren die Vorgängerversion von AAPS auf Deinem Smartphone.
Installiere die neue AAPS-Version auf Deinem Smartphone.
Import settings to restore your objectives and configuration.
Falls du die Einstellungen nicht findest, kopiere sie von deinem externen Speicher auf dein Smartphone.
Prüfe deine Einstellungen und deaktiviere den Energiesparmodus.
Keep on looping.
Gradle Sync schlägt fehl
Der Gradle Sync kann aus verschiedenen Gründen fehlschlagen. Falls Du einen Hinweis bekommst, dass der Gradle Sync fehlgeschlagen ist („Gradle Sync failed“), öffne den „Build“ Reiter (1) im unteren Bereich von Android Studio und überprüfe welche Fehlermeldung (2) du angezeigt bekommst.

Das sind die üblichen Gradle Sync Fehler:
Wichtig: Nachdem Du die Anleitung zum Beheben deines Problems befolgt hast, ist es notwendig den Gradle Sync erneut anzustoßen.
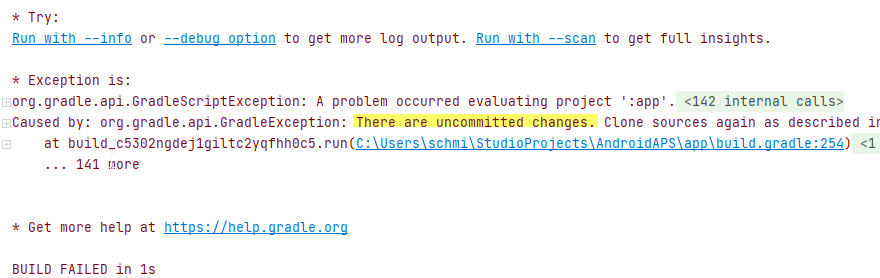
Uncommitted changes
Falls Du eine Fehlermeldung bekommst, die so aussieht
Schritt 1 - Überprüfe deine Git Installation
Öffne den Terminal Reiter (1) im unteren Bereich von Android Studio und kopiere den folgenden Text, oder tippe ihn ins Terminal ein.
git --version
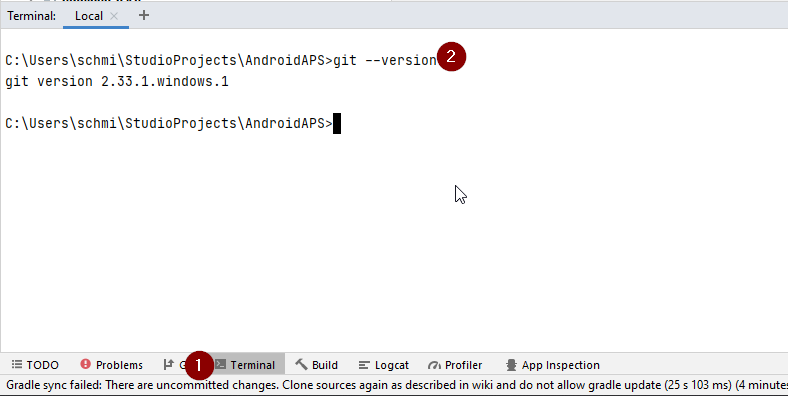
Hinweis: Es ist ein Leerzeichen und zwei Bindestriche zwischen git und version!
Im Terminal sollte ein Hinweis erscheinen, der übermittelt welche git Version installiert ist (siehe Screenshot oberhalb). In diesem Fall gehe zu Schritt 2.
Falls du einen Hinweis wie diesen bekommst
Git: command not found
ist deine git Installation fehlerhaft.
Falls du mit Windows arbeitest und Git erst kurz zuvor installiert wurde, solltest du deinen Computer neu starten, um Git nach der Installation global verfügbar zu machen
Falls Git installiert ist, du deinen Computer neu gestartet hast (wenn du Windows benutzt), und Git immer noch nicht gefunden werden kann:
Suche auf deinem Computer nach einer Datei „git.exe“.
Notiere dir den Pfad, wo diese Datei auf dem Computer liegt.
Gehe zu den Umgebungsvariablen auf Windows, wähle die Variable „PATH“ und klicke bearbeiten. Füge den zuvor notierten Pfad deiner Git Installation hinzu.
Speichern und schließen.
Starte Android Studio neu.
Schritt 2: Prüfe, ob es uncommitted changes gibt.
In Android Studio: öffne den „Commit“ Tab (1) auf der linken Seite.
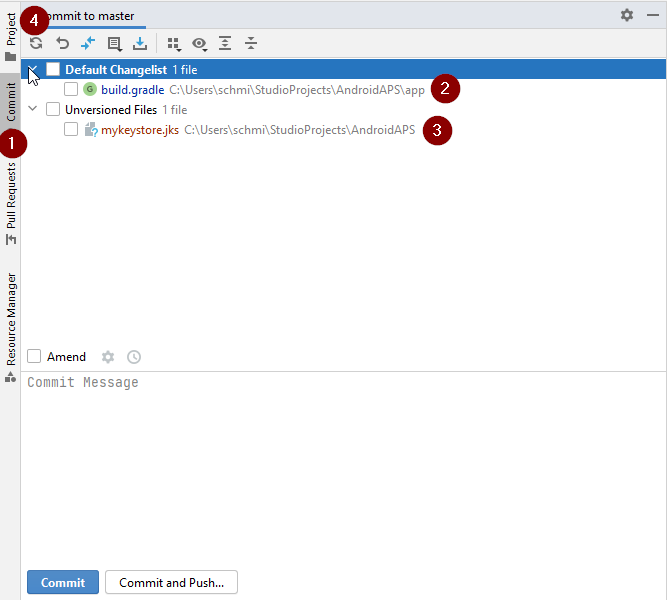
Dort siehst du entweder „Default changeset“ (2) oder „Unversioned files“ (3):
Bei „Default changeset“, hast du wahrscheinlich Gradle upgedatet oder aus Versehen etwas an einer Datei geändert.
Mache einen Rechtsklick auf „Default Changeset“ und wähle „Rollback“
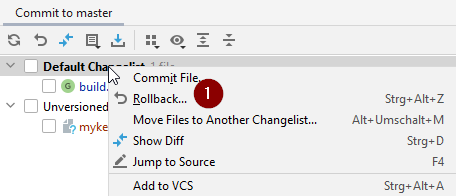
Diese Dateien werden erneut vom Git Server gezogen. Falls keine weiteren Änderungen im Commit Tab zu sehen sind, gehe zu Schritt 3.
Falls du „Unversioned Files“ sehen kannst, hast du wahrscheinlich Dateien im Sourcecode Projekt abgelegt, die dort nicht hingehören (z.B: deine keystore Datei).
Benutze deinen Datei Explorer und verschiebe die Datei an einen Ort, außerhalb des Source Code Projekts.
Go back to Android Studio and click the Refresh button (4) within the Commit tab to make sure the file is not stored in the AAPS directory anymore.
Falls keine weiteren Änderungen im Commit Tab zu sehen sind, gehe zu Schritt 3.
Schritt 3: Resync Gradle (erneut)
Folge der Anleitung bei Gradle Resync.
Incompatible version of Android Gradle plugin
If you experience the following error message

You are using an outdated version of Android Studio. In the menu, go to Help > Check for updates and install any updates of Android Studio and its plugins that are found.
Android Gradle plugin requires Java 17 to run
Wahrscheinlich bekommst du diese Fehlermeldung:

Klicke auf „Gradle Settings“ (1), um die Gradle Einstellungen zu öffnen.
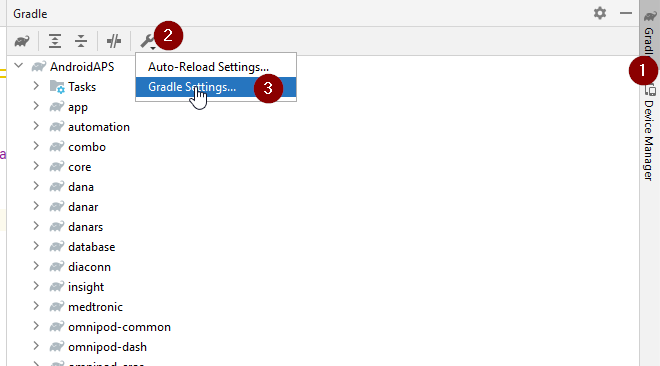
Falls du den Link zu den „Gradle Settings“ nicht hast, öffne die Gradle Settings manuell, indem du den Gradle Tab am rechten Rand von Android Studio auswählst (1). Wähle dann das Werkzeug Icon (2) und dort das Element „Gradle Settings“ (3).
When you have opened the Gradle settings dialog, open the options (1) at „Gradle JDK“ and selected the „jbr-17“ (2), which should be located within your Android Studion installation directory.

Klicke „OK“ um die Einstellungen zu speichern und schließen.
Wichtig: Falls Du die Einstellung „Gradle JDK“ nicht siehst, hast Du Android Studio wahrscheinlich nicht upgedatet. Make sure you are using Android Studio 2022.3 Giraffe) or newer.
Jetzt ist es notwendig einen Gradle Resync auszulösen
Could not resolve/No cached version
Wahrscheinlich siehst Du diese Fehlermeldung:

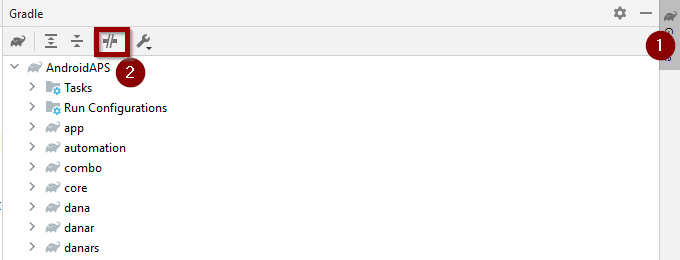
Öffne den Gradle Tab auf der rechten Seite (1).
Stelle sicher, dass der Button der bei (2) zu sehen ist, NICHT selektiert ist.
Jetzt ist es notwendig einen Gradle Resync auszulösen
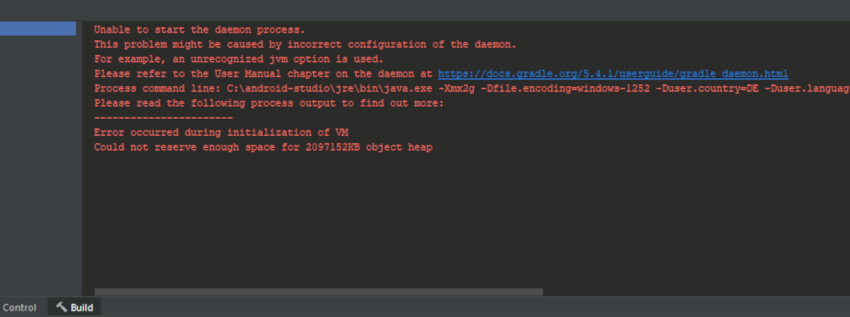
Unable to start daemon process
Wenn Du eine Fehlermeldung wie die unten siehst, verwendest Du wahrscheinlich ein Windows 10 32-Bit-Betriebssystem. Dies wird von Android Studio Version 3.5.1 und höher nicht unterstützt und daran können die AAPS Entwickler leider nichts ändern.
Falls du Windows 10 verwendest, brauchst du ein 64-bit Betriebssystem.
There are a lot of manuals on the internet how to determine wether you have a 32-bit or 64-bit OS - i.e. this one.
Gradle Resync
Falls Du immer noch den Hinweis sehen kannst, dass der Gradle sync fehlgeschlagen ist, wähle den Link „Try again“. 
Falls Du den Hinweis nicht mehr siehst, kannst Du das auch manuell auswählen:
Öffne den Gradle Tab (1) am rechten Rand von Android Studio.
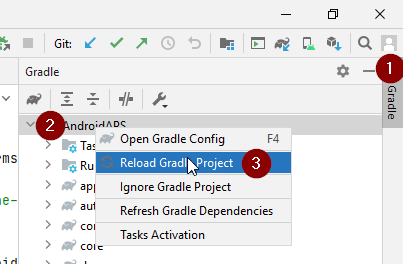
Right-click on AAPS (2)
Klicke auf „Reload Gradle Project“ (3)
Generate Signed APK generated successfully with 0 build variants
Wenn Du die Apk generierst, bekommst Du möglicherweise den Hinweis, dass das Generieren zwar erfolgreich war, aber, dass keine build variants generiert wurden:
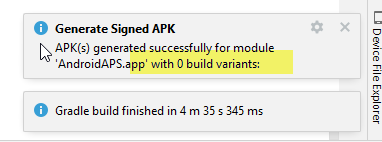
Diese Warnung ist falsch. Prüfe den Pfad den Du als „Destination Folder“ (Ziel Speicherort) für die Erstellung angegeben hast (Schritt Generate Signed APK) und Du wirst die signierte APK dort finden!
App was created with compiler/kotlin warnings
Falls Dein Build erfolgreich durchgelaufen ist, Du aber Warnungen vom Compiler oder Kotlin bekommst (diese zeigen sich durch ein gelbes oder blaues Ausrufezeichen), kannst Du diese Warnungen einfach ignorieren.

Deine App wurde erfolgreich gebaut und kann aufs Smartphone übertragen werden!
Key was created with errors
Beim Erstellen eines neuen Keystores zum Erstellen der signierten APK wird unter Windows möglicherweise die folgende Fehlermeldung angezeigt:

Dies scheint ein Fehler in Android Studio 3.5.1 und seiner Java-Umgebung in Windows zu sein. Der Schlüssel wird korrekt erstellt, aber eine Empfehlung wird fälschlicherweise als Fehler angezeigt. Dies kann momentan ignoriert werden.
No CGM data is received by AAPS
Falls Du gepatchte Dexcom G6-App verwendest: Diese App ist veraltet. Verwende stattdessen die BYODA App.
Falls Du xDrip+ verwendest: Identifiziere den Empfänger wie in den xDrip+ Einstellungen beschrieben.
App not installed
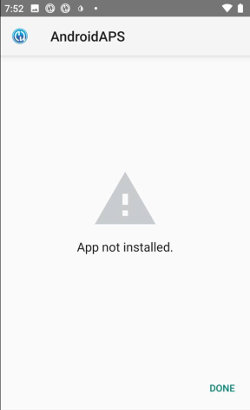
Stelle sicher, dass Du die “app-full-release.apk” auf Dein Smartphone übertragen hast.
Falls „App not installed“ auf dem Smartphone angezeigt wird, gehe wie folgt vor:
Exportiere die Einstellungen (in der AAPS Version, die bereits auf Deinem Smartphone installiert ist)
Deinstalliere AAPS auf Deinem Smartphone.
Aktiviere den Flugmodus & schalte Bluetooth aus.
Installiere die neue Version („app-full-release.apk“).
Aktiviere Bluetooth wieder und schalte den Flugmodus aus.
App installiert, aber weiter die alte Version auf dem Smartphone
Wenn Du die App erfolgreich erstellt, sie auf Dein Smartphone übertragen und dort erfolgreich installiert hast, jedoch weiter die alte Versionsnummer angezeigt wird, so hast Du wahrscheinlich versäumt, Deine lokale Kopie zu aktualisieren.
Keiner der oben genannten Löungsvorschläge funktioniert
Falls die oben genannten Tipps Dich nicht weiter bringen, kannst Du überlegen, die App von Grund auf neu zu erstellen.
Exportiere die Einstellungen (in der AAPS Version, die bereits auf Deinem Smartphone installiert ist)
Halte Dein key Passwort und Dein key store Passwort bereit. Falls du Passwörter vergessen hast, kannst du versuchen sie in Projekt Dateien wiederzufinden wie hier beschrieben.
Oder verwende einfach einen neuen keystore.
Build app from scratch as described here.
Nachdem Du die APK erfolgreich erstellt hast, kannst Du die App auf Deinem Smartphone deinstallieren. Übertrage dann die neue APK auf Dein Smartphone und installiere diese.
Importiere Einstellungen erneut, um deine Zielsetzungen und Einstellungen wiederherzustellen.
Überprüfe deine Einstellungen und deaktiviere den Energiesparmodus erneut.
Worst case scenario
Falls auch die Neuerstellung der App von Grund auf Dein Problem nicht löst, könntest Du versuchen, Android Studio komplett neu zu installieren. Einige Benutzer berichteten, dass dies ihr Problem gelöst hat.
Stelle sicher, dass du alle Dateien, die in Verbindung mit Android Studio stehen, deinstallierst. Falls du Android Studio nicht mit allen versteckten Dateien löscht, können beim Deinstallieren neue Probleme auftreten, anstatt dass Deine bestehenden Probleme gelöst werden. Anleitungen zur kompletten Deinstallation findest Du online z.B.
Installiere Android Studio von Grund auf wie hier beschrieben.