Building AAPS
Φτιάξτε το μόνοι σας, αντί να το κατεβάσετε
The AAPS app (an apk file) is not available for download, due to regulations around medical devices. It is legal to build the app for your own use, but you must not give a copy to others!
See FAQ page for details.
Computer and software specifications for building AAPS
Please use the Android Studio version called «Hedgehog»(2023.1.1) or «Iguana»(2023.2.1) to build the apk. Older versions of Android Studio need to be updated first!
Windows 32-bit systems are not supported by Android Studio. Please keep in mind that both 64 bit CPU and 64 bit OS are mandatory condition. If your system DOES NOT meet this condition, you have to change affected hardware or software or the whole system.
| OS (Only 64 bit) | Windows 8 or higher | Mac OS 10.14 or higher | Any Linux supports Gnome, KDE, or Unity DE; GNU C Library 2.31 or later |
|---|---|---|---|
CPU (Only 64 bit) |
x86_64 CPU architecture; 2nd generation Intel Core or newer, or AMD CPU with support for a Windows Hypervisor |
ARM-based chips, or 2nd generation Intel Core or newer with support for Hypervisor.Framework |
x86_64 CPU architecture; 2nd generation Intel Core or newer, or AMD processor with support for AMD Virtualization (AMD-V) and SSSE3 |
RAM |
8GB or more |
||
Disk |
At least 30GB free space. SSD is recommended. |
||
Resolution |
1280 x 800 Minimum |
||
Internet |
Broadband |
||
It is strongly recommended (not mandatory) to use SSD (Solid State Disk) instead of HDD (Hard Disk Drive) because it will take less time when you are building the AAPS apk file. You can still use a HDD when you are building the AAPS apk file. If you do, the building process may take a long time to complete, but once it has started, you can leave it running unattended.
Help and support during the building process
If you run into difficulties in the process of building the AAPS app, there is a dedicated troubleshooting Android Studio section, please consult that first.
If you think something in the building instructions is wrong, missing or confusing, or you are still struggling, please reach out to other AAPS users on Facebook or Discord. If you want to change something yourself (updating screenshots etc), please submit a pull request (PR).
Step-by-step guide to building the AAPS app
WARNING
If you have built AndroidAPS before, you don’t need to take all the following steps again. Please jump directly to the update guide!
The overall steps for building the AAPS apk file are as follows:
4.1 Install Git
4.4. Set Git path in Android Studio preferences
In this guide you will find example screenshots of building of AAPS apk file. Because Android Studio - the software which we use to build the AAPS apk - is regularly updated, these screenshots may not be identical to your installation, but they should still be possible to follow.
Since Android Studio runs on Windows, Mac OS X and Linux platforms, there might be also be minor differences in the steps for the different platforms.
Install Git (if you don’t have it)
Why Git?
Git is known as a “Versioning Control System” (VCS).
Git is a program that allows you to track changes in code and to collaborate with others. You will use Git to make a copy of the AAPS source code from the Github website to your local computer. Then, you will use Git on your computer to build the AAPS application (apk).
Steps for Installing Git
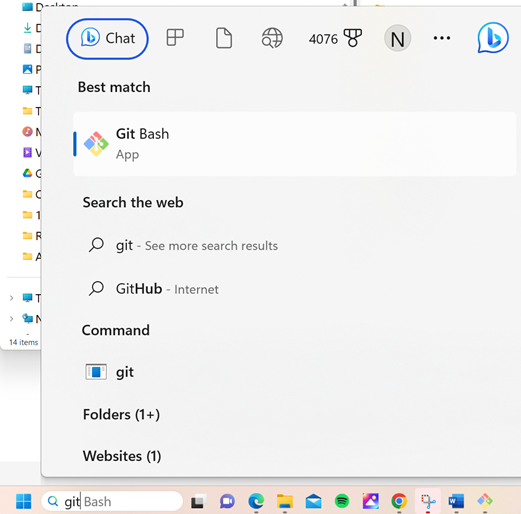
Check that you don’t already have Git installed. You can do this by typing “git” in the Windows search bar – if you see “Git bash” or some other form of Git, it is already installed and you can go straight to installing Android Studio:
If you don’t have Git installed, download and install the latest version for your system from here. Any recent Git version should work, select the correct version according to your system, either Mac, Windows and Linux.
Note for Mac users: the Git webpage will also guide you to install an additional program called «homebrew» to aid the installation. If you install Git via homebrew, there is no need to change any preferences.
During the installation, when you are asked to «select destination location» make a note of where Git is being installed (the «installation path») you will need to check it in the next step. It will be something similar to «C:\Program Files\Git\cmd\git.exe»
As you proceed through several steps of the Git installation, just accept all the default options.
After the install, if you forgot to make a note of the where Git was installed, you can find it as follows: type «git» into the PC search bar, right click on «Git bash», select «open file location» hover over the «Git bash» icon with your mouse, which will then reveal where it is installed.
Reboot your computer before the next step.
Εγκατάσταση του Android Studio
You have to be online all of the time during the following steps, as Android Studio downloads several updates
What is Android Studio?
Android Studio is a program which runs on your computer. It allows you to download source code from the internet (using Git) and build smartphone (and smartwatch) apps. You cannot «break» a current, looping version of AAPS which you might have running on a smartphone by building a new or updated app on your PC with Android Studio, these are totally separate processes.
The following screenshots have been taken from Android Studio Version Hedgehog.
One of the most important things when installing Android Studio is be patient! During installation and setup, Android Studio is downloading a lot of stuff which will take time.
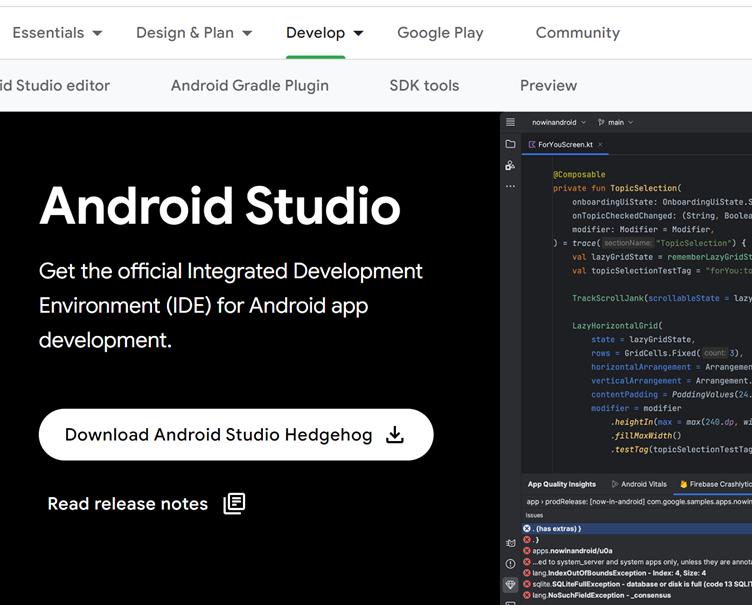
Download the latest version of Android Studio from here, locate it in your browser downloads folder, and install it on your computer:
When you first start Android Studio, you will be greeted as follows:
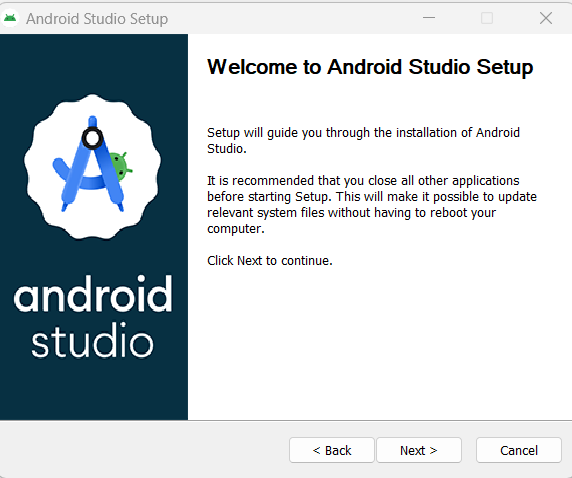
Select «Next»:
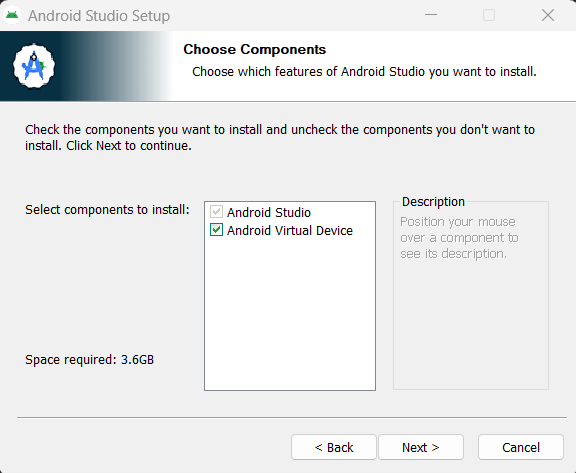
Leave the boxes checked, and select «Next»:
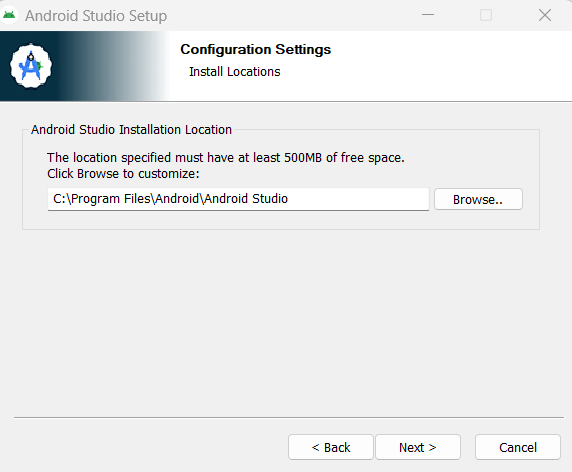
Allow the installation at the default location suggested, and select «Next»:
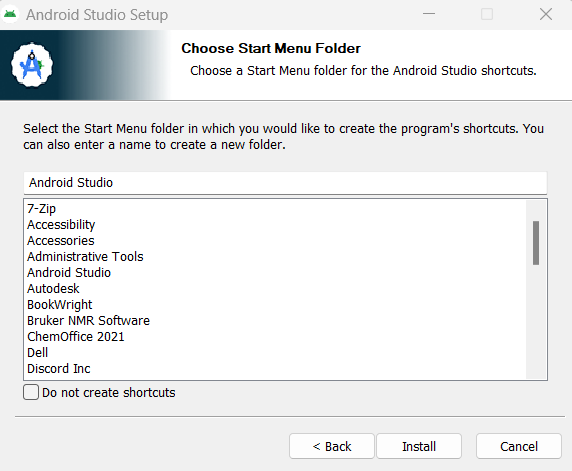
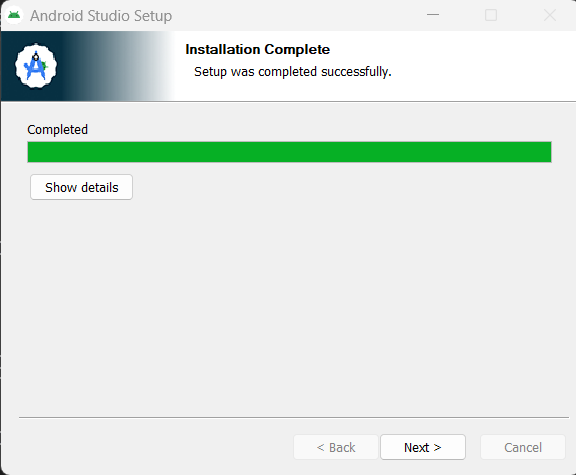
When asked to choose the Smart Menu Folder, simply select «Install». You will now need to wait a few minutes while Android Studio is being installed. You should then see that the Installation is Complete, select «Next»:
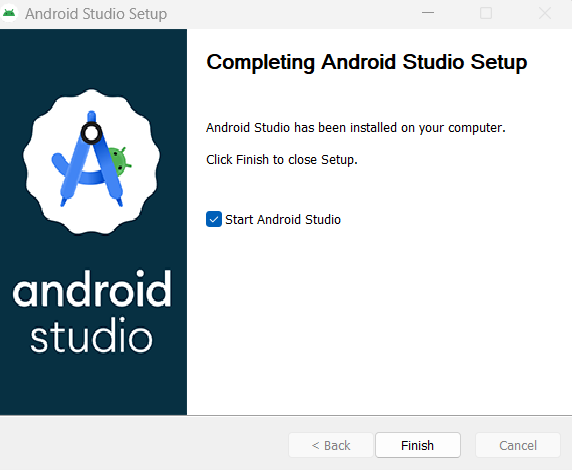
Now select «Finish»:
Android Studio will now start.
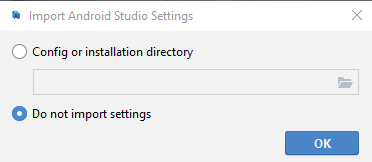
If asked if you want to import settings, select «Do not import settings». We don’t want to import settings from previous installations:
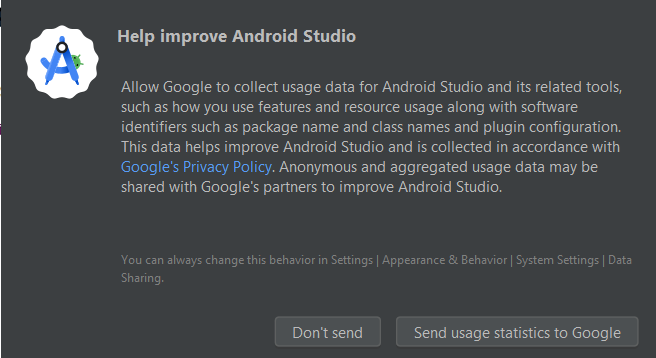
Decide whether you want to share data with Google or not (if unsure, just select «Don’t send»).
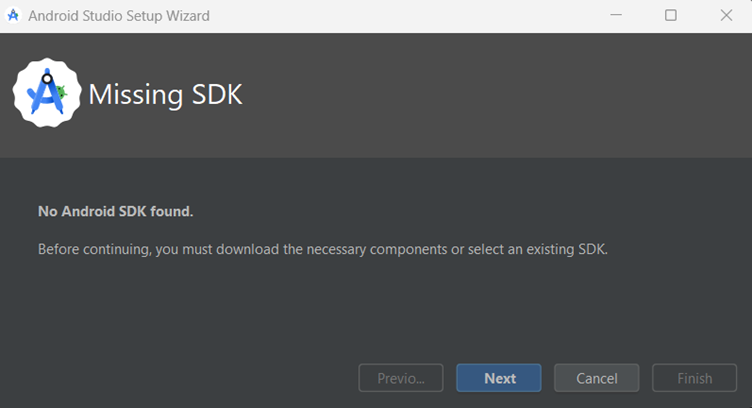
You will now get a message about a missing software development kit (SDK) (don’t worry, this will be solved soon), select «Next»:
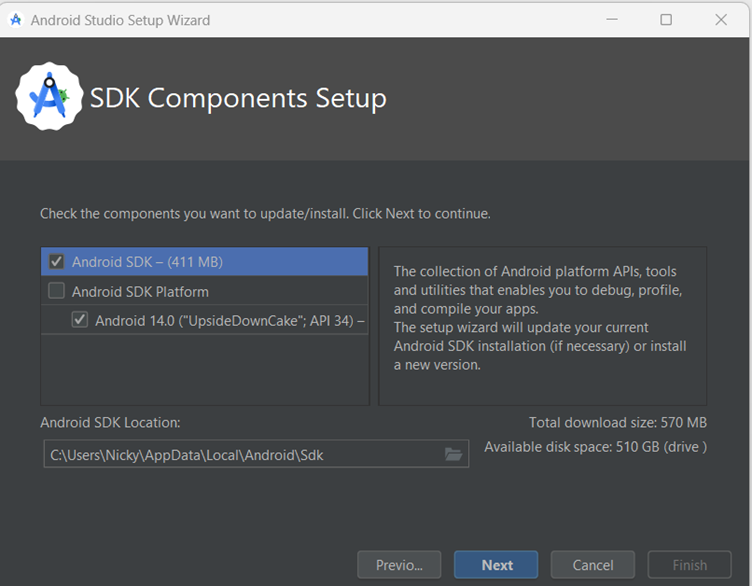
The software should autoselect the required (SDK) and choose a location.
What is an Android SDK?
In order to run AAPS on the phone the application needs to integrate with Android itself. Android provides “software development kits” (SDK) which allow apps like AAPS to interface with an Android operating system.
The SDK platform package does not relate to the version of Android running on your phone, but to the build of AAPS. AAPS version 3.2 (and newer) builds on top of API level 34, which is automatically selected in the Hedgehog version of Android Studio. Therefore, simply click «Next»:
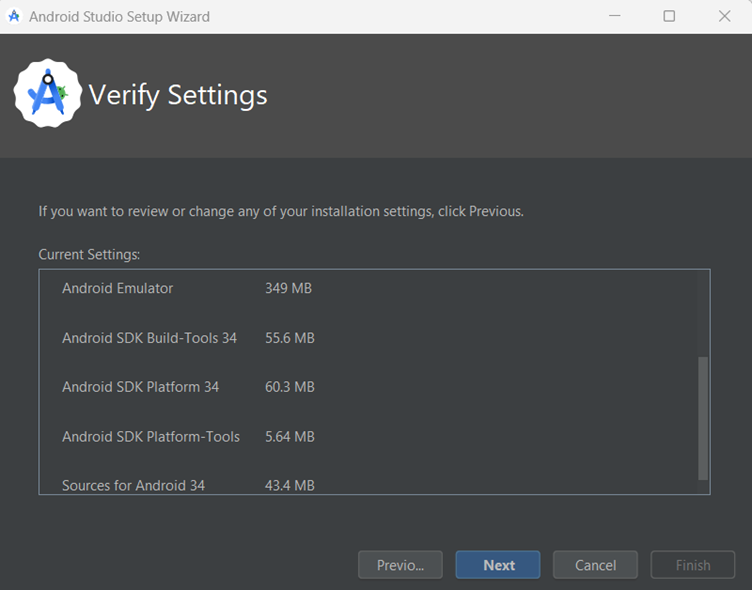
When asked to verify settings, just select «Next»:
When asked about the Licence Agreement, select «Accept» and then click «Finish»:
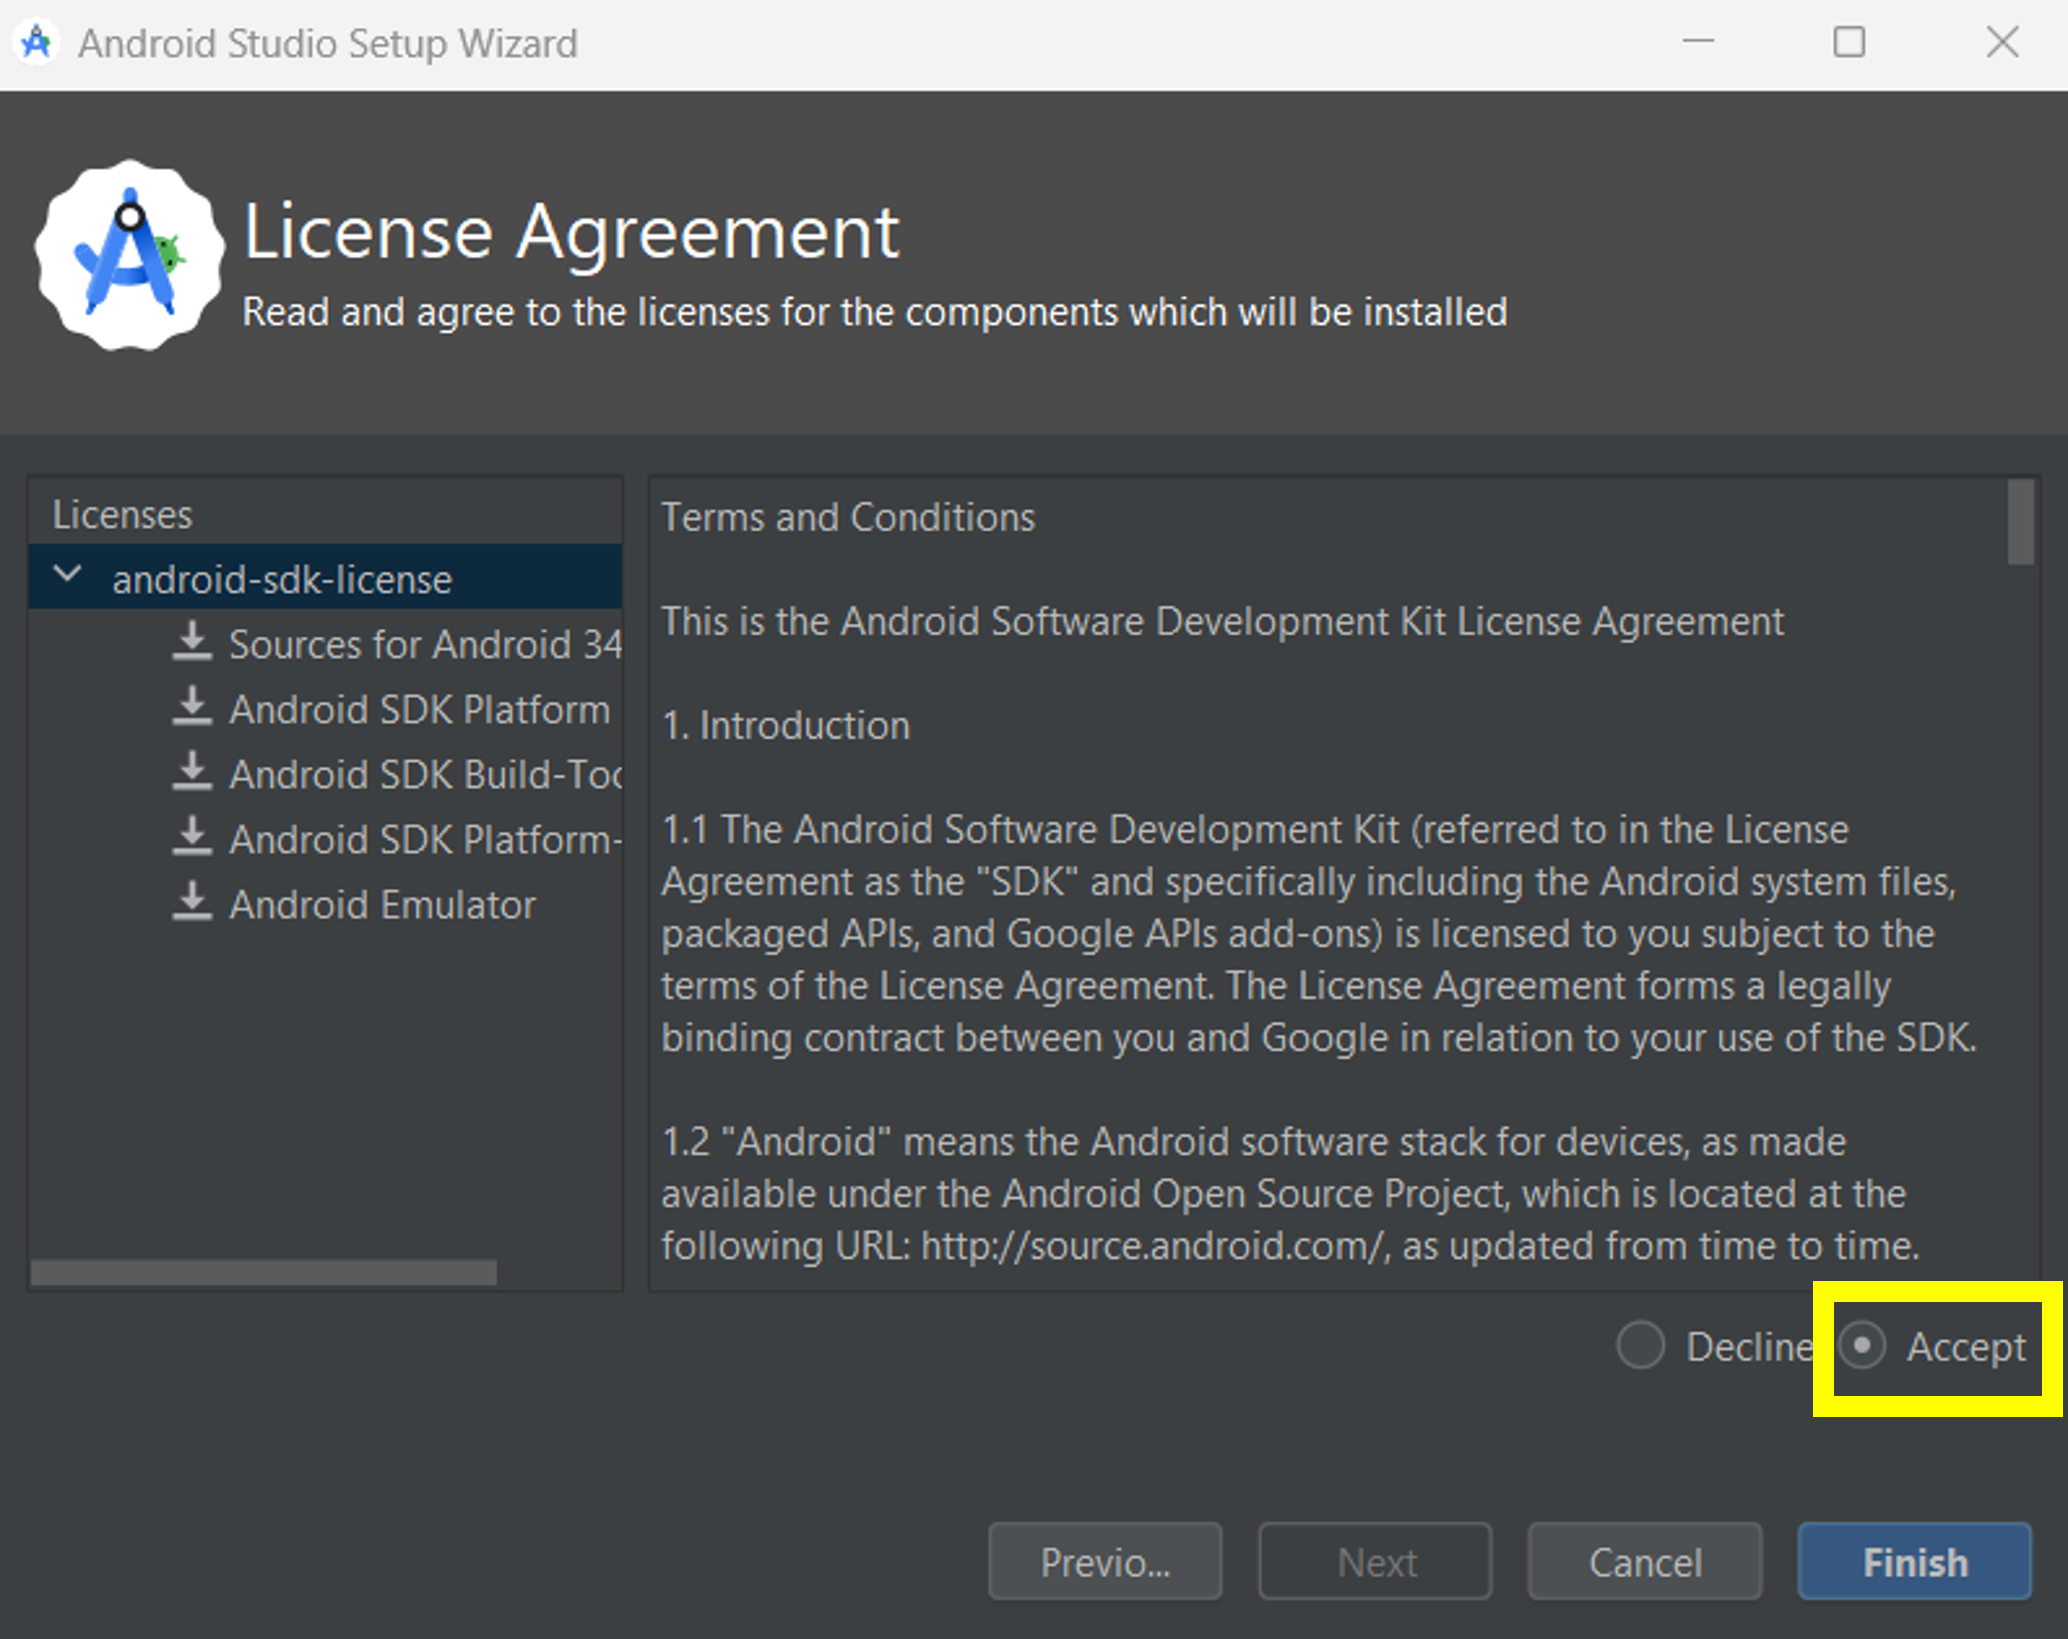
Note: Depending on your set-up, the licenses to be accepted might vary from what is shown in the screenshot.
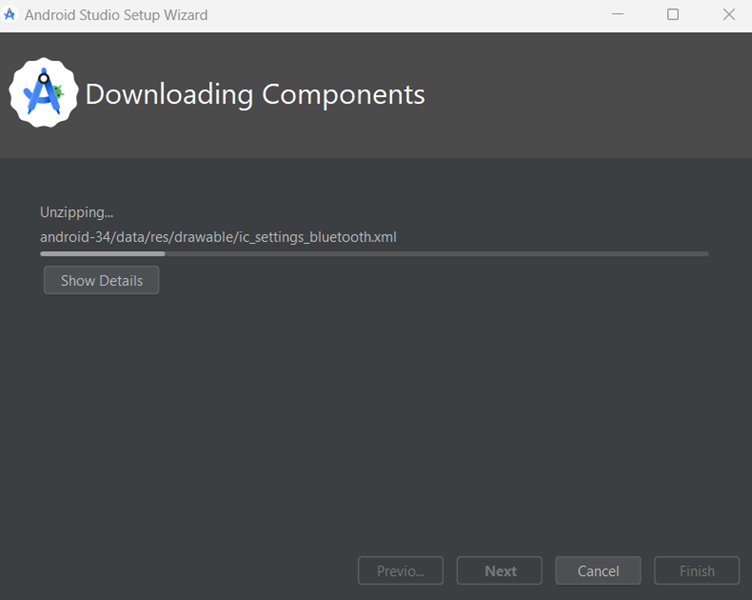
Wait while Android Studio downloads additional components, this may take a few minutes:
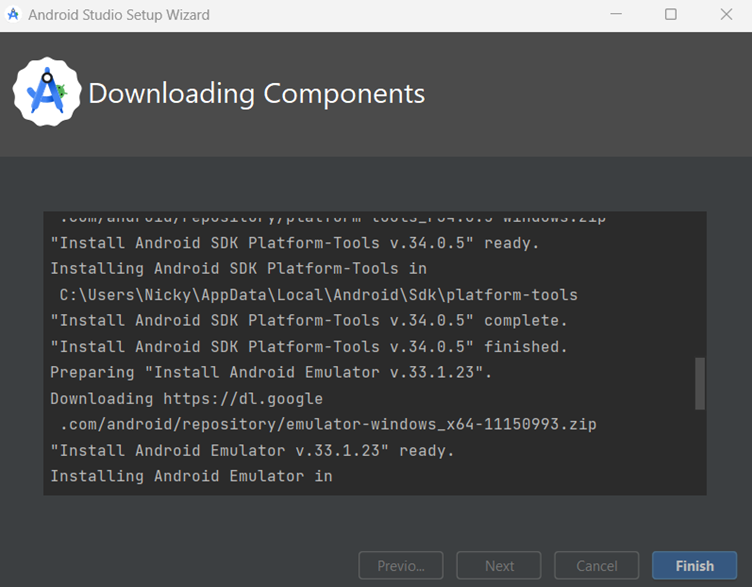
Once everything is downloaded, the «Finish» button turns blue, and you can click it:
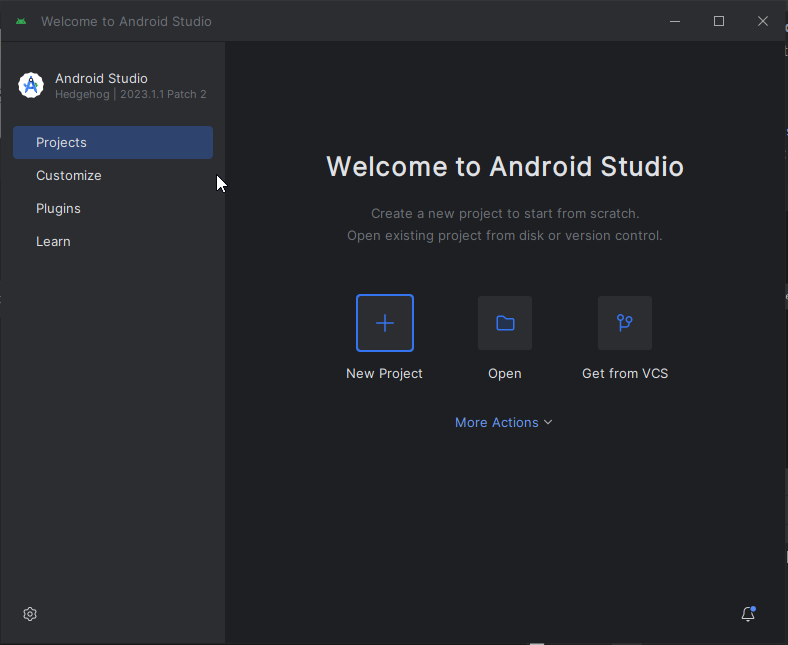
You are now greeted with the «Welcome to Android Studio» screen.
Download the AAPS code
Why can it take a long time to download the AAPS code?
The first time AAPS is downloaded, Android Studio will connect over the internet to the Github website to download the source code for AAPS. This should take about 1 minute.
Android Studio will then use Gradle (a development tool in Android studio) to identify other components needed to install these items on your computer.
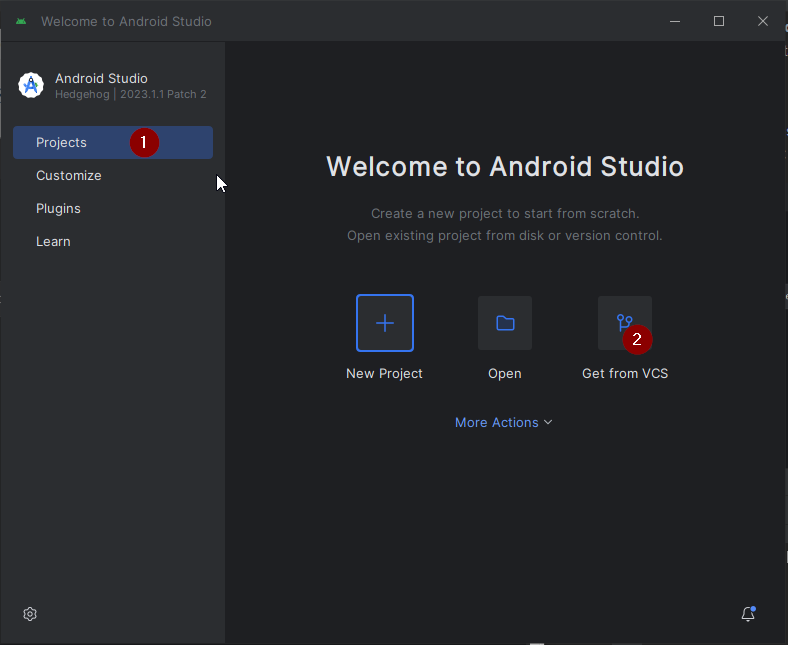
On the Android Studio Welcome screen, check that «Projects» (1) is highlighted on the left. Then click «Get from VCS» (2) on the right:
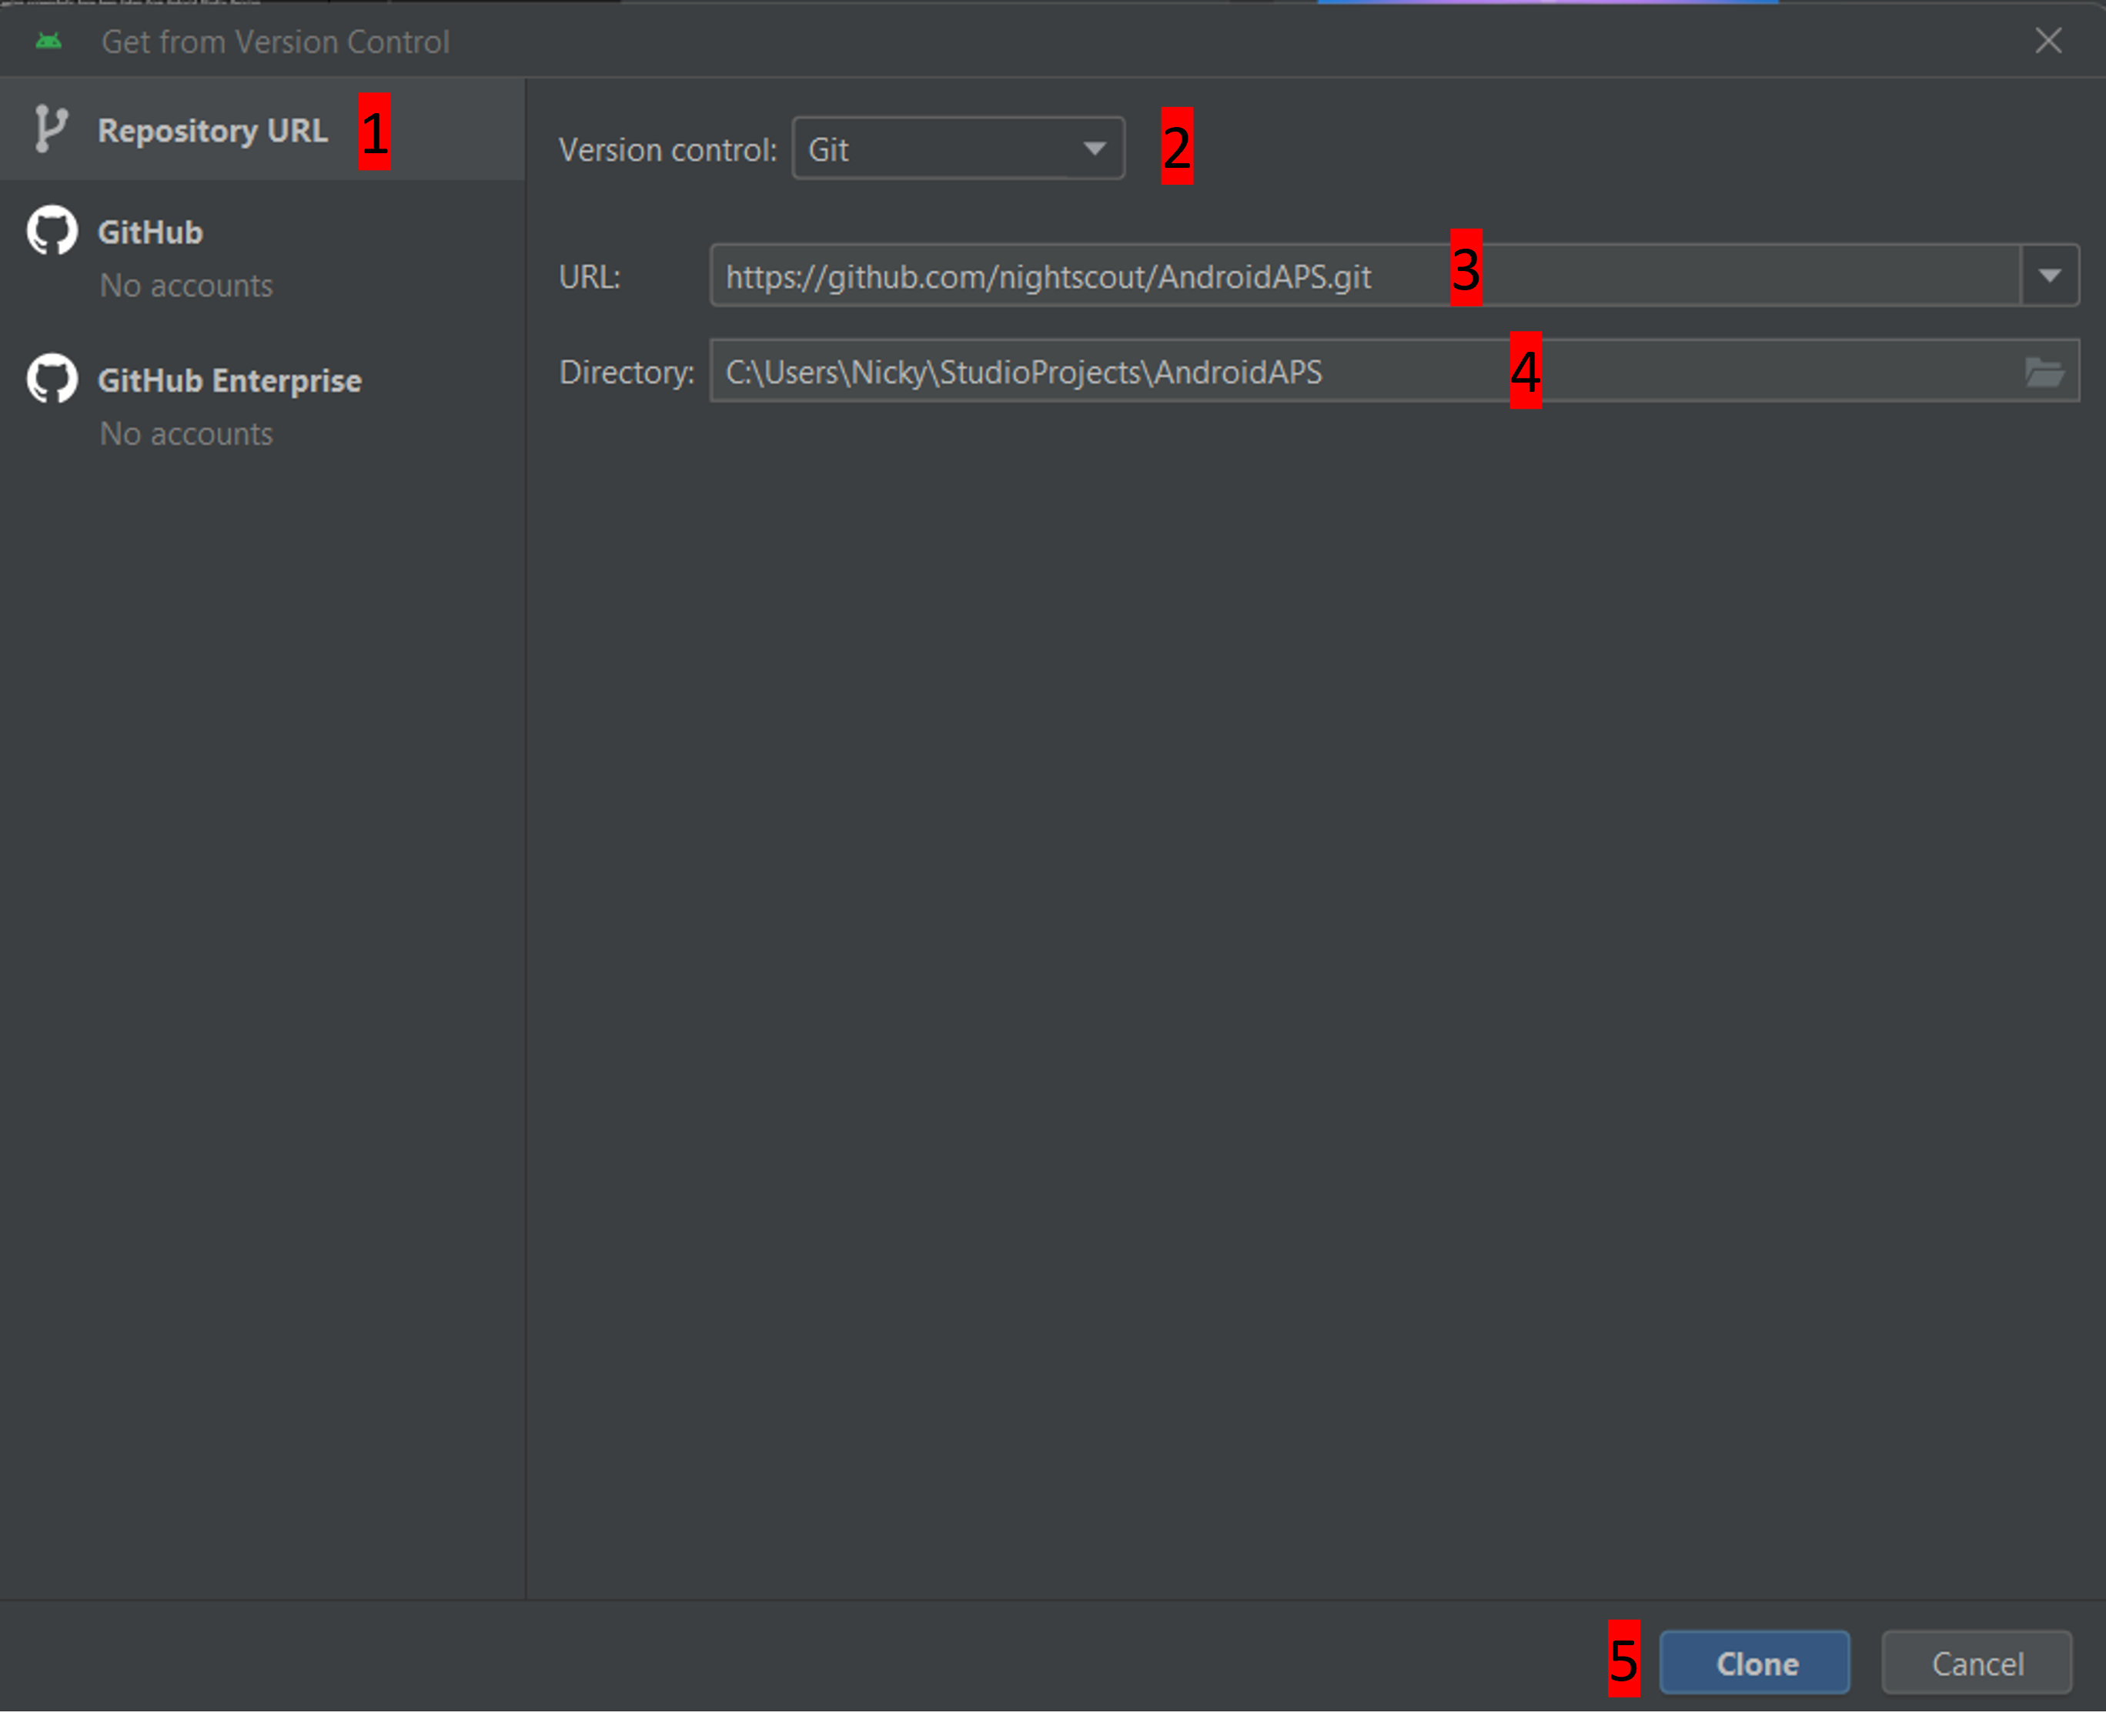
We will now tell Android Studio where to get the code from:
«Repository URL» should be selected (by default) on the left (1).
«Git» should be selected (by default) as version control (2).
Now copy this URL:
https://github.com/nightscout/AndroidAPS.git
and paste it into the URL textbox (3).
Check the (default) directory for saving the cloned code is sensible (4).
INFORMATION
Make a note of the directory. It is where your sourcecode is stored!
Now click the button «Clone» (5).
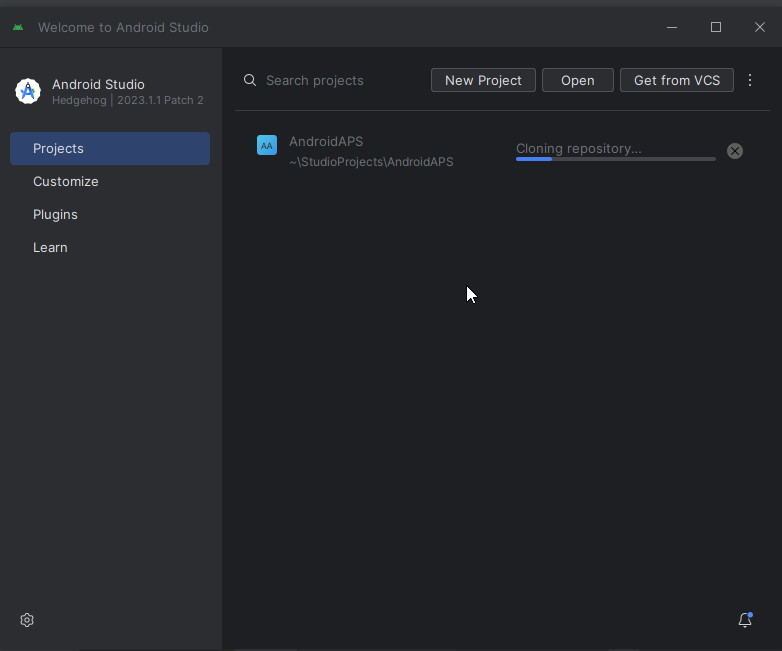
You will now see a screen telling you that the repository is being cloned:
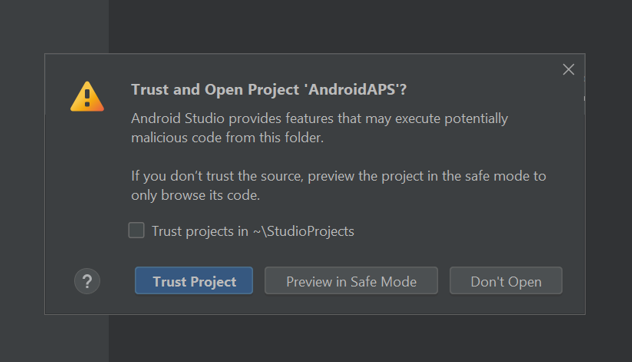
At some point, you may be asked whether you want to trust the project. Click on «Trust project»:
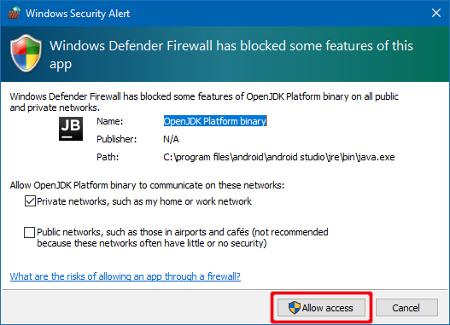
Only for Windows users: If your firewall asks for permission, grant access:
After the repository is cloned successfully, Android Studio will open the cloned project.
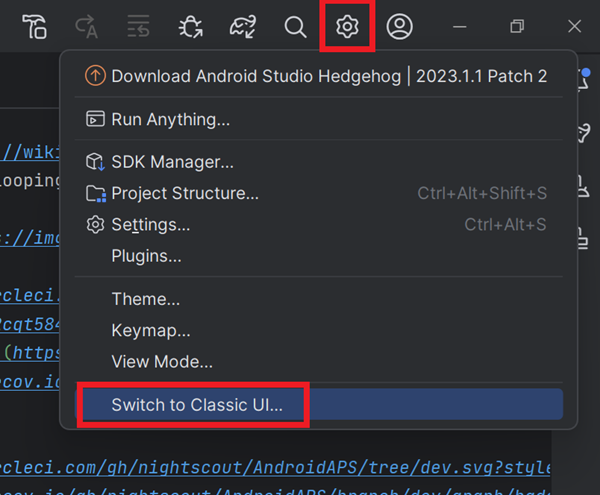
Click on the cog top right and select «Switch to Classic UI…» to return to the view used in this documentation.
If you do not see that cog, don’t worry. You already use the classic UI!
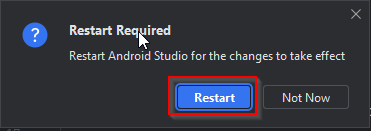
Restart Android Studio to make the changes effective.
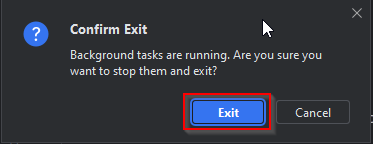
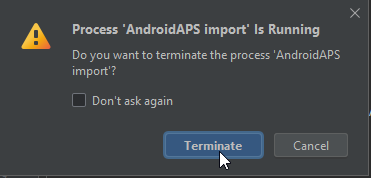
You might get one or both of the following warnings about running processes. It’s save to abort them!
When Android Studio opened again, wait patiently (this may take a few minutes), and particularly, do not update the project as suggested in the pop-up.
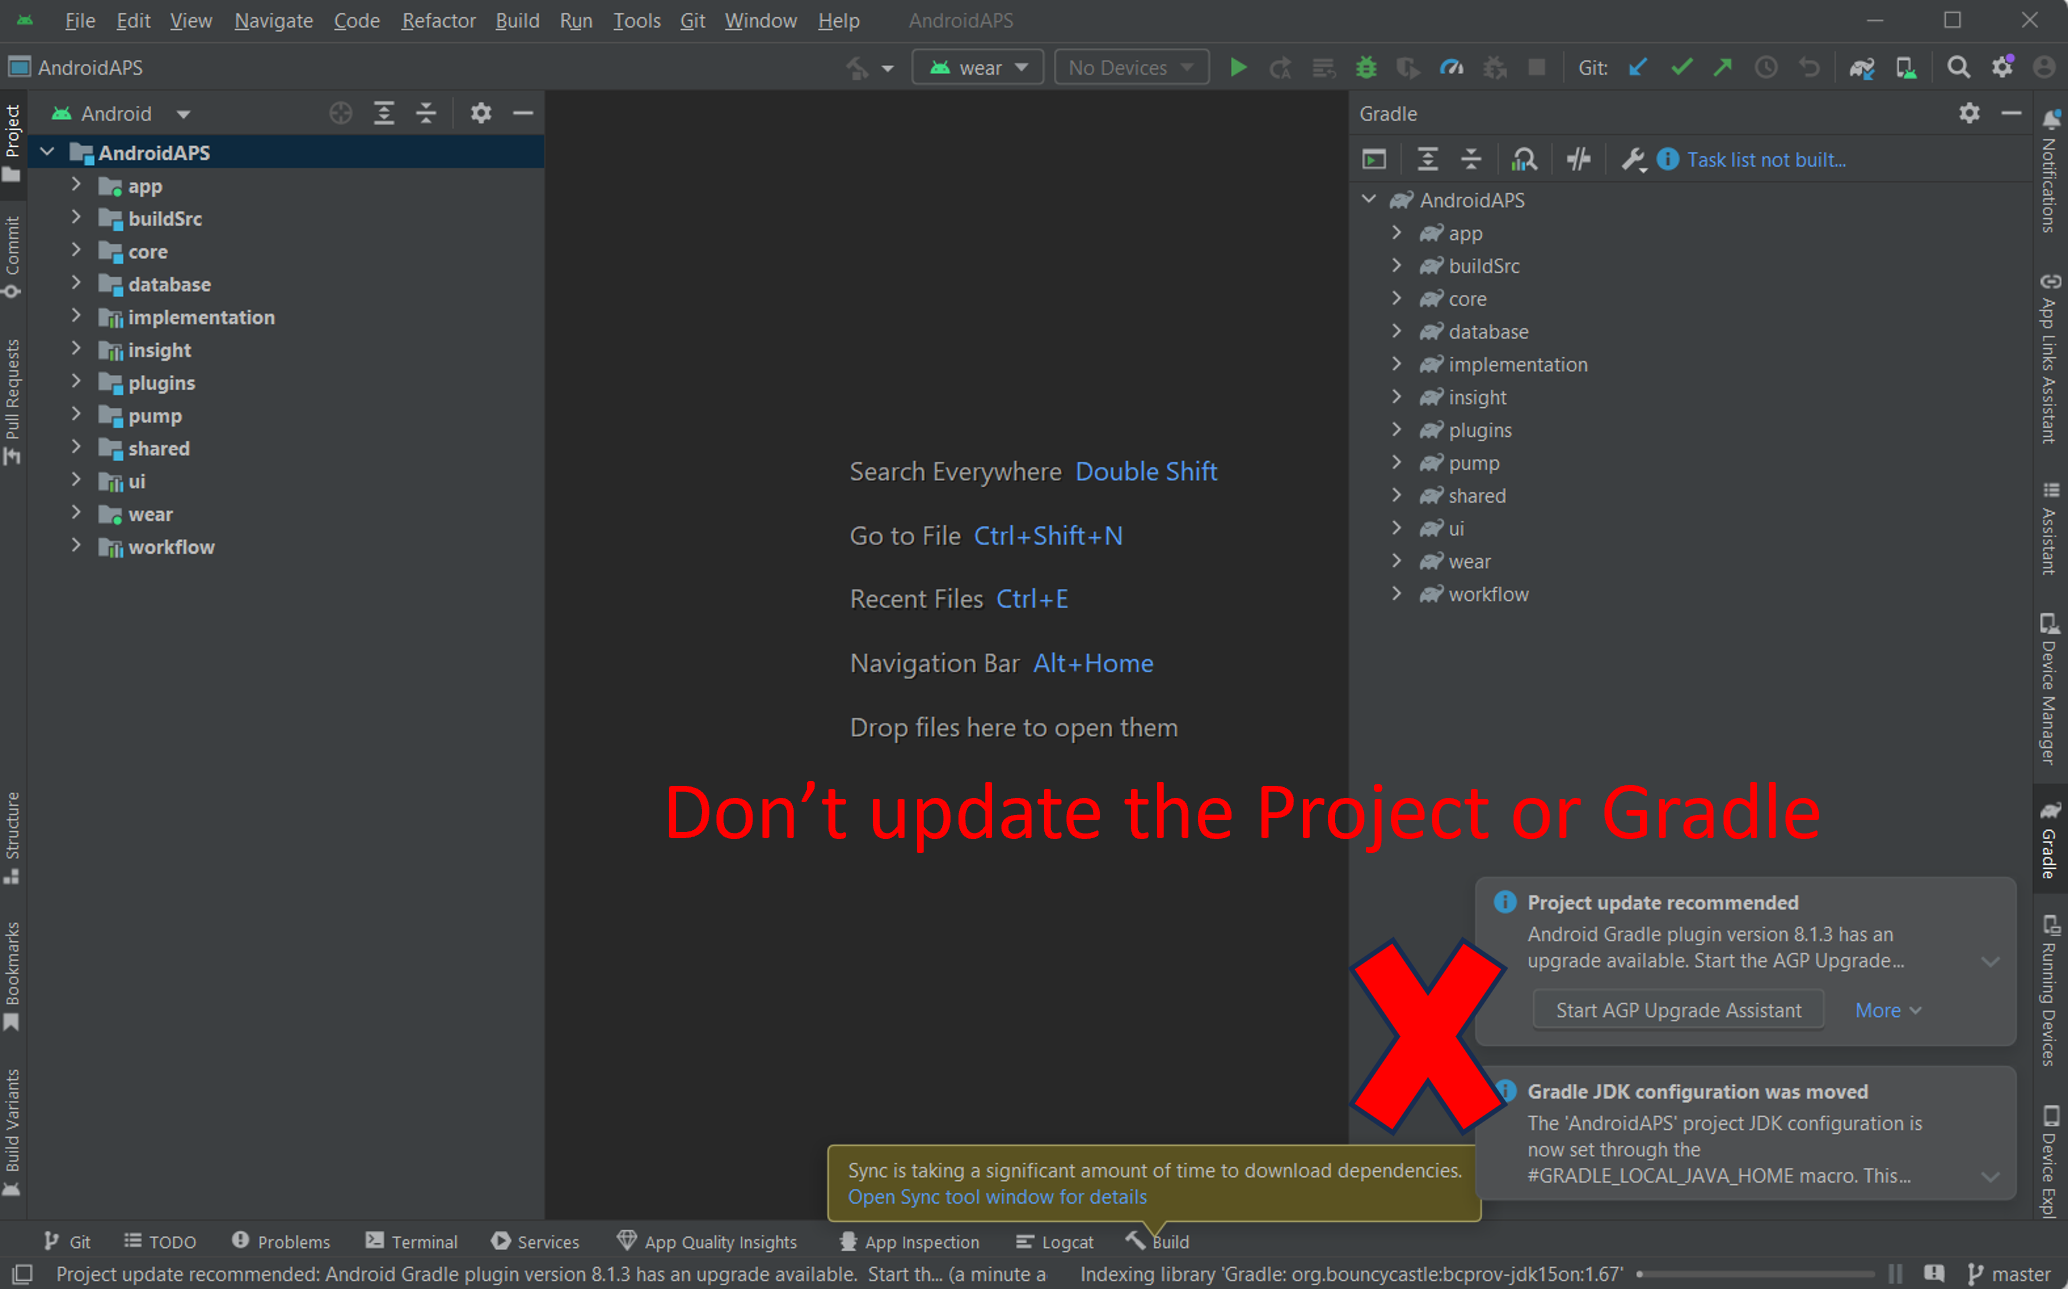
NEVER UPDATE GRADLE!
Android Studio might recommend updating the gradle system. Never update gradle! This will lead to difficulties.
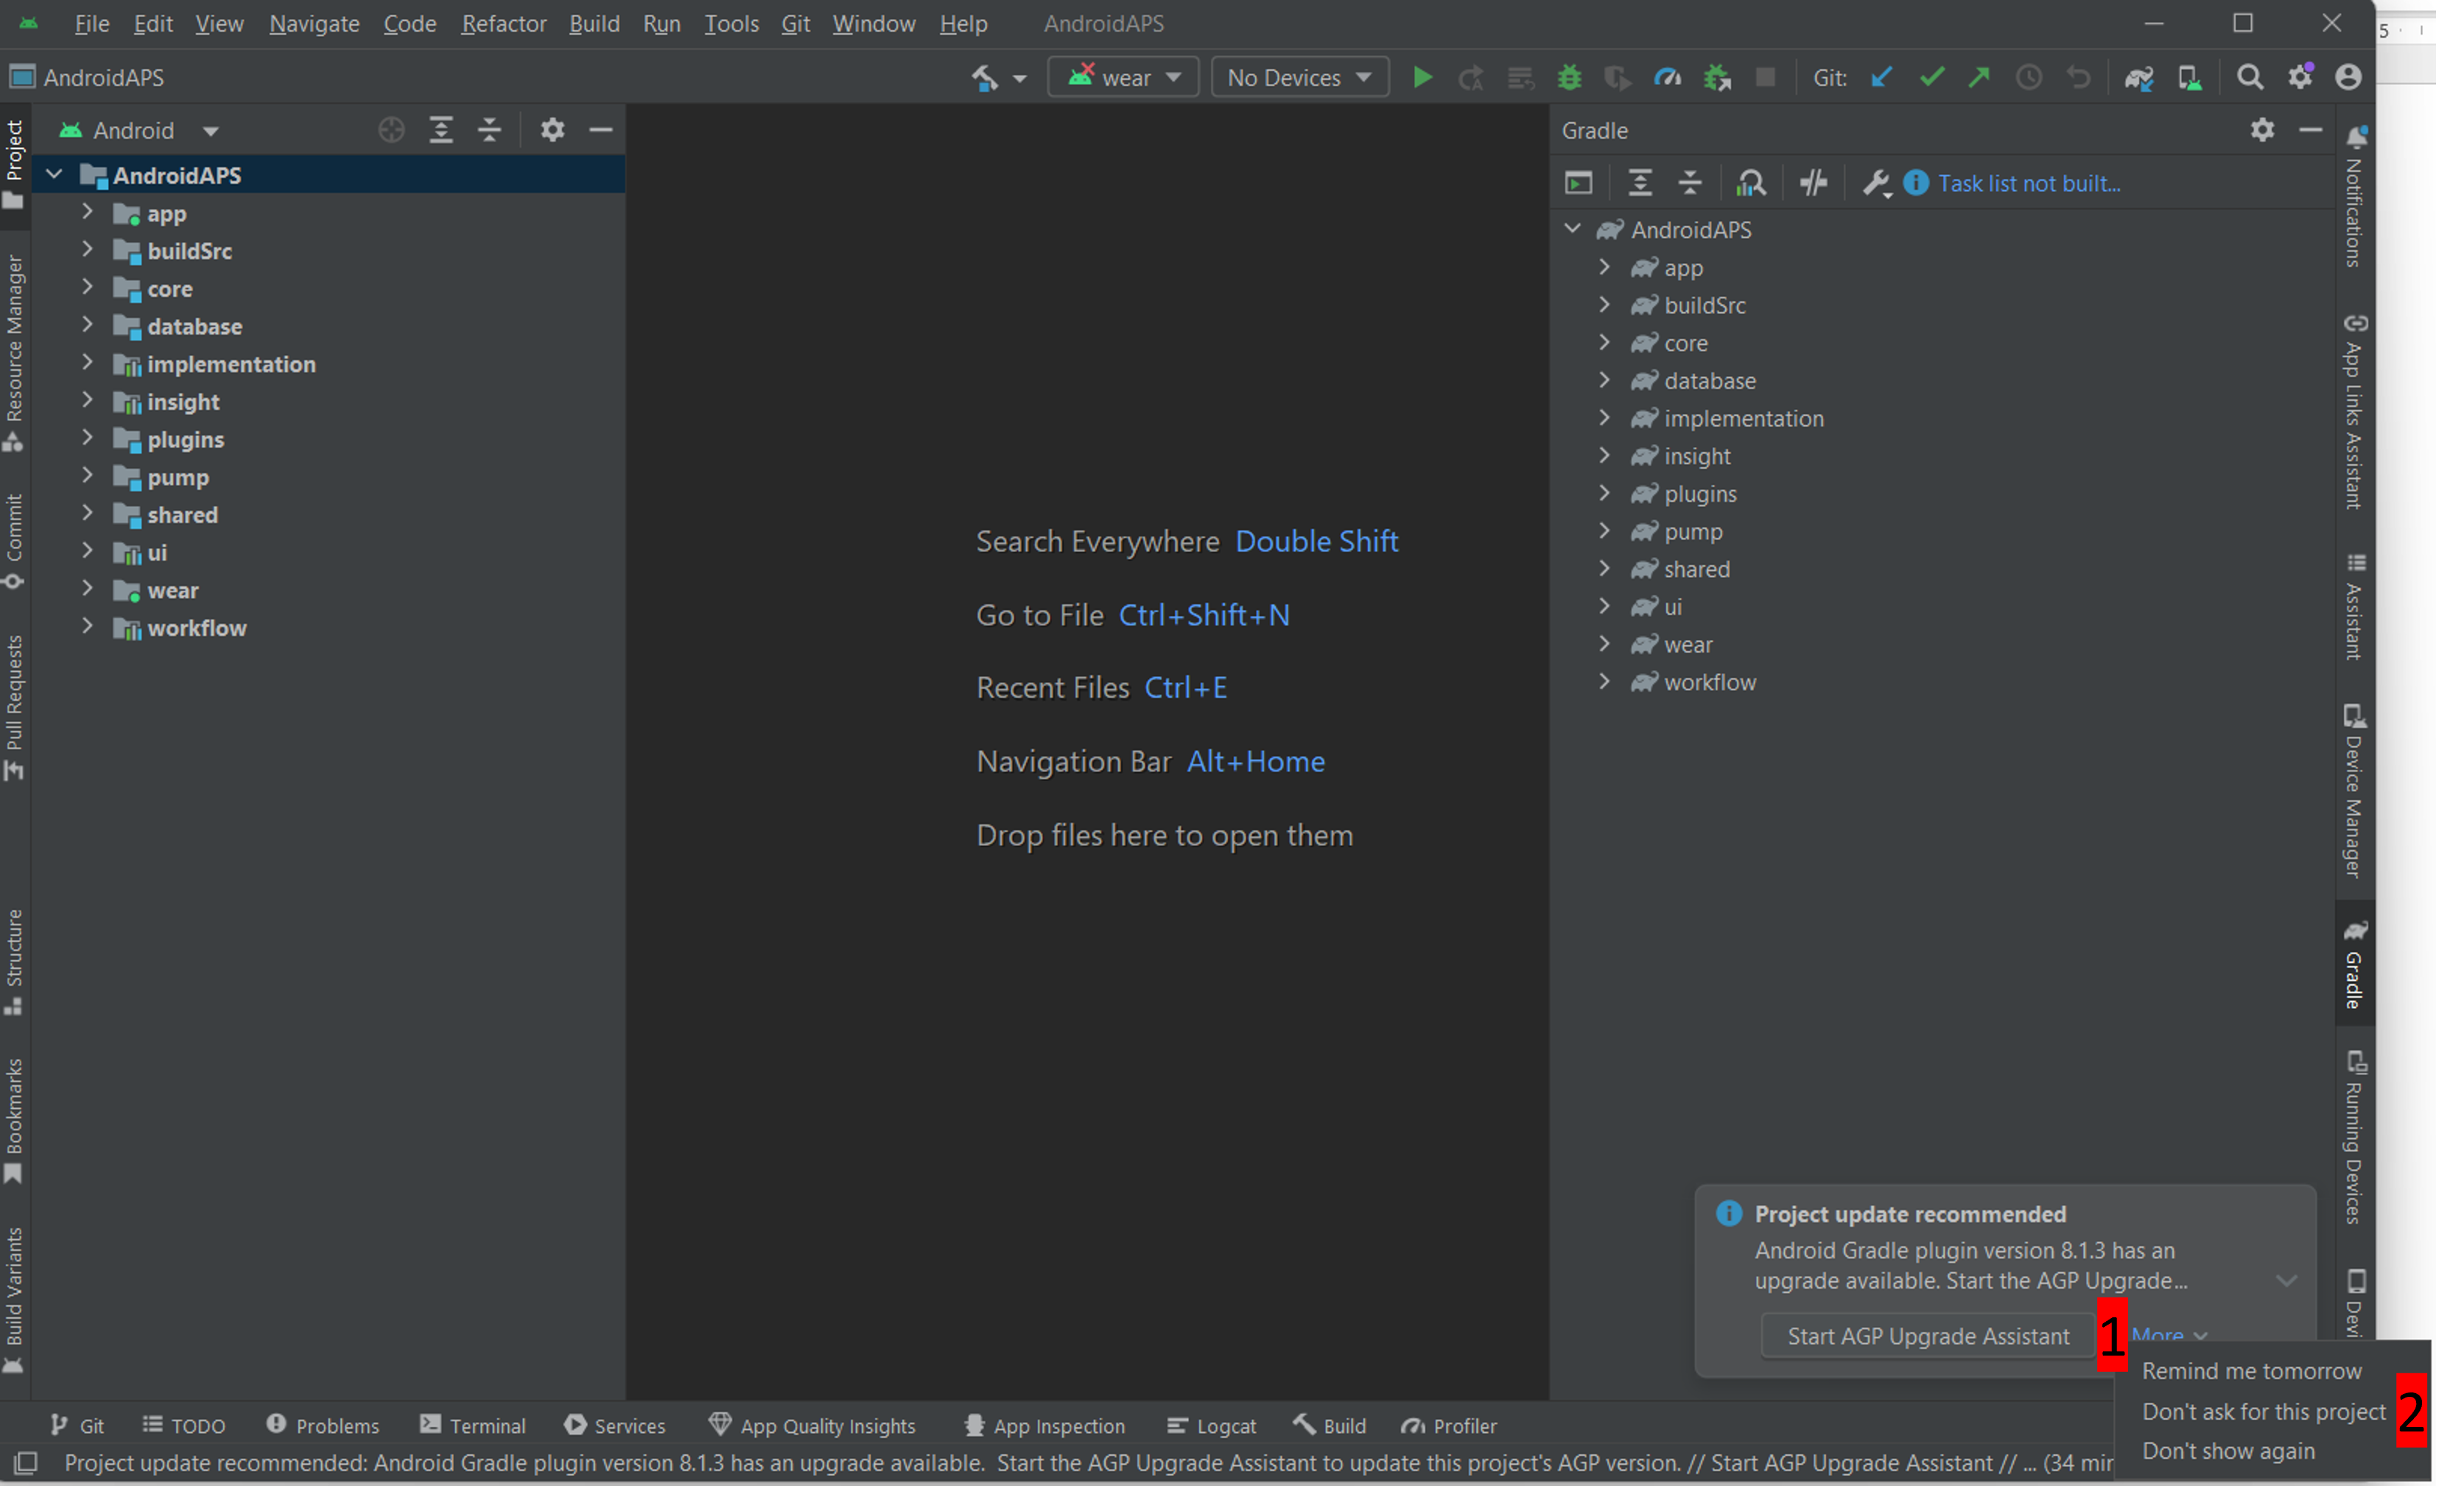
Optional - If you want to clear the pop-up for «project update recommended», click on the blue text «More» (1). In the dialog box the select «Don’t ask for this project» (2).
For Windows users only: If you have not restarted your computer since installing or updating Git, close Android Studio now. Then restart your computer, and re-open Android Studio.
Set git path in Android Studio preferences
Now we will tell Android studio where to find Git, which you installed earlier.
Windows users only: Make sure you have restarted your computer after installing Git.
Open Android Studio (you can find it by searching in the Start menu).
In the top left corner of Android Studio, navigate to File-Settings (Windows) or Android Studio > Preferences (Mac). This opens the following window, click to expand the dropdown called «version control» (1):

Now select «Git» (2).
In the lower middle of the page, make sure update method «Merge» (3) is selected.
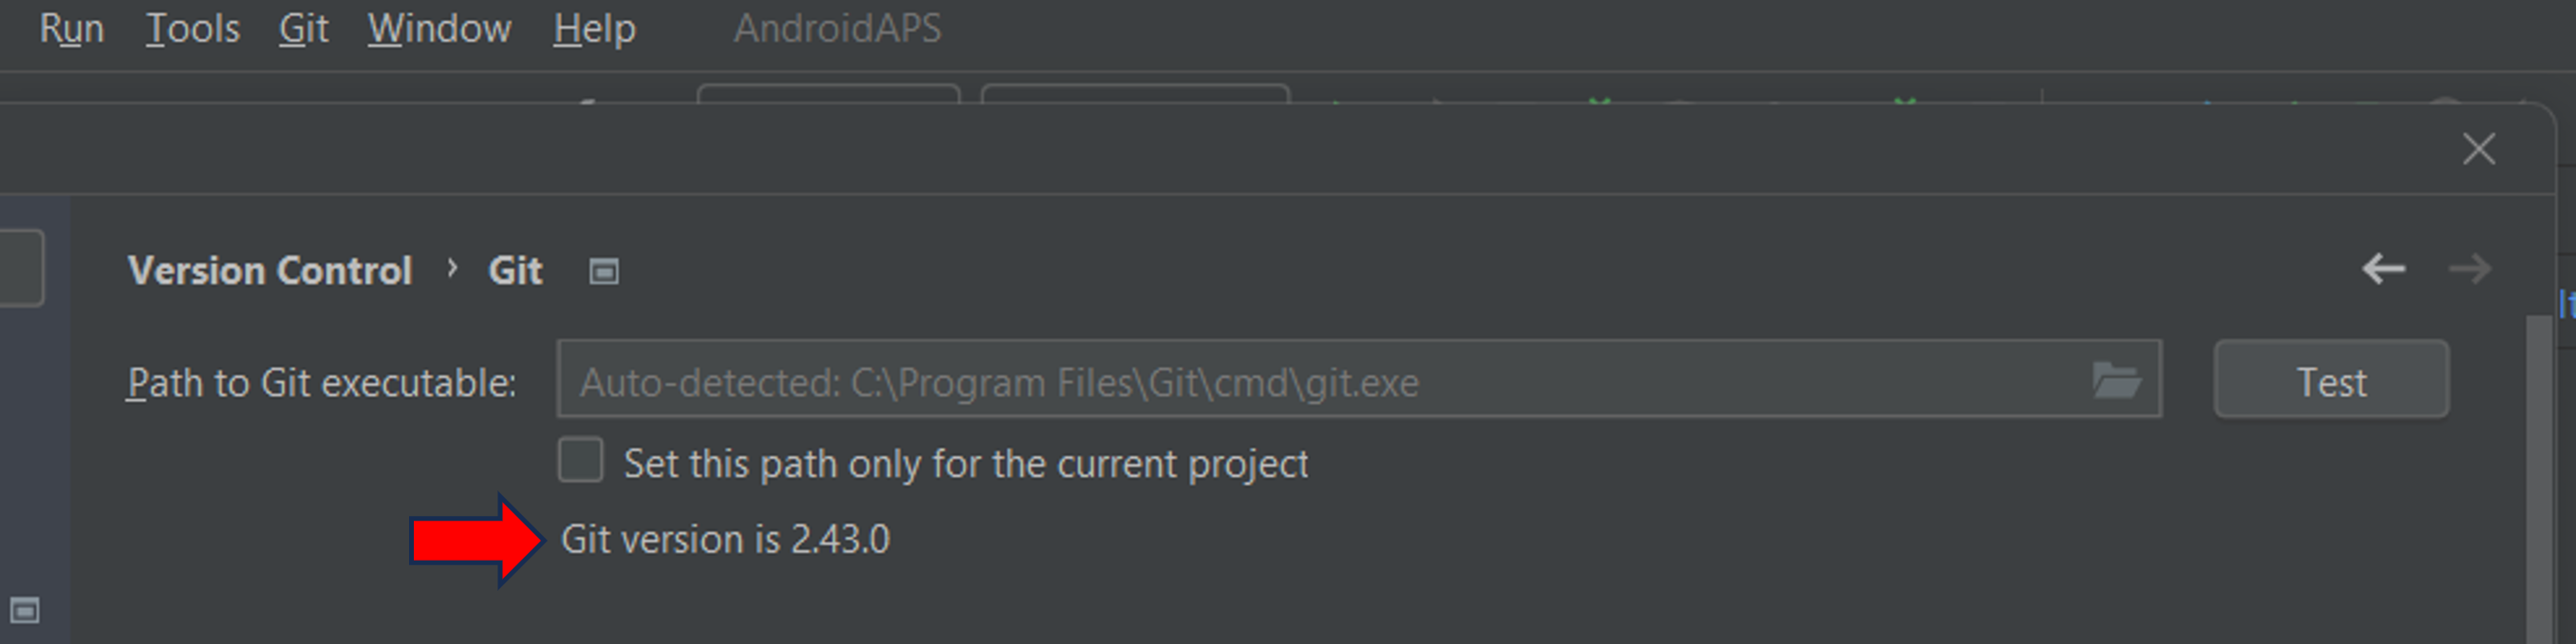
Check if Android Studio can automatically locate the correct path to git.exe automatically by clicking the button «Test» (4):
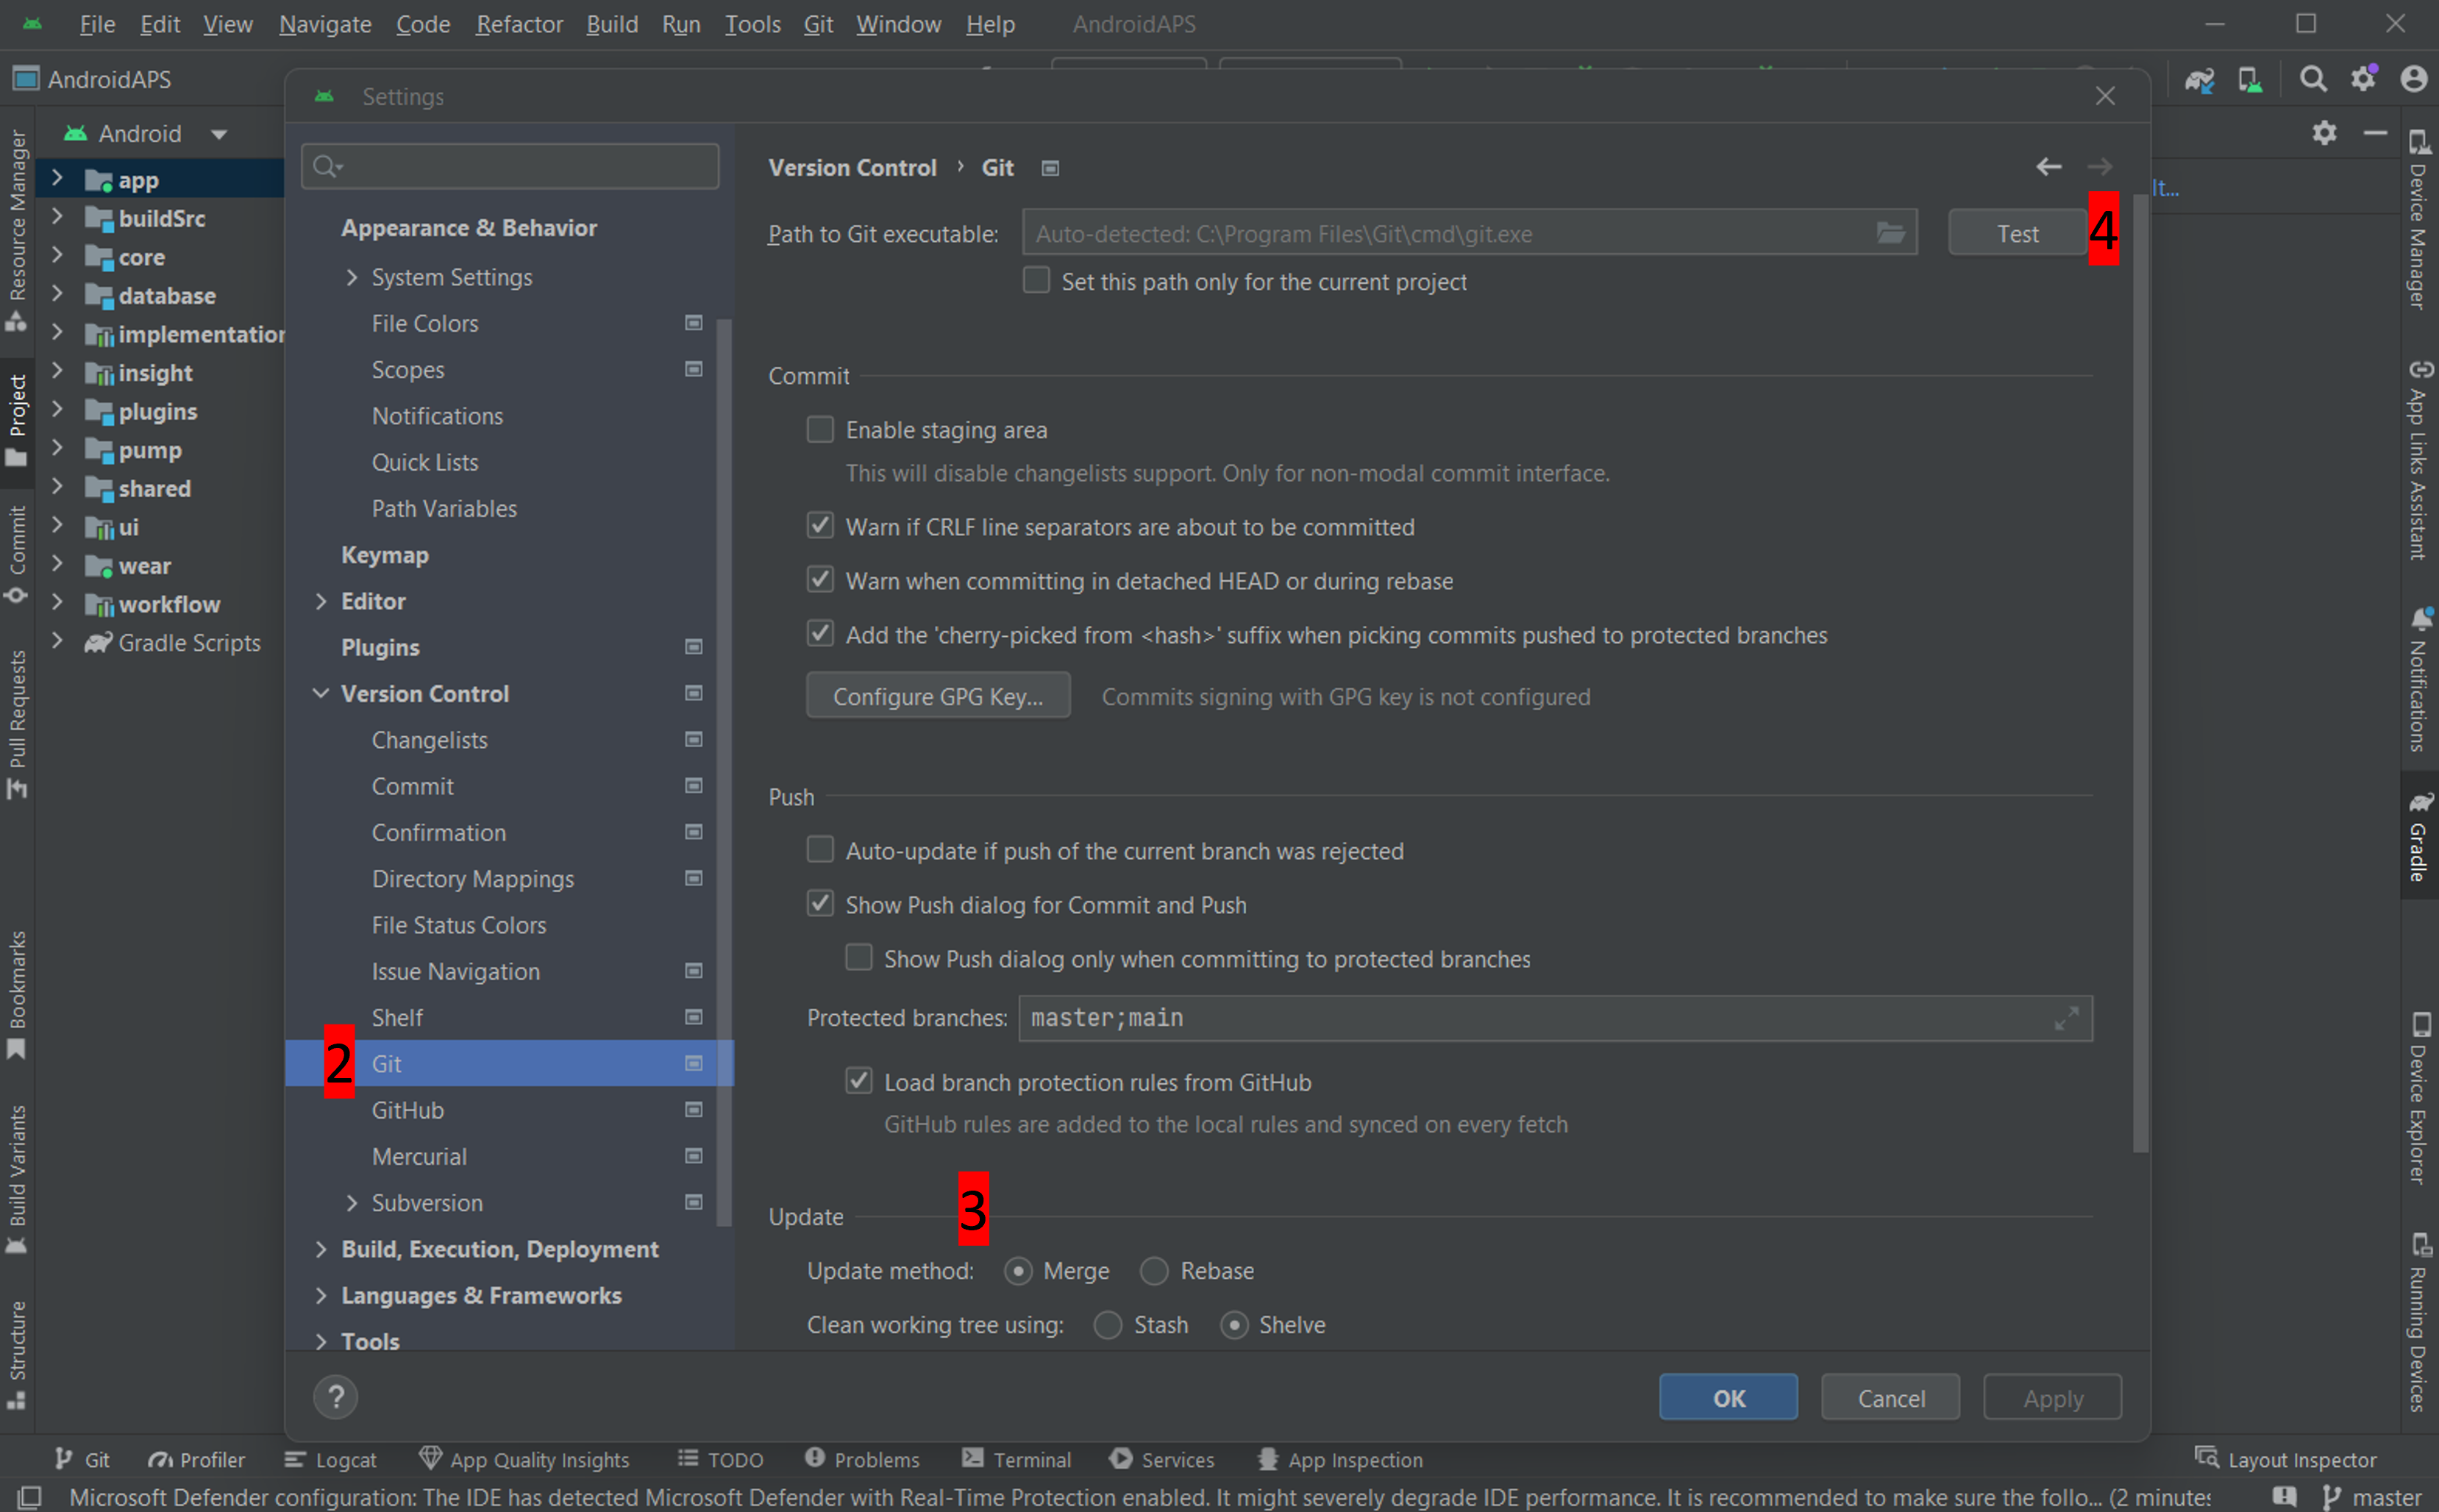
If the automatic setting is successful, your current version of Git will be displayed next to the path.
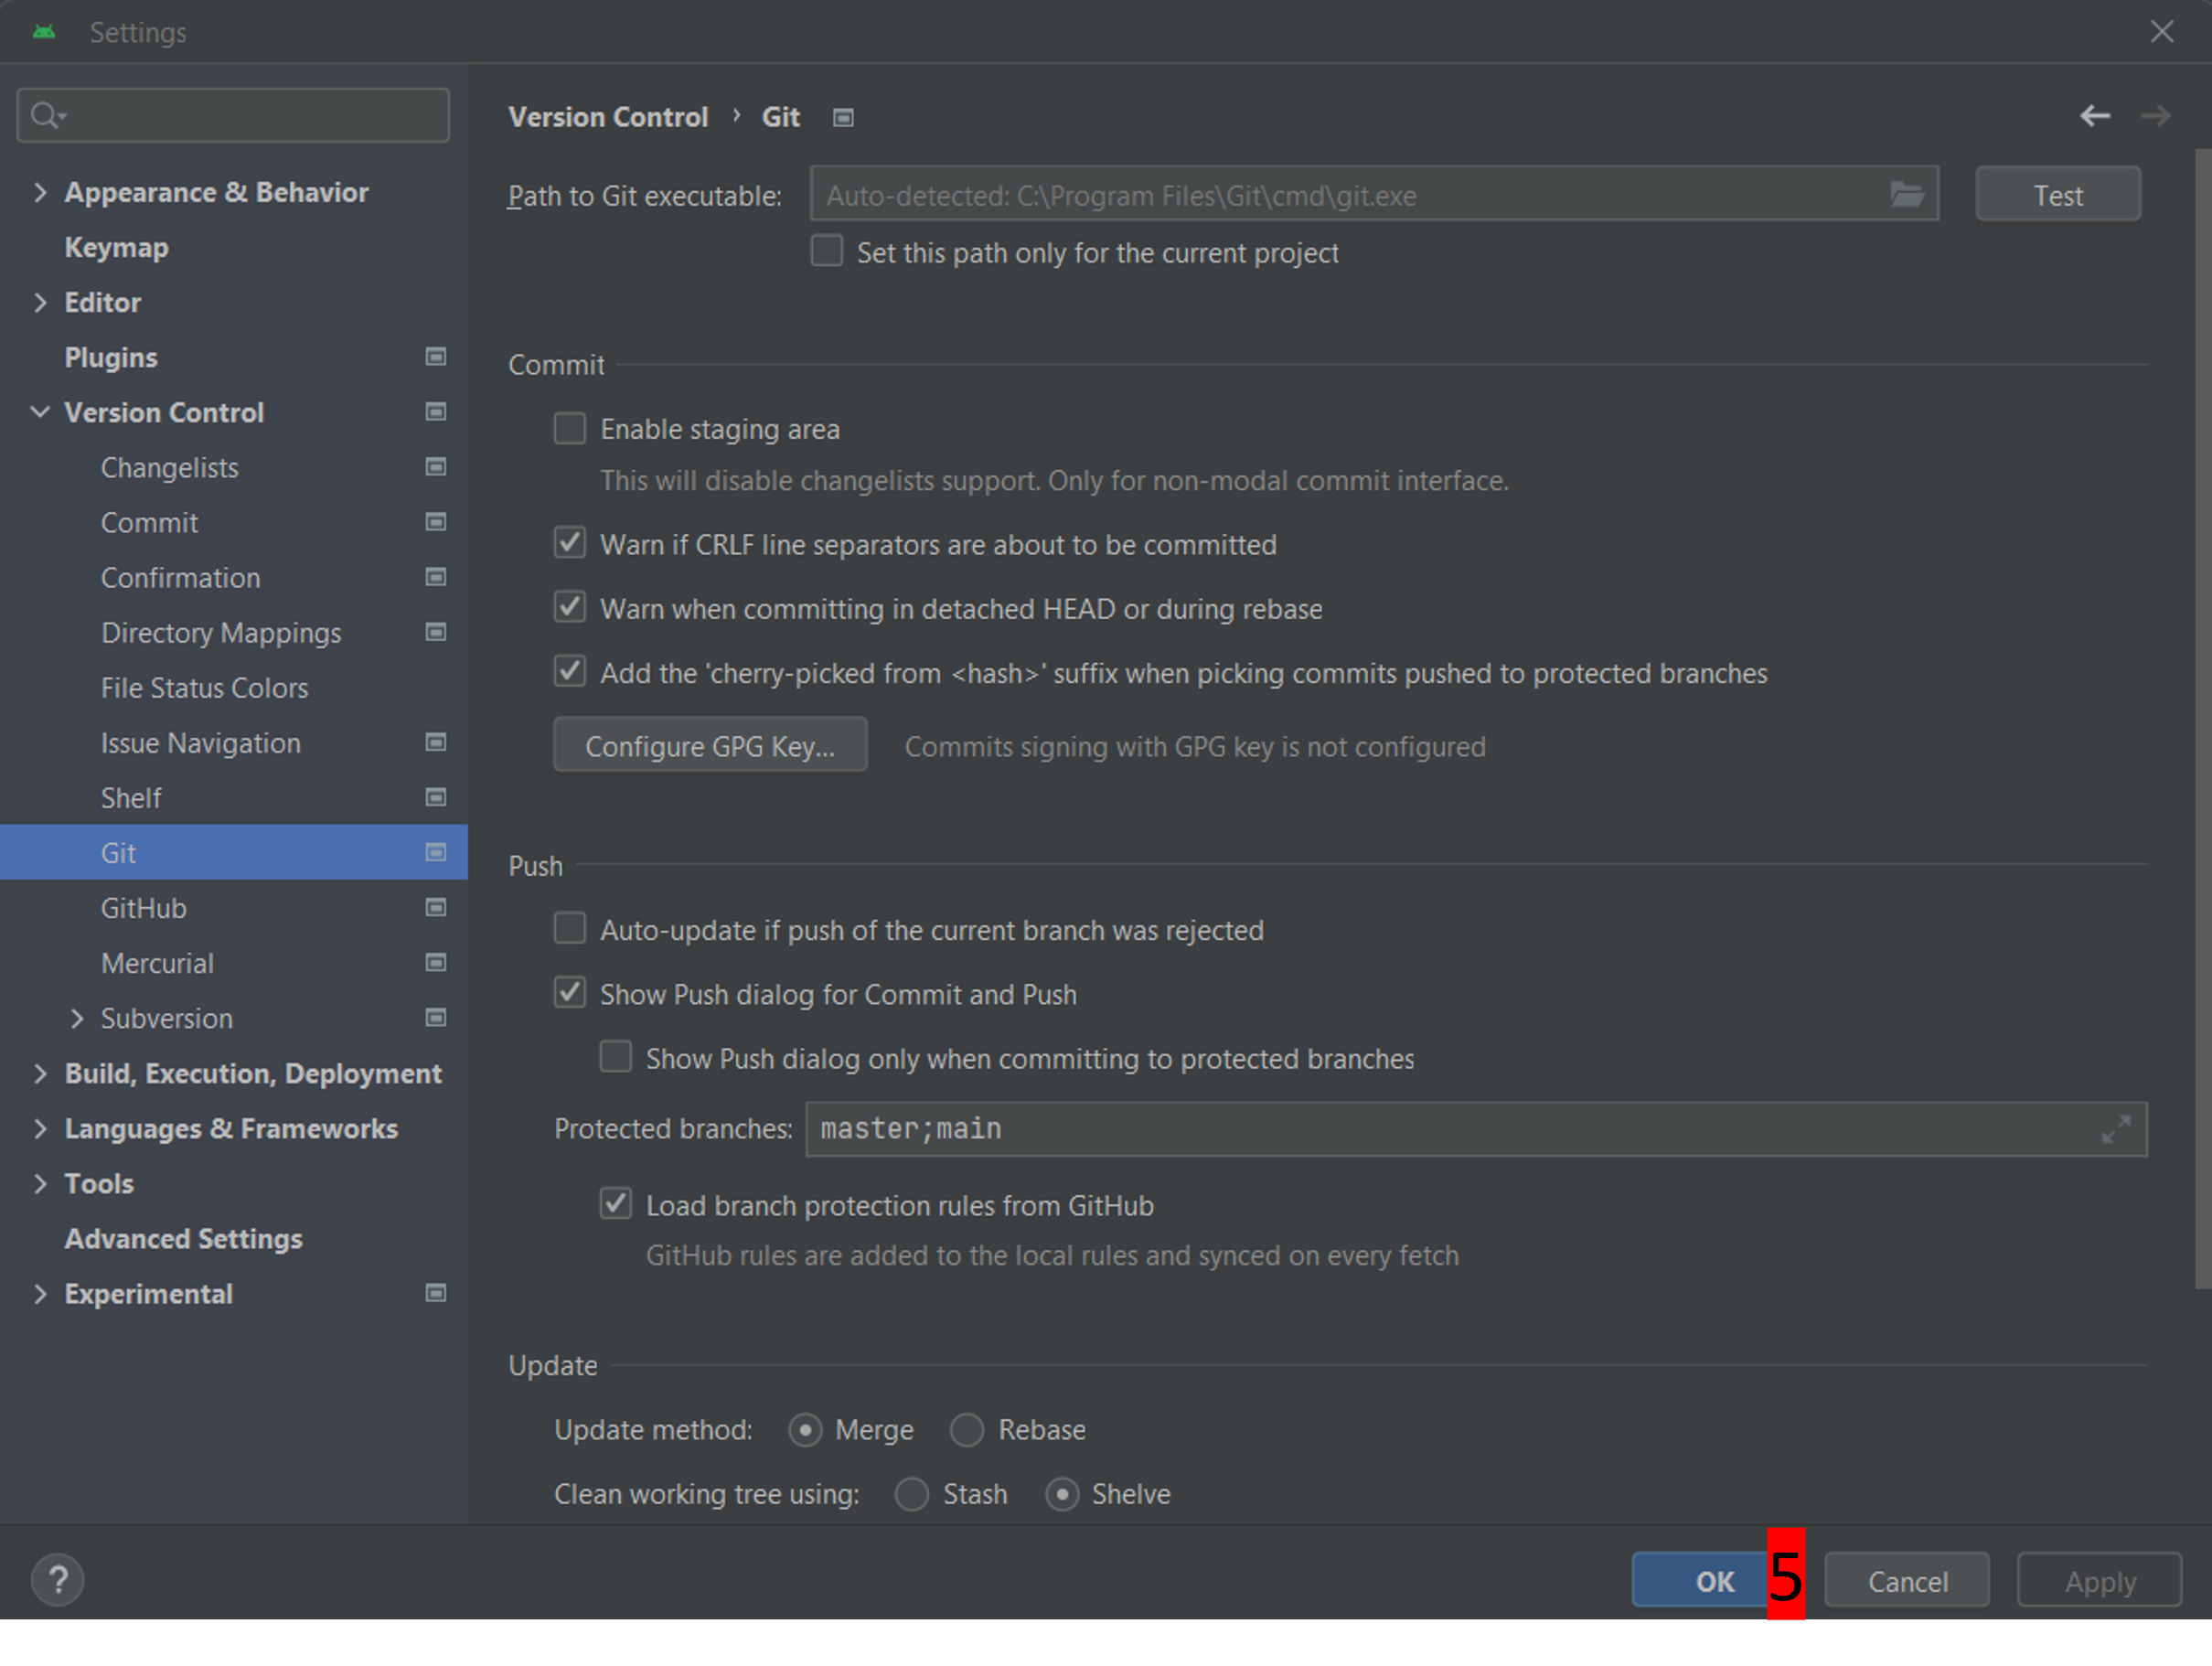
If you find that git.exe is not found automatically, or that clicking «Test» results in an error (1), you can either manually enter the path which you saved earlier, or click on the folder icon (2) and manually navigating to the directory where git.exe is stored:

Use the search function in windows explorer to find «git.exe» if you are unsure where git has been installed. How to do this is explained above in more detail.
If you have manually selected it, check your selected Git path with the «Test» button as described above.
When the Git version is displayed next to the path (see screenshot above) you have completed this stage successfully and you can close the Android Studio «Settings» window by clicking the «OK» button (5):
Build the AAPS «signed» APK
Why does the AAPS app need to be «signed»?
Android requires each app to be signed, to ensure that it can only be updated later from the same trusted source that released the original app. For more information on this topic, follow this link. For our purposes, this just means that we generate a signing or «keystore» file and use it when we build the AAPS app.
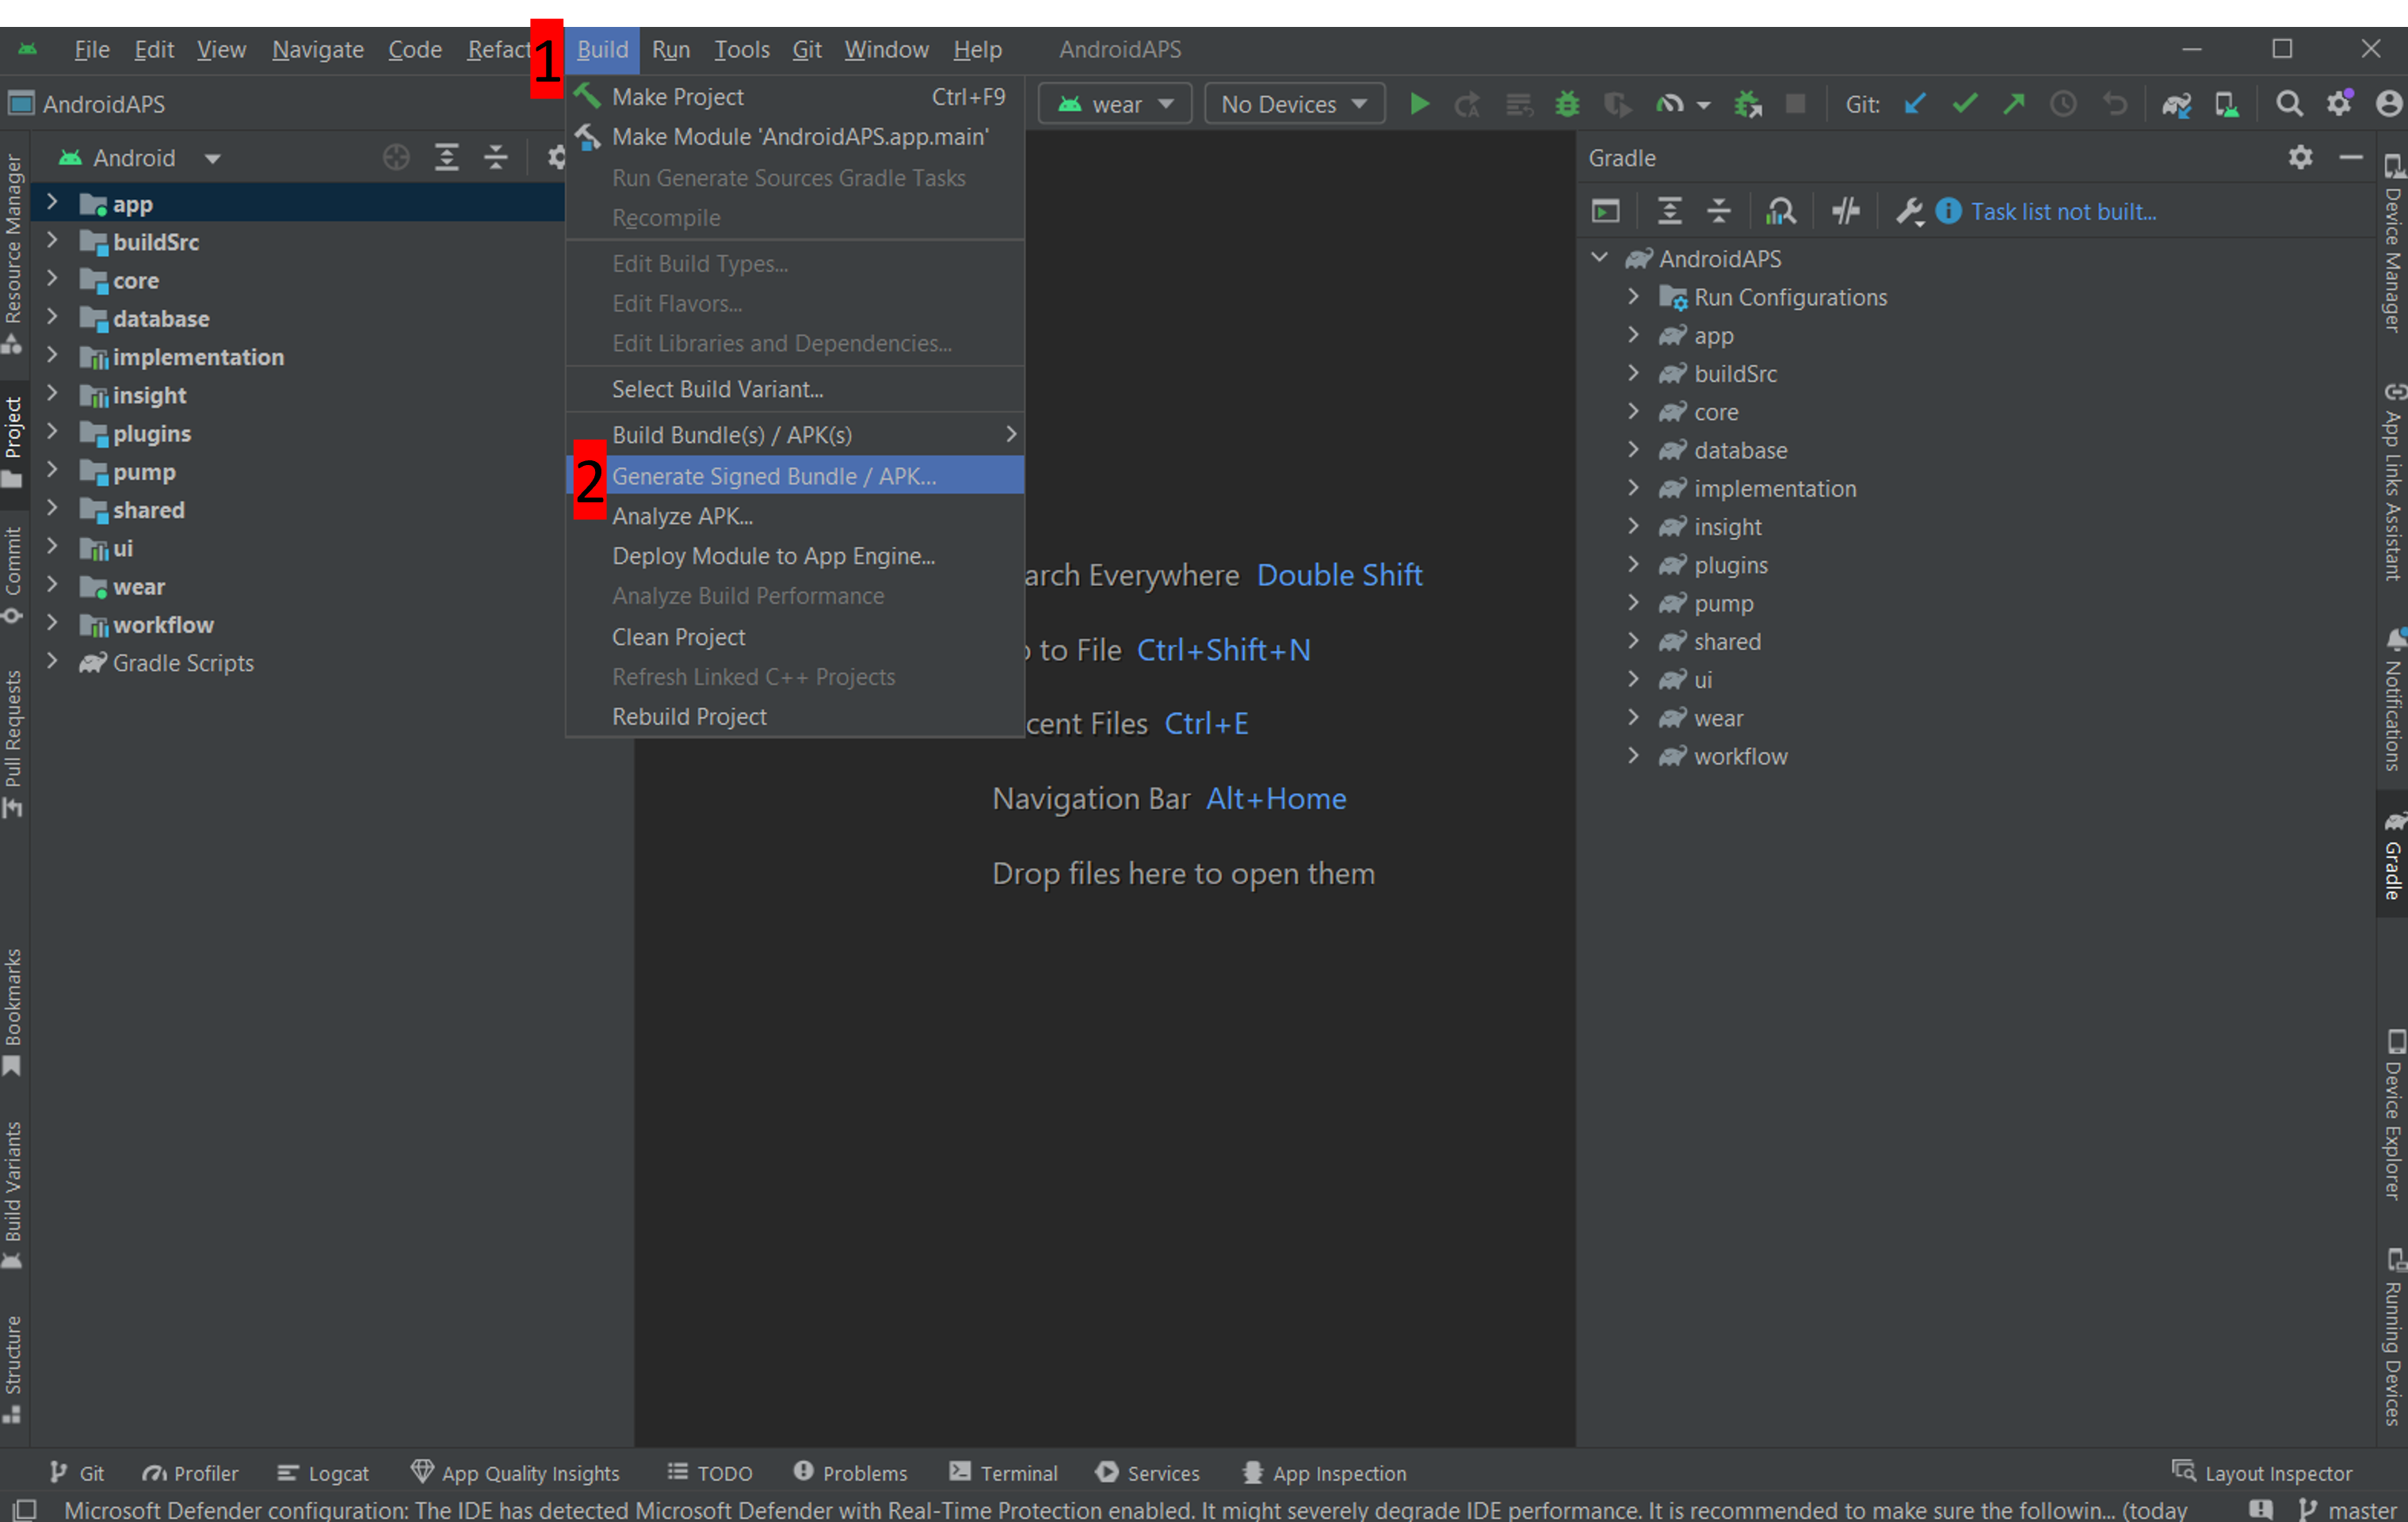
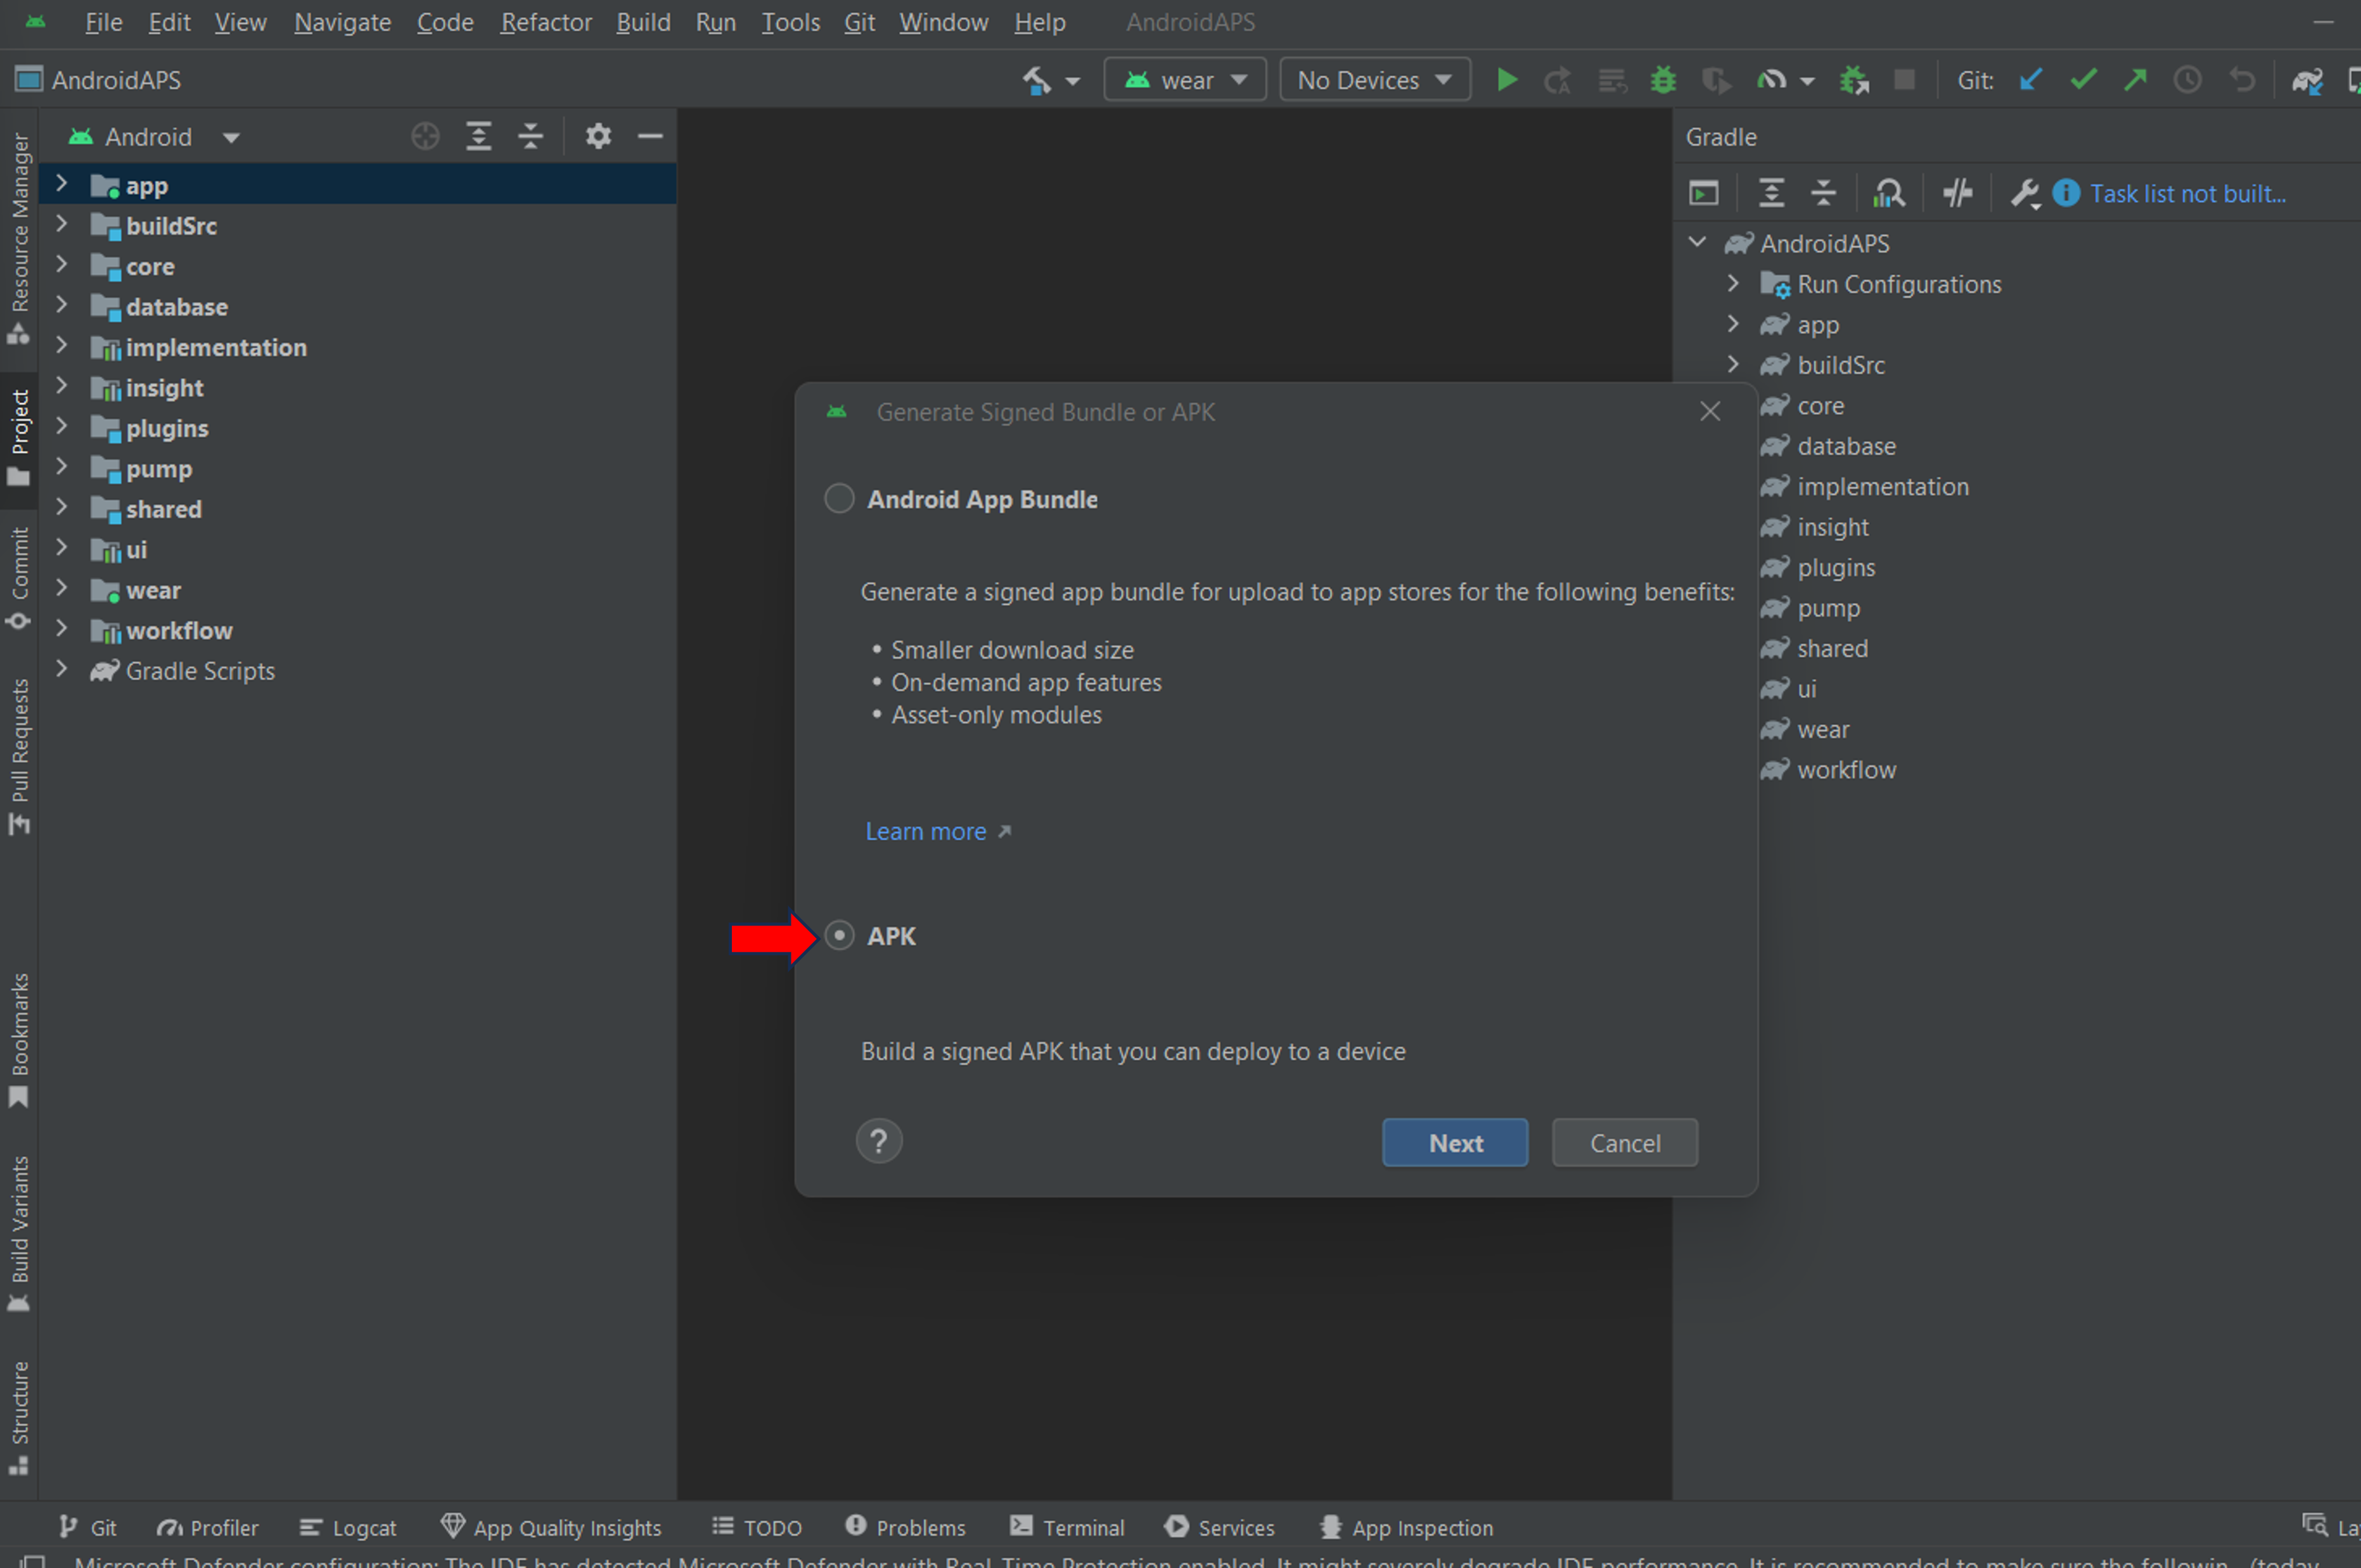
In the menu bar, click «Build» (1), select «Generate Signed Bundle/APK (2)
Select «APK» instead of «Android App Bundle» and click «Next»:
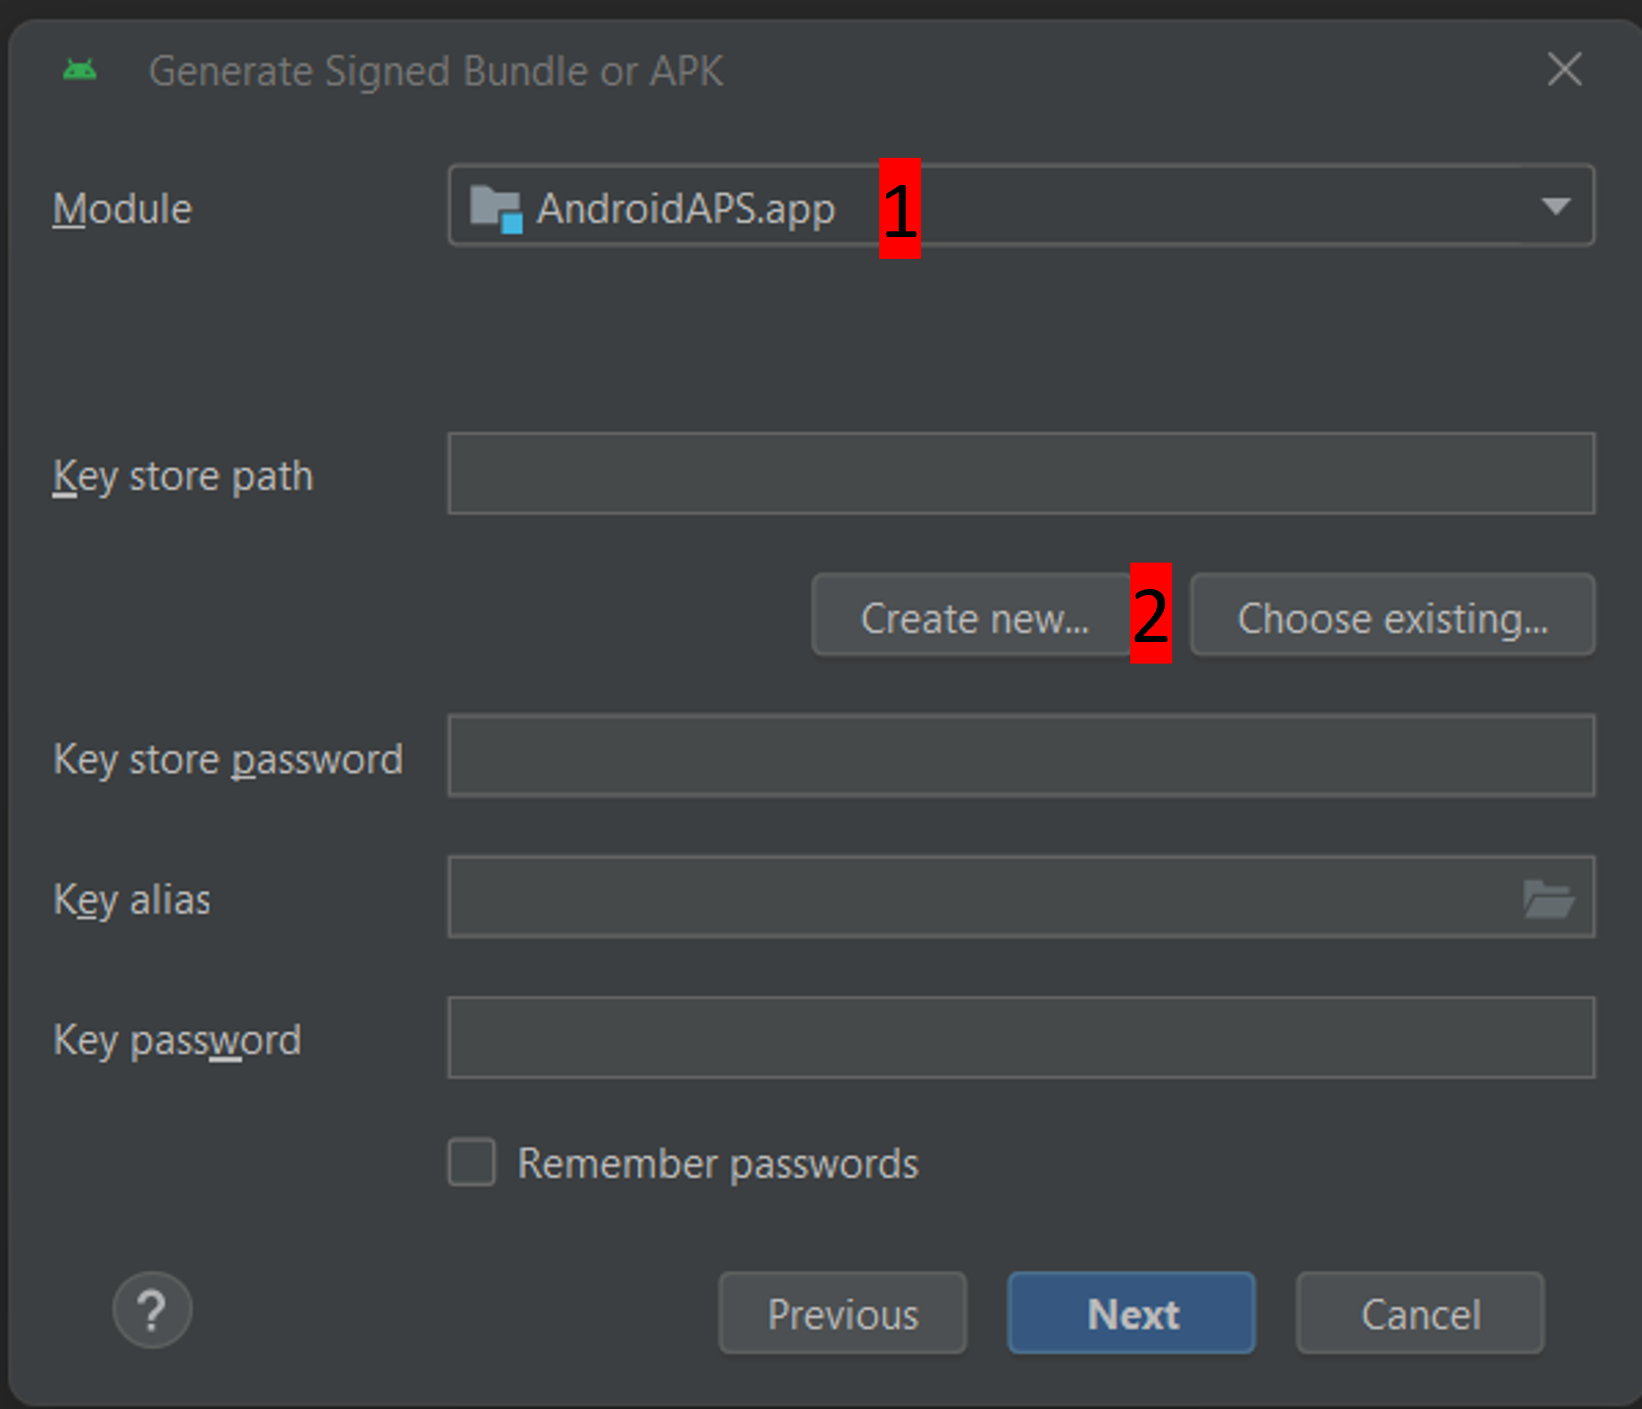
In the next screen, make sure that «Module» is set to «AAPS.app» (1).
INFORMATION!
If you want to create the apk for your watch, you need to select AAPS.wear!
Click «Create new…» (2) to start creating your key store.
INFORMATION!
You will only need to create the keystore once. If you have build AndroidAPS before, do NOT create a new keystore but select your existing one!
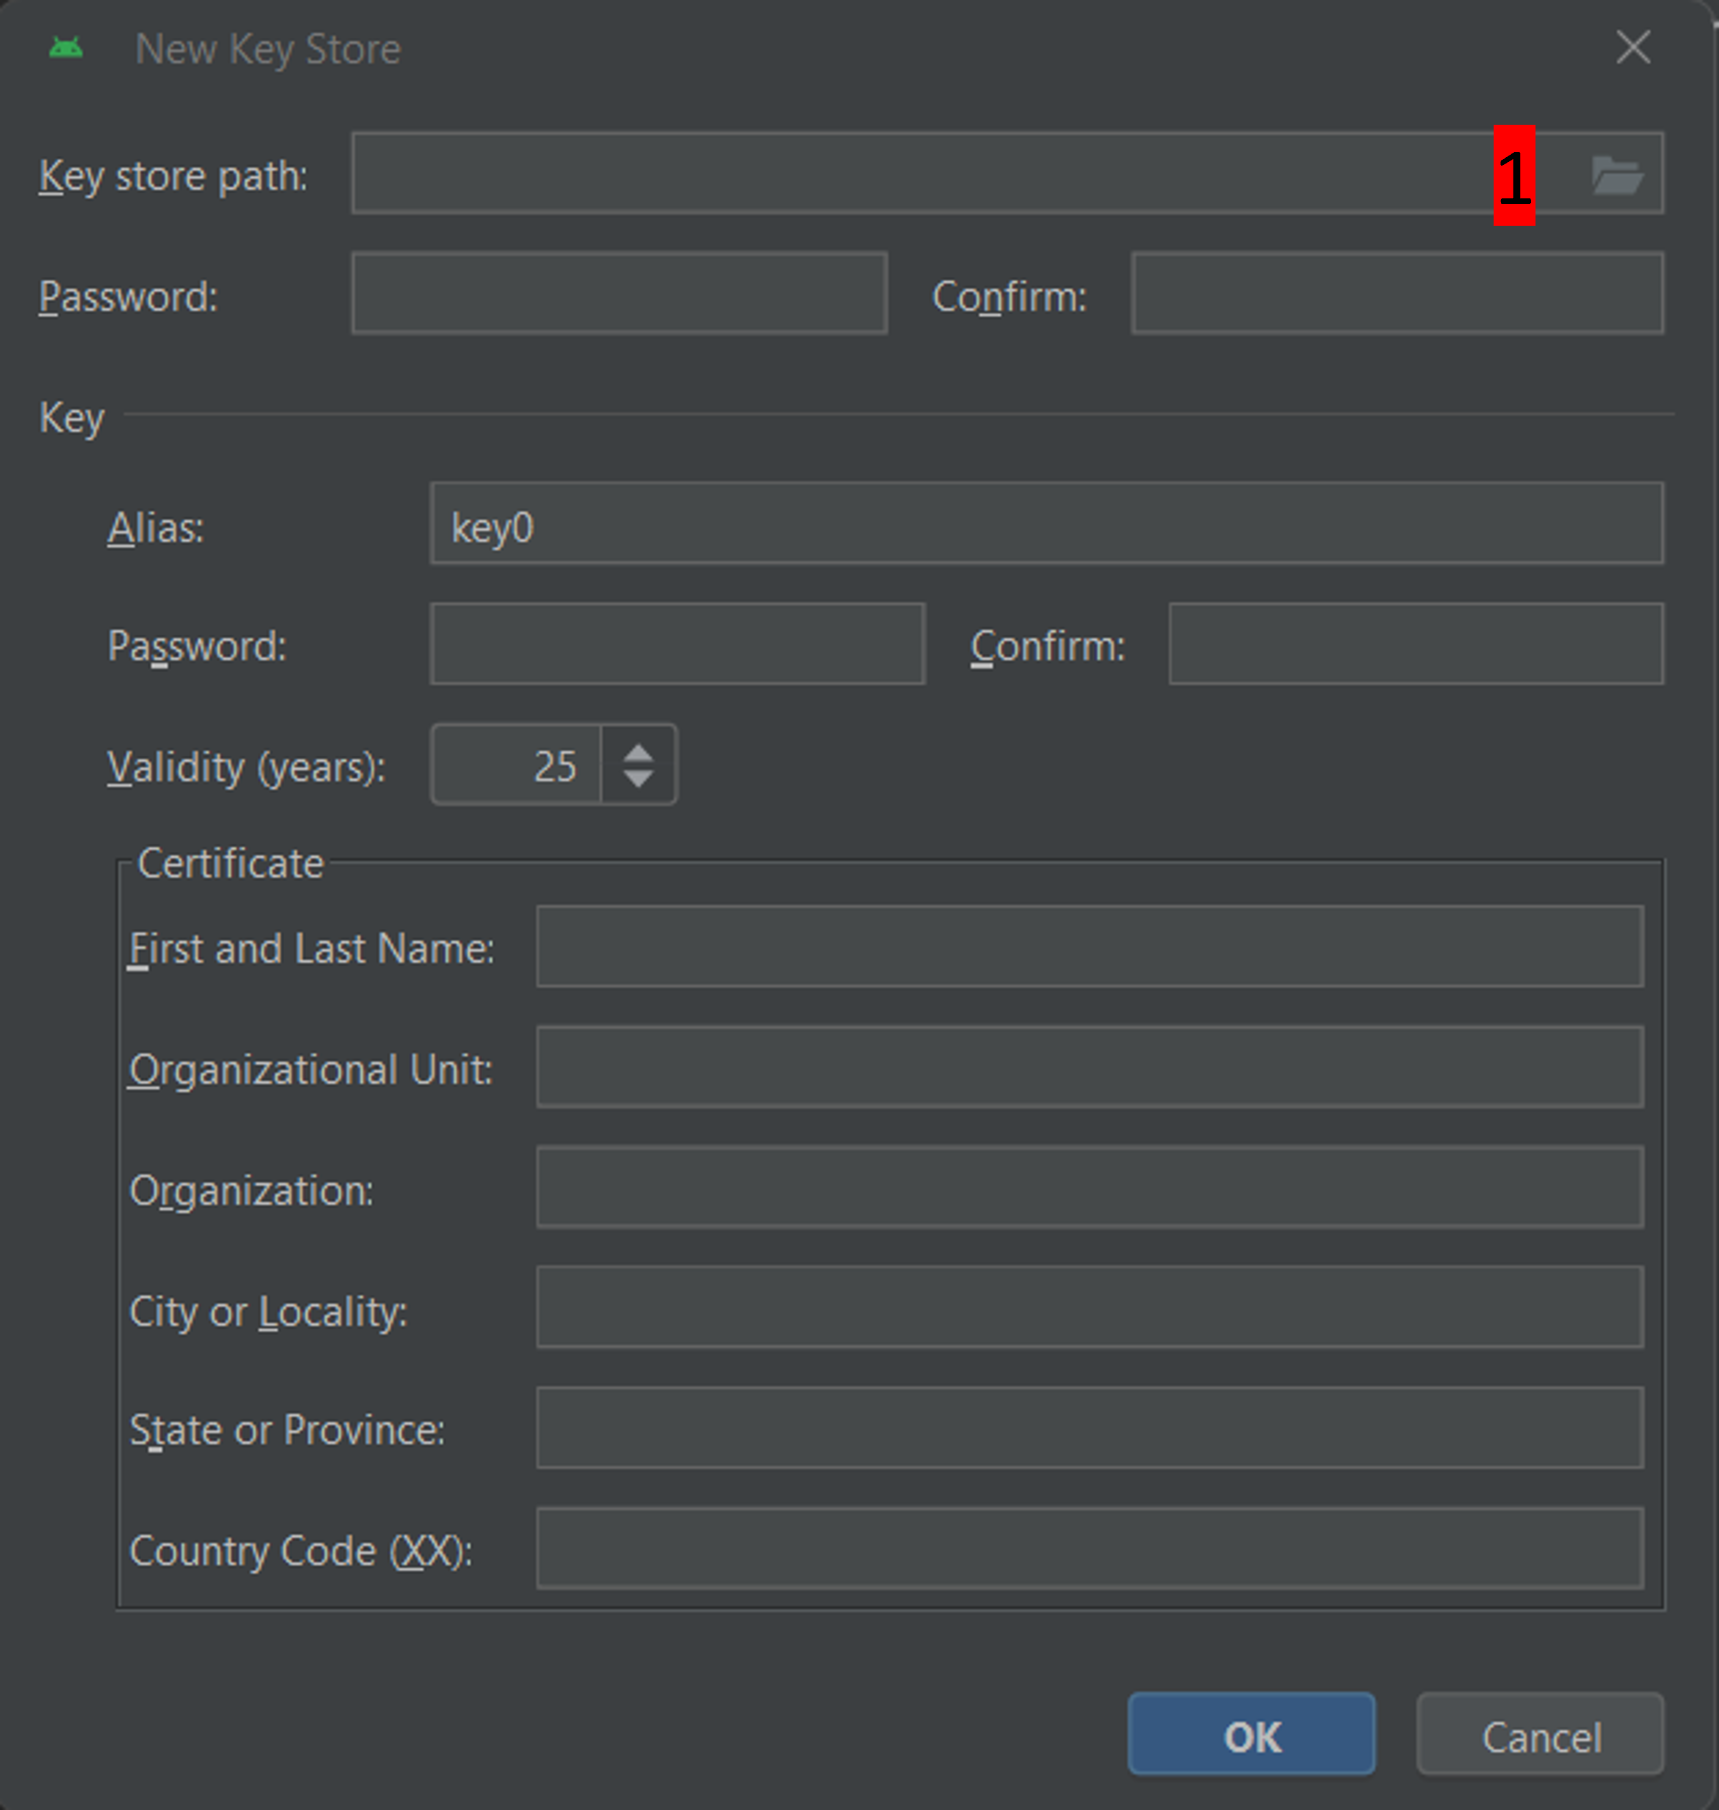
Note: The key store is a file in which the information for signing the app is stored. It is encrypted, and the information is secured with passwords.
Click the «folder» symbol (1) to select a path on your computer for your key store:
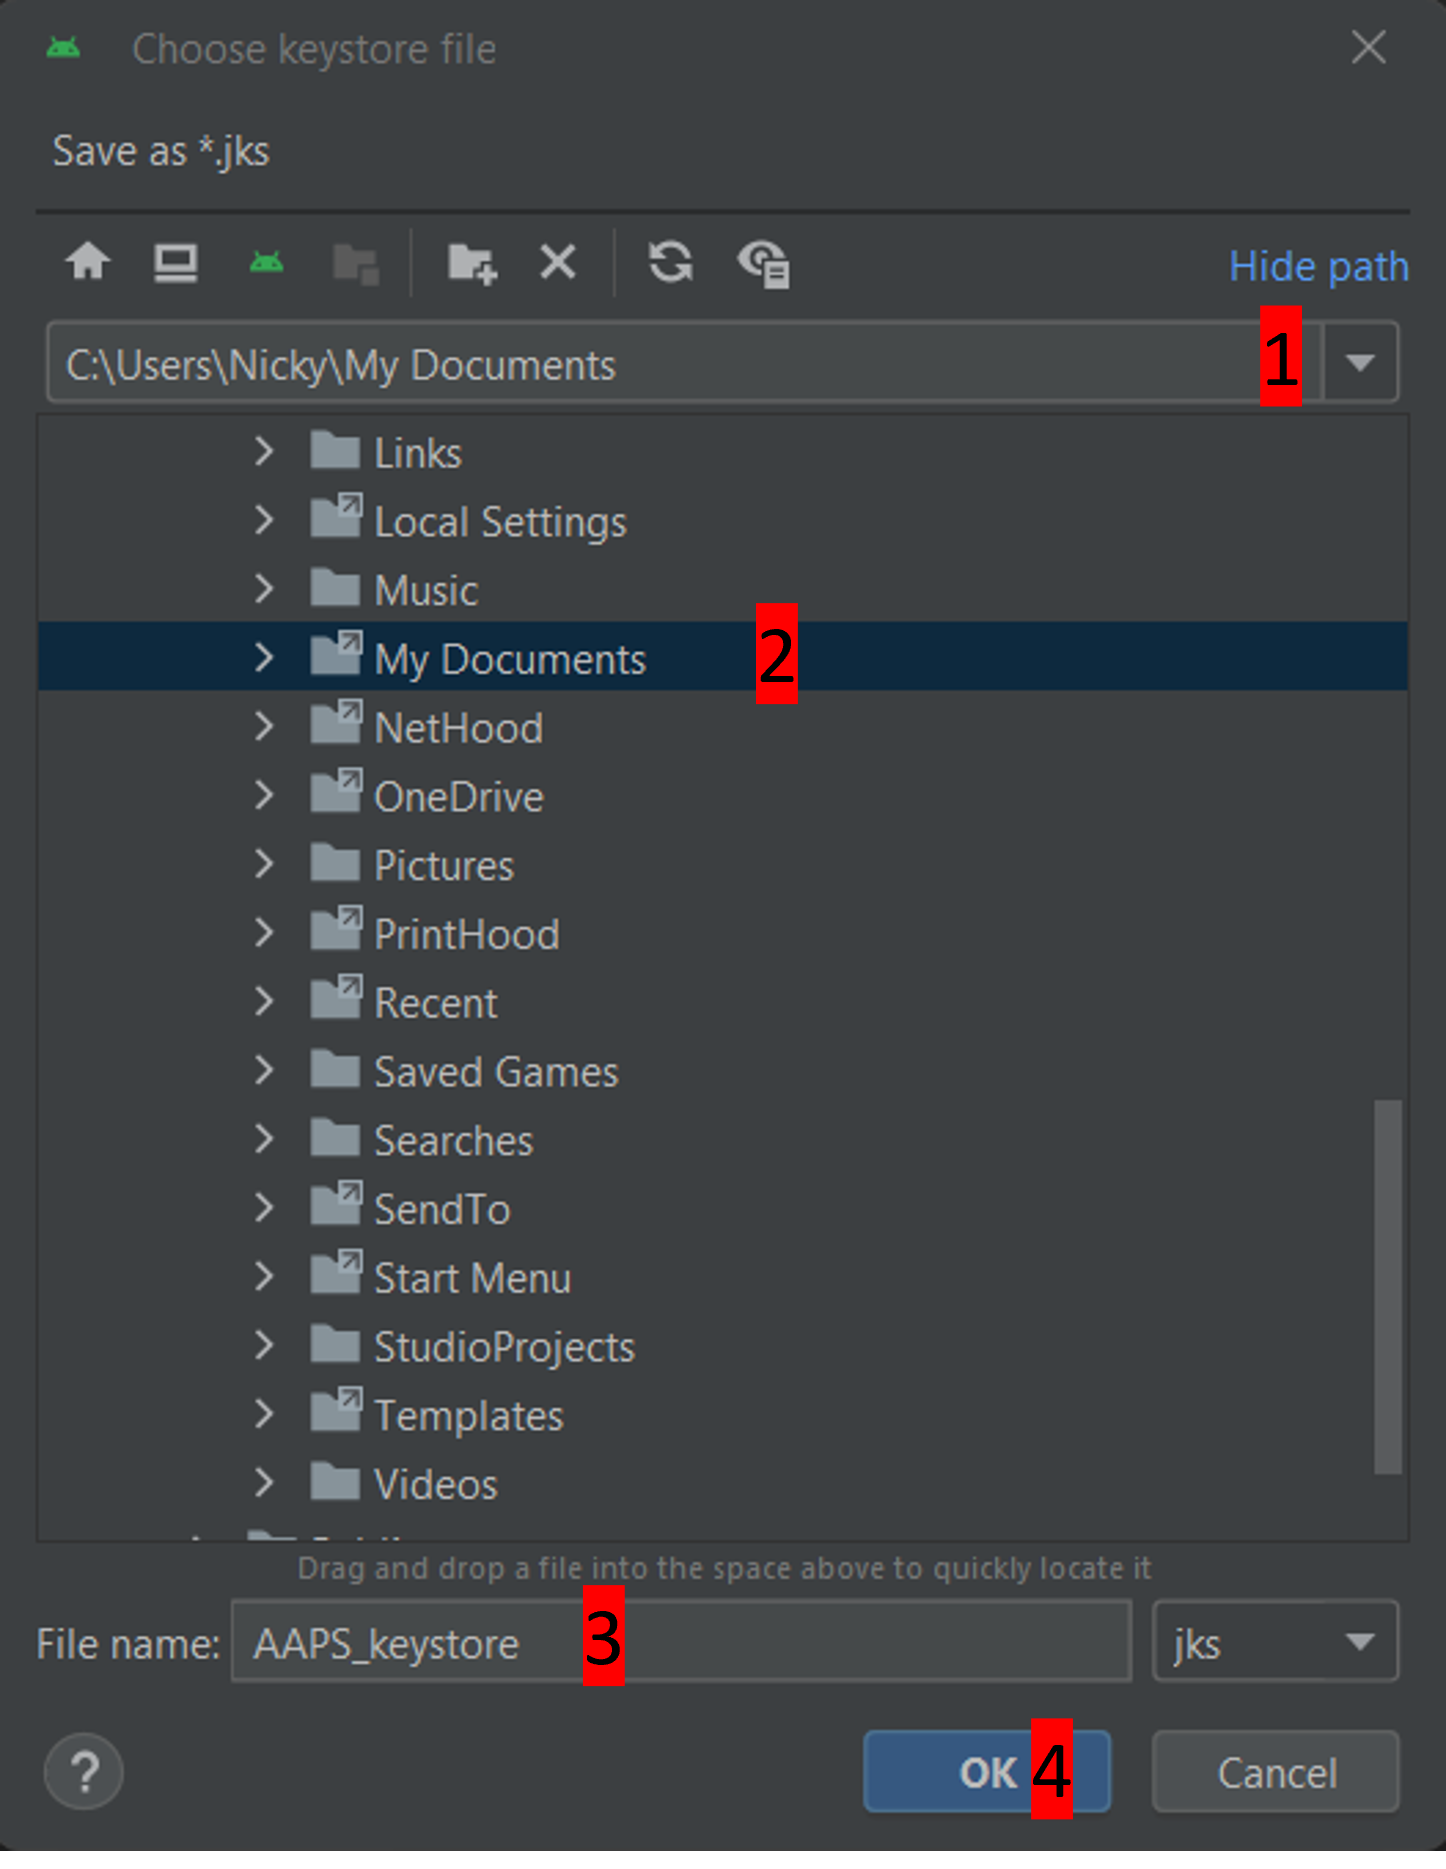
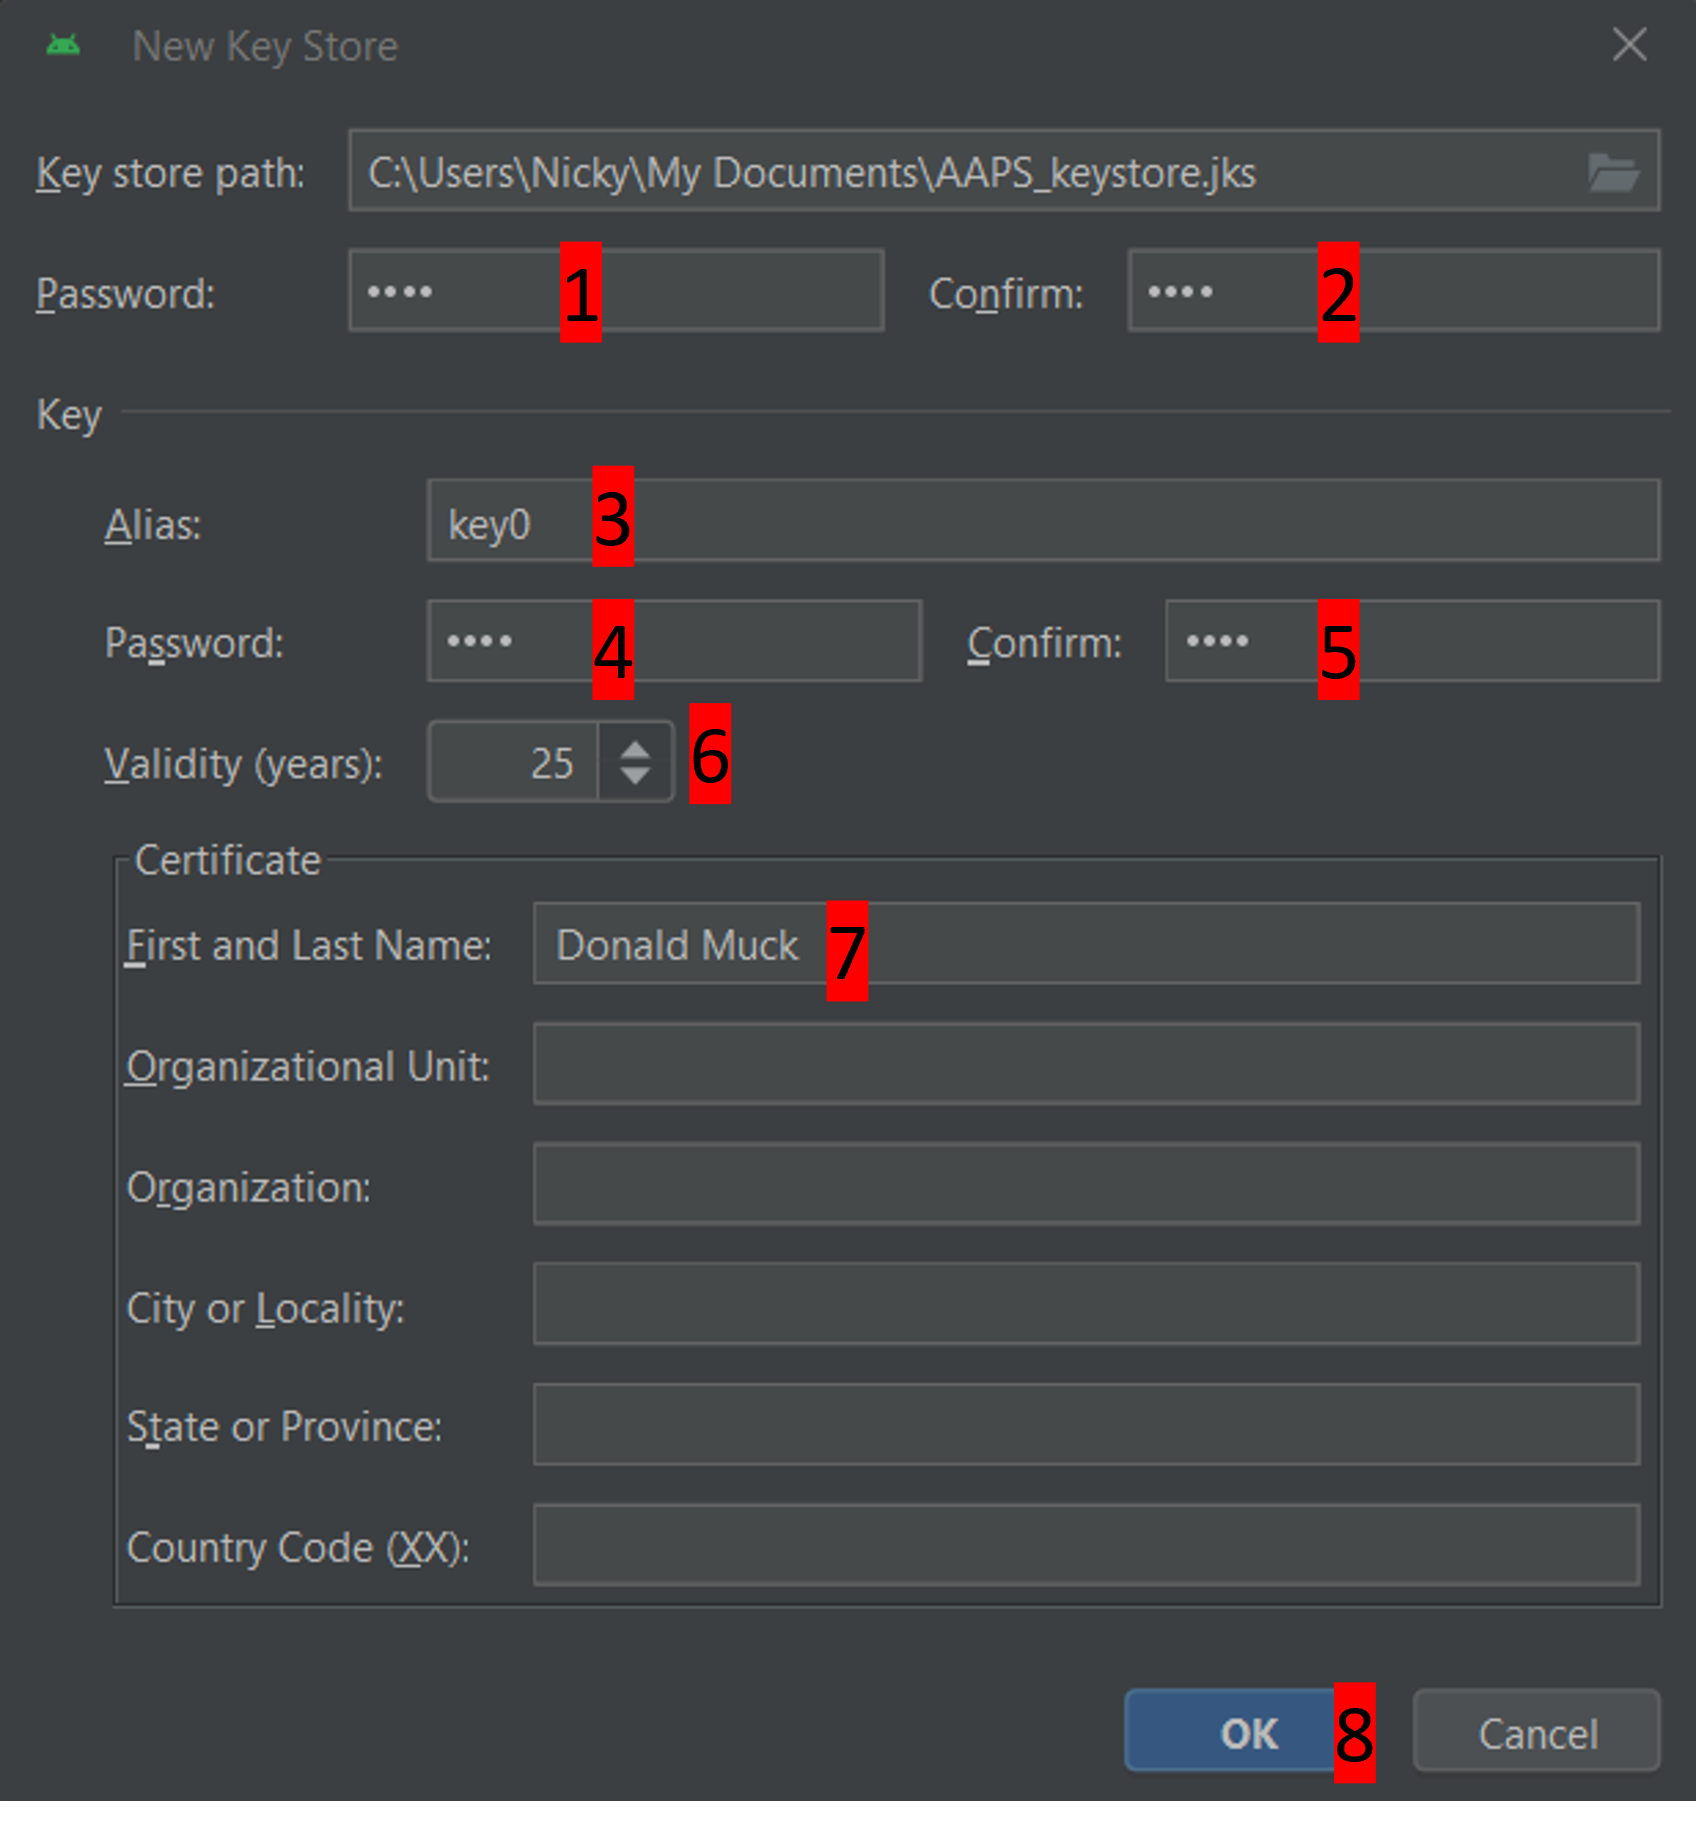
Click on the drop-down menu (1), to select where you want to save your keystore file. In this example, it is being saved in «My Documents» (2). Do not save the keystore in same folder as your Android Studio files (StudioProject). Type in a simple name for your key store (3) and confirm it with «OK» (4):
This will take you back to the previous screen. Your chosen location for saving the key store file is shown.
WARNING!
Make sure to note down for yourself where your keystore is stored. You will need it when you build the next AndroidAPS update!
Now choose a simple password (make a note of it), enter it in the password box (1), and confirm it (2). The passwords for key store and key do not have to be sophisticated. If you lose your password in the future, see troubleshooting for lost key store.
The default alias (3) for your key is «key0», leave this unchanged.
You now need a password for your key. To keep it simple, if you want, you can use the same password you used for your keystore, above. Enter a password (4) and confirm (5) it.
WARNING!
Note down these passwords! You will need them when you build the next AndroidAPS update!
The validity (6) is 25 years by default, leave it as it is.
Enter your first and last name (7). No other information needs to be added.
Click «OK» (8) to continue:
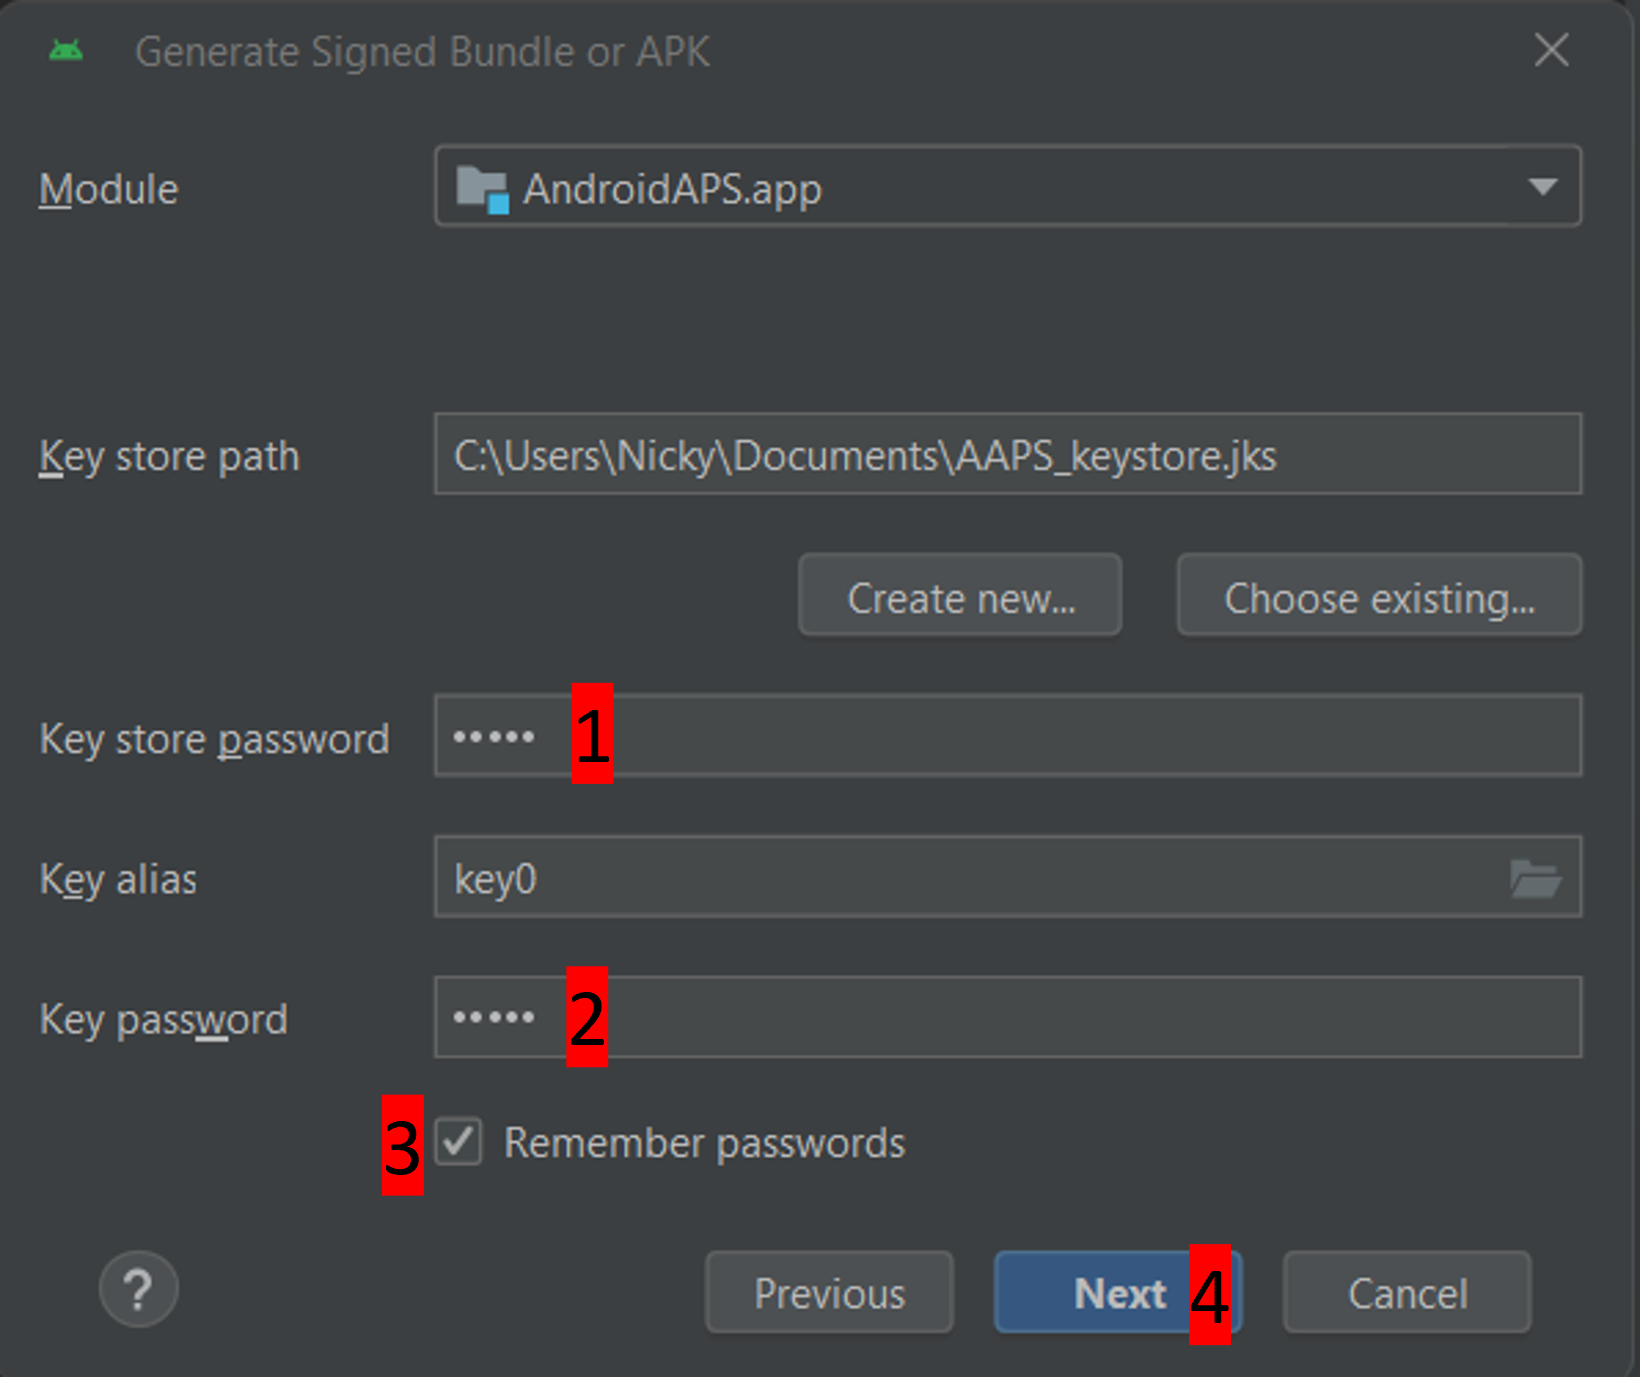
On the «Generate signed bundle or APK» page, the path to your keystore will now be displayed. Now re-enter the Key Store password (1) and Key password (2), and tick the box to remember passwords is checked (3), so you don’t have to enter them again next time you build the apk (i.e. when updating to a new AAPS version). Click «Next» (4):
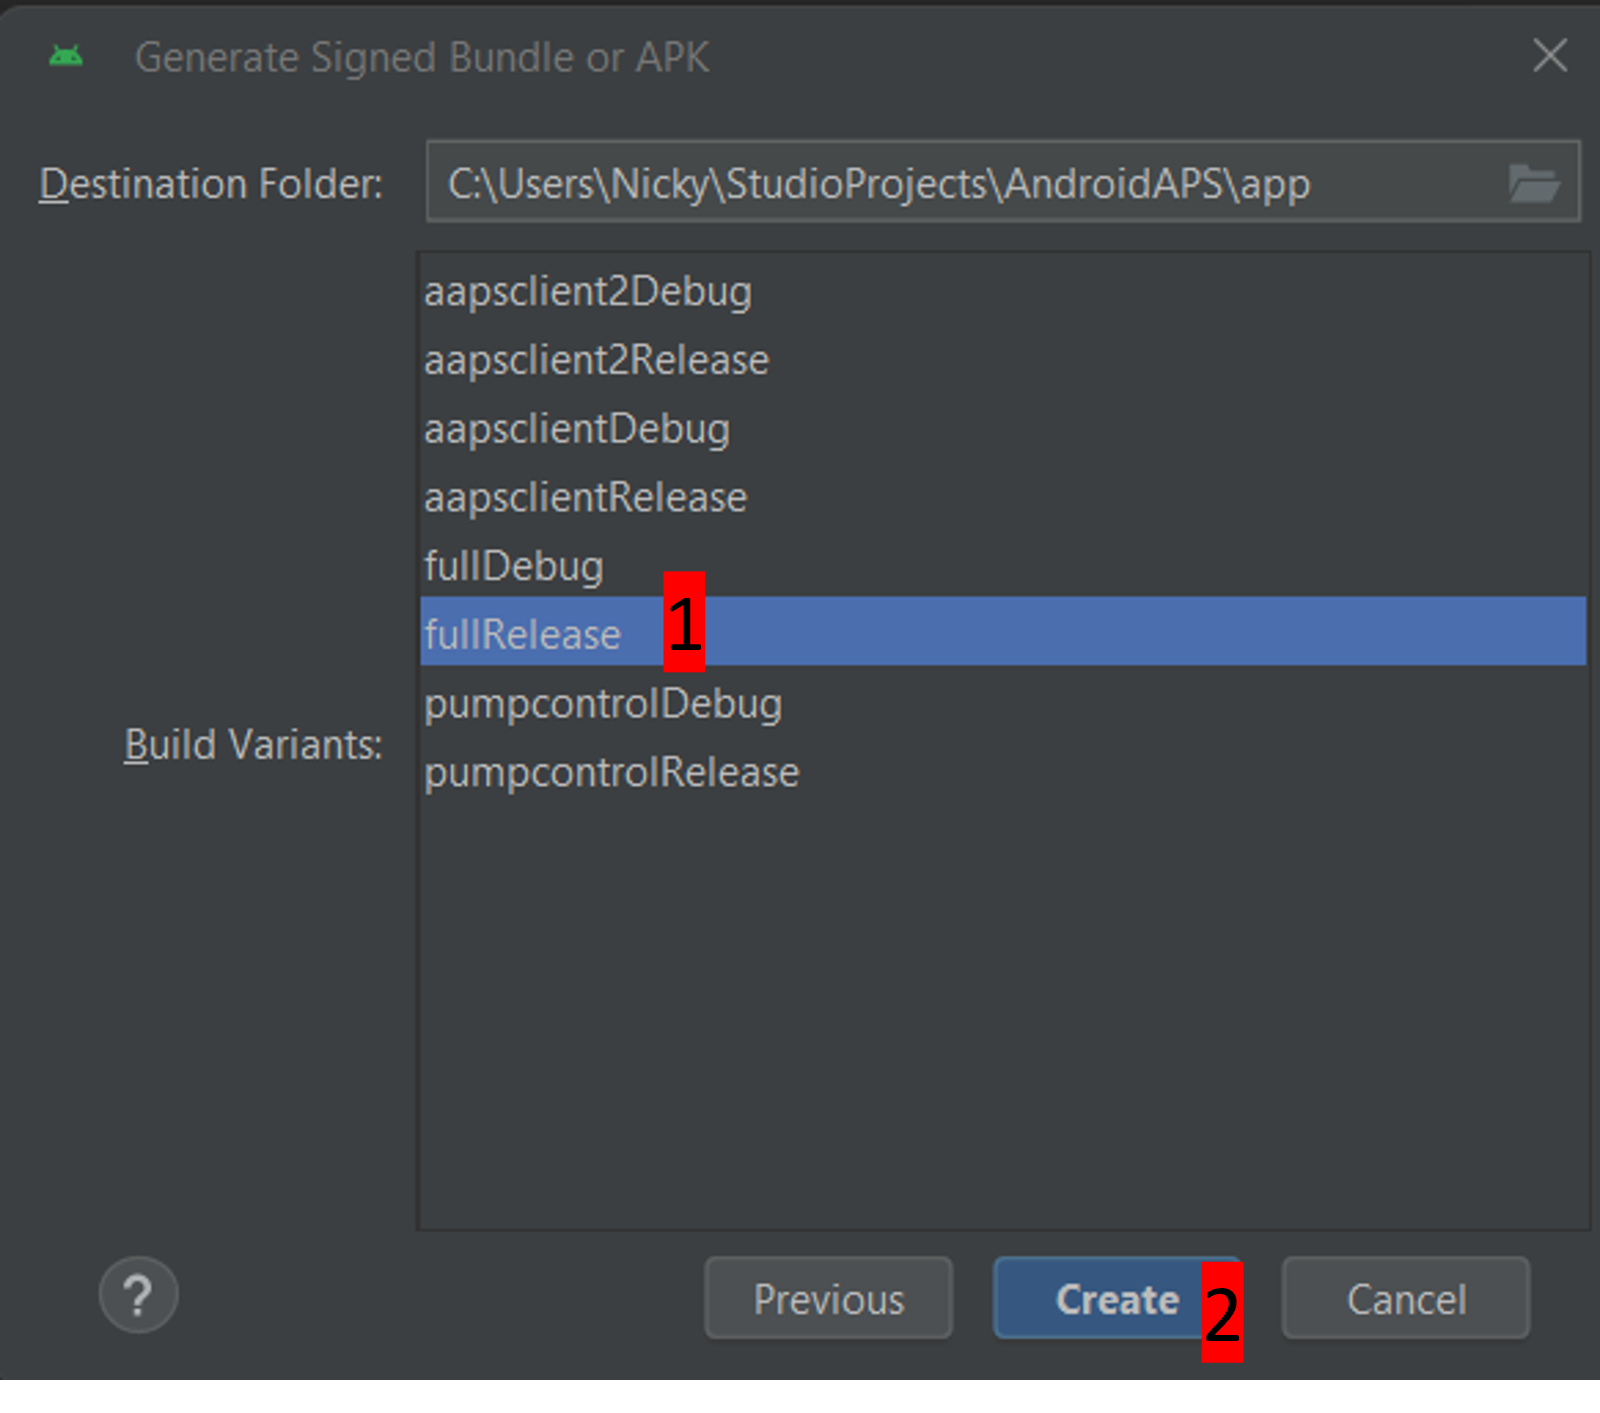
On the next screen, select build variant «fullRelease» (1) and click «Create» (2).
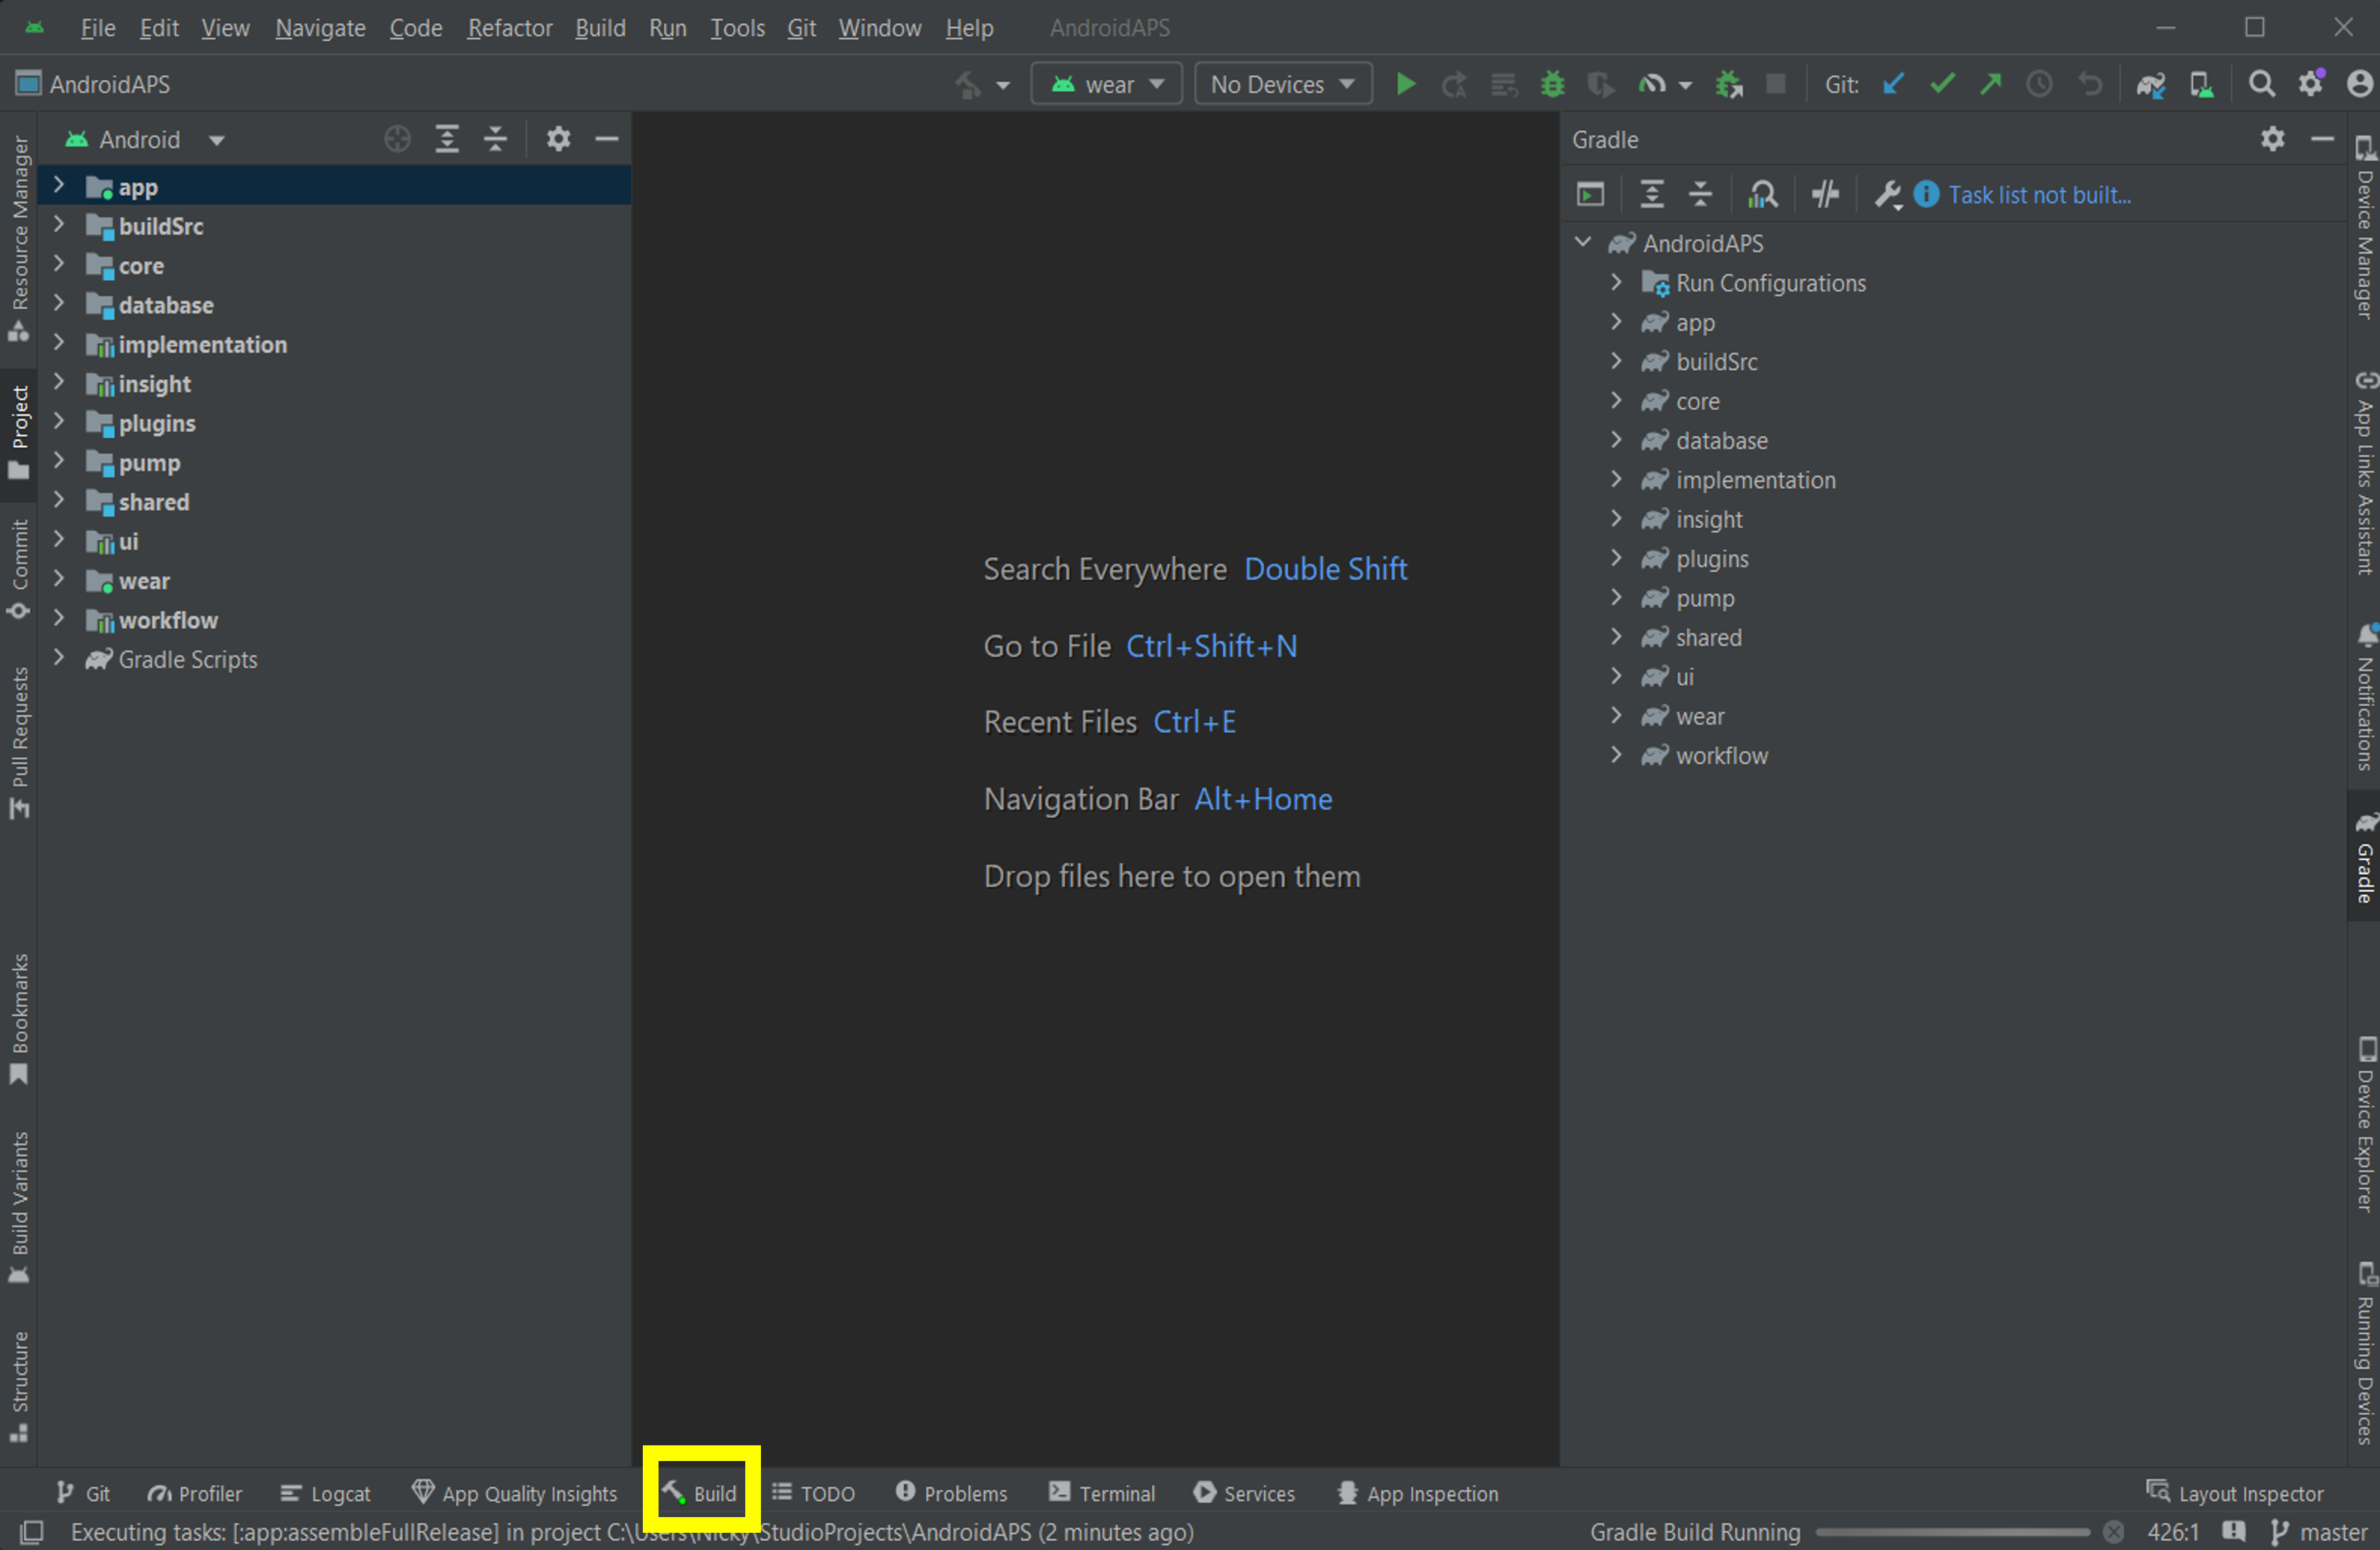
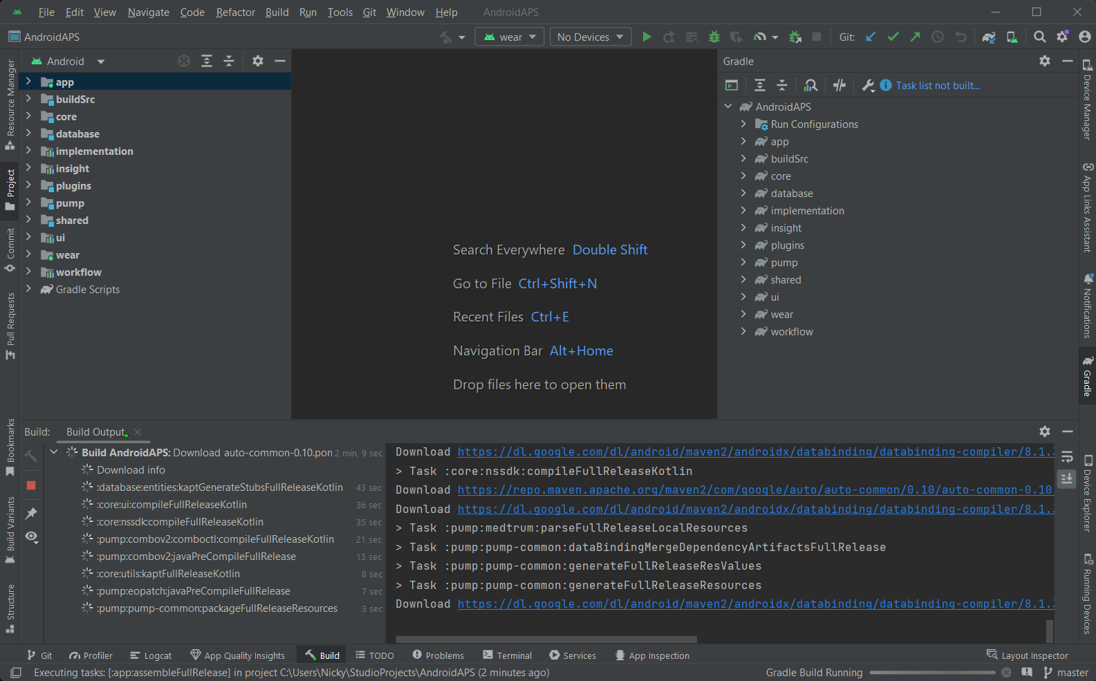
Android Studio will now build the AAPS apk. It will show «Gradle Build running» at the bottom right. The process takes some time, depending on your computer and internet connection, be patient! If you want to watch the progress of the build, click on the small hammer «build» at the bottom of Android Studio:
Now you can watch the building progress:
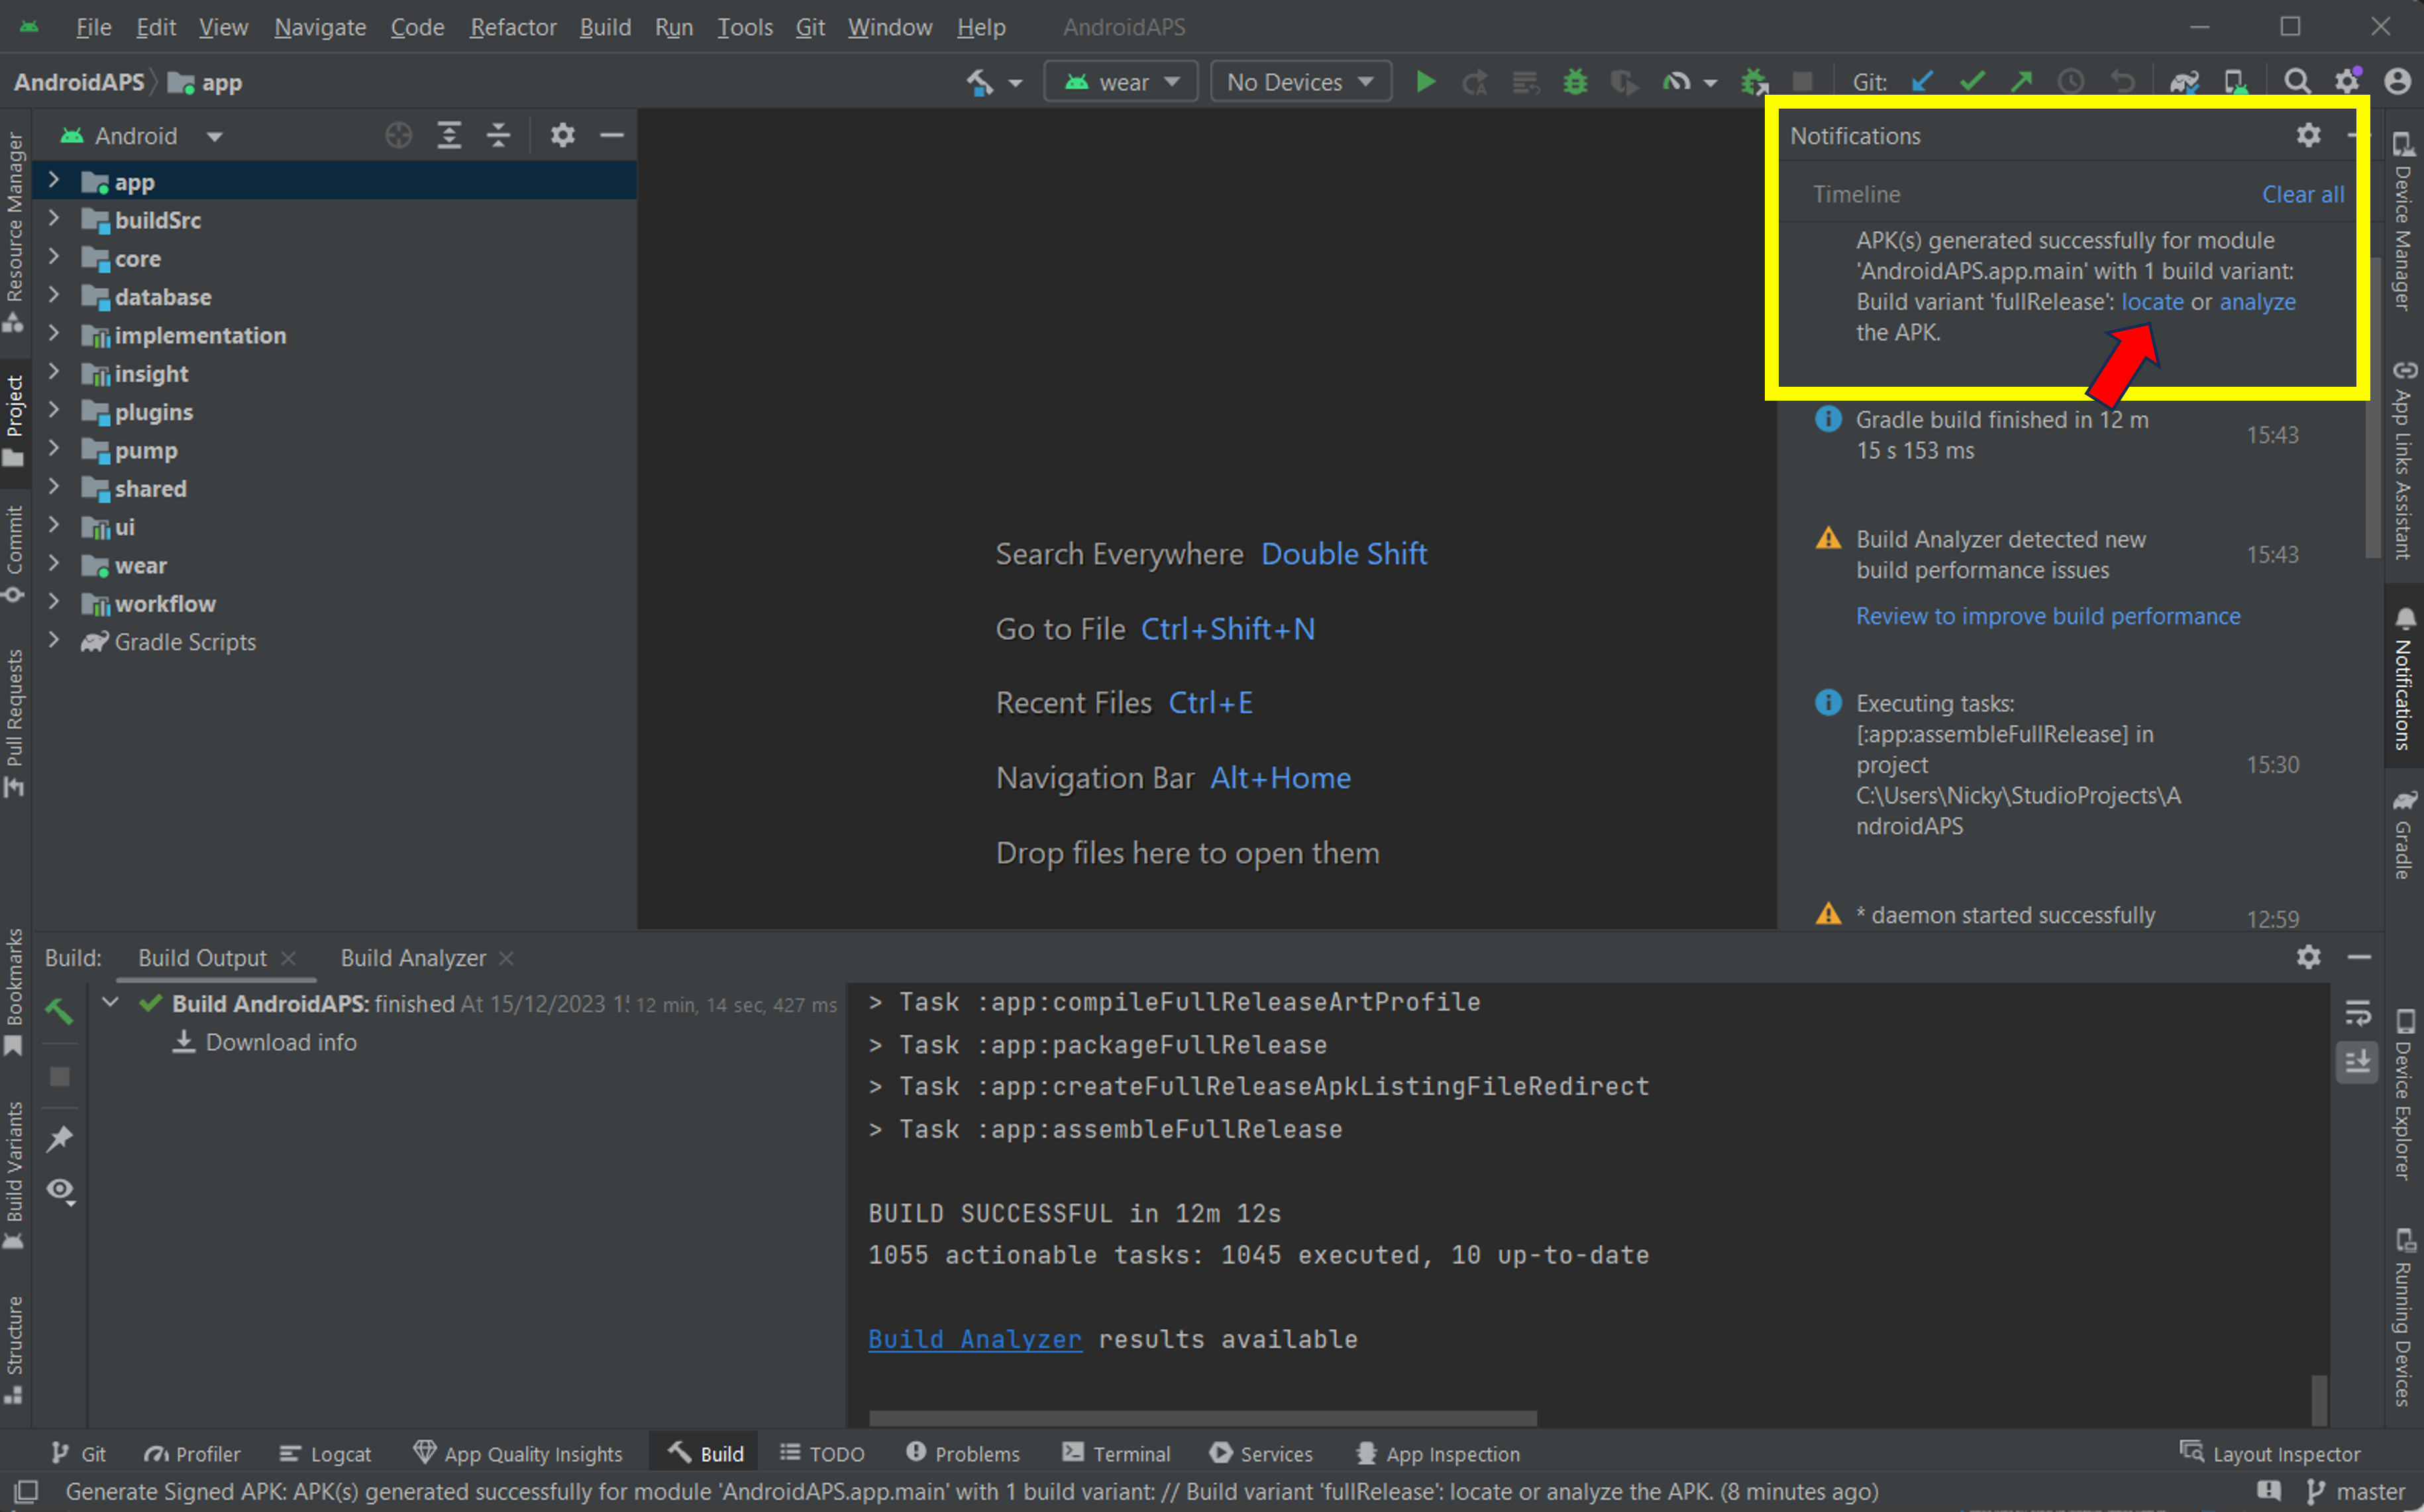
Android Studio will display the information «BUILD SUCCESSFUL» after build is finished. You may see a popup notification which you can click to select «locate». If you miss this, click on the notification «locate or analyse the APK» (yellow highlight) at the very bottom of the screen to bring up the Notifications:
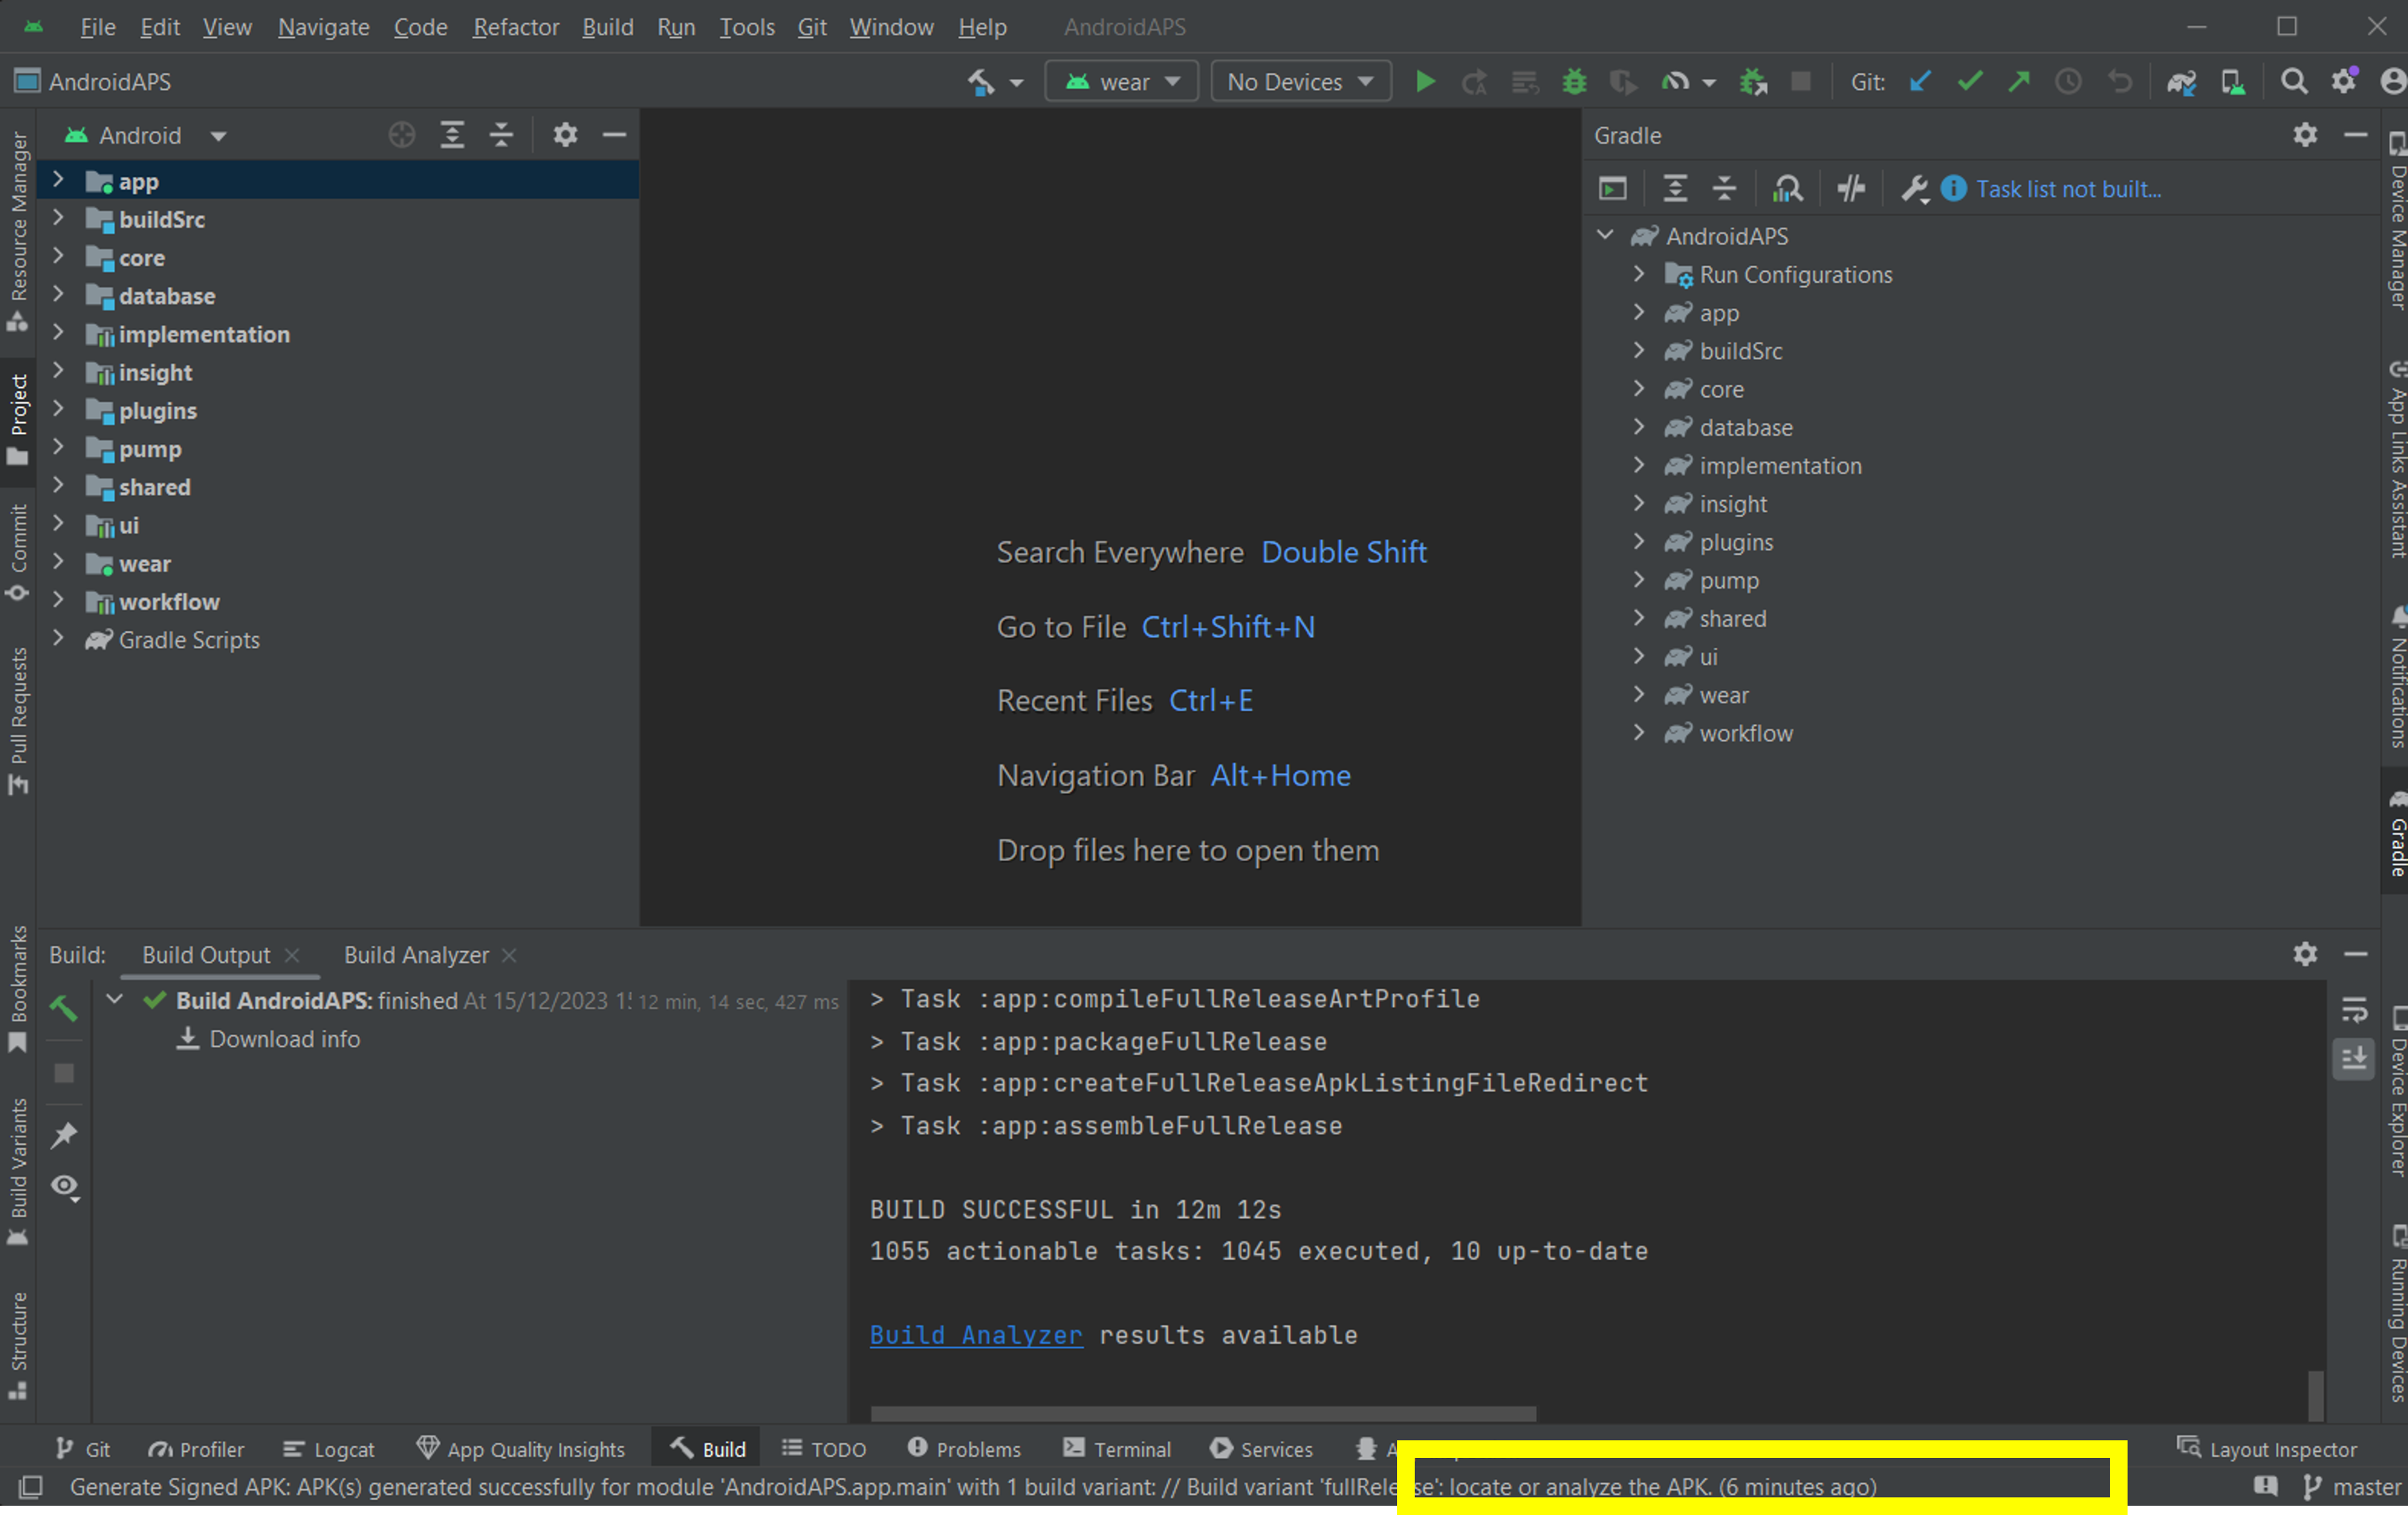
If the build was not successful, refer to the troubleshooting section.
In the Notifications box, click on the blue link «locate»:
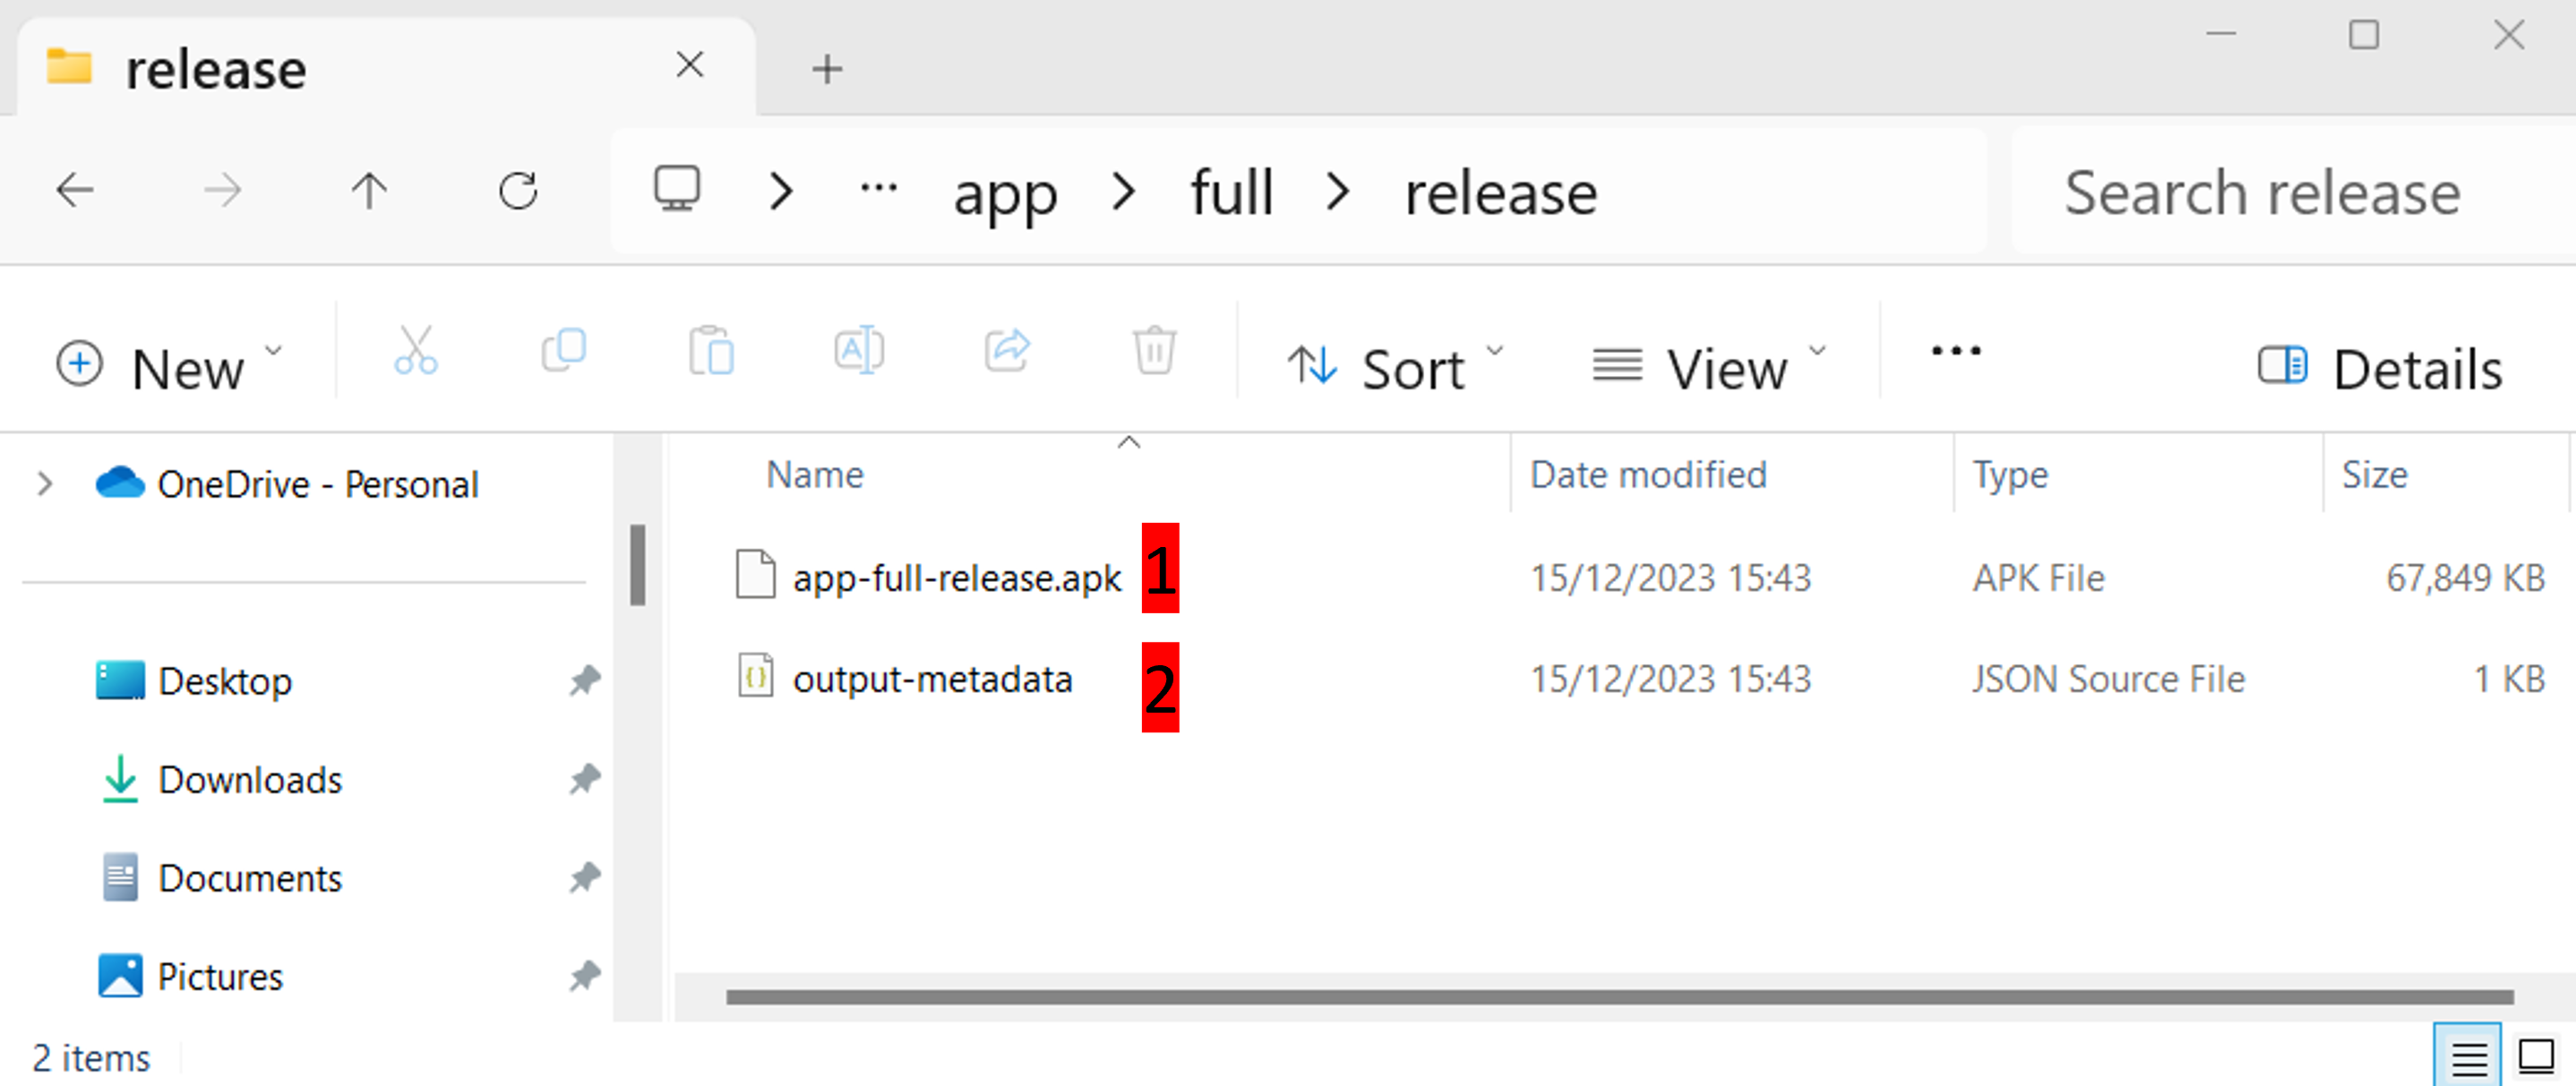
 Your file manager/explorer will open. Navigate to the directory «full» (1) > «release» (2).
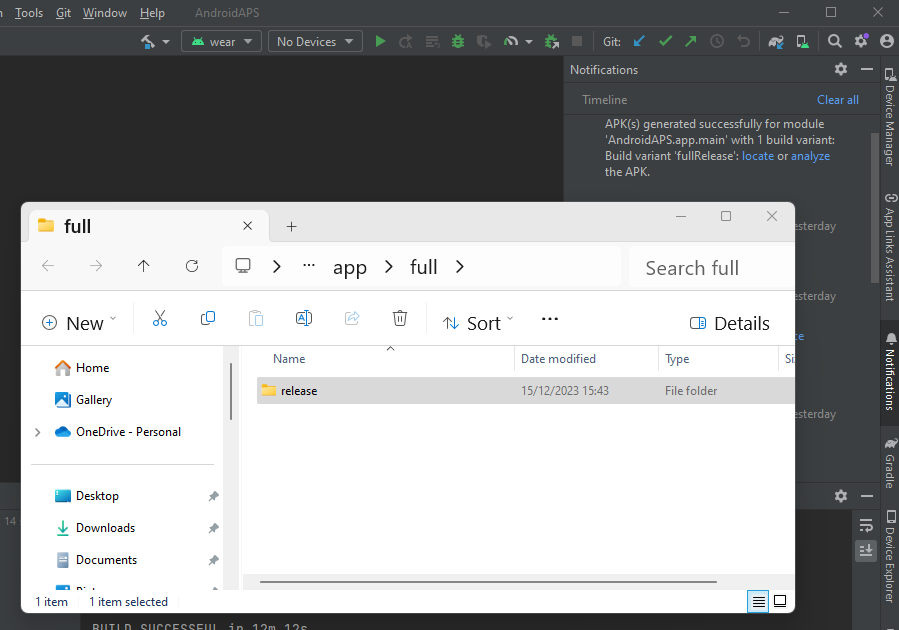
Open the folder «release». The file «app-full-release.apk» (1) is the AAPS apk that you have just built, you will be transferring this file to your smartphone in the next section of the docs:
Congratulations! Now you have built the AAPS apk file, you can move to the next stage of Transferring and Installing AAPS.