Αυτοματοποίηση
What is an Automation?
«Automation» is an AAPS feature which can simplify a user’s diabetes management by making automatic changes to insulin delivery. Automations allow AAPS to be highly personalised for individual users.
An Automation instructs AAPS to carry out a specific action, as a result of one or more conditions or triggers. This can be for irregular episodic events, like low or high BG, a set amount of negative IOB. It can also be for recurring events, for example a meal or exercise at a certain time of day, or when the user is located within a certain distance of GPS location or WIFI SSID area.
There are a wide range of automation options, and users are encouraged to study these within the AAPS app, in the automation section. You can also search the AAPS user groups on Facebook and Discord for automation examples from other users.
How Automation can help
Decreasing decision fatigue: The primary benefit of automations is to relieve the user from the burden of having to make manual interventions in AAPS. Research estimates that an average of 180 additional daily decisions have to be made by those living with Type 1 diabetes. Automations can lessen the mental load, freeing up the user’s mental energy for other aspects of life.
Potentially improving glycemic control: for example, automations can help ensure Temp Targets are always set when needed, even during busy schedules or periods of forgetfulness. For example, if a child with diabetes has sport scheduled at school on Tuesdays at 10am and Thursdays at 2pm and always needs a high temp target actioned 30 min before these activities, these can be actioned by automation.
Enabling AAPS to be highly customised to be more or less aggressive in specific situations, according to user preference. For example, triggering a temporary reduced profile% for a set period of time if negative IOB develops in the middle of the night, indicating that the existing profile is too strong.
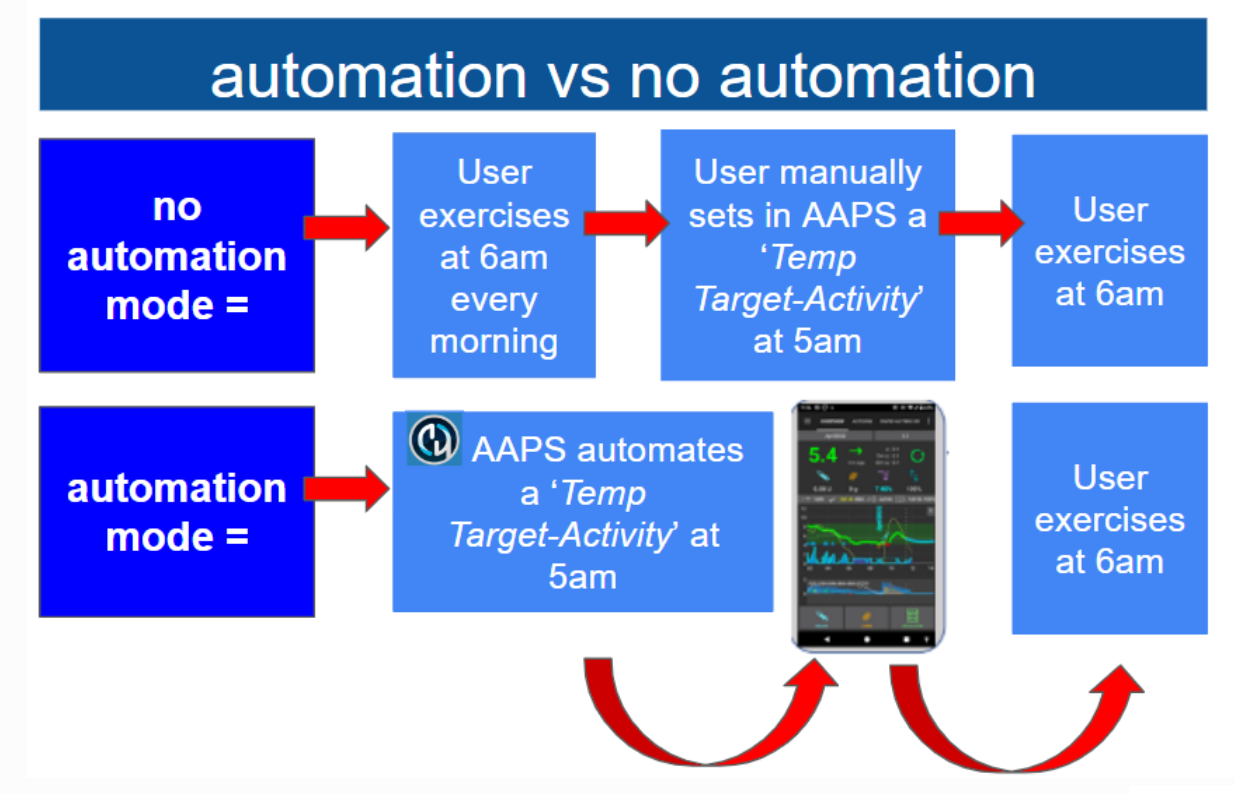
The example below illustrates how an Automation can enable steps to be eliminated. The user has set an Automation to trigger a 5 am ‘Temp Target Exercise’ to ensure their BG and IOB are optimal, in preparation for their 6 am exercise:
Key considerations before starting with Automations
Before setting up an Automation, you should have reasonable BG control with AAPS. Automations should not be used to compensate for sub-optimal basal, ISF or ICR settings (discussed further below). Avoid setting an automated Profile switch to compensate for BG rises due to e.g. food, these are better dealt with via other strategies (SMBs etc).
As with any technology, CGMs and Pumps and phones can malfunction: Technical issues or sensor errors can disrupt the Automation actions, and manual intervention may be needed.
Requirements for automations are likely to change as routines change. When changing between work/school/holiday periods, set a reminder in your calendar to review which automations are currently active (they are easy to activate and de-activate). For example, if you go on holiday, and no longer need the automations set up for school sports or daily exercise, or need to adjust the timings.
Automations may conflict with each other, and it is good to review any new automation(s) setting carefully in a safe environment, and understand why an automation may or may not have triggered in the way you expect.
If using Autosense, try to use Temp Targets instead of Profile Switches. Temp Targets do not reset Autosens back to 0. Profile Switches reset Autosens.
Most automations should only be set for a limited time duration, after which AAPS can re-evaluate and repeat the automation, if necessary, and if the condition is still met. For example, «start temp target of 7.0 mmol/l for 30 min» or «start profile 110% for 10 min» and «start temp target of 5.0 mmol/l for 10 min». Using automations to create permanent changes (e.g. to stronger %profile) risks hypoglycemia.
When can I start using Automation?
When you start Objective 10.
Where are Automations located in AAPS?
Depending on your config builder settings, Automation is located either in the ‘hamburger’ menu or as a tab with AAPS.
How can I set up an Automation?
To set up an Automation create a ‘rule’ with AAPS as follows:
Give your ‘rule’ a title;
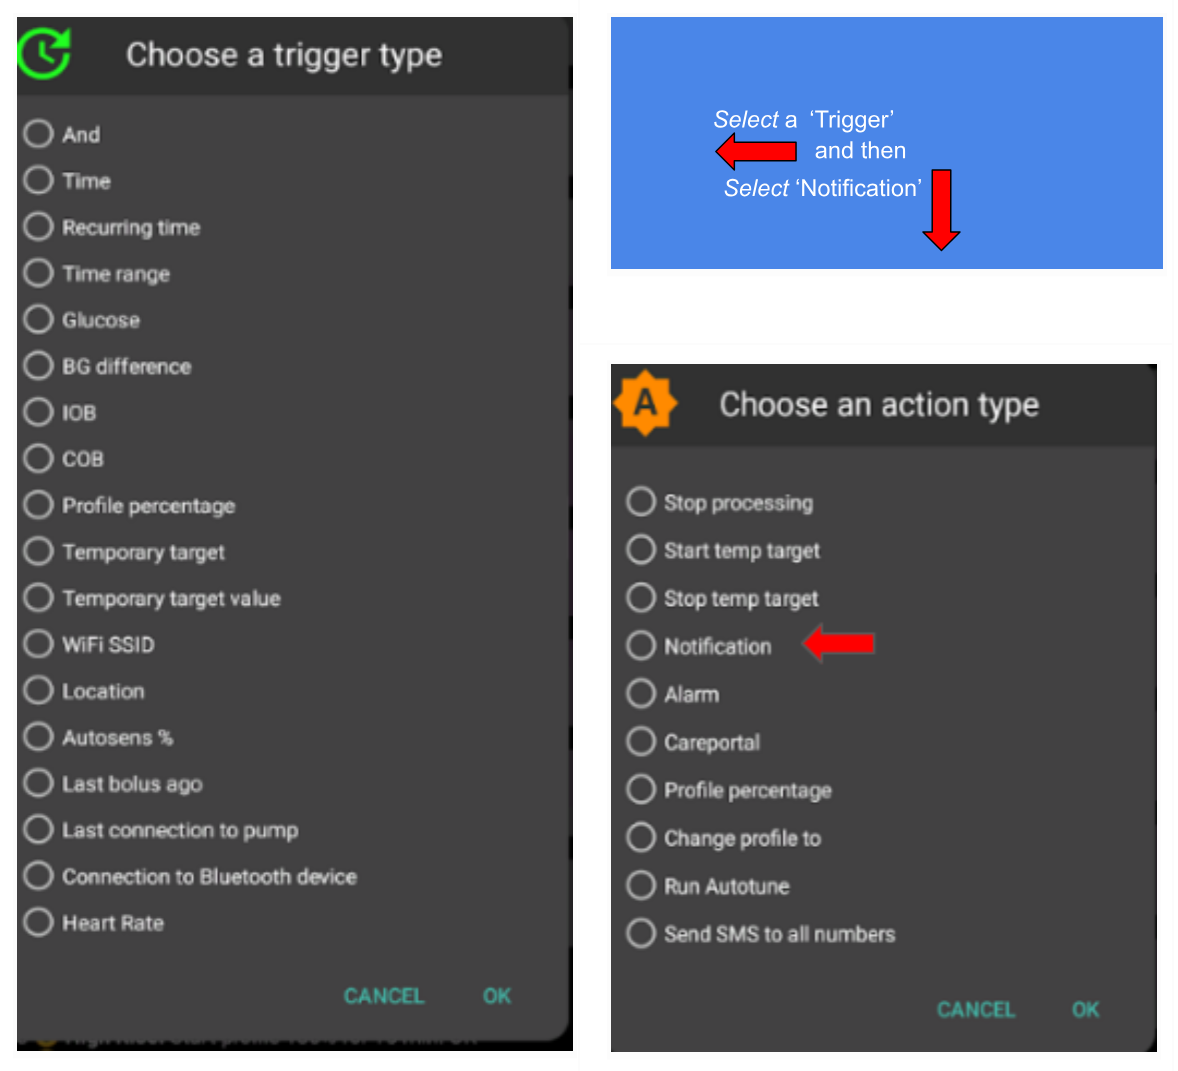
Select at least one ‘Condition’; and
Select one ‘Action’;
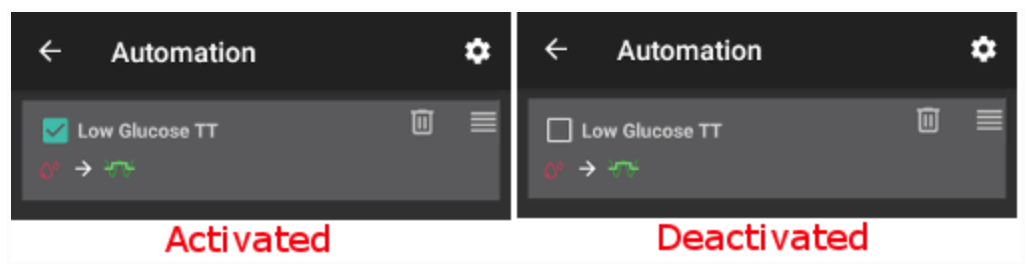
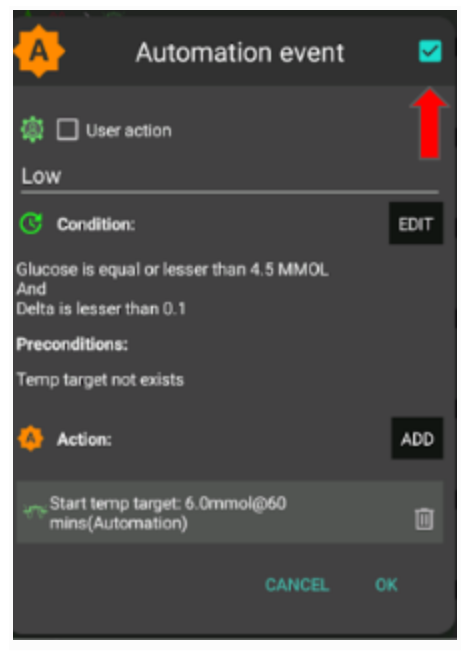
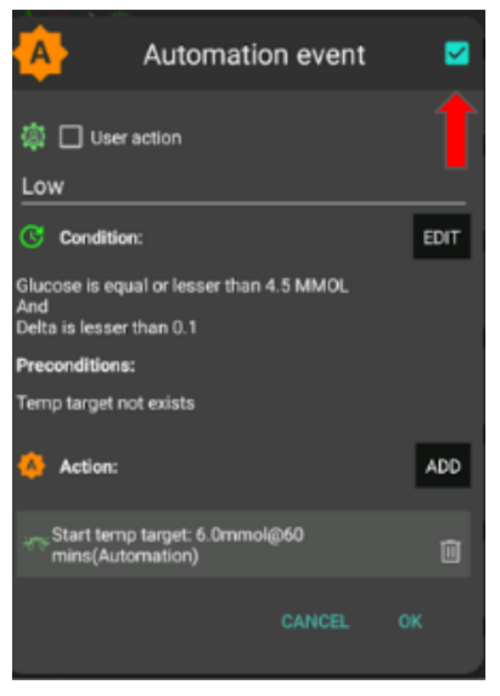
Check the right box to the Automation event is ‘ticked’ to activate the automation:

To deactivate an Automation rule, untick the box left of the name of the Automation. The example below shows an Automation entitled ‘Low Glucose TT’ as either activated (‘ticked) or deactivated (‘unticked’).
When setting up an automation, you can first test it by activating the ‘notification’ option under «Actions». This triggers AAPS to first display a notification rather than actually automating an action. When you are comfortable that the notification has been triggered at the correct time/conditions, the Automation rule can be updated to replace the ‘Notification’ with an ‘Action’.
Important note
Automations are still active when the Loop is disabled!
Safety limits
There are safety limits set for Automations:
The glucose value has to be between 72 and 270 mg/dl (or 4 and 15 mmol/l).
The Profile percentage has to be between 70% and 130%.
There is a 5 minute time limit between executions of Automation (and first execution).
Correct use of negative values
Warning
Please be careful when selecting a negative value in Automation
Caution must be taken when selecting a ‘negative value’ within the ‘Condition’ like «less than» in Automations. For example:
Example 1: Creating a Condition «is lesser than» «-0.1» will:
Trigger an Automation for any number which is strictly less than** -0.1. This includes numbers like -0.2, -0.3, -0.4 and so on. Remember that -0.1 itself is not included in this condition. (The condition «is equal or lesser than -0.1» would include -0.1).
Example 2: Creating a Condition «is greater than» -0.1 will:
Trigger an Automation for any number which is greater than -0.1. This includes numbers like 0, 0.2, 0.4, and any other positive number.
It is important to carefully consider the exact intention of your Automation when choosing these conditions and values.
Automation Conditions
There are various ‘Conditions’ that can be selected by the user. The list below is non-exhaustive:
Condition: connect conditions
Options:
Several conditions can be linked with
“And”
“Or”
“Exclusive or” (which means that if one - and only one of the - conditions applies, the action(s) will happen)
Condition: time vs. recurring time
Options:
time = single time event
recurring time = something that happens regularly (i.e. once a week, every working day etc.)
Condition: location
Options:
in the config builder (Automation), the user can select their required location service.
Condition: location service
Options:
Use passive location: AAPS only takes locations when other apps are requesting it.
Use network location: Location of your Wifi.
Use GPS location (Attention! This can cause excessive battery drain!)
Ενέργεια
Actions: start Temp Target
Options:
BG must be between 72 mg/dl and 270 mg/dl (4 mmol/l and 15 mmol/l)
TT works only if there is no previous Temp Target
Actions: stop Temp Target
Options:
none
Actions: Profile percentage
Options:
Profile must be between 70% and 130%
works only if the previous percentage is 100%
Once the ‘Action’ is added, the default values must be changed to the desired number by clicking and adjusting the default values.

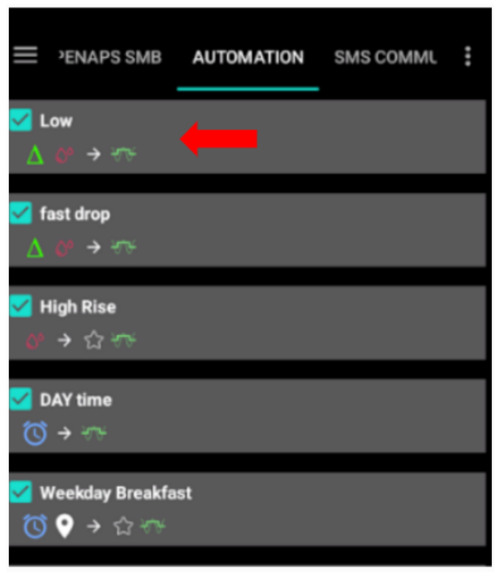
The order of the automations in the list matters
AAPS will automate the rules created in the order of preference, starting from the top of the Automation list. For example, if the ‘low hypoglycemia’ Automation is the most important Automation, above all other rules, then this Automation should appear at the top of the user’s Automation list as demonstrated below:
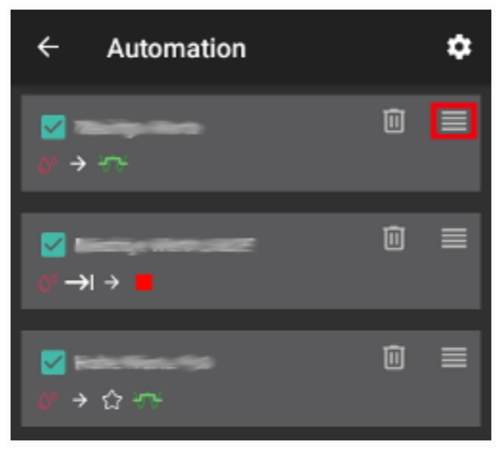
To reprioritise the Automation rules, click and hold the four-lines-button on the right side of the screen. Reorder the Automations by moving the rules up or down.
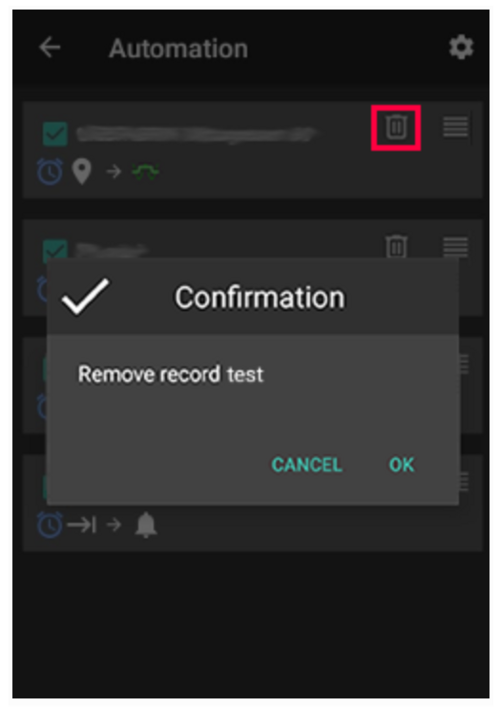
How to delete Automation rules
To delete an Automation rule click on the trash icon.
Examples of Automations
Below are examples of Automations. Further discussion on Automations and how users have individualised their Automation can be found in Facebook discussions groups or on Discord. The examples below should not be replicated without the user having a good understanding of how the Automation will work.
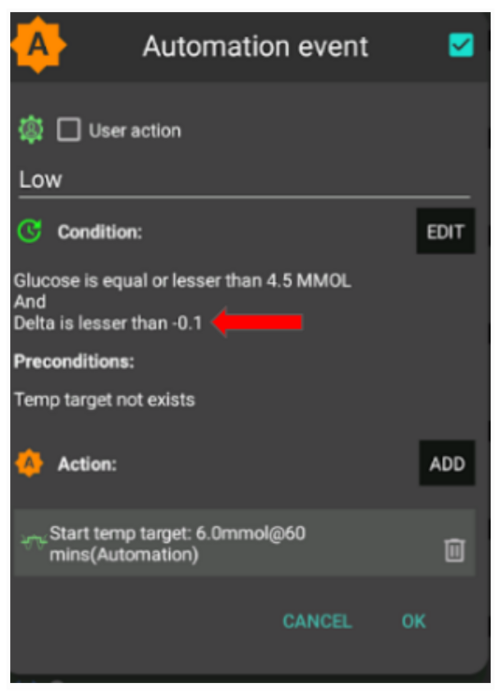
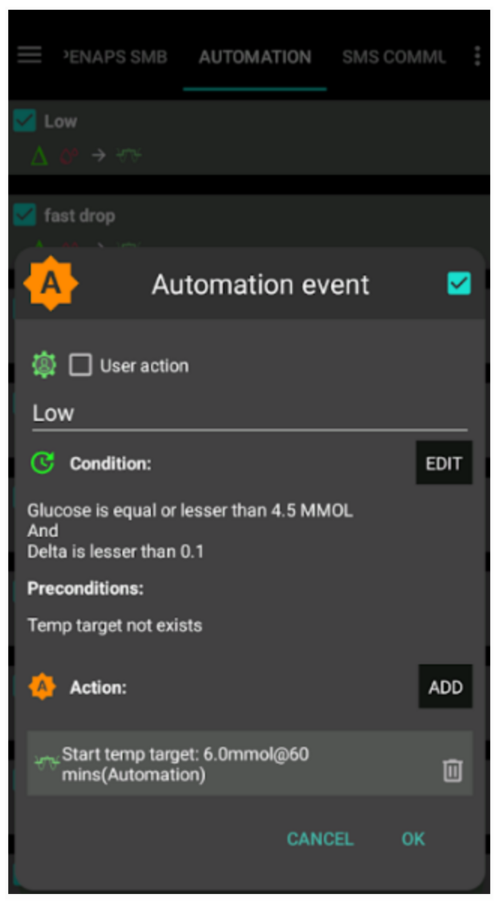
Low Glucose Temp Target
This Automation triggers an automatic ‘Temp Target Hypo’ when low BG is at a certain threshold.
Lunch Time Temp Target (with ‘Location’)
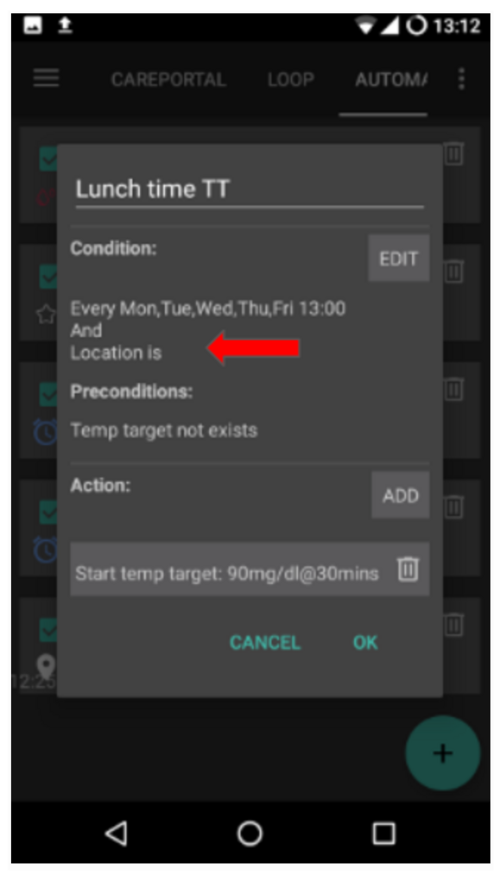
This Automation has been created for a user who eats their lunch at work around the same time every weekday but triggered only if the user is situated within a set ‘location’. So if the user is not at work one day, this Automation will be activated.
This Automation will set a low Temp Target (Eating Soon) at 13:00 to drive ‘BG, to 90mg (or 5 mmol/l) in preparation for lunch.
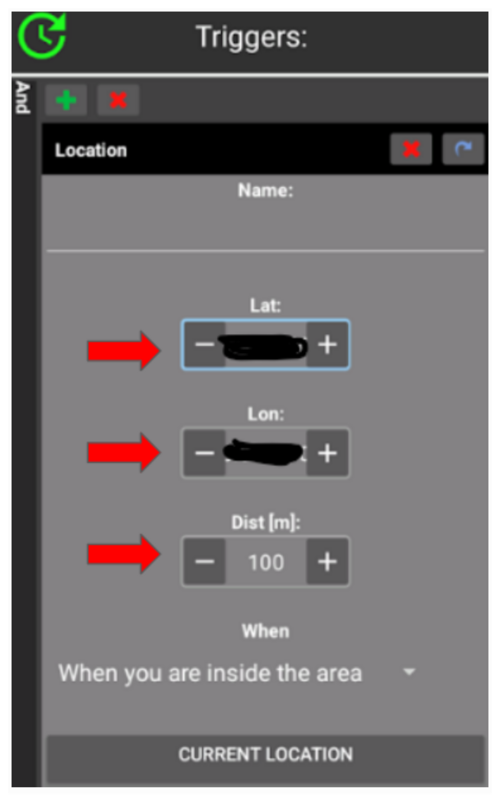
The ‘Trigger’ location is set by inputting the latitude and longitude GPS coordinates as below:
Because of the ‘And’ connection, the Automation only happens during the ‘chosen time’ and if the user is at the selected location.
The Automation will not be triggered on any other time at this location or on this time outside of 100 metres set GPS coordinates.
WIFI SSID Location Automation
Using WIFI SSID is a good option to trigger an Automation while within range of a specific wifi network (than compared with GPS), it is fairly precise, uses less battery and works in enclosed spaces where GPS and other location services might not be available.
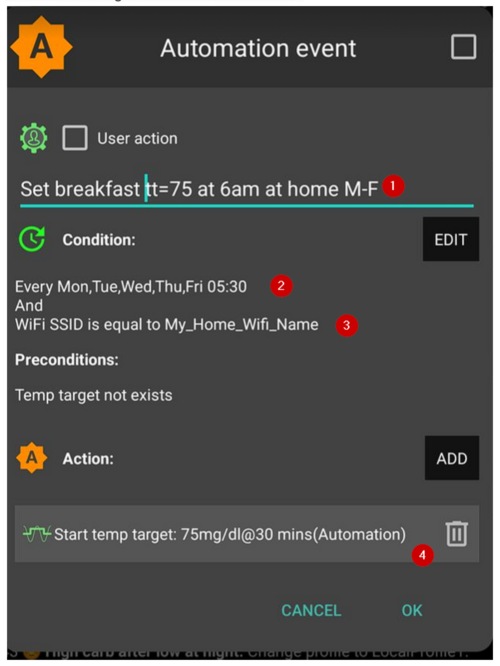
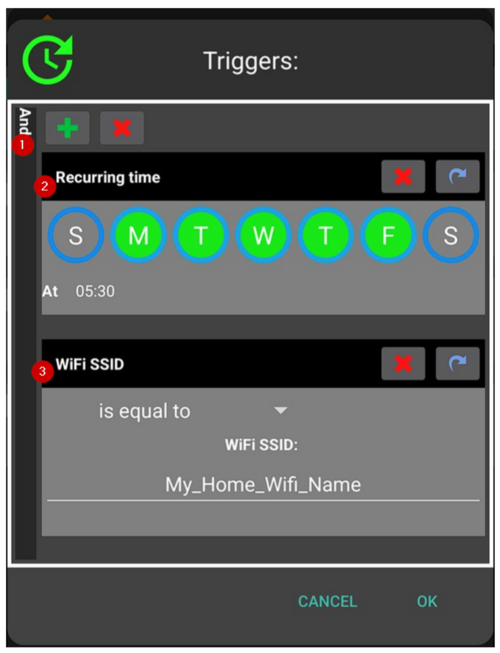
Here is another example of setting up a Temp Target for work days only before breakfast(1).
The Automation will trigger at 05:30am only on Monday-Friday(2)
and while being connected to a home wifi network (3).
It will then set aTemp Target of 75mg/dl for 30 minutes (4). One of the advantages of including the location is that it will not trigger if the user is travelling on vacation for instance.
Here is the screenshot detailing the Automation triggers:
Under the main “AND” (both conditions need to be met to trigger) 1) Recurring time = M,T,W,T,F At 5:30am
WIFI SSID = My_Home_Wifi_Name
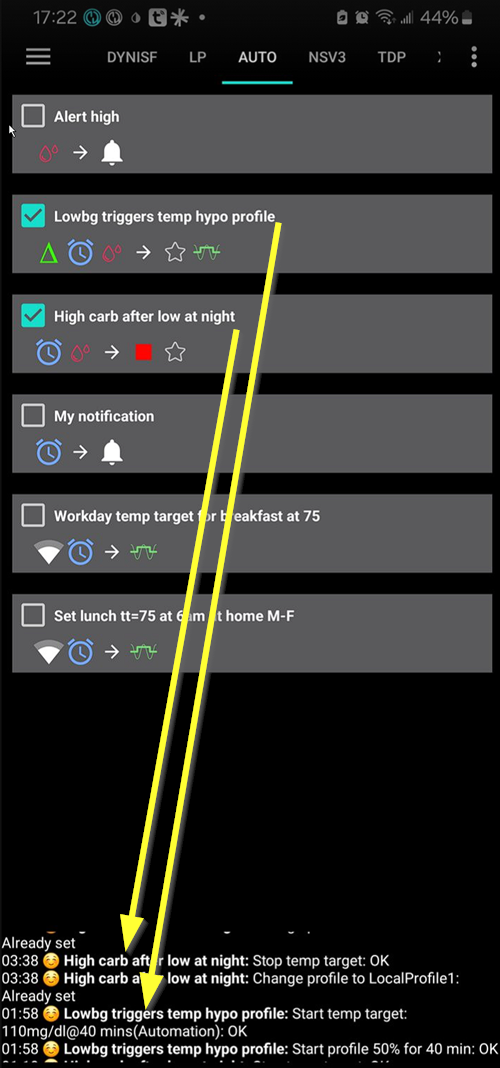
Automation Logs
AAPS has a log of the most recent Automation triggered at the bottom of the screen under the Automation tab.
In the example below the logs indicate:
(1) at 01:58 am, the “Low BG triggers temp hypo profile” is activated
glucose value is less than 75mg/dl;
delta is negative (ie: the BG is going down);
time is within 01:00 am and 06:00 am.
The Automation will:
set a Temp Target to 110mg/dl for 40 minutes;
start a temporary Profile at 50% for 40 minutes.
(2) at 03:38 am, the “High carb after low at night” is triggered
time is between 01:05 am and 06:00 am;
glucose value is greater than 110mg/dl.
The Automation will:
change Profile to LocalProfile1 (ie: cancel the temporary profile if any)
stop Temp Target (if any)
Αντιμετώπιση προβλημάτων
Problem: My automations are not being triggered by AAPS?
Check the box to the right of Automation event is ‘ticked’ to ensure the rule is activated.
Problem: My automations are being triggered in the wrong order.
Check your rule prioritisation order as discussed above here.
Alternatives to Automations
For advanced users, there are other possibilities to automate tasks using IFTTT or a third party Android app called Automate.