Willkommen zur AAPS-Dokumentation
Latest Release
Juni 2026: Version 3.4.2.3 ist veröffentlicht. Schau in die Release Notes, um zu sehen was es Neues gibt, und führe die Schritte wie sie in der Aktualisierungsanleitung beschrieben sind, um entsprechend auf die neueste Version zu aktualisieren.
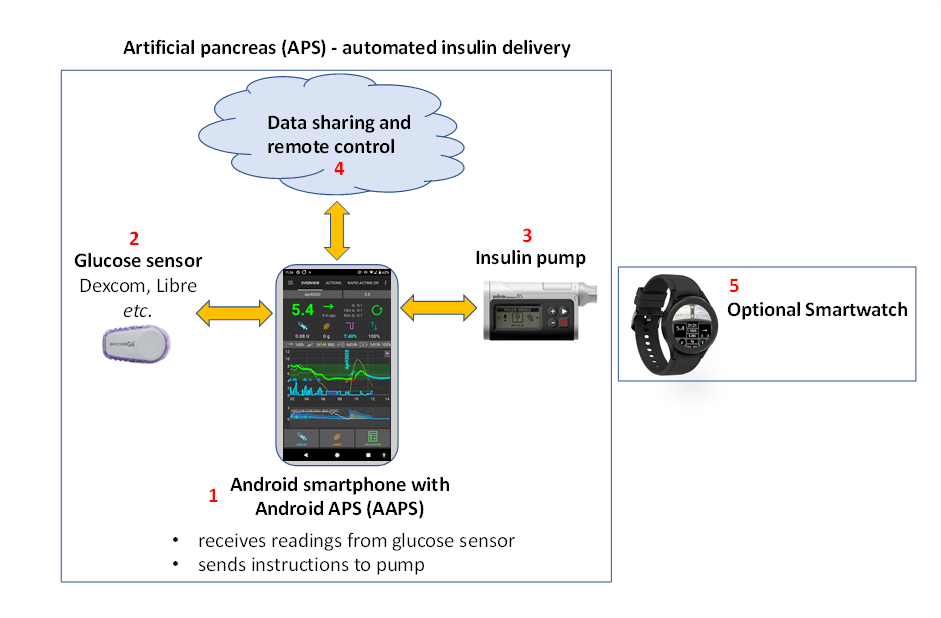
Android APS (AAPS) ist eine Open-Source-App für Menschen mit insulinabhängigem Diabetes. Es handelt sich dabei um ein künstliches Bauchspeicheldrüsen-System (APS), das auf Android-Smartphones läuft. AAPS nutzt verschiedene OpenAPS-Softwarealgorithmen, um damit genau das zu tun, was eine echte Bauchspeicheldrüse auch tut: den Glukosespiegel durch automatisierte Insulindosierung (AID) in gesunden Grenzen halten. Um AAPS nutzen zu können, benötigst Du drei kompatible Geräte: (1) ein Android-Smartphone, (2) ein CGM-System (Sensor) und (3) eine von der FDA/CE zugelassene Insulinpumpe. Um (4) AAPS remote steuern zu können, Daten speichern, teilen und Berichte auf einem Berichtsserver erstellen zu können, benötigst Du optional einen Cloud-Dienst und eventuell auch (5) eine Smartwatch.
Diese Dokumentation erklärt, wie Du AAPS einrichtest und nutzt. Du kannst entweder durch das Menü auf der linken Seite (und die praktische „Suche in den Dokumenten“-Funktion) oder durch den Index am Ende dieser Seite durch die AAPS-Dokumentation navigieren.
Überblick über die AAPS-Dokumentation („The docs“)
Abschnitt 2) „Erste Schritte“ - Die Einführung erläutert das allgemeine Konzept und die grundlegende Funktionsweise eines künstlichen Bauspeicheldrüsen-Systems (APS). Es umreißt den Hintergrund des Loopens im Allgemeinen, warum AAPS entwickelt wurde, vergleicht AAPS mit anderen Systemen und behandelt Sicherheitsfragen. Es gibt Vorschläge, wie Du mit Deinem Diabetes-Team über AAPS sprechen kannst, erklärt, warum Du die AAPS-App selbst erstellen musst (anstatt sie nur herunterzuladen), und gibt einen Überblick über den typischen Aufbau eines AAPS-Systems. Es behandelt auch die Zugänglichkeit und wer wahrscheinlich von AAPS profitieren wird.
Vorbereitungen, um mit AAPS zu starten beschreibt weitere Überlegungen zur Sicherheit, den Smartphones, Sensoren (CGMs - Continuous Glucose Monitors) und Insulinpumpen, die mit AAPS kompatibel sind. Es gibt einen Überblick über den Prozess, den Du durchlaufen wirst, und gibt eine zeitliche Einschätzung wie lange es dauern wird bist Du alle AAPS-Funktionalitäten nutzen kannst. Dieser Abschnitt bereitet Dich technisch darauf vor, Deine AAPS-Einrichtung so schnell und effizient wie möglich abzuschließen. Der Unterabschnitt CGM-Konfiguration erläutert, wie die CGM-Konfiguration optimiert wird und welche Glättungsoptionen am besten sind.
Jetzt, da Du ein solides Grundverständnis des Prozesses hast, kannst Du damit beginnen, Deinen AAPS-Loop zu erstellen.
Abschnitt 3) AAPS einrichten enthält Schritt-für-Schritt Anleitungen, um dies zu tun. Er beschreibt die Auswahl und Einrichtung Deines Servers für Berichte (Nightscout oder Tidepool), damit Du Deine relevanten Daten auswerten und teilen kannst, die Vorbereitung für die Erstellung, das eigentliche Erstellen (sog. Build) der AAPS-App und die Übertragung der AAPS-App auf Dein Smartphone. Es umfasst auch das Einrichten der AAPS-App mithilfe des Einrichtungsassistenten, das Verknüpfen mit Deiner CGM-App und entweder einer echten oder einer virtuellen Insulinpumpe sowie das Verknüpfen von AAPS mit Deinem Berichtsserver. Du wirst danach durch einen kleinschrittigen und sehr fein justierten Prozess sehr behutsam an die vollständige AAPS-Nutzung herangeführt. Damit soll sichergestellt werden, dass Du oder Dein Kind, sicher durch die verschiedenen Funktionen und Menü-Konfigurationen navigieren lernst, bevor Du zur folgenden Phase (auch „nächstes Ziel“ bzw. „Objective“ genannt) übergehst und schließlich genug Erfahrung gesammelt hast, um die weitreichensten Funktionalitäten der App nutzen zu können. Diese Objectives (Ziele) sind so aufgebaut, dass nach und nach weitere AAPS-Funktionen freigeschaltet werden und so am Ende vom ‚Open Loop‘ auf ‚Closed Loop‘ umgestellt werden kann.
Abschnitt 4) AAPS im Alltag behandelt wichtige AAPS-Funktionen, um Dir beim Umgang (und der Anpassung) von AAPS zu helfen. Dies beinhaltet insbesondere das Verständnis der Bildschirme, Kohlenhydrate an Bord (CoB), Sensitivität, Profilwechsel, temporäre Ziele, verzögerte Kohlenhydrate (oder eCarbs), Automatisierungen und dynamischer ISF (DynamicISF). Es behandelt auch häufige Themen wie den Umgang mit verschiedenen Mahlzeitenarten den Umgang mit Kanülen- und Sensorwechseln, Smartphone-Updates, Zeitumstellungen, Reisen mit AAPS und Sport. Häufig gestellte Fragen und Antworten dazu findest Du im Abschnitt zur Fehlerbehebung.
Abschnitt 5) Remote AAPS-Funktionen stellen eine echte Stärke von AAPS dar. Es gibt eine Vielzahl von Möglichkeiten, Befehle remote an AAPS zu senden oder einfach dessen Daten zu folgen. Dies ist ebenso nützlich für Betreuende, die AAPS für Minderjährige verwenden möchten, als auch für Erwachsene mit Diabetes, die entweder ihre Glukosewerte (und andere Metriken) bequemer als nur auf ihrem Smartphone überwachen möchten (z. B. auf einer Smartwatch, im Auto usw.), oder die möchten, dass auch nahestehende Personen die Daten überwachen. Dieser Abschnitt hat auch eine Anleitung zur Nutzung von Android Auto, sodass Du die Glukosewerte auch im Auto sehen kannst.
Abschnitt 6) Wear OS Smartwatches gibt Informationen und beschreibt Vorgehensweise zum Umgang mit einer Android Wear OS Smartwatch und speziellen AAPS-Zifferblättern oder selbsterstellten Zifferblätter zur Remotesteuerung Deines Smartphones oder nur zur reinen Anzeige.
Abschnitt 7) AAPS Wartung und Pflege behandelt, wie Du Deine Einstellungen exportieren und sichern kannst (das ist besonders wichtig, für den Fall, dass Du Dein Smartphone verlierst oder es beschädigt wird), gibt die neuesten Versionshinweise und erläutert, wie Du AAPS aktualisierst. In der Regel gibt es 2-3 neue AAPS-Versionen im Jahr, die ein Update der App erforderlich machen. Diese Updates sind - wie für jede Software - wichtig, da damit kleinere Fehler ausgebügelt und Verbesserung in AAPS verfügbar werden. Es gibt einen eigenen Abschnitt, der sich mit Fehlerbehebungen rund um den Aktualisierungsvorgang und den dazu häufig gestellten Fragen beschäftigt.
Abschnitt 8) Hilfestellung bekommen soll Dir die Stellen zeigen, an denen Du Hilfe zu allgemeinen Themen rund um AAPS erhältst. Gerade am Anfang ist es wichtig, mit anderen so schnell wie möglich in Kontakt zu treten, Fragen zu klären und die üblichen Fallstricke zu lösen. Viele Menschen nutzen AAPS bereits erfolgreich, aber jeder hatte irgendwann eine Frage, die er nicht alleine lösen konnte. Das Schöne an der großen Community ist, dass die Reaktionszeiten auf Fragen in der Regel kurz (meist nur wenige Stunden) sind. Mach‘ Dir keine Sorgen, um Hilfe zu bitten, es gibt keine dummen Fragen! Wir ermutigen Benutzer*innen aller Erfahrungsstufen, so viele Fragen, wie sie für notwendig halten, zu stellen, um sie sicher ans Laufen zu kommen. Dieser Abschnitt enthält allgemeine Fehlerbehebungen für AAPS und den AAPSClient (eine Begleit-App) sowie die Erklärung, wie Du, wenn Du der Meinung bist, dass ein technisches AAPS Problem vorliegt, Deine AAPS-Daten (Protokolldateien) zur Prüfung an die Entwickler senden kannst.
Abschnitt 9) behandelt Erweiterte AAPS-Optionen wie beispielsweise mit AAPS den Übergang vom Hybrid-Closed-Looping (Bolusgabe für Mahlzeiten usw.) zum vollständigen Closed-Looping (keine Bolusgabe) hinbekommst und erläutert Entwickler- und Engineering-Modi. Die meisten kommen sehr gut mit der Haupt- oder „Master“-Version von AAPS zurecht, ohne sich mit diesen (Entwickler-)Optionen zu befassen. Dieser Abschnitt richtet sich an Benutzende, die bereits eine gute Kontrolle haben und ihre Einstellungen weiter verbessern möchten.
Im Abschnitt 10) Wie ich AAPS weiterbringen kann erklären wir wie Du das Projekt unterstützen und weiter voranbringen kannst. Du kannst Geld oder Geräte spenden oder Dein Fachwissen einbringen. Du kannst Änderungen an der Dokumentation vorschlagen oder selber machen, Du kannst bei der Übersetzung der Dokumentation unterstützen und Du kannst Deine Daten über das Open Humans Projekt zur Verfügung stellen.
Im Abschnitt 11) Ressourcen finden sich archivierte und auch zusätzliche Dokumentation, sowie ein Unterabschnitt für Mediziner und Fachpersonal, das sich für die Open-Source-Technologie der künstlichen Bauchspeicheldrüse wie AAPS interessiert und für Patienten und Patientinnen, die diese Informationen mit ihren Ärztinnen und Diabetesberaterinnen teilen möchten. Der Abschnitt enthält auch zusätzliche Referenzen und Ressourcen rund um das Thema Diabetes und Looping. Dazu gehört auch das Glossar, eine Liste der Akronyme (oder Kurzbezeichnungen), die in AAPS verwendet werden. Hier erfährst Du beispielsweise, wofür die Begriffe ISF oder TT stehen.
Du willst mit AAPS loslegen? In Einführung in APS und AAPS erfährst Du mehr über AAPS.
SAFETY NOTICE
Die Sicherheit von AAPS ist unmittelbar von den Sicherheits-Features Deiner Hardware (Smartphone, Insulinpumpe, CGM) abhängig. Nutze ausschließlich eine voll funktionsfähige FDA/CE-zugelassene Insulinpumpe und CGM (Sensor). Verwende keine defekte, veränderte oder selbstgebaute Insulinpumpe oder CGM-Empfänger. Verwende nur Originalzubehör (Setzhilfen, Katheter und Insulinreservoire), die vom Hersteller für Deine Pumpe und Dein CGM zugelassen sind. Die Verwendung von nicht getesteten oder modifizierten Verbrauchsmaterial kann zu Ungenauigkeiten und Insulindosierungsfehlern führen und stellt damit ein erhebliches Risiko für den Anwendenden dar.
Solltest Du SGLT-2-Hemmer (Gliflozine) nehmen, kannst Du AAPS aufgrund der Glukosespiegel senkenden Wirkung der Glifozine AAPS nicht nutzen. Durch den abgesenkten Glukosespiegel, riskierst Du eine diabetische Ketoazidose (DKA), da weniger Insulin abgegeben wird und Hypoglykämien auftreten können.
Disclaimer
Alle hier beschriebenen Informationen und Quellcodes dienen ausschließlich Informations- und Bildungszwecken. Du nutzt Nightscout und AAPS auf eigenes Risiko. Treffe keine medizinischen Entscheidungen auf Basis der Informationen oder des Codes. Nightscout erfüllt keinerlei Anforderungen des Datenschutzes im Gesundheitswesen.
Bei Nutzung des Quellcodes von github.com bestehen keinerlei Gewährleistungs- und Garantieansprüche. Es gibt keinen Support. Im Übrigen wird auf die Lizenz verwiesen, die im Repository abgerufen werden kann.
Sämtliche Produkt- und Herstellernamen, Handelsmarken, Dienstleistungsmarken, Warenzeichen und eingetragene Dienstleistungsmarken sind Eigentum ihrer jeweiligen Inhaber und werden nur zu Informationszwecken genutzt und nicht für Werbung oder Marketing. Ihre Verwendung dient nur zur Information und bedeutet weder, dass AAPS zu ihnen gehört, noch dass sie unterstützt werden.
AAPS steht in keinerlei Verbindung zu und wird auch nicht unterstützt von: SOOIL, Dexcom, Accu-Chek, Roche Diabetes Care, Insulet oder Medtronic.
AAPS Dokumenten-Index
1) Sprache
2) Erste Schritte
- Einführung in AAPS
- Was ist eine „künstliche Bauchspeicheldrüse” (artifical pancreas system)?
- Was bedeutet „Hybrid-Closed-Loop“?
- Wie und warum ist das Loopen begonnen worden?
- Was ist Android APS (AAPS)?
- Was sind die Grundbestandteile von AAPS?
- Welche Vorteile hat das AAPS-System?
- Besondere Vorteile sind:
- 1) Eingebaute Sicherheit
- 2) Flexibilität bei der Hardware
- 3) Hochgradig anpassbar, mit umfangreichen Parametern
- 4) Fernüberwachung
- 5) Fernbedienung
- 6) Keine kommerziellen Einschränkungen aufgrund der offenen Anwendungsschnittstellen
- 7) Detaillierte App-Oberfläche
- 8) Zugänglichkeit und Bezahlbarkeit
- 9) Support
- 10) Vorhersagbarkeit, Transparenz und Sicherheit
- 11) Zugriff auf erweiterte Funktionen durch Entwicklungsmodi (dev) einschließlich vollständigem Closed Loop
- 12) Möglichkeit, sich an weiteren Verbesserungen zu beteiligen
- Besondere Vorteile sind:
- Wie unterscheidet sich AAPS von ICT (MDI) und Open Loop?
- Wie unterscheidet sich AAPS von anderen Loop-Systemen?
- Verwendet AAPS künstliche Intelligenz oder einen Lernalgorithmus?
- Welches System ist für mich oder meinen Angehörigen das Richtige?
- Ist der Einsatz von Open-Source-Systemen wie AAPS sicher?
- Wie kann ich mit meinem Klinikteam über AAPS ins Gespräch kommen?
- F: Warum kann ich AAPS nicht einfach herunterladen und sofort nutzen?
- Was macht die Connectivity des AAPS-Systems aus?
- Wie läuft die stetige Weiterentwicklung und Verbesserung von AAPS?
- Wer kann von AAPS profitieren?
- Welche Vorteile habe ich von AAPS?
- Vorbereitung für AAPS
- Deinen Weg durch die Dokumentation finden
- Sicherheitshinweise
- Technische Sicherheit
- Medizinische Sicherheit
- Keine SGLT-2-Hemmern
- Grundprinzipien des Loopens mit AAPS
- Rechne mit Verzögerungen und kleineren Stolpersteinen auf dem Weg alles einzurichten und ans Laufen zu bekommen
- Technologie-Kompatibilität
- Zeit die App zu erstellen und zum vollständigen Loopen weiterzugehen
- Exportdatei des Keystore & der Konfigurationseinstellungen
- Problembehandlung
- Wo finde ich Hilfe?
- Abschnitt für Mediziner und Fachpersonal
- Was werden wir bauen und installieren?
- Wie lange wird es dauern, alles einzurichten?
- Voraussetzungen
- Komponentenübersicht
- - Kompatible Pumpen
- - Kompatible CGMs
- - Kompatible Smartphones
- - Kompatible Smartwatches
3) AAPS einrichten
- Einrichten des Berichtsservers
- - Nightscout
- - Tidepool
- AAPS erstellen
- - Im Browser (Browser Build)
- Kein Download möglich - APK muss selbst erstellt werden
- Computer- und Software-Anforderungen für die AAPS-Erstellung
- 1. AAPS eigener „Fork“
- 2. Vorbereitende Schritte
- AAPS-CI GitHub Aktionen, um die AAPS APK zu erstellen
- AAPS-CI Fehlerbehebung
- Wenn Du einen bestimmten Commit zu Deinem Branch hinzufügen möchtest, benutze bitte „Cherry-pick“ als Methode
- CI KeyStore Export
- - Mit Android Studio (PC)
- - Mit Kommandozeile (CLI Build)
- AAPS übertragen und installieren
- Einrichtungsassistent
- Begrüßungstext
- Lizenzvereinbarung
- Erforderliche Berechtigungen
- Master-Passwort
- Einheiten (mg/dl <-> mmol/l)
- Anzeigeeinstellungen
- Synchronisierung (u.a. mit dem Auswertungs- bzw. Berichtsserver)
- Name des Patienten
- Patiententyp
- Verwendetes Insulin
- Blutzucker-Quelle
- Profil
- Insulinpumpe
- Der APS Algorithmus
- Empfindlichkeitserkennung
- Starte das erste Ziel (Objective 1)
- AAPS neustarten, um die Einstellungen zu überprüfen
- Ändern der AAPS-Konfiguration
- - Konfiguation
- - Einstellungen
- Allgemein
- Schutz
- Übersicht
- Bildschirm aktiv lassen
- Schaltflächen
- Quick Wizard
- Vordefinierte temporäre Ziele
- Füll-/Vorfüll-Standardmengen
- Zielbereich für die Grafikanzeige
- Kurze Tab-Überschriften
- Möglichkeit zur Erfassung von Notizen in Behandlungsdialogen
- Statusanzeige
- Abgabe nur eines Teils der vom Bolus-Rechner ermittelten Insulinmenge
- Schwelllenwert für alte Glykämie
- Bolus-Berater aktivieren
- Bolus-Erinnerung aktivieren
- Erweiterte Einstellungen (Übersicht)
- Sicherheitseinstellungen der Behandlungen
- Loop
- Advanced Meal Assist (AMA) oder Super Micro Bolus (SMB)
- Resorptions-Einstellungen
- Pumpe
- Pumpen-Einstellungen
- Tidepool
- Nightscout-Client
- NSClientV3
- SMS Kommunikator
- Automatisierung
- Lokale Alarme
- Wartungseinstellungen
- Open Humans
- Abschluss der Ziele
- Einstellungen sichern
- Objective 1: Setting up visualization and monitoring, analyzing basals and ratios
- Ziel 2: Lerne, wie AAPS bedient wird
- Ziel 3: Belege Dein Wissen
- Ziel 4: Starte den Open Loop
- Ziel 5: Open Loop inklusive der temporären Basalratenvorschläge verstehen
- Ziel 6: Closed Loop mit Abschaltung bei niedrigen Glukose-Werten
- Ziel 7: Justiere den Closed Loop, erhöhe maxIOB über 0 und setze den Zielbereich langsam herunter
- Objective 8: Adjust basals and ratios if needed, and then enable Autosens
- Ziel 9: Aktiviere zusätzliche oref1 Funktionen zum täglichen Gebrauch, wie z. B. den super micro bolus (SMB)
- Ziel 10: Automatisierung
- Objective (Ziel) neu starten
4) Der Alltag mit AAPS
- AAPS-Bildschirme
- Die Startseite
- Bolus-Rechner
- Aktionen Tab
- Insulinprofil
- Status der Pumpe
- Loop, AMA / SMB
- Profil
- Automatisierung
- Nightscout-Client
- BZ-Quelle - xDrip+, BYODA…
- Behandlungen
- Historie
- Statistiken
- Profile Helper
- AAPS-Funktionen
- Loop-Modus
- Autosens
- Super Micro Bolus (SMB)
- Maximale IE/h, die als TBR gesetzt werden können
- Maximales Gesamt-IOB, das nicht überschritten werden darf [IE]
- Dynamische Empfindlichkeit aktivieren
- Nutze Autosens
- Aktiviere SMB
- Aktiviere SMB bei temporären Zielen oberhalb des regulären Ziels
- SMB immer aktivieren
- Aktiviere SMB während aktiver Kohlenhydrate.
- Aktiviere SMB bei aktiven temporären Zielen
- Aktiviere SMB nach Mahlzeiten.
- Wie häufig SMBs abgegeben werden (in Min.)
- SMB Basal-Limit in Minuten
- SMB Basal-Limit in Minuten für UAM
- Aktiviere UAM
- Minimale KH-Menge, die für einen Vorschlag erforderlich ist
- Erweiterte Einstellungen
- Erweiterter Mahlzeit-Assistent (AMA)
- Übersicht der fest programmierten Limits
- COB-Berechnung
- Wie berechnet AAPS die aktiven Kohlenhydrate?
- Faktor der Kohlenhydrat-Empfindlichkeit (Carb Sensitivity Factor)
- Kohlenhydrat-Empfindlichkeit (Carb Sensitivity) - Oref1
- Kohlenhydrat-Empfindlichkeit - Gewichteter Mittelwert
- Erkennung Fehlerhafter COB-Werte
- Manuelle Korrektur der eingegebenen Kohlenhydrate
- Kohlenhydrate korrigieren - wie KH-Einträge aus den Behandlungen gelöscht werden
- Empfindlichkeitserkennung
- Profilwechsel & prozentuale Profilanpassung
- Wie aktiviert man einen Profilwechsel?
- Wie aktiviert man einen Profilwechsel?
- Um eine prozentuale Profilanpassung mit dem Profilwechsels zu aktivieren:
- Prozentsatz des Profils
- Zeitliche Verschiebung des prozentual angepassten zirkadianen Profils
- Speichere den Profilwechsel, falls Du ihn später nutzen willst
- Temporäre Ziele
- Was sind temporäre Ziele und wie nutzt und richtet man sie ein?
- Wo kann ich ein Temporäres Ziel auswählen und setzen?
- Wo kann ich die vorgegebenen temporären Ziele ändern und mit meinen eigenen Einstellungen überschreiben?
- Wie kann ich ein temporäres Ziel abbrechen?
- Wie wähle ich ein „vordefiniertes temporäres Ziel“ aus
- Temporäres Ziel für Hypos
- Aktivitäten Temp-Target
- Temporäres Ziel für „Bald essen“
- Wie kann ich SMB während eines Temp-Targets deaktivieren?
- Verzögerte Kohlenhydrate
- Automatisierung
- Was ist eine Automatisierung?
- Wie Automatisierung helfen kann
- Wichtige Vorüberlegungen, bevor mit Automatisierung gestartet wird
- Wann kann ich mit Automatisierungen beginnen?
- Wo finden sich die Automatisierungen in AAPS?
- Wie kann ich eine Automatisierung einrichten?
- Sicherheitsbeschränkungen
- Negative Werte richtig nutzen
- Automatisierungsauslöser
- Aktion
- Die Reihenfolge innerhalb der Liste der Automatisierungen ist entscheidend
- Löschen von Automatisierungsregeln
- Beispiele für Automatisierungen
- Automatischer Export der Einstellungen
- Automatisierungsprotokolle (Logs)
- Problembehandlung
- Problembehandlung
- Alternativen zu einer Automatisierung
- Dynamischer ISF (DynISF)
- AAPS für Kinder
- Pumpen und Kanülen
- Über Zeitzonen hinweg reisen & Sommerzeit-Umstellung
- Mit der Pumpe über Zeitzonen hinweg reisen
- Zeitzonenwechsel mit Omnipod-Dash
- Zeitzonenwechsel mit DanaR, koreanische DanaR
- Zeitzonenwechsel mit DanaRv2, DanaRS
- Zeitzonenwechsel mit Insight
- Zeitzonenwechsel mit Accu-Chek Combo
- Zeitzonenänderung für Medtrum
- Zeitumstellung (Sommer-/Winterzeit)
5) AAPS Remote-Funktionen
- Remote überwachen
- Remote steuern
- SMS-Befehle
- Sicherheitshinweise
- SMS-Kommandos einrichten
- SMS-Befehle verwenden
- Kommandos
- Problembehebung und FAQ
- Was kann mit SMS-Befehlen nicht gemacht werden?
- Was passiert, wenn ich es mir nach dem Senden eines Befehls anders überlege?
- Warum habe ich keine Antwort auf einen SMS-Befehl erhalten?
- Keinerlei Reaktion auf SMS-Befehle
- Fehler beim Ausführen der Befehle
- Wie kann ich einen Befehl stoppen, nachdem er bereits authentifiziert wurde?
- Mehrfach-SMS
- Ich bekomme von SMS-Befehlen zu viele SMS-Nachrichten. Kann ich die Häufigkeit reduzieren oder stoppen?
- AAPS nur folgen
- Smartphone Apps
- Smartwatches zur AAPS-Überwachung (vollständige Profilinformationen oder nur Glukosewerte), wobei AAPS auf einem Smartphone läuft.
- Geräte, um AAPS zu folgen
- Android Auto
6) Wear OS Smartwatches
- AAPS für Wear OS
- Smartwatch nutzen
- Wear OS-Versionen und Kompatibilität
- Wie man eine Samsung Galaxy 4 Smartwatch mit AAPS einrichtet
- Mit der Smartwatch vertraut machen
- Samsung-Konto einrichten
- Übertragen der AAPS Wear-App auf Dein AAPS-Smartphone
- Die Verbindung zwischen der Smartwatch und Smartphone aus AAPS heraus einrichten
- Wechsel zu einem AAPS-Zifferblatt auf Deiner WearOS-Smartwatch
- AAPSv2 Watchface - Legende
- Remote steuern
- AAPS Watchfaces
- Konfiguration
- Zugriff auf das Hauptmenü von AAPS
- Einstellungen (in der Watch-App)
- Komplikationen
- Wear OS Kacheln
- Wie man Kacheln hinzufügt
- Always-on
- Schlummeralarm verknüpfen
- Tipps zur Performance und zur Akku-Laufzeit
- Fehlerbehebung der Smartwatch App:
- Es gibt weitere benutzerdefinierte AAPS Watchfaces
- Erstelle Deine eigenen Zifferblätter (engl. watchfaces)
- Eigene Zifferblätter - Referenzdokument
- „Custom Watchface“-Format
- JSON-Struktur
- Wie Du Dein erstes Zifferblatt entwirfst/erstellst
- Erweiterte Funktionen
- Key und KeyValue Referenz
- Austausch-Plattform für eigene Zifferblätter
7) AAPS pflegen
- Deine Daten prüfen
- AAPS Release Notes
- Android Version und AAPS Version
- Wear OS-Version
- Version 3.4.2.3
- Version 3.4.2.2
- Version 3.4.2.1
- Version 3.4.2.0
- Version 3.4.1.0
- Version 3.4.0.0
- Version 3.3.2.1
- Version 3.3.2.0
- Version 3.3.1.3
- Version 3.3.1.2
- Version 3.3.1.0
- Version 3.3.0.0
- Version 3.2.0.4
- Version 3.2.0.0 ist @Philoul gewidmet
- Version 3.1.0
- Version 3.0.0
- Version 2.8.2
- Version 2.8.1.1
- Version 2.8.0
- Version 2.7.0
- Version 2.6.1.4
- Version 2.6.1.3
- Version 2.6.1.2
- Version 2.6.1.1
- Version 2.6.1
- Version 2.6.0
- Version 2.5.1
- Version 2.5.0
- Version 2.3
- Version 2.2.2
- Version 2.2
- Version 2.1
- Version 2.0
- Version 1.0
- - Browser-Update
- - Android Studio-Update
8) Hilfe
- Allgemeine Fehlerbehebung
- Anleitung zum Profil-Tuning
- Fehlersuche Android Studio
- Verlorener Keystore
- Gradle Sync schlägt fehl
- Generate Signed APK generated successfully with 0 build variants
- App was created with compiler/kotlin warnings
- AAPS empfängt keine CGM-Daten
- APK not installed / Installation fehlgeschlagen
- APK installiert, aber weiter die alte Version auf dem Smartphone
- Keiner der oben genannten Löungsvorschläge funktioniert
- Worst case scenario
- Zugriff auf Logdateien
9) Erweiterte AAPS-Optionen
- Full Closed Loop
- Was erwartet mich?
- Generelle Überlegungen, warum (nicht) von Hybrid zu Full Closed Loop gewechselt werden sollte
- Gut eingestellter Hybrid Closed Loop
- Schnelles Insulin (Lyumjev, Fiasp)
- Voraussetzungen
- Mahlzeitbezogene Einschränkungen
- Vorbereitung auf Aktivität/Sport
- Hindernisse für Kinder
- Aktivierung stärkerer SMBs: Sicherheit
- Mahlzeiterkennung / Deine Automationen zum Boosten
- Einer Hypo vorbeugen
- Problembehandlung
- Entwicklerversion (Dev-Branch)
- Autotune
10) Das AAPS-Projekt unterstützen
- Wie ich helfen kann
- AAPS lebt ausschließlich von ehrenamtlichem Einsatz und hat keine bezahlten Mitarbeiter.
- Ich kann programmieren! Wie kann ich mich beteiligen?
- Ich kenne mich aus mit dem System und möchte bei den Docs mitschreiben!
- Ich spreche mehrere Sprachen und würde gerne bei der Übersetzung der App bzw. des Wikis helfen
- Gibt es weitere Möglichkeiten, zu helfen?
- Stand der Übersetzung
- Open Humans Uploader
11) Ressources
- Glossar
- FAQ
- Allgemein
- Der APS Algorithmus
- Andere Einstellungen
- Häufige Fragen auf Discord und ihre Antworten…
- Mein Problem ist hier nicht aufgeführt.
- Mein Problem ist hier nicht aufgeführt, aber ich habe die Lösung gefunden
- AAPS stoppt jeden Tag ungefähr zur gleichen Zeit.
- Wie kann ich meine Backups organisieren?
- Ich habe Probleme und/oder Fehler beim Erstellen der App.
- Ich stecke bei einem Ziel fest und brauche Hilfe.
- Wie kann ich das Passwort in AAPS v2.8.x zurücksetzen?
- Wie kann ich das Passwort in AAPS v3.x zurücksetzen?
- Mein Link/Pumpe/Pod reagiert nicht (RL/OL/EmaLink…)
- Fehler beim App erstellen: Dateiname zu lang
- Alarm: Entwickler-Version. Closed Loop ist nicht verfügbar.
- Wo finde ich die Einstellungsdateien?
- Wie konfiguriere ich die Akkuoptimierung?
- Alarm Pumpe nicht erreichbar mehrmals am Tag oder in der Nacht.
- Wo kann ich Behandlungen in AAPS v3 löschen?
- AAPSClient Remote App konfigurieren und nutzen
- Ich sehe ein rotes Dreieck / AAPS schließt den Loop nicht / Loop bleibt in LGS / Ich sehe ein gelbes Dreieck
- Kann ich einen laufenden DASH Pod auf eine andere Hardware umziehen?
- Schritte, die ich hierbei mache:
- Wie importiere ich Einstellungen aus früheren AAPS-Versionen in AAPS v3?
- Allgemeine Diabetes und Looping-Informationen
- Separates Google-Konto für AAPS (optional)
- Wie Du ein dediziertes Google-Konto für AAPS einrichtest
- Gehe zu https://account.google.com
- Gib die Details zu Deinem NEUEN dedizierten Konto ein:
- Gib Deine persönlichen Daten ein:
- Wähle Deine NEUE E-Mail-Adresse & Passwort
- Gib eine Telefonnummer ein, mit der Du SMS-Verifizierungen empfangen kannst
- Gib die Wiederherstellungs-E-Mail-Adresse ein
- Einrichtung Deines Kontos abschließen
- Passe die Anzeige des neuen Profils an
- Öffne die Gmail-Website in beiden Fenstern, um das neue Konto zu konfigurieren
- Öffne die Einstellungen des neuen Gmail-Kontos (unteres Fenster)…
- Weiterleitung einrichten…
- Bestätige die E-Mail-Adresse für Weiterleitungen
- Archiviere weitergeleitete E-Mails im neuen dedizierten Gmail-Konto (unteres Fenster)
- Wie Du ein dediziertes Google-Konto für AAPS einrichtest
- Für Mediziner und Fachpersonal (veraltet)
- Die Schritte zum Aufbau eines DIY Closed Loop
- Wie ein DIY Closed Loop funktioniert
- Wie Daten gesammelt werden
- Woher weiß es, was es zu tun hat?
- Beispiele für die Entscheidungsfindung des AAPS-Algorithmus
- Hier einige Beispiele für die Vorhersagelinien und wie sie sich unterscheiden können:
- Die folgenden Beispiele zeigen verschiedene Zeiträume und wie sie die Insulingabe beeinflussen:
- Szenario 1 - ZeroTemp aus Sicherheitsgründen I
- Szenario 2 - ZeroTemp aus Sicherheitsgründen II
- Szenario 3 - erhöhter Insulinbedarf
- Szenario 4 - Reduktion der Insulingabe aus Sicherheitsgründen
- Optimierung von Einstellungen und Änderungen
- OpenAPS
- Zusammenfassung