AAPS 浏览器构建指南
GitHub Actions 构建流程
为什么 3.3.2.1 是“强制底线”?
自行构建而非下载
由于医疗器械相关法规的限制,AAPS应用(一个apk文件)无法提供下载。 构建该应用供自己使用是合法的,但不得将副本提供给他人
详情请参阅常见问题页面。
构建 AAPS 的设备与软件规范
我们推荐使用 Android 设备。 你也可以使用电脑或 iOS 设备。
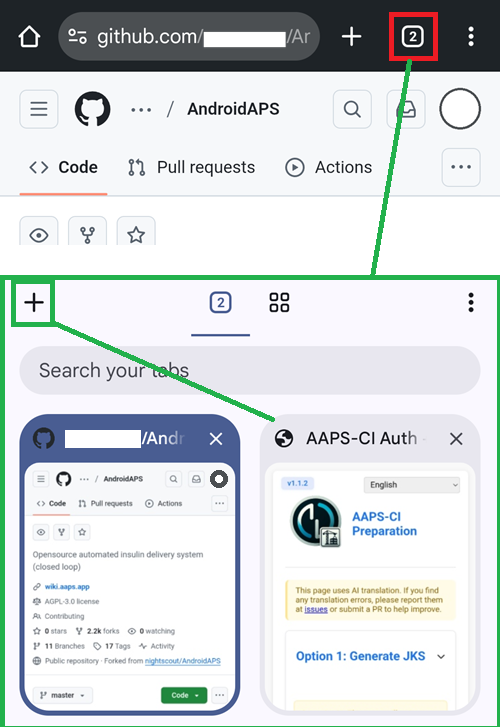
你需要在浏览器中打开多个标签页,并频繁地在它们之间切换。 例如使用 Chrome 浏览器:
你还需要一个 Google 账号,以便将生成的应用程序保存到你的 Google 云端硬盘(Google Drive)中。
备注
本维基指南假设你正通过手机和 Chrome 浏览器执行所有操作。
你需要在不同的标签页之间来回切换:建议在开始前关闭所有已打开的标签页,以防在切换过程中迷失操作步骤。
1. AAPS 个人分叉 (AAPS personal fork)
你需要将你的个人 Android Java 密钥(Key)和 Google Drive 信息秘密地存储在 GitHub 中(稍后我们将解释具体操作方法)。
由于这些操作无法在 AndroidAPS 的公共仓库中进行,因此你需要创建一份属于你个人的源代码副本(这被称为“分叉”或 Fork)。
GitHub 账号
如果你还没有 GitHub 账号,你需要创建一个 GitHub 账号。 你可以使用电子邮件注册,也可以通过 Google 账号进行关联注册。 请按照注册和验证流程进行操作。
完成账号注册后,登录 GitHub。
分叉 (Fork) AndroidAPS
点击此链接打开 AndroidAPS 官方仓库。
点击“Fork”图标。 这将在你自己的账户中创建一份副本。

向下滚动下一个页面,点击“Create Fork”。
如果你想要构建开发版本(Developers versions)或进行自定义开发,你可以[取消勾选]“Copy the main branch only(仅复制主分支)”。

备注
以下是该段内容的原文翻译:
你无法执行 Fork 并且看到了这个提示?
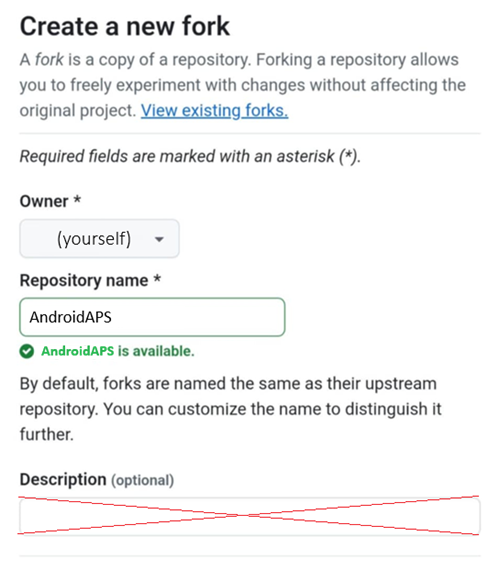
创建新的分叉 (Create a new fork)
分叉 (Fork) 是仓库的一份副本。 分叉(Forking)一个仓库可以让你自由地实验各种更改,而不会影响到原始项目。 查看现有的分叉(View existing forks)。 “必填项均标有星号 ()”
“没有可用于分叉此仓库的目标。” 这意味着你已经拥有一个现有的 AndroidAPS 分叉(Fork)。 请确保它是最新的,然后继续执行“准备步骤(Preparation Steps)”。
警告
绝不要在未备份 Secret(私密变量)的情况下删除你的分叉(Fork)!
以下是该段内容的原文翻译: GitHub 现在显示的是你个人的 AndroidAPS 副本。 请保持此浏览器标签页处于打开状态。

2. 准备步骤
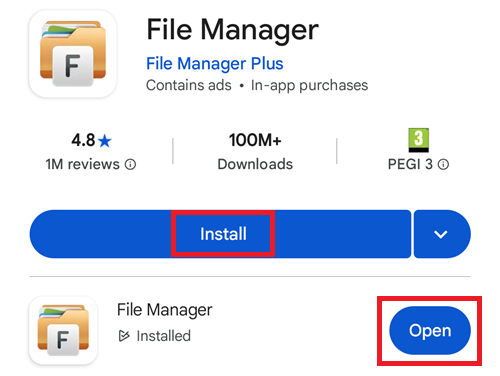
如果你正在使用 Android 设备进行构建,请从 Google Play 商店安装 “File Manager Plus”(文件管理器 +)。
File Manager Plus
Install File Manager Plus from the Google Play store.
The app is necessary for the preliminary phase and you can safely delete it from your phone once you’ve successfully build and installed AAPS.
Check this is the correct app and tap Install, then Open.
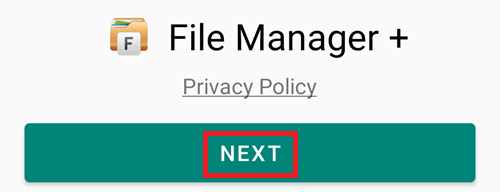
Tap Next to accept the Privacy Policy.
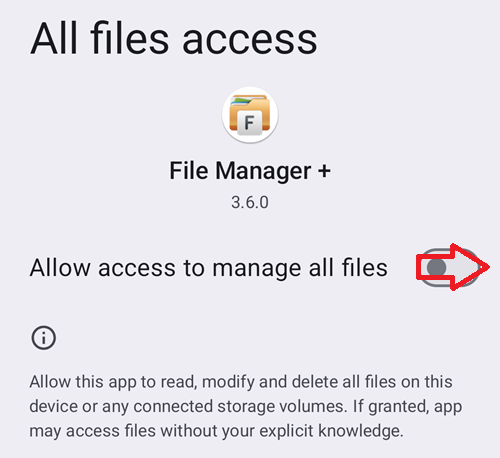
Tap Next to allow the app to access the phone files.

Switch to enable access to all files.
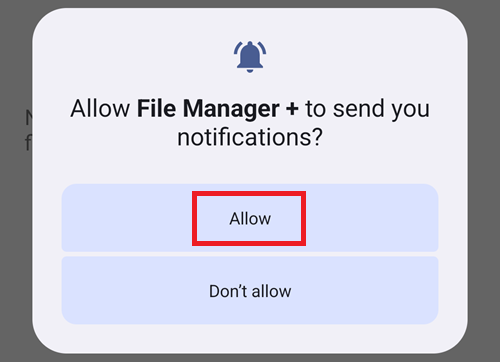
Allow File Manager + notifications.
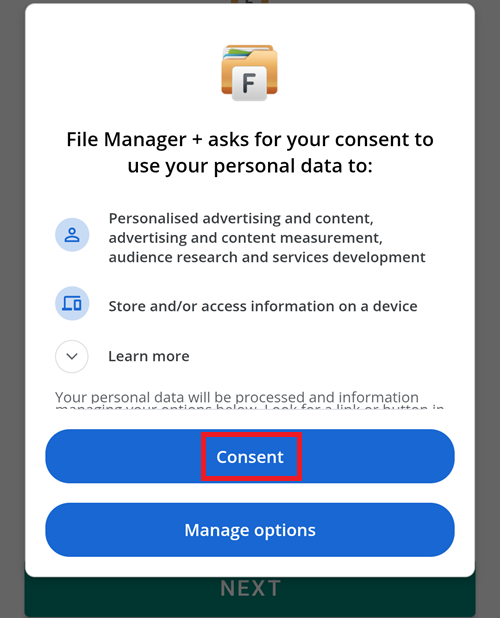
Consent to profiling.
从此处下载准备文件:aaps-ci-preparation.html
Note
如果你是从某个 App 内部(通过内置网页视图 Web View)打开此页面,HTML 文件可能无法正常下载。 请复制该 URL 并在浏览器(如 Chrome)中打开:
https://github.com/nightscout/aaps-ci-preparation/releases/download/release-v1.1.2/aaps-ci-preparation.html
或者访问最新的发布版本页面:
https://github.com/nightscout/aaps-ci-preparation/releases/latest
2.托管在本站的备份副本: —— 如果外部链接也无法访问,你可以使用此备份文件进行下载。
aaps-ci-preparation.htmlAndroidAPS 的构建需要私钥(Private keys),这些私钥存储在一个 Java 密钥库(Java KeyStore,简称 JKS)中:
If this is your first time building AAPS (or you don’t have a an Android Studio JKS), follow AAPS-CI Option 1 – Generate JKS to complete the setup.
警告
使用 选项 1 (Option 1) 构建 AAPS 将无法直接升级你现有的 AAPS。 你需要: Export settings on your phone. 2. 将设置文件从手机复制或上传到外部位置(例如:你的电脑、云存储服务等)。 3. 按照“选项 1”所述的方法,生成一个新版本的已签名 APK,并将其传输到你的手机上。 4. 在您的手机上卸载之前的 AAPS 版本。 5. 在您的手机上安装新的 AAPS 版本。 6. 导入设置以恢复你的任务进度(Objectives)和配置信息 7. 从 Nightscout 恢复你的数据。
If you want to use your own JKS (the one you used on a previous build of AAPS from a computer in Android Studio), you know its password and alias (key0), please choose AAPS-CI Option 2 – Upload Existing JKS.
AAPS 应用程序(App)构建完成后,将自动保存到您的 Google 云端硬盘(Google Drive)中。
AAPS-CI 选项 1 – 生成 JKS (Generate JKS)
Suitable for first-time users, or those without a JKS, or who have forgotten the password or alias.
Here are examples using multiple platforms below.
Select your platform in the list below, between Android (preferred choice), iOS or Computer.
Compatible with Android (The simplest, recommended as the first choice)
Open the CI preparation help file
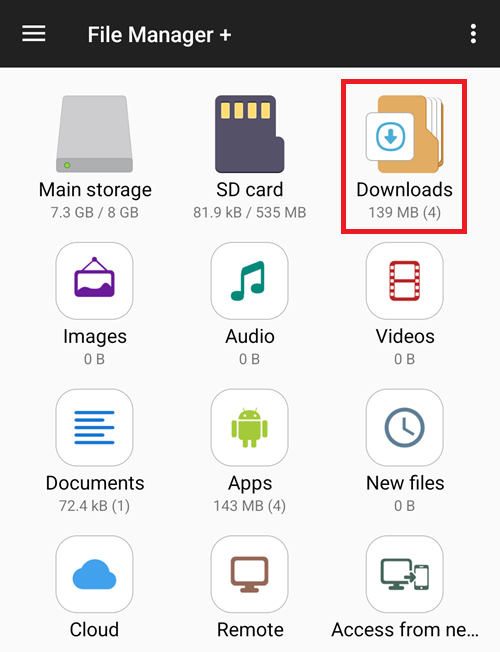
With File Manager+, open the file aaps-ci-preparation-html you downloaded above.
Select Downloads.
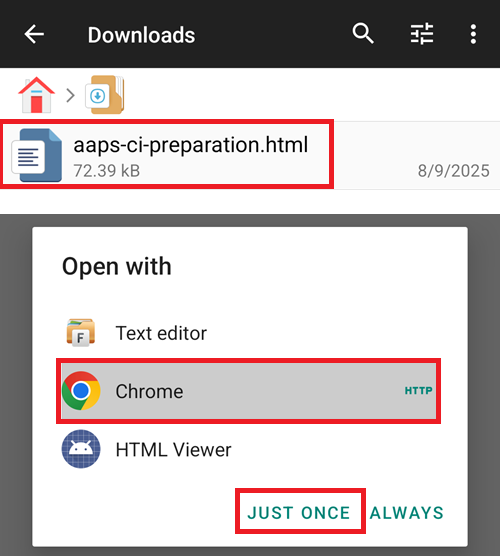
And search for this file, tap it to open it, open it with Chrome, tap Just once.
It will open like this.
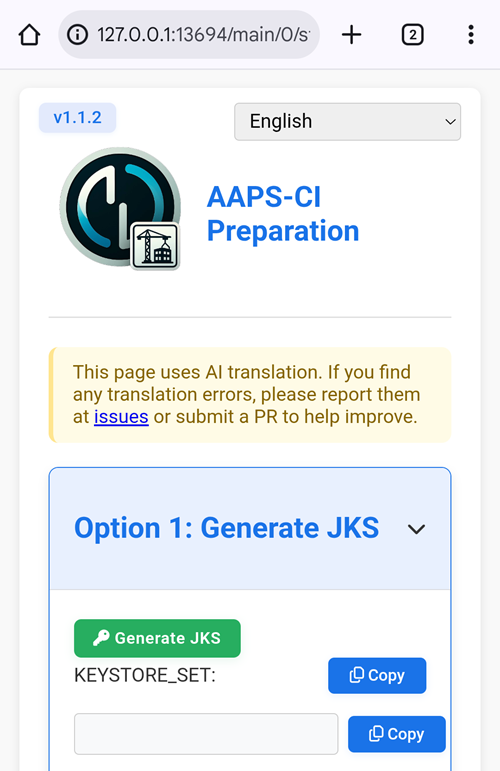
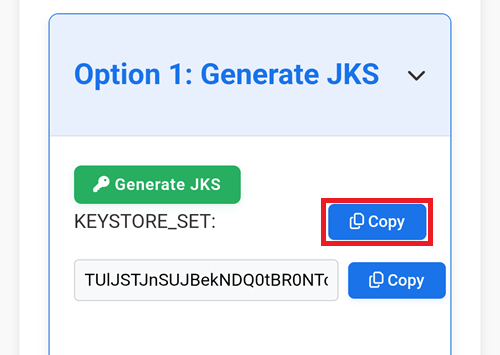
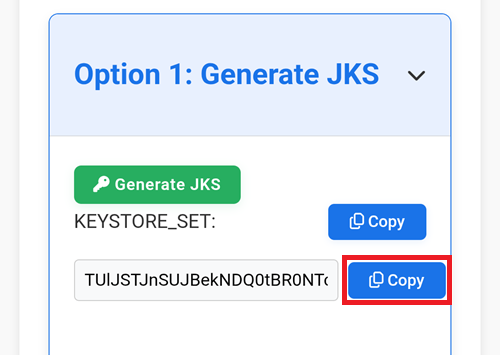
Select Generate JKS. The field below will populate with characters.
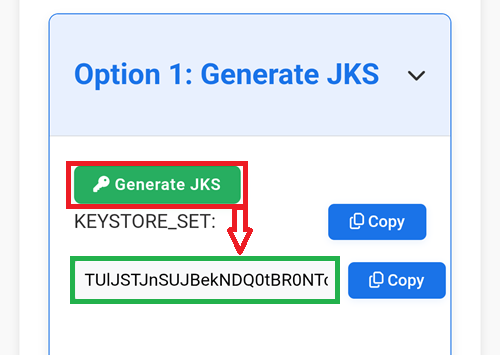
Keep this tab open.
Create a new secret in GitHub
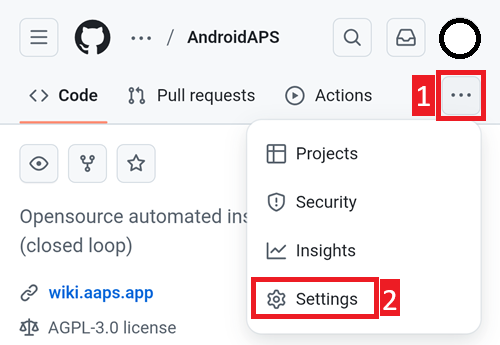
Return to your GitHub browser tab: your own AndroidAPS copy.
Top right, tap the
...buttonSelect Settings in the list
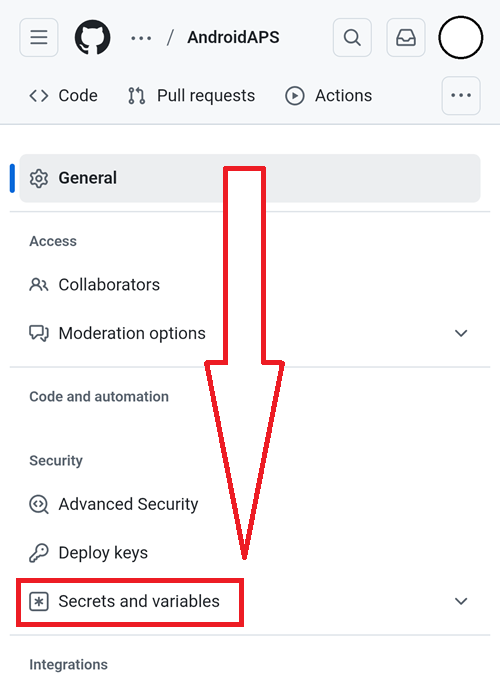
Scroll down to Security and select Secrets and variables.
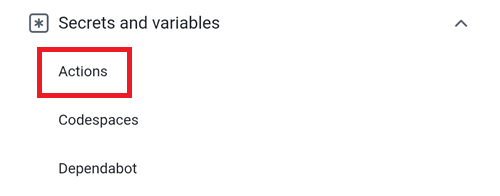
Now select Actions
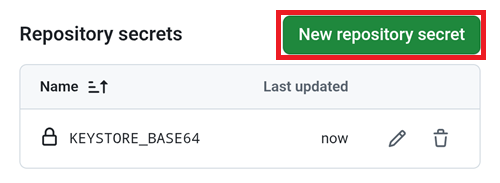
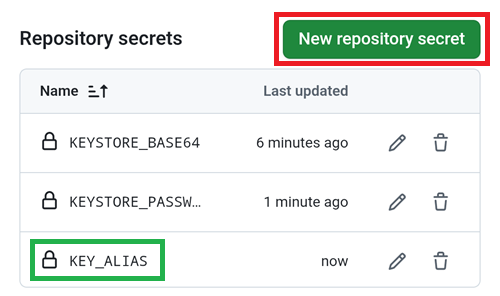
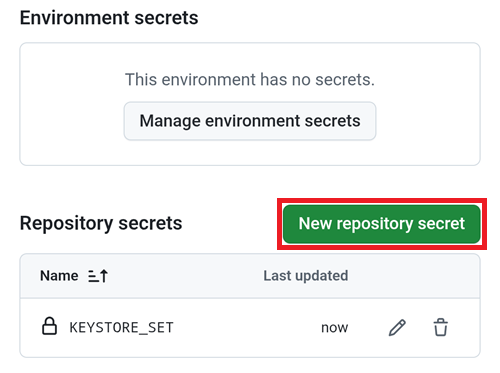
Scroll down to Repository secrets and tap New repository secret
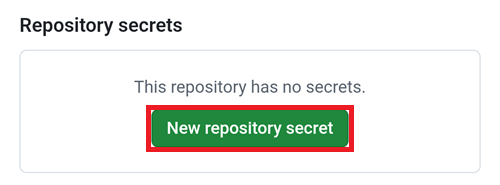
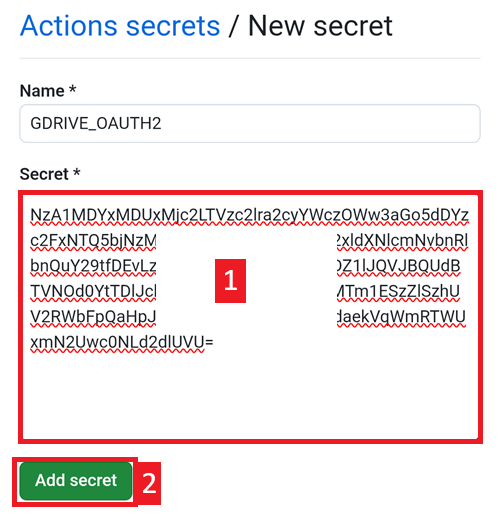
You will see this dialog (scroll down if it’s not visible).
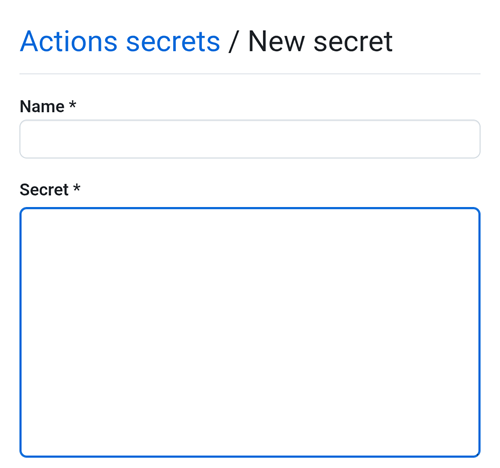
Leave the tab opened like this.
Switch to the File Explorer Plus tab.
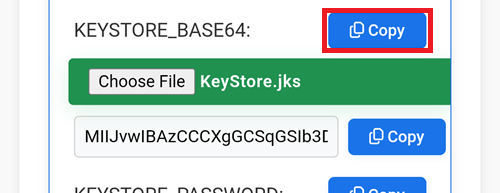
Tap the top Copy button.
Switch back to the GitHub tab.
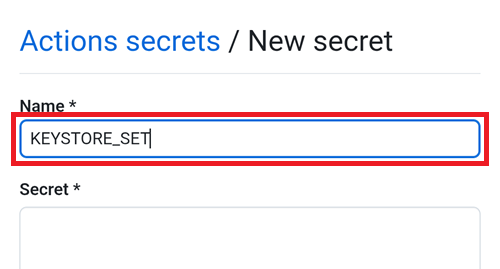
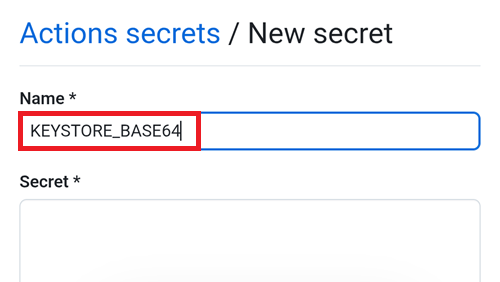
In the Name field, paste the text you just copied. Use a long touch on the text box to show the paste menu.
Switch to the File Explorer Plus tab.
Tap the second Copy button.
Switch back to the GitHub tab.
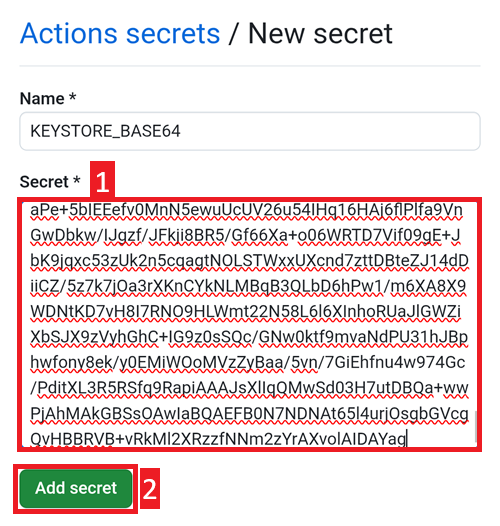
In the Secret field, paste the text you just copied. Use a long touch on the text box to show the paste menu.
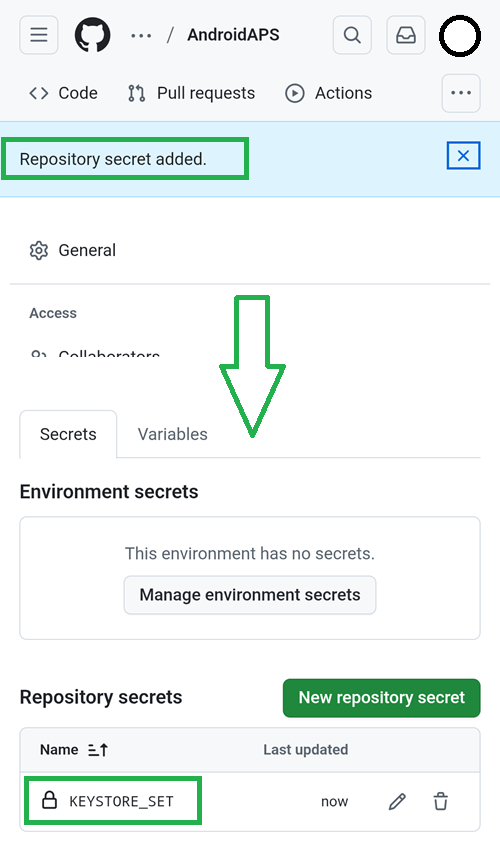
Tap Add secret.

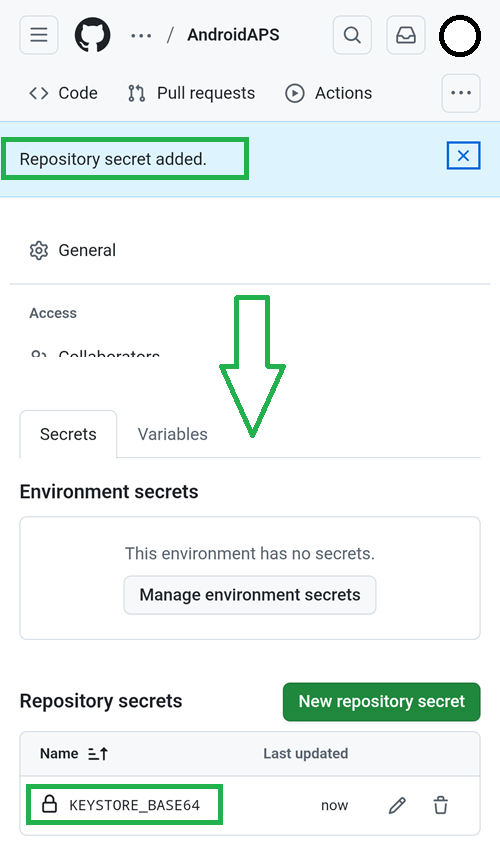
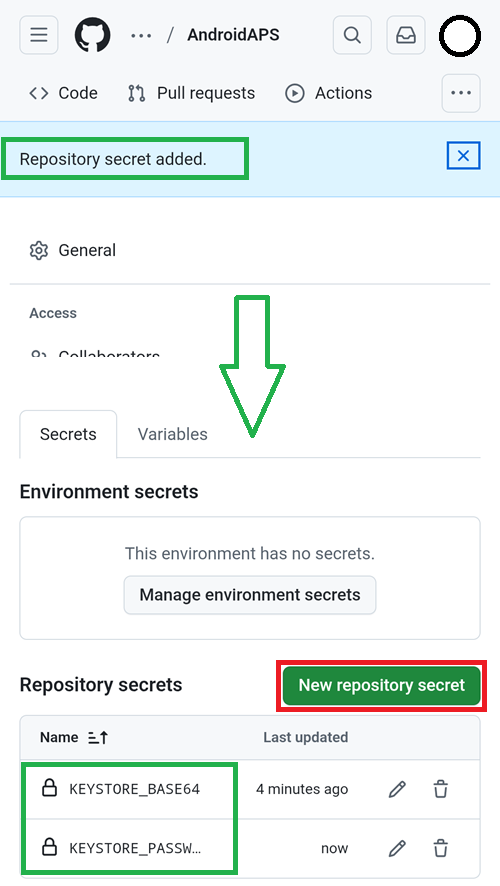
Check the secret has been added, scroll down to verify.
Compatible with iOS (using iPad as an example)
Use a computer (supports Windows/Mac/Linux)
Open the webpage https://simplewebserver.org/download.html
Install Simple HTTP Server If you are a Windows/Mac user, you can install it from the store. After clicking the link, you will be asked whether to allow opening it. Please choose Open Link. 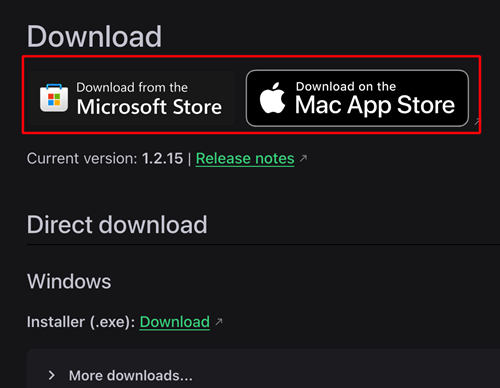
Example on Mac:
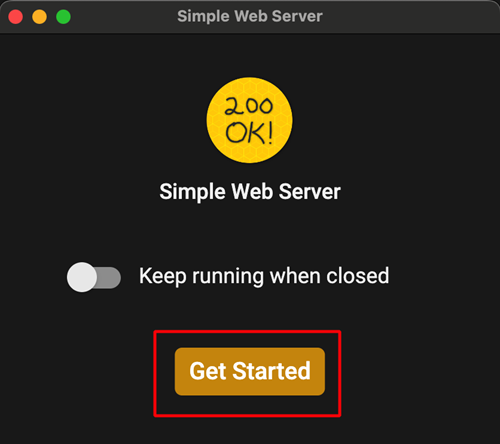
get → install → open
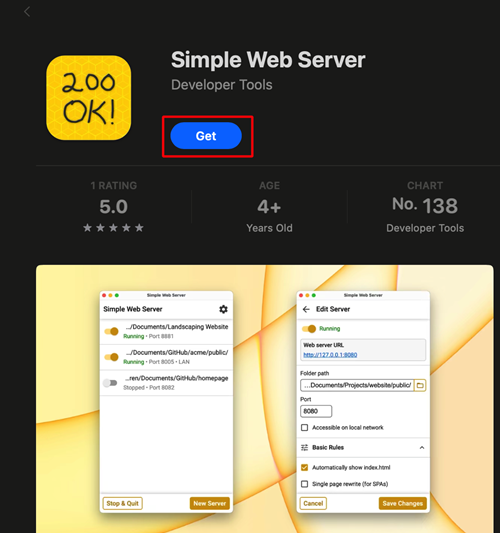
Click Get Started
Click Get Server
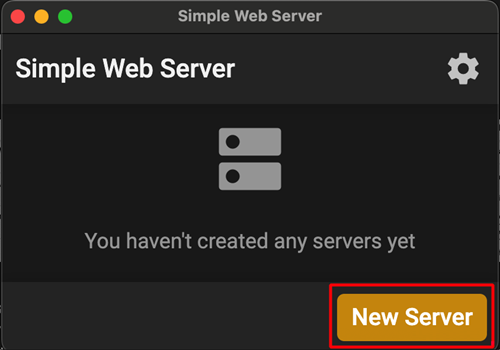
In Folder Path, select the folder where aaps-ci-preparation.html is located, and then click Create Server.

Seeing this screen means the server has been started.
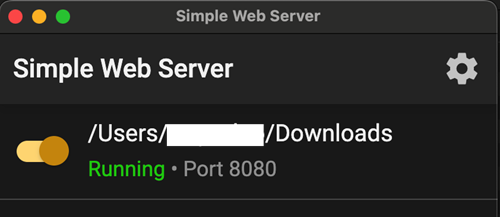
Do not close Simple HTTP Server. Please switch to your browser and open http://127.0.0.1:8080/aaps-ci-preparation.html
For the subsequent steps, please refer to the video below, starting from 1 minute 37 seconds.
Skip the next section and continue here.
AAPS-CI Option 2 – Upload Existing JKS
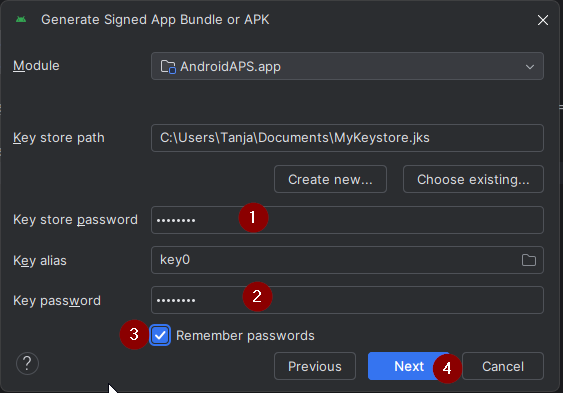
Suitable for users who already have a JKS and know the JKS password and alias (For
KEYSTORE_PASSWORD,KEY_ALIAS, andKEY_PASSWORD, enter your actual password and alias in GitHub - those from Android Studio, see below where you used them.)
KEY + PASSWORDS
Here are examples using multiple platforms below.
Select your platform in the list below, between Android (preferred choice) or Computer.
Compatible with Android (The simplest, recommended as the first choice)
Copy your Android Studio key in your Google Cloud drive.
On your computer, search for the keystore file you used to build AAPS. It is named with the extension .jks.
Drag it into your Google Drive, either inside the browser or your mapped Google Drive.

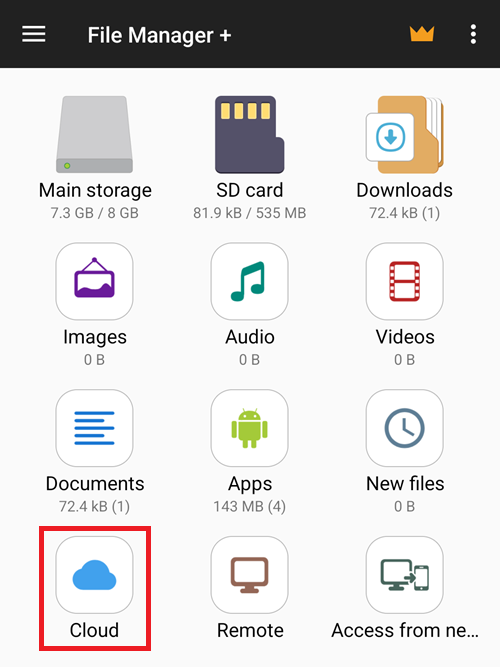
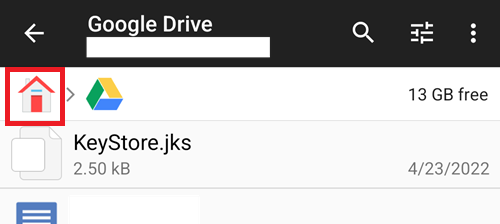
Open File Manager Plus and select Cloud.
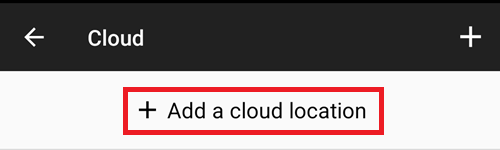
Add a Cloud location.
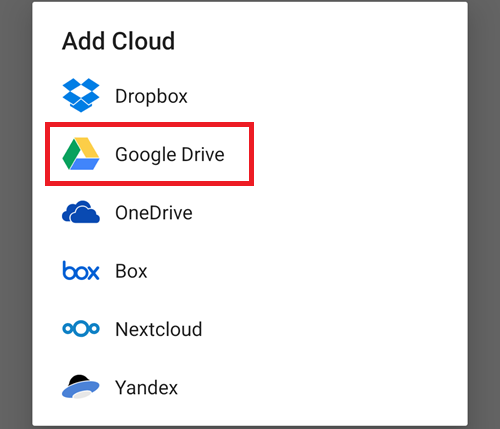
Choose Google Drive.
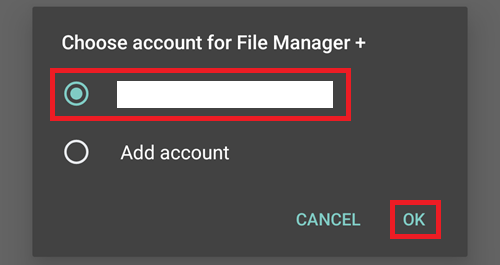
Select your Google Drive account email. Tap OK.
Your Google Cloud drive should display its contents. Now return to the app home page.
Open the CI preparation help file
Open the file aaps-ci-preparation-html you downloaded above.
Select Downloads.
And search for this file, tap it to open it, open it with Chrome, tap Just once.
It will open like this.
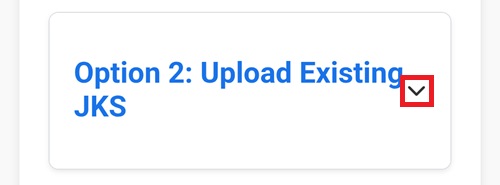
Scroll down to Option 2: Upload Existing JKS. Expand the interface.
Select Choose File.
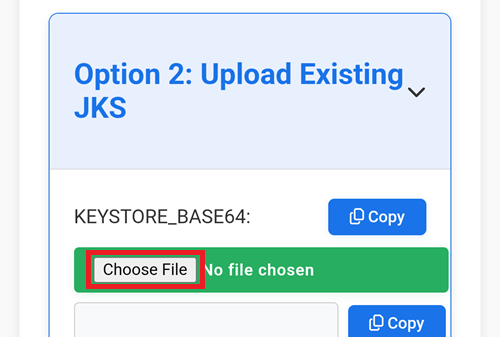
Pick your KeyStore file from your Google Drive files.

The field below will populate.
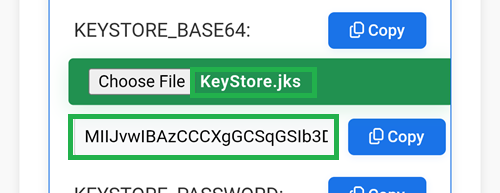
Keep this tab open.
Create a new secret in GitHub
Return to your GitHub browser tab: your own AndroidAPS copy.
Top right, tap the
...buttonSelect Settings in the list
Scroll down to Security and select Secrets and variables.
Now select Actions
Scroll down to Repository secrets and tap New repository secret
You will see this dialog (scroll down if it’s not visible).
Leave the tab opened like this.
Switch to the File Explorer Plus tab.
Tap the top Copy button.
Switch back to the GitHub tab.
In the Name field, paste the text you just copied. Use a long touch on the text box to show the paste menu.
Switch to the File Explorer Plus tab.
Tap the second Copy button.

Switch back to the GitHub tab.
In the Secret field, paste the text you just copied. Use a long touch on the text box to show the paste menu.
Tap Add secret.
Check the secret has been added, scroll down to verify.
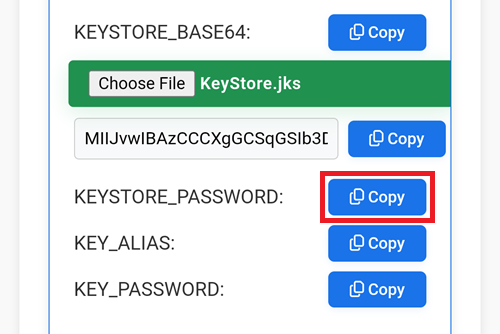
Add a new secret: tap the New repository secret button.
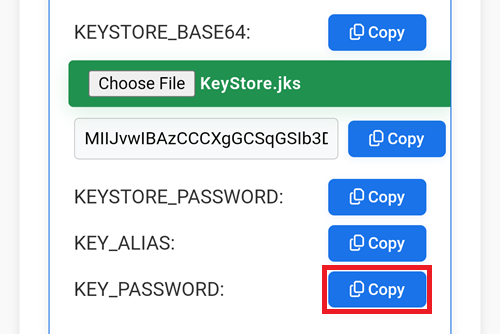
Switch to the File Explorer Plus tab.
Tap the top Copy button to copy KEYSTORE_PASSWORD.
Note: if you’re comfortable with typing the key names directly in GitHub you don’t need to Copy/Paste. If you’re not sure you will type exactly the same key name, continue like this. Note that you shouldn’t leave : at the end of the key name.
Switch back to the GitHub tab.
Paste the new key name.
In the Secret entry, put your KeyStore password (don’t leave it empty).
Tap Add secret.

Check the secret has been added, scroll down to verify.
Tap the New repository secret button shown above.
Switch to the File Explorer Plus tab.
Tap the top Copy button to copy KEYSTORE_ALIAS.
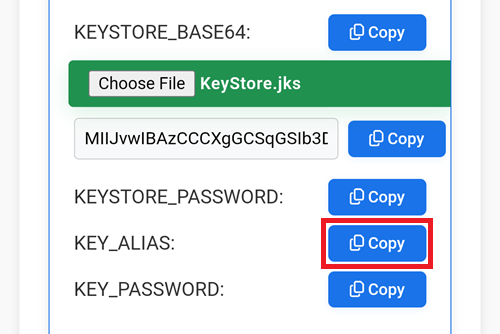
Switch back to the GitHub tab.
Paste the new key name.
In the Secret entry, put your KeyStore Alias (usually it’s
key0, lowercase with the number zero, not the letter O). Don’t let Android autocorrect it.Tap Add secret.
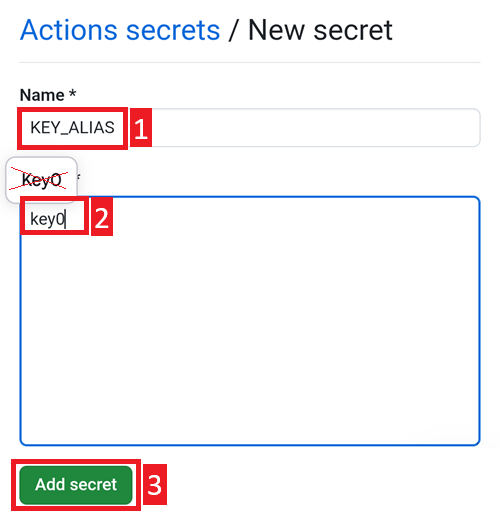
Check the secret has been added, scroll down to verify.
Tap the New repository secret button shown above.
Switch to the File Explorer Plus tab.
Tap the top Copy button to copy KEY_PASSWORD.
Switch back to the GitHub tab.
Paste the new key name.
In the Secret entry, put your Key password (don’t leave it empty). It is usually the same than your KeyStore password.
Tap Add secret.
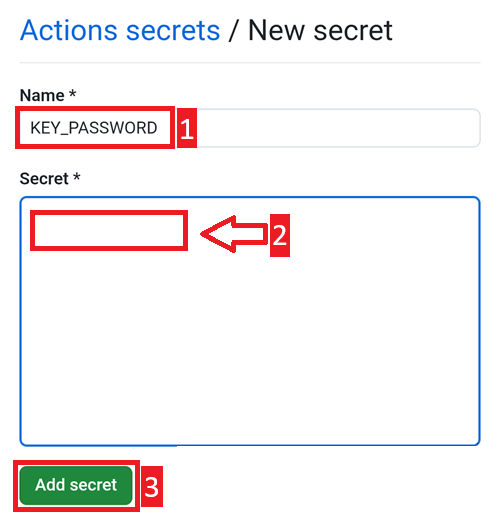
Check the secret has been added, scroll down to verify.
Use a computer (supports Windows/Mac/Linux)
Install Simple HTTP Server If you are a Windows/Mac user, you can install it from the store. After clicking the link, you will be asked whether to allow opening it. Please choose Open Link.
Example on Mac:
get → install → open
Click Get Started
Click Get Server
In Folder Path, select the folder where aaps-ci-preparation.html is located, and then click Create Server.
Seeing this screen means the server has been started.
Do not close Simple HTTP Server. Please switch to your browser and open http://127.0.0.1:8080/aaps-ci-preparation.html
For the subsequent steps, please refer to the video below, starting from 2 minute 18 seconds.
AAPS-CI Google Drive Auth
警告
No matter which of the prior sets of instructions you followed (option 1 or option 2), you MUST add the Google Drive authorization to successfully use the Browser Build.
Note: If you already followed this part in the video, you can now skip to here.
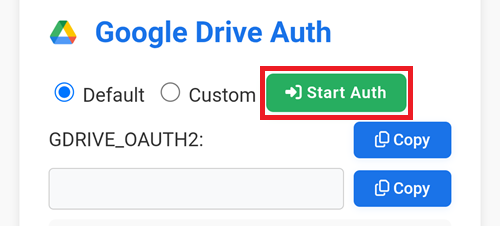
Return to the File Explorer Plus tab.
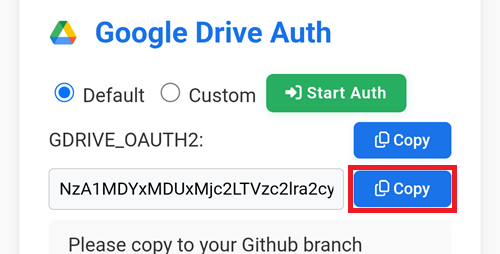
Scroll down to the Google Drive Auth section and tap Start Auth.
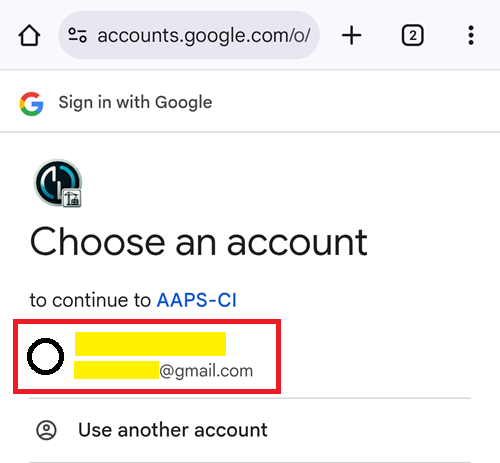
Select your Google account.
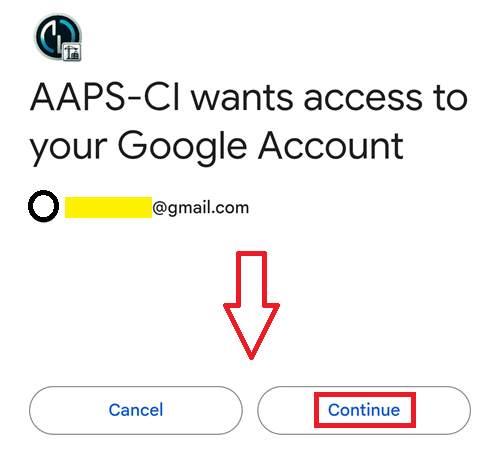
Scroll down and accept the access. The web page needs it to obtain the Google Drive authentication key.
Tap Continue.
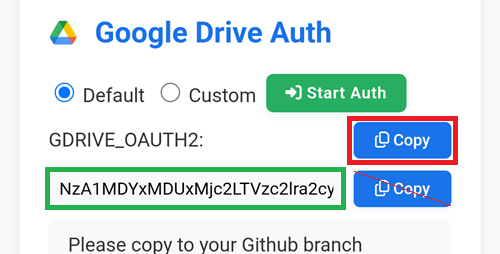
The GDRIVE_OAUTH2 field will populate, tap the top Copy button.
Switch back to the GitHub tab.
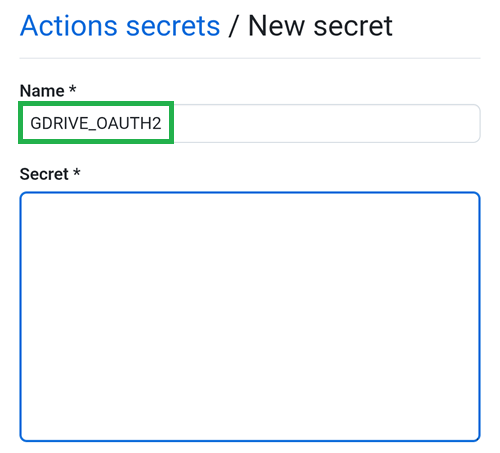
Scroll down to Repository secrets and tap New repository secret.
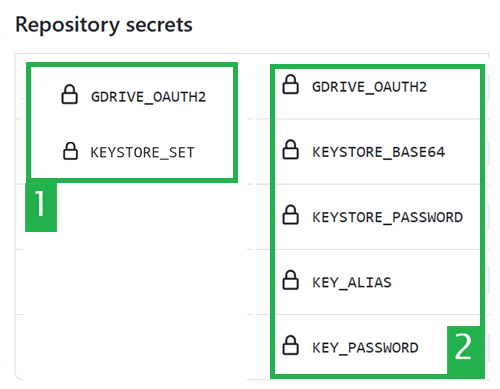
If you followed Option 1 you should see this:
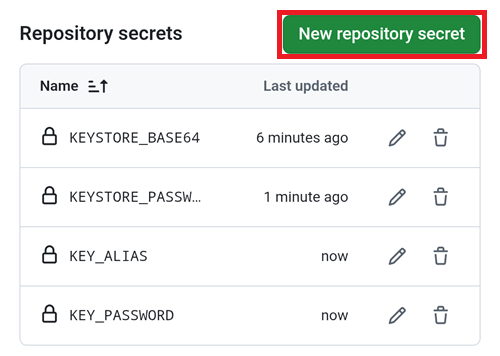
If you followed Option 2 there will be more keys:
In the Name field, paste the text you just copied. Use a long touch on the text box to show the paste menu.
Switch to the File Explorer Plus tab.
Tap the second Copy button.
Switch back to the GitHub tab.
In the Secret field, paste the text you just copied. Use a long touch on the text box to show the paste menu.
Tap Add secret.
You should have either two (option 1) or five (option 2) secrets entries now.
GitHub will now be able to store the AAPS apk file in your Google Drive, once built.
AAPS-CI GitHub Actions to Build the AAPS APK
Suitable for general users.
Run the Workflow to Build the Signed APK
In your GitHub copy of AndroidAPS, select Actions.
Expand All Workflows.
Select AAPS-CI
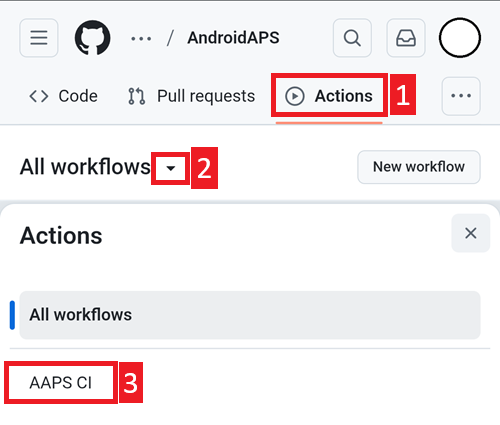
Scroll down and tap Run Workflow.
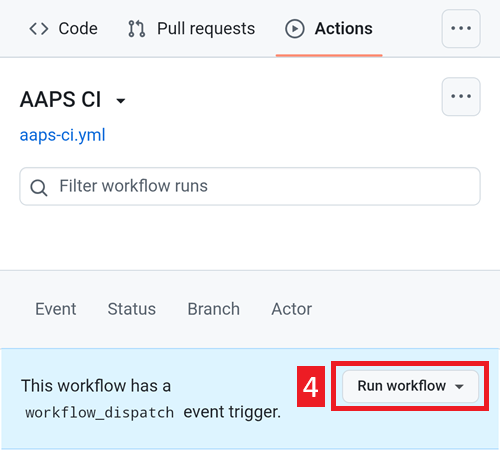
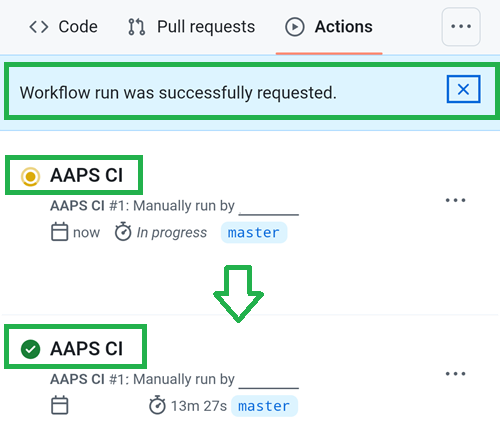
Select the branch you want to deploy (master), the variant (fullRelease) and tap Run Workflow.

You will see the message Workflow run was successfully requested. Refresh your browser page and you will be able to monitor the build progress. When the action completes, the AAPS CI action will show a green tick mark. You have successfully built the updated version of Android APS.
Install the AAPS APK
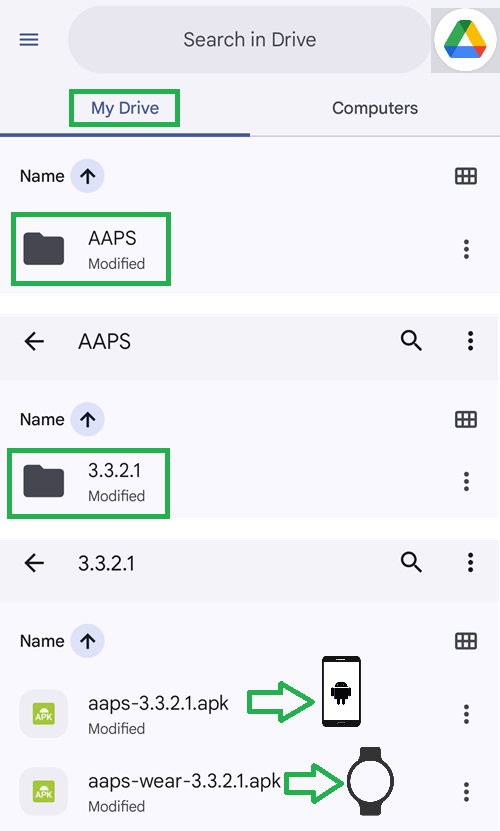
Open your Google Drive
Browse into AAPS, select the new version folder and you will find both the phone and Android Wear versions.
Build Version selection
Only AAPS versions from 3.3.2.1 and above will build with the Browser method.

Build Variants selection
Note: both Android and Android Wear apps will be built automatically.
Select the variant you need:
fullRelease: For regular pump usage with full functionality.
aapsclientRelease, aapsclient2Release: For caregivers (requires Nightscout)。
pumpcontrolRelease: To replace your pump app/controller
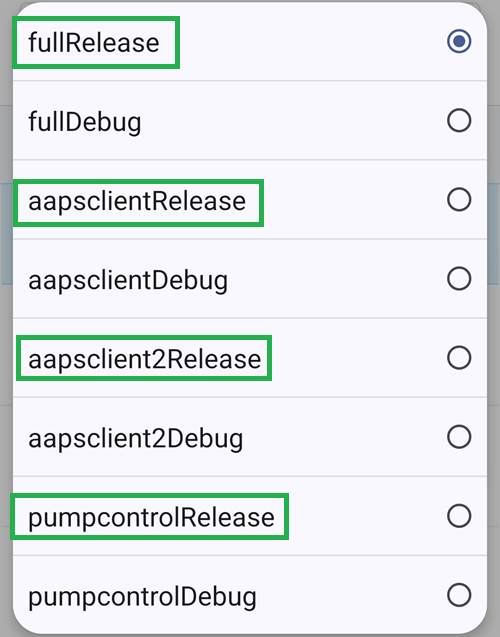
Variants ending with “Debug” indicates that the APK will be built in debug mode, which is useful for developers for troubleshooting.
AAPS-CI Troubleshooting
aaps-ci-preparation web page
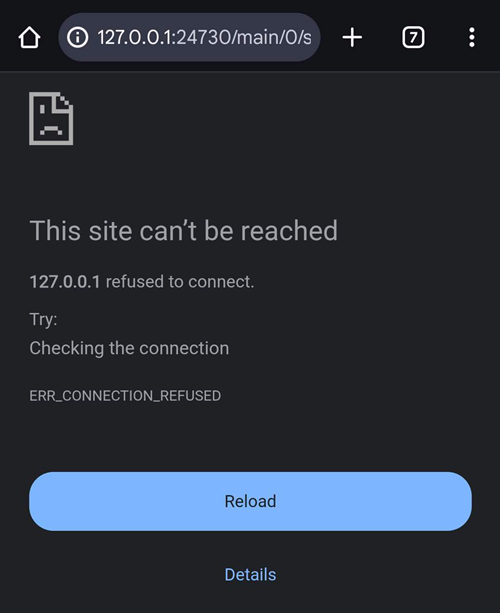
When you open aaps-ci-preparation.html using a file manager, it will start a temporary local server on your phone to display the webpage and receive the Google refresh token.
If you see the screen below, it means you have been inactive for a while, and the file manager has already shut down the local server.
Please reopen aaps-ci-preparation.html using the file manager app and complete the remaining steps.
Google Refresh Token Expired
Google OAuth2 refresh tokens will expire if not used for 6 months, and may also become invalid under other conditions (e.g., you have changed your Google account password, or manually revoked access). For more details, see the Google OAuth2 documentation.
You will see an error indicating that the access token is invalid, as shown below:
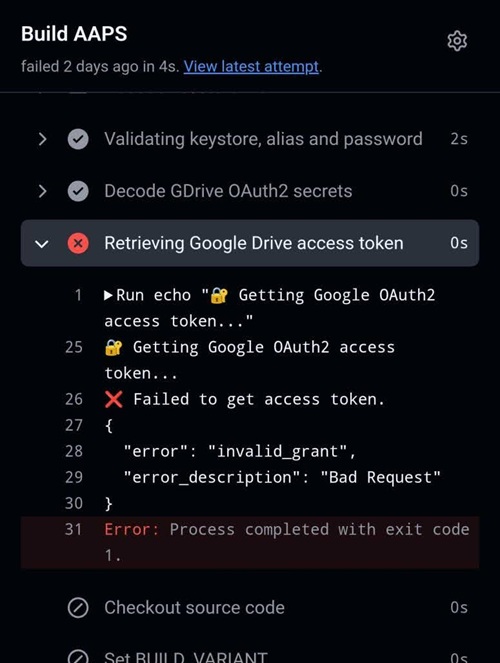
If your build fails due to an expired or revoked Google refresh token, you will need to redo the Google Drive Auth steps to obtain a new
GDRIVE_OAUTH2token and update the secret in your GitHub repository, then re-run the build workflow.
Disable Software That May Interfere With OAUTH Verification
Disable any VPN or security app (firewall, antimalware,…) on the phone before trying to get the OAUTH key.
Check GitHub Actions Permission Settings
Make sure GitHub Actions policies are set to “Allow all actions and reusable workflows” (Settings → Actions → General).
actions/checkout@v4 and actions/setup-java@v4 are not allowed to be used in xxxxx/AndroidAPS. Actions in this workflow must be: within a repository owned by xxxxx
警告
Customizations are usually not necessary. This is for your information ony.
If you want to add a specific commit to your branch, please use cherry-pick.
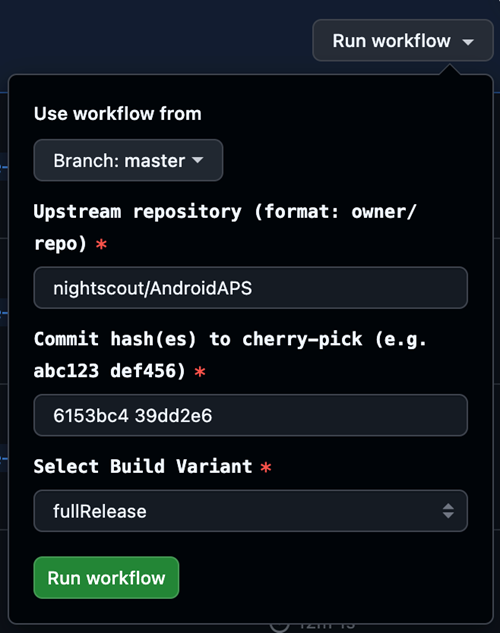
Use workflow from Branch: Please enter the branch name you want to cherry-pick to.
Upstream Repository: Please enter the repository name you want to cherry-pick from.
Commit SHA: Please enter the commit SHA you want to cherry-pick.(like git commit hash)
Select Build Variant: variant
CI KeyStore Export
If you want to export your stored keystore, use this method.
This script will export your previously configured keystore information (from Option 1 or Option 2) as a password-protected ZIP file to the /AAPS/KeyStore directory in your Google Drive.
警告
Before using this export method, make sure your keystore and Google Drive settings have been completed.
步骤:
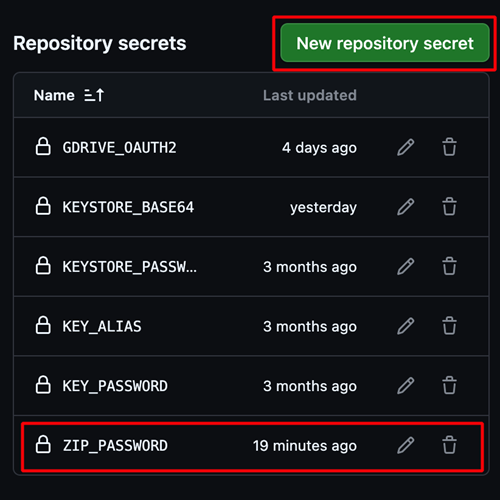
Add ZIP Password Secret:
Go to your repository’s Settings → Secrets and variables → Actions
Click New repository secret
In the Name field, enter:
ZIP_PASSWORDIn the Secret field, enter your custom ZIP encryption password
Use only English letters and numbers for the password (no special symbols)
Click Add secret
Run Export Workflow:
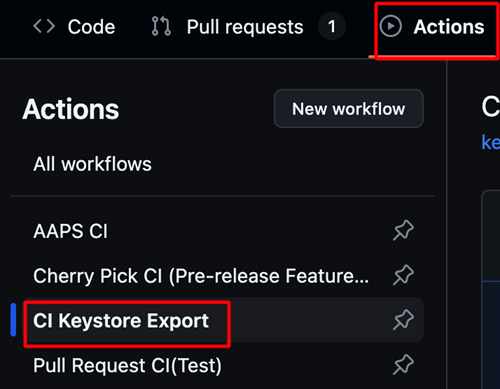
Go to the Actions tab in your repository
Select CI KeyStore Export
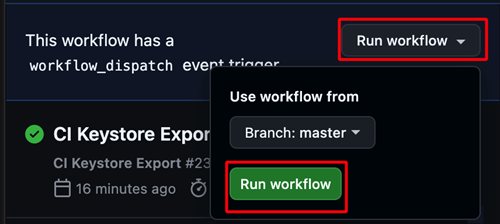
Click Run workflow
The exported keystore ZIP file will be saved to your Google Drive