Your AAPS profile
Your AAPS Profile is a set of five key parameters which define how AAPS should deliver insulin in response to your sensor glucose levels. These are the main parameters AAPS is built upon. As you progress through the Objectives, you will unlock additional modifiable parameters (like SMB settings), but the performance of these features rely on your underlying Profile being correct. The Profile incorporates:
duration of insulin action (DIA),
basal rates (BR),
insulin sensitivity factors (ISF) and
insulin-to-carb ratios (IC or ICR).
As part of AAPS’ management, users should continually assess and scrutinise the accuracy of their Profile settings. It is recommended to take the settings in the order they are presented here. Старайтесь выверить одну настройку прежде чем переходить к другой. Двигайтесь небольшими шагами, не вносите большие изменения сразу. Don’t forget to activate the new profile after each change. Regularly backup your Profile settings by exporting your Preferences.
Your Profile settings interact with one another - you can have „wrong“ settings that work well together in certain circumstances but do not in others. For instance, if a too-high basal happens to be at the same time as a too-high CR. This means that you need to consider the settings individually and check they work harmoniously together in a variety of circumstances.
Можно использовать автонастройку Autotune которая даст общее направление, но принимайте рекомендации не вслепую и не во всех ситуациях.
Your diabetes may vary
Profiles vary significantly from person-to-person.
For basal rates (BR), insulin sensitivity factors (ISF) and insulin-to-carb ratios (IC or ICR), the absolute values and trends in insulin requirements vary significantly from person to person, depending on your biology, gender, age, fitness level etc. as well as shorter term factors like illness and recent exercise. For more guidance on this, the book “Brights Spots and Landmines” by Adam Brown is an excellent book to read.
The four last parameters (glucose targets, basal rates, insulin sensitivity factors and insulin-to-carb ratios) can be set to different values, changing hourly if required, over a 24-hour period.

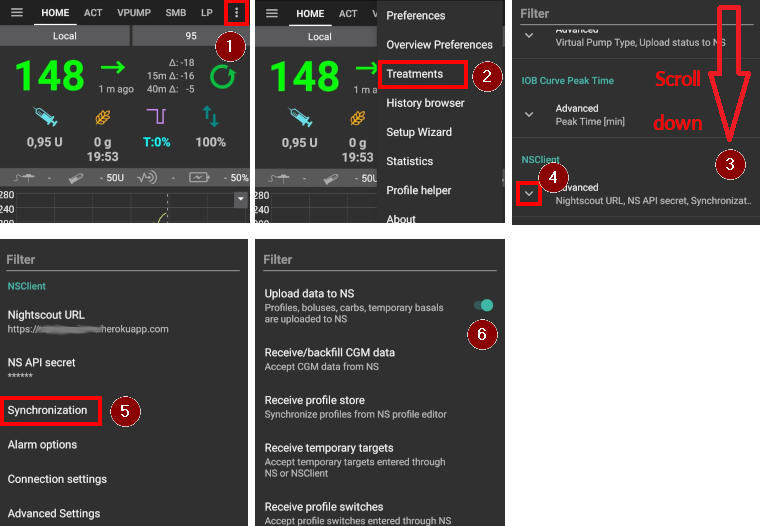
Screenshots from AAPS of an example profile are shown below. Please note, this sample profile below shows a large number of timepoints. When you start out with AAPS, your profile is likely to be much simpler.
Duration of insulin action (DIA)
Description
The length of time that insulin takes to decay to zero.
The duration of insulin action is set to a single value in AAPS, because your pump will continually infuse the same type of insulin.
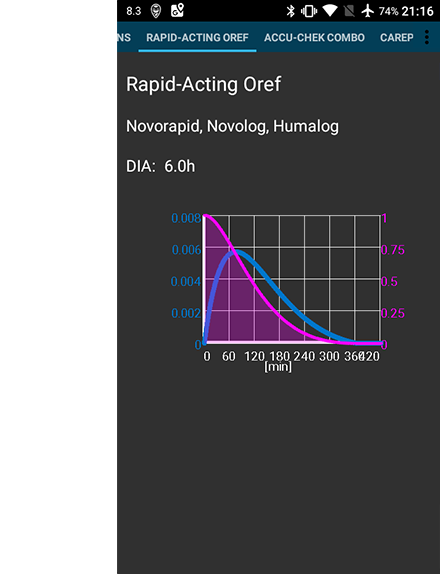
In combination with the insulin type, this will result in the insulin profile, as shown in the image above. The important thing to note is that the decay has a long tail. If you have been used to manual pumping, you have probably been used to assuming that insulin decays over a much shorter period i.e. about 3.5 hours. However, when you are looping, the long tail matters as the calculations are far more precise and these small amounts add up when they are subjected to the recursive calculations in the AAPS algorithm. Therefore, AAPS uses minimum 5h as DIA.
Additional reading on the topic of duration of insulin action, and why it matters :
Understanding the New IOB Curves Based on Exponential Activity Curves on OpenAPS documentation.
Why we are regularly wrong in the duration of insulin action (DIA) times we use, and why it matters… on Diabettech.
Exponential Insulin Curves + Fiasp on See My CGM (archive).
Revised Humalog model in a closed loop and other articles on Bionic Wookie, recommending a DIA of 9h for Lyumjev, Fiasp, NovoRapid, Humalog.
Impact
Too short DIA can lead to low BGs. And vice versa.
If DIA is too short, AAPS will calculate too early that your previous bolus is all consumed, and if your BG is still high, it will over-deliver in insulin. (Фактически, алгоритм не выжидает, а продолжает добавлять инсулин, предсказывая, что произойдет). This essentially creates ‘insulin stacking’ that AAPS is unaware of. This is especially noticeable at night, if you see negative IOB with no other explanation than the queue of the last bolus.
Example of a too-short DIA is a high BG followed by AAPS over-correcting and giving a low BG.
How to set it
The figure below shows an example of how the DIA is set in an AAPS profile.

The DIA setting is often set too short by new users. A DIA of 6 or 7 is probably a good place to start. A growing number of people find that a DIA of 8 to 9 hours works good for them. See the additional reading mentioned above.
Glucose targets
Description
Your BG target is a core value and all of AAPS calculations are based on it. It is different from the target range which you usually aim to keep your blood glucose values in. The target is used in AAPS calculations: if AAPS predicts that your BG will land outside the target range, then it will take action to take you back in said range.
The targets can be defined within those boundaries :
Low target |
High target |
|
|---|---|---|
Минимум |
4 ммоль/л или 72 мг/дЛ |
5 mmol/l or 90 mg/dL |
Максимум |
10 mmol/l or 180 mg/dL |
15 ммоль/л или 225 мг/дЛ |
Impact
If the target in your Profile is very wide (say, 3 or more mmol/l [50 mg/dl or more] wide), you will often find little AAPS action. This is because BG level is predicted to be somewhere in that wide range, and thus temporary basal rate are unlikely to be actioned by AAPS.
How to set it
The figure below shows an example of how the target can be set in an AAPS profile.

BG targets are set according to your personal preferences and requirements. For example, if you are concerned about hypos at night, you may set your target slightly higher at 117 mg/dL (6.5 mmol/L) from 9 pm - 7am. Если вы хотите убедиться, что у вас достаточно активного инсулина (IOB) утром перед болюсом на завтрак, можно установить нижнюю цель в 4. ммоль/л с 7 до 8 утра.
When In Open Loop, especially when progressing through the first objectives, using a wide range target can be a good option while you are learning how AAPS behaves and adjusting your Profile.
When In Closed Loop (starting at Objective 6), it is recommended to reduce the range until you have a single target for each time of the day (Low target = High target), to make sure that AAPS reacts promptly to BG fluctuations.
Basal rates
Description
Базальная скорость инсулина (ед./час) обеспечивает фоновый инсулин, поддерживая нужную гликемию в отсутствие пищи или физических упражнений.
Инсулиновая помпа подает небольшое количество быстродействующего инсулина каждые несколько минут, не позволяя печени выделять слишком много глюкозы, и давая возможность глюкозе перемещаться в клетки организма. Базальный инсулин обычно составляет от 40 до 50% суточной дозы (TDD), в зависимости от диеты, и обычно следует суточному ритму, с одним пиком и одной долиной потребности в инсулине в течение 24 часов. For more information, chapter 6 of “Think like a Pancreas” by Gary Scheiner is very useful.
Most type 1 diabetes educators (and people with type 1 diabetes!) agree that you should work on getting your basal rates correct, before attempting to optimise your ISF and ICR.
Impact
Точно определенная базальная скорость позволяют просыпаться в заданном диапазоне, пропускать еду - или есть - раньше или позже, без падений или взлетов ГК.
Повышенная скорость подачи базала может привести к низкому уровню ГК. And vice versa.
AAPS ‘baselines’ against the default basal rate. Если базал слишком высокий, то «нулевая временная скорость» будет определяться при большем отрицательном значении активного инсулина IOB, чем нужно. This will lead to AAPS giving more subsequent corrections than it should to bring IOB ultimately to zero.
So, a basal rate too high will create low BGs both with the default rate, but also some hours hence as AAPS corrects to target.
Conversely, a basal rate too low can lead to high BGs, and a failure to bring levels down to target.
How to set it
The figure below shows an example of how the basal rates can be set in an AAPS profile.

Setting your basal rates right is done by trial and error, and should be done in consultation with your diabetic team.
There are basal testing methods which usually entails observing your basal rates and insulin needs during an intermittent fasting over a 24-hour period. Although you need to test your basal rates for the whole day, it is not recommended to fast during 24h straight. This is because the body triggers mechanisms such as hormones to compensate. A recommended way is to fast 3 times for 8 hours.
The recommended method is to suspend the loop (for safety you can set AAPS to LGS to avoid lows, as done for achieving objective 6), which will revert to your default background basal rate. Observe how your BG changes: if it is dropping, basal rate is too high. And vice versa.
An alternative method (may be more tricky) is to keep the loop running, and seeing how IOB changes. If IOB is negative, your basal rate is too high. And vice versa. Beware that this method relies on ISF to correct BG, and thus depends on other variables to be set reasonably well for it to be successful.
Another way of adjusting your basal rates is to watch the loop action during the night, when all COB have decayed. This method is particularly useful for children, when fasting is difficult or insulin needs change often. Dr Saleh Adi from Tidepool provides useful ways on how to analyze overnight BG lines in order to optimize your basal rates.
See here how to tweak your basal profile, analyzing patterns in closed loop.
When taking action on the result of your basal testing, changes in the Profile should be done 1 to 2 hours (depends on your insulin type) before the rise/drop. Repeat the test as necessary until you are comfortable with your basal rates settings.
Insulin sensitivity factor (ISF)
Description
Коэффициент чувствительности к инсулину (иногда называемый корректирующим фактором) - это то, насколько 1 единица инсулина понижает ваш уровень гликемии.
In mg/dL units: If you have an ISF of 40, each unit of insulin will reduce your blood glucose by approx. 40 mg/dL (for example, your blood glucose will fall from 140 mg/dL to 100 mg/dL).
In mmol/L units: If you have an ISF of 1.5, each unit of insulin will reduce your blood glucose by approx. 1.5 mmol/L (for example from 8 mmol/L to 6.5 mmol/L).
From these examples you can see that the smaller the ISF value, the less sensitive you are to insulin. So if you reduce your ISF from 40 to 35 (mg/dl) or 1.5 to 1.3 (mmol/L), this is often called strengthening your ISF. Conversely, increasing the ISF value from 40 to 45 (mg/dl) or 1.5 to 1.8 mmol/L) is weakening your ISF.
Impact
A lower / stronger ISF (i.e. 40 instead of 50) means insulin drops your BG less per unit. This leads to a more aggressive / stronger correction from the loop with more insulin. If your ISF is too strong (small value), this can lead to low BG.
A higher / weaker ISF (i.e. 45 instead of 35) means insulin drops your BG more per unit. This leads to a less aggressive / weaker correction from the loop with less insulin. If your ISF is too weak (large value), this can lead to high BG.
Пример:
BG is 190 mg/dL (10,5 mmol/L) and target is 100 mg/dL (5,6 mmol/L).
So, you want a correction of
190 - 110 = 90 mg/dLor10,5 - 5,6 = 4.9 mmol/LIf
ISF = 30->90 / 30 = 3orISF = 1.63->4.9 / 1.63 = 3: 3 units of insulinIf
ISF = 45->90 / 45 = 2orISF = 2.45->4.9 / 2.45 = 2: 2 units of insulin
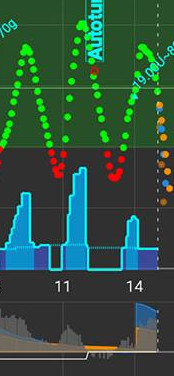
An ISF that is too low (and therefore more aggressive, not uncommon) can result in ‘over corrections’, because AAPS calculates that the user needs more insulin to correct a high BG than actually required. This can lead to ‘roller coaster’ BG levels (esp. when fasting), as shown on the image below. In this circumstance, the ISF value should be increased in order to make AAPS less aggressive. This will ensure AAPS delivers smaller correction doses, and avoid over-correcting a high BG resulting in a low BG.
Conversely, an ISF set too high can result in under-corrections, meaning your BG remains above target – particularly noticeable overnight.
How to set it
See the figure below for an example of how ISF values could be set in an AAPS profile.

Основной отправной точкой для определения ISF в дневное время является суммарная суточная доза (TDD) и правило 1700 (94). More detail is given in Chapter 7 of “Think like a Pancreas” by Gary Scheiner.
1700 (if measuring in mg/dl) or 94 (mmol/L)/ TDD = approx ISF. |
|---|
Assuming your basal levels are correct, you can test this by suspending the loop, checking IOB is zero, and taking a few glucose tablets to get to a stable ‘high’ level.
Затем введите предполагаемое количество инсулина (по текущему соотношению 1/ISF), чтобы прийти к целевой ГК.
Будьте осторожны, так как довольно часто величина слишком занижена. Слишком низкая ГК означает, что 1 ед опустит ГК быстрее, чем ожидалось.
Insulin to Carb ratio (ICR)
Description
The ICR is a measure of how many grams of carbohydrate are covered by one unit of insulin.
Some people also use I:C as an abbreviation instead of ICR, or talk about carb ratio : CR.
Например, соотношение инсулина 1 к 10 (1:10) означает, что вам требуется 1 ед. инсулина на каждые 10 граммов съеденных углеводов. Еда из 25г углеводов потребует 2,5 ед. инсулина.
If your ICR is weaker (higher value), perhaps 1:20, you would only need 0.5U of insulin to cover 10 g of carbs. Еда из 25г углеводов потребует 25/20 = 1,25 ед. инсулина.
It is common to have different ICR at different times of day due to hormone levels and physical activity. Many people find they have their lowest/strongest ICR around breakfast time because they tend to be more insulin resistant. So, for example, one adult user’s ICR could be 1:8 for breakfast, 1:10 for lunch and 1:10 for dinner, but these patterns are not universal, and some people are more insulin resistant at dinner time, and require a stronger/smaller ICR then.
ПРИМЕЧАНИЕ:
В некоторых европейских странах для определения количества инсулина, необходимого для компенсации пищи, использовались т. н. хлебные единицы. В начале 1 хлебная единица равнялась 12г углеводов, позже некоторые стали считать ее как 10 г.
В такой модели подсчетов количество углеводов было фиксированной величиной, а количество инсулина-переменной. («Сколько инсулина нужно для того, чтобы компенсировать одну хлебную единицу?»)
When using ICR the amount of insulin is fixed and the amount of carbs is variable. («Сколько грамм углеводов может компенсироваться одной единицей инсулина?»)
Пример:
Bread unit factor (BU = 12g carbs): 2,4 U/BU -> You need 2,4 units of insulin when you eat one bread unit.
Corresponding ICR: 12g / 2,4 U = 5,0 g/U -> 5,0g carbs can be covered with one unit of insulin.
BU factor 2,4 U / 12g ===> IC = 12g / 2,4 U = 5,0 g/U
Таблицы преобразования доступны в Интернете: здесь .
Impact
A lower / stronger ICR means less food per unit, i.e. you are getting more insulin for a fixed amount of carbs. Может также назваться «более агрессивным». If your IC is too strong, you are getting too much insulin, this can lead to low BGs.
A higher / weaker ICR = more food per unit, i.e. you are getting less insulin for a fixed amount of carbs. Может также назваться «менее агрессивным». If your IC is too weak, you are getting less insulin than you need, this can lead to high BGs.
How to set it
The figure below shows an example of a user’s ICR and how it can be set in an AAPS Profile. When entering these values, we just enter the final part of the ratio, so an insulin-to-carb ratio of 1:3.5 is entered simply as “3.5”.

If after a meal has been digested and the IOB has returned to zero, your BG remains higher than before food, chances are your ICR is too weak (i.e. the number is too high and should be gradually lowered). Conversely, if your BG is lower than before food, ICR is too strong (i.e. the number is too small and should be gradually increased).
Assuming your basal rates are correct, you can test by checking if IOB is zero and that you are in-range, eating exactly known carbs, and take an estimated amount of insulin based on current insulin to carb ratio. Best is to eat food you normally eat at that time of day and count its carbs precisely.
Manage your Profiles
Create and edit Profiles
The Profile tab can be found from the top menu or hamburger menu, depending on your Config Builder settings.

Buttons:
green plus: add
red X: delete
blue arrow: duplicate
If you make any changes to your Profile, make sure you are editing the correct Profile. The Profile tab may not always show the actual profile being used - e.g. if you made a profile switch by using the profile tab on homescreen, it may differ from the profile actually shown in profile tab as there is no connection between these.
Build a Profile from scratch for a kid
The Profile Helper tab may help you to create a profile for a child (up to 18 years).
Важное примечание:
Помощник профиля предназначен для того, чтобы помочь установить первоначальный профиль для вашего ребенка. Несмотря на то, что помощник профиля основан данных двух различных мед учреждений, перед запуском нового профиля обсудите его с эндокринологом!
Помощник профиля основан на данных двух различных детских больниц и рекомендуется для детей до 18 лет.
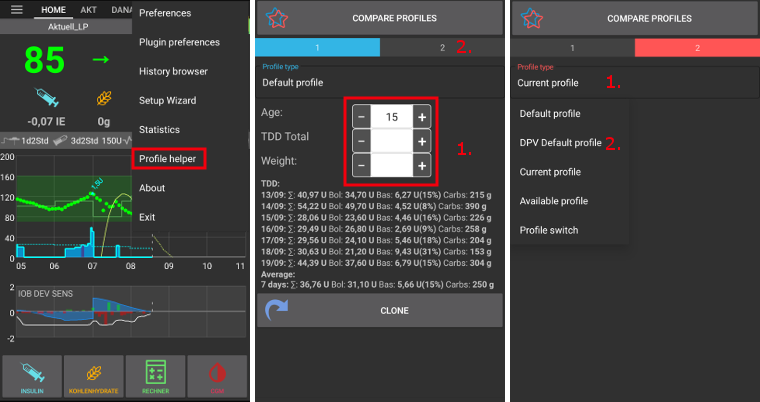
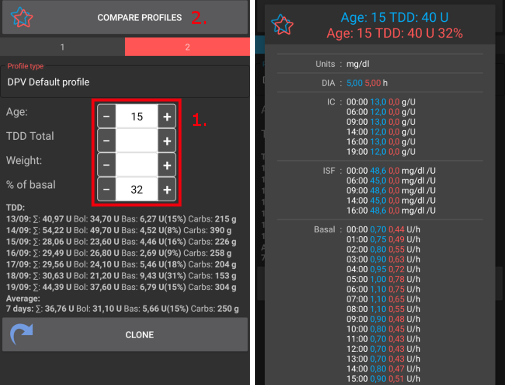
Make sure you are in Profile 1.
In Profile type, make sure you have «Default profile» selected.
Отрегулируйте профиль по умолчанию (на основе набора данных госпиталей), указав возраст ребенка либо суточную дозировку инсулина TDD либо вес.
Change screen by clicking on Profile 2 on the right.
Press Profile type and select «DPV Default profile».
Отрегулируйте профиль по умолчанию (на основе набора данных госпиталей), указав возраст ребенка либо суточную дозировку инсулина TDD либо вес.
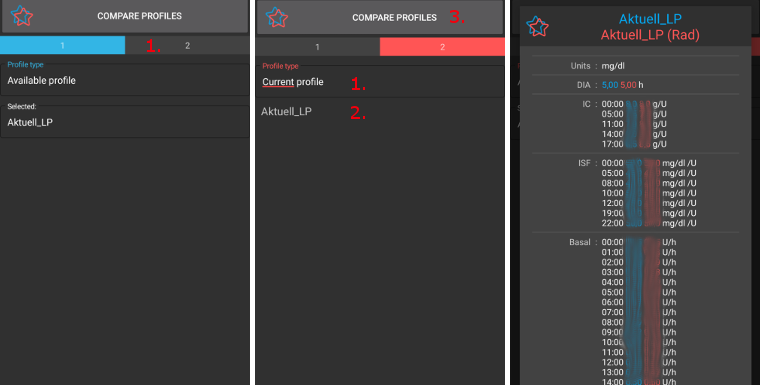
Press the button Compare profiles at the bottom of the screen. Comparison of the two adjusted profiles will be displayed (see screenshot below).
If you want to start tweaking your profile based on one of these suggestions, use the Clone button either from Profile 1 ou Profile 2.
Switch Profile
Clone a Profile switch to a new Profile

The Treatments tab shows all past Profile Switches. When going to the Profile Switch sub-tab, you can use a past Profile Switch as a base to create a new Profile. In this case, timeshift and percentage will be applied to the new local profile. Use the Clone button shown on line 1.
You can now go to the Profile tab to edit the newly created Profile.
Profile backup
Being a core setting of your looping system, your Profiles are highly sensitive and something you really don’t want to lose.
Your Profiles are stored in the AAPS database.
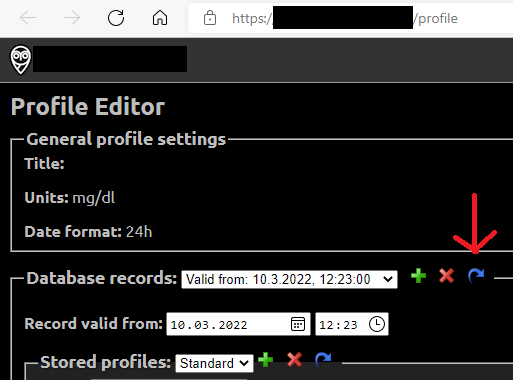
If enabled, Profiles are also uploaded to Nightscout. The settings can be found in NSClient Preferences > NSClient > Synchronization > Upload data to NS.
They are also part of exported settings. So make sure to have a backup in a safe place.
Editing Profiles from Nightscout
If enabled, Profile changes made directly in Nightscout can be received in AAPS. The settings can be found in NSClient Preferences > NSClient > Synchronization > Receive profile store.
This can be helpful when about to make major changes to a more extensive Profile. They can be entered more easily via the web interface, e.g. to manually copy data from a spreadsheet.
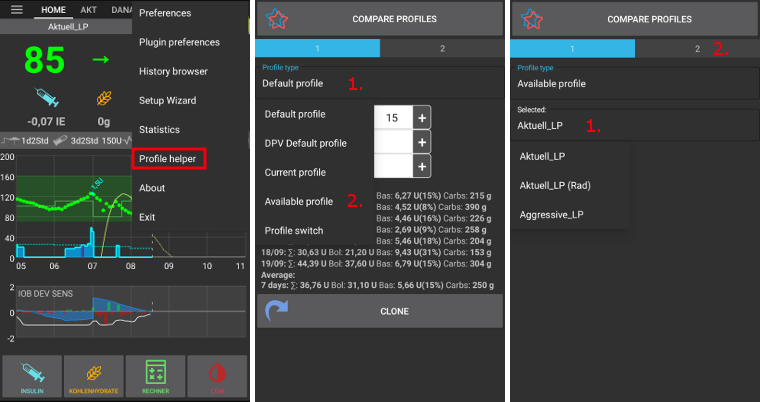
To do this, however, it is important to clone the whole database record consisting of several profiles in the Nightscout editor (blue arrow on the screenshot below). The new database records then carries the current date. After saving, the changed/new Profile can be activated in AAPS with a regular Profile switch.
Compare two Profiles
You can use the Profile Helper tab also to compare to different profiles or profile switches (percentage of one of your profiles used in a profile switch before).
Make sure you are in Profile 1.
In Profile type, select «Available profile» to choose between all stored Profiles.
Choose the Profile you want to compare from.
Change screen by clicking on Profile 2 on the right.
In Profile type, select «Profile switch» to choose in the history of all your Profiles Switched.
Choose the Profile Switch you want to compare to.
Press the button Compare profiles at the bottom of the screen. Comparison of the two adjusted profiles will be displayed (see screenshot below).